butler 4012 usb voip - Quick.cz
butler 4012 usb voip - Quick.cz
butler 4012 usb voip - Quick.cz

You also want an ePaper? Increase the reach of your titles
YUMPU automatically turns print PDFs into web optimized ePapers that Google loves.
Topcom Butler <strong>4012</strong> USB VoIP<br />
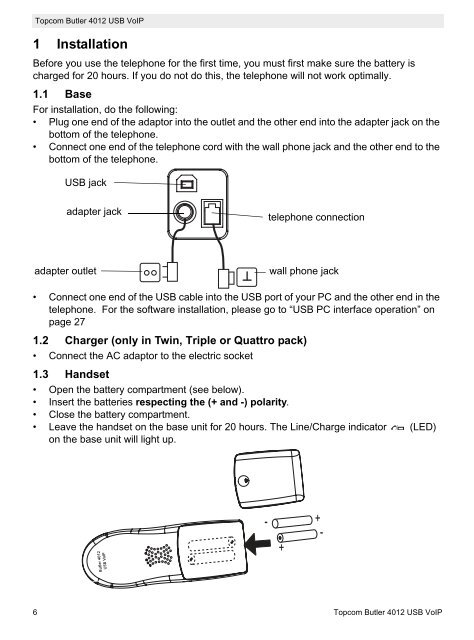
1 Installation<br />
Before you use the telephone for the first time, you must first make sure the battery is<br />
charged for 20 hours. If you do not do this, the telephone will not work optimally.<br />
1.1 Base<br />
For installation, do the following:<br />
• Plug one end of the adaptor into the outlet and the other end into the adapter jack on the<br />
bottom of the telephone.<br />
• Connect one end of the telephone cord with the wall phone jack and the other end to the<br />
bottom of the telephone.<br />
USB jack<br />
adapter jack<br />
telephone connection<br />
adapter outlet wall phone jack<br />
• Connect one end of the USB cable into the USB port of your PC and the other end in the<br />
telephone. For the software installation, please go to “USB PC interface operation” on<br />
page 27<br />
1.2 Charger (only in Twin, Triple or Quattro pack)<br />
• Connect the AC adaptor to the electric socket<br />
1.3 Handset<br />
• Open the battery compartment (see below).<br />
• Insert the batteries respecting the (+ and -) polarity.<br />
• Close the battery compartment.<br />
• Leave the handset on the base unit for 20 hours. The Line/Charge indicator<br />
on the base unit will light up.<br />
(LED)<br />
6 Topcom Butler <strong>4012</strong> USB VoIP<br />
-<br />
+<br />
+<br />
-