butler 4012 usb voip - Quick.cz
butler 4012 usb voip - Quick.cz
butler 4012 usb voip - Quick.cz

Create successful ePaper yourself
Turn your PDF publications into a flip-book with our unique Google optimized e-Paper software.
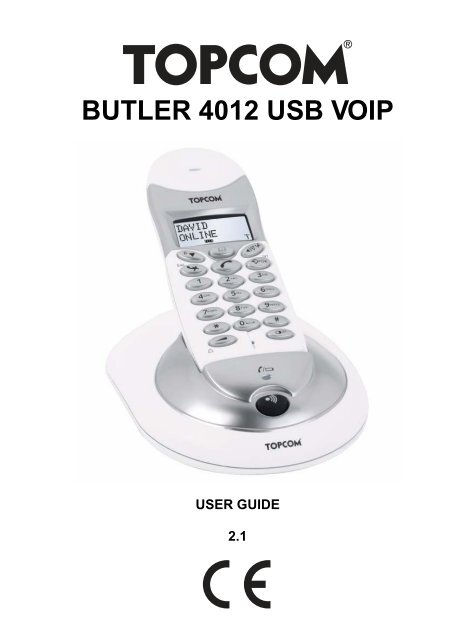
BUTLER <strong>4012</strong> USB VOIP<br />
USER GUIDE<br />
2.1
Important<br />
To use ‘Caller ID’ (display caller), this service has to be activated on your phone line.<br />
Normally you need a separate subscription from your telephone company to activate this<br />
function. If you don’t have the Caller ID function on your phone line, the incoming telephone<br />
numbers will NOT be shown on the display of your telephone.<br />
This product is in compliance with the essential requirements and other relevant provisions of the R&TTE directive 1999/5/EC.<br />
The Declaration of conformity can be found on :<br />
http://www.topcom.net/support/cedeclarations.php<br />
To be connected to the public analogue telephone network.<br />
The CE symbol indicates that the unit complies with the essential<br />
requirements of the R&TTE directive.<br />
The features described in this manual are published with reservation to modifications.
Topcom Butler <strong>4012</strong> USB VoIP<br />
1 Installation 6<br />
1.1 Base 6<br />
1.2 Charger (only in Twin, triple or quattro pack) 6<br />
1.3 Handset 6<br />
2 Keys/LED 7<br />
3 Display (LCD) 8<br />
4 Handset operation 9<br />
4.1 Setting the language 9<br />
4.2 Making PSTN Calls 10<br />
4.3 Receiving a PSTN Call 11<br />
4.4 Activate/deactivate handsfree function 12<br />
4.5 Transferring a call to another handset 12<br />
4.6 Out of Range Warning 12<br />
4.7 Setting the speaker volume 12<br />
4.8 Call Duration Indicator on the display 13<br />
4.9 Turning off the microphone (mute) 13<br />
4.10 Pause key 13<br />
4.11 Conference call (two internal DECT handsets and one external caller) 13<br />
4.12 Locating a misplaced handset (paging) 13<br />
4.13 Using the alphanumeric handset keypad 14<br />
4.14 The Phone Book 14<br />
4.15 Switch the handset ON/OFF 15<br />
4.16 Setting the ring volume level on the handset 16<br />
4.17 Setting the ringer melody on the handset 16<br />
4.18 Setting the ring volume and melody of the base 17<br />
4.19 Locking the key pad 18<br />
4.20 Turning key click ON/OFF 18<br />
4.21 The R key (flash) 18<br />
4.22 Changing the PIN code 19<br />
4.23 Subscribing a handset to a B24xx, 28xx, 29xx, 32xx, 40xx, 46xx 19<br />
4.24 Subscribing Butler <strong>4012</strong> handset on another base (other brand/model) 20<br />
4.25 Removing subscription of a handset to a base unit 21<br />
4.26 Selecting a base unit 21<br />
4.27 Barring outgoing calls 22<br />
4.28 Direct Call 23<br />
4.29 Default settings (reset) of the parameters 23<br />
4.30 Complete reinitialisation of the telephone 24<br />
4.31 Setting the handset dialling mode 24<br />
5 Caller ID/CLIP 24<br />
5.1 Setting the date and time 25<br />
5.2 The Call List 25<br />
5.3 Calling a number from the Call List 26<br />
5.4 Storing a number from the Call List in the Phone Book 26<br />
5.5 Deleting numbers from the Call List 26<br />
6 Voice mail indicator 27<br />
Topcom Butler <strong>4012</strong> USB VoIP 3<br />
ENGLISH
Topcom Butler <strong>4012</strong> USB VoIP<br />
7 USB PC interface operation 27<br />
7.1 Installing the software 27<br />
7.2 General PC call settings 28<br />
7.3 Skype interface 29<br />
7.4 SJ-Phone/Net2Phone interface 33<br />
7.5 MSN Messenger interface 34<br />
8 Trouble shooting 35<br />
9 Technical characteristics 36<br />
10 Topcom warranty 36<br />
10.1 Warranty period 36<br />
10.2 Warranty handling 36<br />
10.3 Warranty exclusions 37<br />
4 Topcom Butler <strong>4012</strong> USB VoIP
Safety Instructions<br />
Topcom Butler <strong>4012</strong> USB VoIP<br />
• Only use the charger plug supplied. Do not use other chargers, as this may damage the<br />
battery cells.<br />
• Only insert rechargeable batteries of the same type. Never use ordinary,<br />
non-rechargeable batteries. Insert rechargeable batteries so they connect to the right<br />
poles (indicated in the battery compartment of the handset).<br />
• Do not touch the charger and plug contacts with sharp or metal objects.<br />
• The operation of some medical devices may be affected.<br />
• The handset may cause an unpleasant buzzing sound in hearing aids.<br />
• Do not place the basic unit in a damp room or at a distance of less than 1.5 m away from<br />
a water source. Keep water away from the handset.<br />
• Do not use the telephone in environments where there is a risk of explosions.<br />
• Dispose of the batteries and maintain the telephone in an environment-friendly manner.<br />
• As this telephone cannot be used in case of a power cut, you should use a<br />
mains-independent telephone for emergency calls, e.g. a mobile phone.<br />
• This telephone uses rechargable batteries. You have to dispose of the batteries in an<br />
environment friendly manner according to your country regulations.<br />
Disposal of the device (environment)<br />
At the end of the product lifecycle, you should not throw this product into the normal<br />
household garbage but bring the product to a collection point for the recycling of electrical<br />
and electronic equipments. The symbol on the product, user guide and/or box indicate this.<br />
Some of the product materials can be re-used if you bring them to a recycling point. By reusing<br />
some parts or raw materials from used products you make an important contribution to<br />
the protection of the environment.<br />
Please contact your local authorities in case you need more information on the collection<br />
points in your area.<br />
Cleaning<br />
Clean the telephone with a slightly damp cloth or with an anti-static cloth. Never use cleaning<br />
agents or abrasive solvents.<br />
Topcom Butler <strong>4012</strong> USB VoIP 5<br />
ENGLISH
Topcom Butler <strong>4012</strong> USB VoIP<br />
1 Installation<br />
Before you use the telephone for the first time, you must first make sure the battery is<br />
charged for 20 hours. If you do not do this, the telephone will not work optimally.<br />
1.1 Base<br />
For installation, do the following:<br />
• Plug one end of the adaptor into the outlet and the other end into the adapter jack on the<br />
bottom of the telephone.<br />
• Connect one end of the telephone cord with the wall phone jack and the other end to the<br />
bottom of the telephone.<br />
USB jack<br />
adapter jack<br />
telephone connection<br />
adapter outlet wall phone jack<br />
• Connect one end of the USB cable into the USB port of your PC and the other end in the<br />
telephone. For the software installation, please go to “USB PC interface operation” on<br />
page 27<br />
1.2 Charger (only in Twin, Triple or Quattro pack)<br />
• Connect the AC adaptor to the electric socket<br />
1.3 Handset<br />
• Open the battery compartment (see below).<br />
• Insert the batteries respecting the (+ and -) polarity.<br />
• Close the battery compartment.<br />
• Leave the handset on the base unit for 20 hours. The Line/Charge indicator<br />
on the base unit will light up.<br />
(LED)<br />
6 Topcom Butler <strong>4012</strong> USB VoIP<br />
-<br />
+<br />
+<br />
-
11<br />
10<br />
12<br />
8<br />
Topcom Butler <strong>4012</strong> USB VoIP<br />
Battery indicator:<br />
• The battery is fully charged.<br />
• The battery is half drained (50%)<br />
• The battery is low. When the battery is low, you will hear warning signals and the<br />
battery symbol on the display will blink.<br />
2 Keys/LED<br />
R<br />
VoIP<br />
Esc INT<br />
/OK<br />
1<br />
4 GHI<br />
7 PQRS<br />
*<br />
2 ABC<br />
5 JKL<br />
8 TUV<br />
0<br />
#<br />
3 DEF<br />
6 MNO<br />
9 WXYZ<br />
HANDSET<br />
1<br />
5<br />
3<br />
2<br />
4<br />
9<br />
6<br />
7<br />
Butler <strong>4012</strong> USB VoIP<br />
1. Display<br />
2. PC/VoIP key<br />
3. Up/Handsfree key /<br />
4. Programming key/INT key<br />
5. Line key<br />
6. Redial/Pause key<br />
7. Microphone<br />
8. Volume/Ringer key /<br />
9. Alphanumeric keys<br />
10.Delete/Mute key/Escape key<br />
11. Down/Flash key /R<br />
12.*/Phonebook key<br />
BASE<br />
13. Paging key<br />
14. Line/Charge indicator (LED)<br />
14<br />
13<br />
Topcom Butler <strong>4012</strong> USB VoIP 7<br />
/P<br />
ENGLISH
Topcom Butler <strong>4012</strong> USB VoIP<br />
3 Display (LCD)<br />
1<br />
2<br />
CHARGER<br />
15. Charge indicator<br />
15<br />
13 12 11 10 9 7 6 14 5<br />
4<br />
PC<br />
1. Number of calls received.<br />
2. Date (day/month) of calls received.<br />
3. Time (hour:minutes) of calls received.<br />
4. Call information.<br />
5. Symbol display ( ):<br />
– this symbol means that the handset is located within the range of the base unit.<br />
– when this symbol starts blinking, this means you are beyond the range of the<br />
base unit. Move closer to the base unit so that the connection between the base<br />
unit and the handset can be restored.<br />
6. Symbol display ( ):<br />
– this symbol means that the telephone has received calls that are automatically<br />
stored in the Call List.<br />
7. Symbol display ( ):<br />
– this symbol means that the mute function is activated, the microphone is turned<br />
off during a conversation.<br />
8. Symbol display ( ):<br />
– this symbol appears on the display when you make or receive a call.<br />
9. Symbol display ( ):<br />
– this symbol means that the ringer is turned off. When you receive a call, the<br />
telephone does not ring. The telephone will ring when you receive an internal<br />
call.<br />
8 Topcom Butler <strong>4012</strong> USB VoIP<br />
3
Topcom Butler <strong>4012</strong> USB VoIP<br />
10. Symbol display ( ):<br />
– this symbol is the battery indicator.<br />
11. Symbol display ( ):<br />
– this symbol means you are in the menu.<br />
12. Symbol display ( ):<br />
– this symbol appears when you browse the numbers in the Phone Book.<br />
13. Symbol display ( ):<br />
– this symbol appears when you have received a voice mail message (See “6<br />
Voice mail indicator” on page 27).<br />
14. Symbol display ( ):<br />
– this symbol means that the handsfree function is activated. You can now talk<br />
without having to pick up the handset.<br />
– Blinks when base telephone is active. You can’t take the line with the handset as<br />
long as base telephone is active!<br />
15. Symbol display (PC):<br />
– Blinks during incoming PC call<br />
– Steady during PC calls<br />
4 Handset operation<br />
This section only describes PSTN operation and discards any co-related pc<br />
call operations! For PC operation, See ”7 USB PC interface operation”.<br />
4.1 Setting the language<br />
The telephone has 14 display languages: see display languages table on packaging!!<br />
To set the language, do the following:<br />
• Press the Programming key .<br />
• Press the Up or Down key repeatedly until ‘SETTING’ appears on the display<br />
• Press the Programming key .<br />
• Press the Up or Down key repeatedly until ‘LANGUAGE’ appears on the display.<br />
• Press the Programming key .<br />
• The language set appears on the display.<br />
• Press the Up or Down key repeatedly to select the language you would like to use.<br />
• Once the desired language appears on the display, press the Programming key to<br />
confirm your selection or repeatedly press the ESC key to leave the menu.<br />
Topcom Butler <strong>4012</strong> USB VoIP 9<br />
ENGLISH
Topcom Butler <strong>4012</strong> USB VoIP<br />
4.2 Making PSTN Calls<br />
When making external calls through the handset, base telephone operation<br />
is not possible!<br />
4.2.1 External Call<br />
• Press the Line key .<br />
• The Line/Charge indicator (LED) on the base unit will blink. ‘EXT’ and the Call<br />
symbol appear on the display.<br />
• You will hear the dial tone. Dial the telephone number you wish to call.<br />
• The number appears on the display and is dialled.<br />
• After finishing your call, press the Line key to hang up.<br />
4.2.2 Number preparation<br />
• Dial the telephone number you wish to call. You can correct the number by pressing the<br />
Delete/Mute key .<br />
• Press the Line key .<br />
• The Line/Charge indicator (LED) on the base unit will blink. ‘EXT’ and the Call<br />
symbol appear on the display.<br />
• The telephone number is dialled automatically.<br />
• After finishing your call, press the Line key to hang up.<br />
4.2.3 Redialling the last number dialled<br />
• Press the Line key .<br />
• The Line/Charge indicator (LED) on the base unit will blink. ‘EXT’ and the Call<br />
symbol appear on the display.<br />
• You will hear the dial tone.<br />
• Press the Redial key . The number you last called is dialled automatically.<br />
4.2.4 Redial one of the last 5 numbers dialled<br />
• Press the Redial key .<br />
• Select ‘REDIAL’ and press OK<br />
• The number you last called appears on the display. If you would like to dial one of the<br />
last 5 numbers dialled, press the Redial key<br />
appears on the display.<br />
a few times until the desired number<br />
• Press the Line key .<br />
• The number shown on the display is dialled automatically.<br />
• After finishing your call, press the Line key to hang up.<br />
4.2.5 Calling a programmed number from the Phone Book<br />
The telephone has a Phone Book in which you can program the telephone number with<br />
name. If you would like to call a number from the Phone Book:<br />
• Press the Phone Book key<br />
display.<br />
. The first number of the Phone Book appears on the<br />
• Press the Up or Down key<br />
call.<br />
repeatedly to select the telephone number you wish to<br />
10 Topcom Butler <strong>4012</strong> USB VoIP
• Press the Line key .<br />
• The number shown on the display, is dialled automatically.<br />
• After finishing your call, press the Line key to hang up.<br />
4.2.6 An internal call: calling another handset<br />
This function only works if multiple handsets are subscribed to the base unit !<br />
• Press the INT key twice.<br />
• ‘INT‘ appears on the display<br />
• Dial the number of the handset you would like to call.<br />
• After finishing your call, press the Line key to hang up.<br />
4.3 Receiving a PSTN Call<br />
Topcom Butler <strong>4012</strong> USB VoIP<br />
4.3.1 Receiving an external call<br />
• All subscribed handsets will ring when you receive a call.<br />
• The Call symbol blinks on the display.<br />
• The telephone number of the caller appears on the display if you have Caller ID service<br />
(CLIP). Consult your telephone company. The name of the caller also appears on the<br />
display if:<br />
– the name is programmed into the Phone Book<br />
– the network sends the name together with the telephone number (FSK CID<br />
system only).<br />
• Press the Line key to accept the external call.<br />
• During the call ‘EXT’ and the symbol appear on the display. The call timer starts<br />
running.<br />
• After finishing your call, press the Line key to hang up or put the handset back on the<br />
base unit.<br />
4.3.2 Receiving an internal call<br />
This function only works if multiple handsets are subscribed to the base unit!<br />
• The handset rings.<br />
• ‘INT’ and the number of the handset calling, appear on the display. The Call symbol<br />
blinks on the display.<br />
• Press the Line key to accept the internal call.<br />
• During the call, ‘INT’, the handset number of the caller and the symbol appear on the<br />
display. The call timer starts running.<br />
• After finishing your call, press the Line key to hang up.<br />
4.3.3 Receiving an external call during an internal call<br />
If you receive an external call during an internal call, you will hear a call waiting tone (double<br />
beep) on both handsets being used for an internal call.<br />
• Press the Line key twice to accept the external call.<br />
• After finishing your call, press the Line key to hang up.<br />
Topcom Butler <strong>4012</strong> USB VoIP 11<br />
ENGLISH
Topcom Butler <strong>4012</strong> USB VoIP<br />
4.4 Activate/deactivate handsfree function<br />
This function allows you to communicate without having to pick up the handset. When you<br />
are talking, press the Up/Handsfree key / to activate the handsfree function.<br />
Press the same button to deactivate the handsfree function.<br />
When you are calling in handsfree mode and you want to change the<br />
volume, press the Volume button.<br />
When you use the handsfree function for a long time, the batteries will be<br />
empty quickly!<br />
4.5 Transferring a call to another handset<br />
• You have an external caller on the line.<br />
• Press the INT key twice.<br />
• The external call is now on hold.<br />
• ‘INT‘ appears on the display.<br />
• Dial the number of the handset to which you would like to transfer the call.<br />
• If the handset dialled is answered, you can have an internal conversation. Press the<br />
Line key and the external call is transferred.<br />
• If the handset dialled is not answered, press the Down key<br />
caller again.<br />
to speak to the external<br />
4.6 Out of Range Warning<br />
If the handset is out of range of the base unit, a warning signal will sound.<br />
• ‘SEARCHING’ appears on the display and the symbol blinks on the display.<br />
• Move closer to the base unit.<br />
• As soon as you are back within range of the base unit, a signal sounds and the<br />
symbol stops blinking.<br />
4.7 Setting the speaker volume<br />
Use the Volume/Ringer key / to set the volume of the speaker (handset). You can select<br />
from 5 levels. The telephone is set to level ‘3’ by default.<br />
During a call, you can change the volume:<br />
• Press the Volume/Ringer key / .<br />
• The volume level currently set appears on the display.<br />
• Use the number keys to set the desired level (1-5).<br />
• Press the Volume/Ringer key / to confirm your selection.<br />
You have 8 seconds to set the desired volume; if you do not, the telephone<br />
returns to standby mode and the volume remains unchanged.<br />
12 Topcom Butler <strong>4012</strong> USB VoIP
4.8 Call Duration Indicator on the display<br />
Topcom Butler <strong>4012</strong> USB VoIP<br />
The Speaker volume for normal calls and PC-calls are independent.<br />
As soon as you press the Line key the call duration appears on the display (minutesseconds).<br />
E.g. “ 01:20 “ for 1 minute and 20 seconds.<br />
The call duration remains visible on the display for 5 seconds after each call.<br />
4.9 Turning off the microphone (mute)<br />
It is possible to turn off the microphone during a call by pressing the Delete/Mute key<br />
you can speak freely without the caller being able to hear you.<br />
. Now<br />
• You are on the phone. The Line/Charge indicator (LED) on the base unit will blink<br />
and the Call symbol appears on the display.<br />
• Press the Delete/Mute key to turn off the microphone.<br />
• The symbol ‘X’ appears on the display ( ).<br />
• When you want to resume the conversation, press the Delete/Mute key again.<br />
• The symbol ‘X’ disappears from the display (<br />
can hear you again.<br />
). The person on the other end of the line<br />
4.10 Pause key<br />
If you dial a telephone number and you would like to add a pause to this number, press the<br />
Pause key at the desired place in the number.<br />
When you call this number, this pause (3 seconds) is automatically included.<br />
4.11 Conference call (two internal DECT handsets and one external caller)<br />
You can have a telephone conversation with one internal and one external caller at the same<br />
time.<br />
• While on the line with an external caller, press the INT key twice.<br />
• The external call is now on hold.<br />
• ‘INT‘ appears on the display.<br />
• Dial the number of the handset you would like to include in the call.<br />
• Once the handset dialled is answered, keep the ‘#’ key pressed for 3 seconds.<br />
• ‘CONFERENCE’ appears on the display.<br />
• Now you are connected to one external and one internal caller (conference call).<br />
4.12 Locating a misplaced handset (paging)<br />
If you cannot find the handset, briefly press the Paging key on the base unit.<br />
All handsets subscribed with the base unit will sound a signal so you can locate the<br />
misplaced handset. To stop the signal, briefly press the Line key on any handset.<br />
Topcom Butler <strong>4012</strong> USB VoIP 13<br />
ENGLISH
Topcom Butler <strong>4012</strong> USB VoIP<br />
4.13 Using the alphanumeric handset keypad<br />
Use the alphanumeric keypad to type text. To select a letter, press the corresponding key.<br />
E.g. if you press the alphanumeric key ’5’, the first character (j) appears on the display. Press<br />
it repeatedly to select other characters from this key.<br />
Press the ‘2’ key twice to select the letter ‘B’. If you would like to select both ‘A’ and ‘B’ after<br />
each other, first press the ‘2’ key once to select ‘A’, wait 2 seconds until the cursor moves to<br />
the next position and then press the ‘2’ key twice to select ‘B’. You can delete characters<br />
mistakenly typed by using the Delete key . The character in front of the cursor will be<br />
deleted. You can move the cursor by pressing the Up and Down keys .<br />
4.14 The Phone Book<br />
The phonebook allows you to memorise 50 telephone numbers and names. You can enter<br />
names of up to 10 characters length and numbers of up to 25 digits length.<br />
4.14.1 Adding a number and a name to the Phone Book<br />
• Press the Programming key .<br />
• Press the Up or Down key repeatedly until ‘PHONE BOOK’ appears on the display.<br />
• Press the Programming key .<br />
• ‘SEARCH‘ appears on the display.<br />
• Press the Up or Down key repeatedly until ‘ADD NEW’ appears on the display.<br />
• Press the Programming key .<br />
• ‘NAME‘ appears on the display.<br />
• Enter the name. Use the alphanumeric keys.<br />
• Press the Programming key .<br />
• Enter the telephone number. Use the alphanumeric keys.<br />
• Press the Programming key .<br />
• You will hear a long beep. The name and the number are stored in the Phone Book.<br />
4.14.2 Looking up a number in the Phone Book<br />
• Press the Programming key .<br />
• Press the Up or Down key repeatedly until ‘PHONE BOOK’ appears on the display.<br />
• Press the Programming key .<br />
• ‘SEARCH‘ appears on the display.<br />
• Press the Programming key .<br />
• Enter the first letters of the desired name.<br />
• Press the Programming key .<br />
• The first name, corresponding with these letters appears on the display.<br />
• Press the Up or Down key to browse for other numbers in the Phone Book.<br />
• Once the desired number appears on the display, the number will be automatically<br />
dialled once the Line key is pressed.<br />
You can also enter the phonebook by press and hold the phonebook key<br />
for 3 seconds!<br />
14 Topcom Butler <strong>4012</strong> USB VoIP
Topcom Butler <strong>4012</strong> USB VoIP<br />
4.14.3 Changing a name or number in the Phone Book<br />
• Press the Programming key .<br />
• Press the Up or Down key repeatedly until ‘PHONE BOOK’ appears on the display.<br />
• Press the Programming key .<br />
• ‘SEARCH‘ appears on the display.<br />
• Press the Up or Down key repeatedly until ‘EDIT’ appears on the display.<br />
• Press the Programming key .<br />
• The first number in the Phone Book appears on the display.<br />
• Press the Up or Down key until the desired number appears on the display.<br />
• Press the Programming key to change the selected number programmed into the<br />
memory.<br />
• Press the Delete key to delete each letter of the name and use the alphanumeric<br />
keypad to enter the correct name.<br />
• Press the Programming key .<br />
• Press the Delete key to delete each digit of the number and use the alphanumeric<br />
keypad to enter the correct number.<br />
• Press the Programming key to save the changes made.<br />
4.14.4 Deleting name and number from the Phone Book<br />
• Press the Programming key .<br />
• Press the Up or Down key repeatedly until ‘PHONE BOOK’ appears on the display.<br />
• Press the Programming key .<br />
• ‘SEARCH‘ appears on the display.<br />
• Press the Up or Down key repeatedly until ‘DELETE’ appears on the display.<br />
• Press the Programming key .<br />
• The first number in the Phone Book appears on the display.<br />
• Press the Up or Down key until the number you want to delete appears on the<br />
display.<br />
• Press the Delete key .<br />
• ‘DELETE ?’ appears on the display.<br />
• Press the Programming key to confirm that you want to delete it.<br />
4.15 Switch the handset ON/OFF<br />
4.15.1 Switch the handset off<br />
The handset is turned on.<br />
• Press the Programming key .<br />
• Press the Up or Down key repeatedly until ‘POWER OFF?’ appears on the display.<br />
• Press the Programming key . The telephone turns itself off. You cannot dial any more<br />
numbers, nor receive any calls.<br />
If you would like to leave the menu without turning off the handset, press<br />
the Delete/Mute key .<br />
Topcom Butler <strong>4012</strong> USB VoIP 15<br />
ENGLISH
Topcom Butler <strong>4012</strong> USB VoIP<br />
4.15.2 Switch the handset on<br />
The handset is turned off.<br />
• Press the Programming key . The telephone turns itself on.<br />
4.16 Setting the ring volume level on the handset<br />
You can change the ring volume of an incoming call. You have 10 levels. You can set the<br />
ring volume of internal and external calls separately so you can hear a difference.<br />
If you select level ‘0’, the symbol appears on the display and you no longer hear the phone<br />
ring when an external call is received (you still hear it ring for internal calls).<br />
Level ‘9’ is the highest level. The telephone is set to level ‘5’ by default.<br />
4.16.1 Setting the ring volume for external calls (0-9)<br />
• Press the Programming key .<br />
• Press the Up or Down key repeatedly until ‘RING SEL’ appears on the display.<br />
• Press the Programming key .<br />
• ‘EXTERNAL‘ appears on the display.<br />
• Press the Programming key .<br />
• Press the Up or Down key repeatedly until ‘VOLUME’ appears on the display.<br />
• Press the Programming key .<br />
• The current volume level used appears on the display.<br />
• Enter a number between 0 and 9 to select the desired ringer volume. Use the number<br />
keypad to do this.<br />
• Press the Programming key to confirm your selection.<br />
4.16.2 Setting the ringer volume for internal calls (1-9)<br />
• Press the Programming key .<br />
• Press the Up or Down key repeatedly until ‘RING SEL’ appears on the display.<br />
• Press the Programming key .<br />
• ‘EXTERNAL‘ appears on the display.<br />
• Press the Up or Down key repeatedly until ‘INTERNAL’ appears on the display.<br />
• Press the Programming key .<br />
• Press the Up or Down key repeatedly until ‘VOLUME’ appears on the display.<br />
• Press the Programming key .<br />
• The current volume level appears on the display.<br />
• Enter a number between 1 and 9 to select the desired ringer volume. Use the number<br />
keypad to do this.<br />
• Press the Programming key to confirm your selection.<br />
4.17 Setting the ringer melody on the handset<br />
You can change the ringer melody for an incoming call. You have 18 ringer melodies to<br />
choose from (1-18).<br />
4.17.1 Setting a ringer melody for external calls (1-18)<br />
• Press the Programming key .<br />
• Press the Up or Down key repeatedly until ‘RING SEL’ appears on the display.<br />
• Press the Programming key .<br />
16 Topcom Butler <strong>4012</strong> USB VoIP
Topcom Butler <strong>4012</strong> USB VoIP<br />
• ‘EXTERNAL‘ appears on the display.<br />
• Press the Programming key .<br />
• ‘MELODIES‘ appears on the display.<br />
• Press the Programming key .<br />
• The currently set ringer melody appears on the display.<br />
• Enter a number between 1 and 9 to select he desired ringer melody. Use the number<br />
keypad to do this.<br />
• Press the Programming key to confirm your selection.<br />
4.17.2 Setting a ringer melody for internal calls (1-9)<br />
• Press the Programming key .<br />
• Press the Up or Down key repeatedly until ‘RING SEL’ appears on the display.<br />
• Press the Programming key .<br />
• ‘EXTERNAL‘ appears on the display.<br />
• Press the Up or Down key repeatedly until ‘INTERNAL’ appears on the display.<br />
• Press the Programming key .<br />
• ‘MELODIES‘ appears on the display.<br />
• Press the Programming key .<br />
• The currently set ringer melody appears on the display.<br />
• Enter a number between 1 and 9 to select the desired ringer melody. Use the number<br />
keypad for this.<br />
• Press the Programming key to confirm your selection.<br />
4.18 Setting the ring volume and melody of the base<br />
4.18.1 Setting the base ring volume (0-9)<br />
• Press the Programming key .<br />
• Press the Up or Down key repeatedly until ‘RING SEL’ appears on the display.<br />
• Press the Programming key .<br />
• ‘EXTERNAL‘ appears on the display.<br />
• Press the Up or Down key repeatedly until ‘BASE’ appears on the display.<br />
• Press the Programming key .<br />
• Press the Up or Down key repeatedly until ‘VOLUME’ appears on the display.<br />
• Press the Programming key .<br />
• The current volume level used appears on the display.<br />
• Enter a number between 0 and 9 to select the desired ringer volume. Use the number<br />
keypad to do this.<br />
• Press the Programming key to confirm your selection.<br />
4.18.2 Setting a ringer melody<br />
• Press the Programming key .<br />
• Press the Up or Down key repeatedly until ‘RING SEL’ appears on the display.<br />
• Press the Programming key .<br />
• ‘EXTERNAL‘ appears on the display.<br />
• Press the Up or Down key repeatedly until ‘BASE’ appears on the display.<br />
• Press the Programming key .<br />
Topcom Butler <strong>4012</strong> USB VoIP 17<br />
ENGLISH
Topcom Butler <strong>4012</strong> USB VoIP<br />
• Press the Up or Down key repeatedly until ‘VOLUME’ appears on the display.<br />
• Press the Programming key .<br />
• The current volume level used appears on the display.<br />
• Enter a number between 0 and 9 to select the desired ringer volume. Use the number<br />
keypad to do this.<br />
• Press the Programming key to confirm your selection.<br />
4.19 Locking the key pad<br />
If you lock the alphanumeric keypad, it is impossible to dial a telephone number.<br />
Only the Programming key<br />
display.<br />
can still be used. ‘KEY LOCKED’ will be displayed on the<br />
• Press the Programming key .<br />
• Press the Up or Down key repeatedly until ‘KEY SETUP’ appears on the display.<br />
• Press the Programming key .<br />
• KEY LOCK‘ appears on the display.<br />
• Press the Programming key .<br />
• The current status of the keypad appears on the display:<br />
– ‘LOCK’: the keypad is locked<br />
– ‘UNLOCK’: the keypad is not locked<br />
• Press the Up or Down key to make your selection.<br />
• Press the Programming key to confirm your selection.<br />
You can also Press and hold the #-key until KEY LOCK appear. To unlock,<br />
press and hold the #-key again.<br />
4.20 Turning key click ON/OFF<br />
You can set the telephone to make a sound whenever you press a key.<br />
• Press the Programming key .<br />
• Press the Up or Down key repeatedly until ‘KEY SETUP’ appears on the display.<br />
• Press the Programming key .<br />
• Press the Up or Down key repeatedly until ‘KEY CLICK’ appears on the display.<br />
• Press the Programming key .<br />
• The current status appears on the display:<br />
– ‘CLICK ON’: turn on key click<br />
– ‘CLICK OFF’: turn off key click<br />
• Press the Up or Down key to make your selection.<br />
• Press the Programming key to confirm your selection.<br />
4.21 The R key (flash)<br />
Press the Flash key ‘R’ to use certain services such as “call waiting” (if your telephone<br />
company offers this feature); or to transfer calls if you use a telephone exchange (PABX).<br />
The Flash key ‘R’ is a brief interruption of the line. You can set the flash time to 100ms or<br />
18 Topcom Butler <strong>4012</strong> USB VoIP
Topcom Butler <strong>4012</strong> USB VoIP<br />
300ms. This is set to 100ms by default! However, if your system requires a longer flash time,<br />
do the following:<br />
• Press the Programming key .<br />
• Press the Up or Down key repeatedly until ‘SETTING’ appears on the display<br />
• Press the Programming key .<br />
• Press the Up or Down key repeatedly until ‘RECALL’ appears on the display.<br />
• Press the Programming key .<br />
• Press the Up or Down key repeatedly to select the flash time:<br />
– SHORT = 100ms<br />
– LONG = 300ms<br />
• Press the Programming key to confirm your selection.<br />
4.22 Changing the PIN code<br />
Certain functions are only available if you know the PIN code of the telephone.<br />
The PIN code has 4 digits. The default PIN code setting is ‘0000’. If you would like to change<br />
the default PIN code and set your own secret code, do the following:<br />
• Press the Programming key .<br />
• Press the Up or Down key repeatedly until ‘SETTING’ appears on the display.<br />
• Press the Programming key .<br />
• Press the Up or Down key repeatedly until ‘PIN CODE’ appears on the display.<br />
• Press the Programming key .<br />
• ‘OLD CODE’ appears on the display.<br />
• Enter the old PIN code. Use the number keys.<br />
• Press the Programming key .<br />
• ‘NEW CODE’ appears on the display.<br />
• Enter the new PIN code in. Use the number keys.<br />
• Press the Programming key .<br />
• ‘AGAIN’ appears on the display.<br />
• Enter the new PIN code again. Use the number keys.<br />
• Press the Programming key .<br />
• You hear a confirmation tone. The new PIN code has been set.<br />
Do not forget your personal PIN code. If you do, you have to restore the<br />
default settings (reset – See “4.30 Complete reinitialisation of the<br />
telephone” on page 24).<br />
4.23 Subscribing a handset to a B24xx, 28xx, 29xx, 32xx, 40xx, 46xx<br />
In order to be able to make and receive telephone calls, a new handset has to be subscribed<br />
to the base unit. You can subscribe 5 handsets to one base unit. By default, each handset is<br />
subscribed as handset 1 on the base unit upon delivery (base unit 1).<br />
!!! You only need to subscribe the handset if:<br />
• the handset subscription has been removed from the base unit (e.g. for reinitialisation)<br />
• you want to subscribe a different handset to this base unit.<br />
The underlined procedure is only applicable to a B40XX handset and base unit!!<br />
Topcom Butler <strong>4012</strong> USB VoIP 19<br />
ENGLISH
Topcom Butler <strong>4012</strong> USB VoIP<br />
Keep the Paging key on the base unit pressed for 10 seconds until The Line/Charge<br />
indicator on the base unit begins to blink rapidly. The Line/Charge indicator will blink<br />
rapidly for one minute. During this minute, the base unit is in subscribing mode and you must<br />
do the following to subscribe the handset:<br />
• Press the Programming key .<br />
• Press the Up or Down key repeatedly until ‘BASE SUB’ appears on the display.<br />
• Press the Programming key .<br />
• ‘BASE _‘ appears on the display.<br />
• Enter a number of the base unit you would like to subscribe the handset to (1-4). Use the<br />
number keypad.<br />
• ‘SEARCHING’ and the symbol appears on the display.<br />
Each handset can be subscribed to 4 different DECT base units. Each base<br />
unit is assigned a number from 1 to 4 in the handset. When you subscribe a<br />
new handset, you can assign a base unit number. It is best to use ‘1’.<br />
• The RFPI code (each base unit has a unique RFPI code) appears on the display and a<br />
signal sounds when the handset has found the base unit.<br />
• Press the Programming key .<br />
• ‘PIN’ appears on the display.<br />
• Enter the 4-digit PIN code of the base unit in (default PIN code is ‘0000’). Use the<br />
number keypad.<br />
• Press the Programming key .<br />
• The handset is subscribed to the base unit.<br />
4.24 Subscribing Butler <strong>4012</strong> handset on another base (other brand/model)<br />
Put the base in subscription mode (see manual of the base). If the base is in subscribing<br />
mode, you have to do the following to subscribe the handset:<br />
• Press the Programming key .<br />
• Press the Up or Down key repeatedly until ‘BASE SUB’ appears on the display.<br />
• Press the Programming key .<br />
• ‘BASE _‘ appears on the display.<br />
• Enter a number for the base unit to which you would like to subscribe the handset (1-4).<br />
• Use the number keypad.<br />
• ‘SEARCHING’ and the symbol appear on the display.<br />
• The RFPI code (each base unit has a unique RFPI code) appears on the display and a<br />
signal sounds once the base unit is found by the handset.<br />
• Press the Programming key .<br />
• ‘PIN’ appears on the display.<br />
• Enter the 4-digit PIN code of the base unit (default PIN code is ‘0000’). Use the number<br />
keypad.<br />
• Press the Programming key .<br />
• The handset is subscribed to the base unit.<br />
20 Topcom Butler <strong>4012</strong> USB VoIP
4.25 Removing subscription of a handset to a base unit<br />
Topcom Butler <strong>4012</strong> USB VoIP<br />
It is possible to cancel subscription of a handset to a base unit. You would do this if a<br />
handset is damaged and has to be replaced by a new one.<br />
You can only cancel subscription of another handset, not the handset you<br />
are using to do the cancellation procedure.<br />
• Press the Programming key .<br />
• Press the Up or Down key repeatedly until ‘SETTING’ appears on the display.<br />
• Press the Programming key .<br />
• Press the Up or Down key repeatedly until ‘REMOVE HS’ appears on the display.<br />
• Press the Programming key .<br />
• ‘PIN’ appears on the display.<br />
• Enter your 4-digit PIN code in (default PIN code is ‘0000’). Use the number keypad.<br />
• Press the Programming key .<br />
• ‘REMOVE HS’ appears on the display.<br />
• Dial the number of the handset you want to remove (1 –5). Use the number keypad.<br />
• Press the Programming key .<br />
• ‘REMOVE HS’ appears on the display and the handset is removed<br />
• NOT SUB’ appears on the handset removed.<br />
4.26 Selecting a base unit<br />
If your handset is subscribed to several base unit stations (max. 4) , you must select a base<br />
unit because the handset can only communicate with one base unit at a time. There are two<br />
possibilities:<br />
4.26.1 Automatic selection<br />
If you set the handset to ‘automatic selection’, the handset will automatically choose the<br />
closest base unit in standby.<br />
• Press the Programming key .<br />
• Press the Up or Down key repeatedly until ‘SETTING’ appears on the display.<br />
• Press the Programming key .<br />
• Press the Up or Down key repeatedly until ‘BASE SEL’ appears on the display.<br />
• Press the Programming key .<br />
• Press the Up or Down key repeatedly until ‘AUTO’ appears on the display.<br />
• Press the Programming key .<br />
• ‘SEARCHING’ and the symbol appear on the display.<br />
• A signal sounds once the handset has found a base unit.<br />
Topcom Butler <strong>4012</strong> USB VoIP 21<br />
ENGLISH
Topcom Butler <strong>4012</strong> USB VoIP<br />
4.26.2 Manual selection<br />
If you set the handset to ‘manual selection’, the handset will only choose the base unit you<br />
have set.<br />
• Press the Programming key .<br />
• Press the Up or Down key repeatedly until ‘SETTING’ appears on the display.<br />
• Press the Programming key .<br />
• Press the Up or Down key repeatedly until ‘BASE SEL’ appears on the display.<br />
• Press the Programming key .<br />
• Press the Up or Down key repeatedly until ‘MANUAL’ appears on the display.<br />
• Press the Programming key .<br />
• ‘BASE -‘ appears on the display.<br />
• Enter the number of the base unit you want to select (1-4). Use the number keypad.<br />
• Press the Programming key .<br />
• ‘SEARCHING’ and the symbol appear on the display.<br />
• A signal sounds once the selected base unit has been found.<br />
• Before you can select a base unit, the base unit must be subscribed to<br />
the handset first.<br />
• If ‘NOT SUB’ appears on the display, this means the selected base unit<br />
does not exist or the handset has not been subscribed.<br />
4.27 Barring outgoing calls<br />
You can program the handsets to bar calls to certain telephone numbers so that for instance<br />
‘00’ international numbers cannot be called. Up to 5 numbers (of max. 5 digits) can be barred.<br />
To do this, do the following:<br />
• Press the Programming key .<br />
• Press the Up or Down key repeatedly until ‘SETTING’ appears on the display.<br />
• Press the Programming key .<br />
• Press the Up or Down key repeatedly until ‘BARRING’ appears on the display.<br />
• Press the Programming key .<br />
• ‘PIN’ appears on the display.<br />
• Enter your PIN code<br />
• Press the Programming key .<br />
• ‘BAR NUM ’ appears on the display. You are in memory “1. _ _ _ _ _”.<br />
• Press the Up or Down key to select one of the 5 memories.<br />
• Enter the number (max. 5 digits) to be barred, e.g. 01486.<br />
• Press the Programming key .<br />
• ‘HS _ _ _ _ _’ (= number on the handset (1-5)) ‘01486’ (= the barred numbers) appear<br />
on the display.<br />
• Enter the numbers of the handsets from which the barred numbers cannot be called.<br />
• e.g. Press the number key 2, 3 and 5. On the display, this will appear: HS _2 3_5 01486<br />
These handsets can no longer dial numbers beginning with ‘01486’.<br />
• Press the Programming key to confirm your selection. Repeat the same procedure<br />
described above if you would like to bar other numbers (max. 5)!<br />
22 Topcom Butler <strong>4012</strong> USB VoIP
4.28 Direct Call<br />
Topcom Butler <strong>4012</strong> USB VoIP<br />
By setting a Direct Call number, the phone will automatically take the line and dial out this<br />
number. This function is useful to use the phone as a emergency phone.<br />
4.28.1 To program the Direct Call number<br />
• Press the Programming key<br />
• Press the Up or Down key until ‘DIRECT’ appears on the display<br />
• Press the Programming key<br />
• If necessary, delete the existing number by pressing the Delete-key a few times<br />
• Enter the direct number<br />
• Press the Programming key<br />
4.28.2 Turn the Direct Call function ON/OFF<br />
To turn it ON:<br />
• Press the Programming key<br />
• Press the Up or Down key until ‘DIRECT’ appears on the display<br />
• Press the mute-key for 2s<br />
• ‘DIRECT ON’ appears on the display<br />
To turn if OFF:<br />
• <strong>Quick</strong> press the Programming key twice<br />
4.29 Default settings (reset) of the parameters<br />
You can reset the standard (default) settings in the telephone. You need the PIN code to do<br />
this.<br />
The default settings are:<br />
Keypad: not locked<br />
Key clicks: active<br />
Speaker volume: level<br />
Ringer melody: 1<br />
Ringer volume : 5<br />
Selection base unit: automatic<br />
Flash time: 100ms<br />
To restore the default settings, do the following:<br />
• Press the Programming key .<br />
• Press the Up or Down key repeatedly until ‘SETTING’ appears on the display.<br />
• Press the Programming key .<br />
• Press the Up or Down key repeatedly until ‘RESET’ appears on the display.<br />
• Press the Programming key .<br />
• ‘PIN’ appears on the display.<br />
• Enter your PIN code.<br />
• Press the Programming key .<br />
Topcom Butler <strong>4012</strong> USB VoIP 23<br />
ENGLISH
Topcom Butler <strong>4012</strong> USB VoIP<br />
4.30 Complete reinitialisation of the telephone<br />
This function allows you to completely reinitialise the telephone without requiring your PIN<br />
code. This will delete all Phone Book memory entries, all handsets will be removed, all default<br />
settings will be restored and the default PIN code will be restored to ‘0000’.<br />
Do the following:<br />
• Disconnect the battery in the telephone.<br />
• Keep the ‘*’ key pressed and reconnect the battery until the handset rings continually<br />
and the display lights up. Release the ‘*’ button and press the Programming key .<br />
• The handset finds the base unit and a signal sounds.<br />
• Briefly press the ‘*’ key.<br />
• ‘RESET ?‘ appears on the display.<br />
• Press the Programming key to confirm your selection of disconnect the battery to<br />
discontinue the procedure.<br />
• ‘RESETTING‘ appears on the display and a long beep tone sounds.<br />
• ‘NOT SUB‘ appears on the display. The handset is completely reinitialised.<br />
Afterwards, you must resubscribe all handsets as described in point 4.23! However you no<br />
longer need to set the base unit to subscription mode, because this now happens<br />
automatically!<br />
4.31 Setting the handset dialling mode<br />
There are two types of dialling modes:<br />
• DTMF/Tone dialling (the most common)<br />
• Pulse dialling (for older installations)<br />
To change the mode of numeration:<br />
• Press the Programming key<br />
• Press the Up or Down key repeatedly until ‘SETTING’ appears on the display.<br />
• Press the Programming key<br />
• Press the Up or Down key repeatedly until ‘DIAL MODE’ appears on the display.<br />
• Press the Programming key<br />
• Select ‘TONE’ or ‘PULSE’ by means of the UP and Down key<br />
• Press the Programming key to confirm<br />
5 Caller ID/CLIP<br />
(This service only works when you have a Caller ID/Clip subscription. Contact your telephone<br />
company).<br />
When you receive a call, the telephone number of the caller, the date and time appears on<br />
the handset display. The telephone can receive calls in both FSK and DTMF. If the name is<br />
programmed in the Phone Book, the name in the Phone Book is displayed!<br />
The telephone can store 30 calls in a Call List that can be reviewed later. The telephone<br />
never stores the same call twice. When the memory is full, the new calls automatically<br />
24 Topcom Butler <strong>4012</strong> USB VoIP
Topcom Butler <strong>4012</strong> USB VoIP<br />
replace the oldest calls in the memory. The symbol on the display blinks if the call is not<br />
read or not answered. If the Call List is empty and you press the Up key , three beep tones<br />
will sound.<br />
You can view the information of an incoming call as follows:<br />
• Press the Up key , select ‘CLIP’ and press OK<br />
• Press the Up key . The name (if sent by the network or present in the Phone Book<br />
memory) of the caller, the sequence number of the call in the Call List, the date and time<br />
of the call appear on the display.<br />
• Press the Down key . The telephone number of the caller appears on the display.<br />
5.1 Setting the date and time<br />
When you receive an incoming call and the date and time are not sent together with the<br />
telephone number or PC TIME (see “PC TIME Settings” on page 29) is not On, this means<br />
that the date and the time will not be shown on the display. By setting the date and time, they<br />
will be shown on the display, together with the telephone number, every time a call comes in !<br />
• Press the Programming key .<br />
• Press the Up or Down key a few times until ‘SETTING’ appears on the display.<br />
• Press the Programming key .<br />
• ’DATE/TIME’ appears on the display.<br />
• Press the Programming key again.<br />
• When ‘YEAR’ appears on the display, enter the 2 last numbers of the year (00=2000,<br />
01=2001, ...) and press the Programming key to confirm.<br />
• When ‘MONTH’ appears on the display, enter the month (01=January, 02=February, ...)<br />
and press the Programming key to confirm.<br />
• When ‘DAY’ appears on the display, enter the day of the month and press the<br />
Programming key to confirm.<br />
• When ‘HOUR’ appears on the display, enter the current hour (in 24h format) and press<br />
the Programming key to confirm.<br />
• When ‘MINUTES’ appears on the display, enter the minutes and press the Programming<br />
key to confirm.<br />
The date and time are now set !<br />
5.2 The Call List<br />
The calls received are stored in the Call List (max. 30 numbers).<br />
• Briefly press the Up key to view the most recent call.<br />
• Select ‘CLIP’ and press OK<br />
• The name of the most recent caller appears on the display. If no name is available, ‘NO<br />
NAME’ appears on the display.<br />
• If it is a private number, ‘UNAVAL’ appears on the display.<br />
• The date and time the call was received are linked to each call.<br />
• Briefly press the Down key to view the telephone number of the call.<br />
• Briefly press the Down key to browse other numbers on the list.<br />
Topcom Butler <strong>4012</strong> USB VoIP 25<br />
ENGLISH
Topcom Butler <strong>4012</strong> USB VoIP<br />
• If neither the Up or Down key is pressed for 15 seconds, the<br />
telephone will return to standby mode.<br />
• After a call is received, the number of the caller remains on the display<br />
for 15 seconds after the last ring.<br />
• Caller ID is not available while you are on the line.<br />
5.3 Calling a number from the Call List<br />
• Press the Up key , select ‘CLIP’ and press OK<br />
• Press the Up key to look up the desired call. Press the Down key to view the<br />
telephone number.<br />
• Once the number is on the display, press the Line key and the number is dialled<br />
automatically. (The symbols and ‘EXT’ appear on the display and the call timer<br />
starts.)<br />
5.4 Storing a number from the Call List in the Phone Book<br />
• Press the Up key , select ‘CLIP’ and press OK<br />
• Press the Up key to look up the desired number.<br />
• Press the Phone Book key twice.<br />
• ‘STORE’ appears on the display.<br />
• The number is stored in the Phone Book. If the call was displayed without a name (NO<br />
NAME), you can add a name to this number in the Phone Book afterwards<br />
• The telephone returns to standby-modus.<br />
5.5 Deleting numbers from the Call List<br />
5.5.1 Deleting one number<br />
• Press the Up key , select ‘CLIP’ and press OK<br />
• Press the Up key to find the call you would like to delete.<br />
• Once this call appears on the display, press the Delete key .<br />
• ‘DELETE?’ appears on the display.<br />
• Press the Programming key to confirm your selection or the Delete key to cancel.<br />
• The call is deleted and the next call appears on the display.<br />
5.5.2 Delete all numbers<br />
• Press the Up key , select ‘CLIP’ and press OK<br />
• Keep the Delete key pressed until ‘DELETE ALL’ appears on the display.<br />
• Press the Programming key to confirm your selection or the Delete key to cancel.<br />
• All calls are deleted.<br />
26 Topcom Butler <strong>4012</strong> USB VoIP
6 Voice mail indicator<br />
Topcom Butler <strong>4012</strong> USB VoIP<br />
This function only works if you have the voice mail or phone mail service and if the network<br />
sends this indication along with the caller ID (CLIP) information!<br />
When you receive a new message in your voice mail system, the icon will appear on the<br />
display. Once you have listened to your messages, the icon will disappear.<br />
7 USB PC interface operation<br />
This section only describe the phone functions when making calls over<br />
internet (VoIP) !<br />
7.1 Installing the software<br />
You can only make or receive calls over internet when you have a internet connection and<br />
one of the following programs installed:<br />
– Skype: downloadable from http//:www.skype.net/go/getskype<br />
– MSN Messenger<br />
– SJ-Phone or Net2Phone<br />
Minimum system requirements:<br />
• PC Running under Windows XP or 2000<br />
• 32 MB free memory<br />
• 20 MB Free hard disk space<br />
• Internet connection with 56Kbps or higher<br />
– Install the software from the CD included with the phone:<br />
For the latest version of the software please look at our website:<br />
http://www.topcom.net/support/downloads.php<br />
– Insert the CD when the PC is on. If the program doesn’t run automatically, click<br />
on the Start icon and select Run. Enter D:\CD_Start.exe (if D in not your CD-<br />
ROM drive, enter the appropriate letter)<br />
– The installation wizard will guide you through the process<br />
– Reboot the PC after installation<br />
Topcom Butler <strong>4012</strong> USB VoIP 27<br />
ENGLISH
Topcom Butler <strong>4012</strong> USB VoIP<br />
– Plug the USB plug of the phone to the PC after your PC has been started up<br />
again.<br />
– Windows will install the proper USB driver for the phone<br />
– Select the appropriate interface for Skype, MSN Messenger, SJ-phone or<br />
Net2Phone at the Butler <strong>4012</strong> software program<br />
– Open the corresponding internet phone program<br />
7.2 General PC call settings<br />
7.2.1 Setting the PC ringer melody and volume on the handset<br />
You can change the ringer volume and melody for an incoming PC call. You have 18 ringer<br />
melodies and 9 volumes to choose from.<br />
• Press the Programming key .<br />
• Press the Up or Down key repeatedly until ‘RING SEL’ appears on the display.<br />
• Press the Programming key .<br />
• ‘PC RING‘ appears on the display.<br />
• Press the Programming key .<br />
• Press the Up or Down key repeatedly to select the volume or ring melodie setting<br />
• Press the Programming key .<br />
• The currently set ringer melody or volume appears on the display.<br />
• Enter a number between 0 and 9 to select he desired ringer volume or 1-18 for the<br />
melodie. Use the number keypad to do this.<br />
• Press the Programming key to confirm your selection.<br />
28 Topcom Butler <strong>4012</strong> USB VoIP
Topcom Butler <strong>4012</strong> USB VoIP<br />
7.2.2 PC TIME Settings<br />
When the PC time setting is On the Call log will use the PC clock to store the date and time<br />
of incoming calls:<br />
• Press the Programming key .<br />
• Press the Up or Down key repeatedly until ‘SETTINGS’ appears on the display.<br />
• Press the OK.<br />
• Press the Up or Down key repeatedly until PC TIME appears on the display<br />
• Press OK and select ON or OFF<br />
• Press OK to confirm<br />
7.3 Skype interface<br />
This section describes the operation under Skype! For more information on<br />
Skype: www.skype.com<br />
MAKE SURE YOU HAVE SELECTED ‘SKYPE’ as interface in the Butler <strong>4012</strong> program:<br />
7.3.1 General comments:<br />
• In idle mode the display of the phone will show you the net status (online, off line, etc...)<br />
• ‘NO CONNECT’ will be displayed when the USB connection fails or when the Butler<br />
<strong>4012</strong> software isn’t installed or open.<br />
7.3.2 Making Skype calls<br />
Receiving an incoming Skype calls<br />
When you receive an incoming Skype call, the callers nickname will be shown on the handset<br />
display<br />
Press the VoIP VoIP-key to answer the call<br />
Press the VoIP VoIP-key to end the call<br />
When you have a Skype subscription, the calling number if available<br />
will be shown during a SkypeIn call.<br />
Topcom Butler <strong>4012</strong> USB VoIP 29<br />
ENGLISH
Topcom Butler <strong>4012</strong> USB VoIP<br />
Making a Skype call from the online buddy list:<br />
The buddy list is your personal Skype contact list.<br />
• Press the VoIP VoIP-key<br />
• The Skype nickname is show on the display.<br />
• Press the Up or Down key repeatedly to scroll through the on-line buddy list.<br />
• Press the OK-key to toggle between the Skype nickname and account ID name.<br />
• Press the VoIP VoIP-key to start making the call<br />
• Press the VoIP VoIP-key again to end the call<br />
If the Skype nickname contains special characters the phone can’t display,<br />
the account ID name will be shown instead.<br />
Making a Skype call using speed-dial numbers<br />
!! Make sure you have add speed dial numbers to your contacts/buddies<br />
• Enter the speed-dial number (0-99)<br />
• Press the VoIP VoIP-key to start making the call<br />
You can also store speed dial numbers into the phonebook (See ”4.14 The<br />
Phone Book”).<br />
Making a SkypeOUT call<br />
To make skype out calls you have to buy Skypeout credits!!<br />
• Enter the telephone number<br />
• Press the VoIP VoIP-key<br />
• Press the VoIP VoIP-key again to end the call<br />
Redial one of the last 5 numbers dialled<br />
• Press the Redial key .<br />
• Select ‘PC OUT’ by the Up or Down key and press OK<br />
• The number/skype nick name you last called appears on the display.<br />
• Press the Redial key a few times until the desired number appears on the display.<br />
• Press the OK-key to toggle between the Skype nickname and account ID name.<br />
• Press the Up key to see the date and time<br />
• Press the VoIP VoIP-key to make the call<br />
• The number shown on the display is dialled automatically.<br />
• After finishing your call, press the VoIP key VoIP<br />
to hang up.<br />
30 Topcom Butler <strong>4012</strong> USB VoIP
Topcom Butler <strong>4012</strong> USB VoIP<br />
7.3.3 Interworking Skype calls and normal PSTN calls<br />
This section describe the interworking between normal PSTN calls and Skype calls.<br />
When you receive two calls at the same time (PSTN and PC call) the first call<br />
will be showed on the display. You can answer one of both calls by pressing<br />
the corresponding off-hook key.<br />
During a conversation an incoming second call :<br />
1) During normal PSTN conversation and incomming Skype call, the calling Skype nick name<br />
will be showed on the display and an alert beep will be heard. The PC icon will blink on the<br />
display:<br />
• Press the line key to end the normal call and to answer the PC call:<br />
The Handset will start to ring<br />
Press the VoIP VoIP-key to answer the PC call<br />
OR<br />
• Press OK key to enter the menu.<br />
• Press the Up or Down key repeatedly until ‘SWITCH’ appears on the display and<br />
•<br />
press OK. The line will be switched to PC call and the PSTN call will be put on hold.<br />
To switch back to PSTN call, press OK key again -> select SWITCH and press OK<br />
• To end both calls press the line or VoIP VoIP-key<br />
2) During Skype conversation and incomming PSTN call, the calling number (or name) will<br />
be shown on the display if callerID is available.<br />
• Press the VoIP VoIP-key to end the Skype call and to answer the PSTN call:<br />
The Handset will start to ring<br />
Press the line -key to answer the PSTN call<br />
OR<br />
• Press OK key to enter the menu.<br />
• Press the Up or Down key repeatedly until ‘SWITCH’ appears on the display and<br />
•<br />
press OK. The line will be switched to PSTN call and the PC call will be put on hold.<br />
To switch back to PC call, press OK key again -> select SWITCH and press OK<br />
• To end both calls press the line or VoIP<br />
VoIP-key<br />
7.3.4 The PC Call List<br />
The calls received are stored in the skype program. The PC call list contains the missed calls<br />
and received calls.<br />
• Briefly press the Up key . Select ‘PC-IN’ by the Up or Down key and press OK.<br />
• The nickname of the most recent caller appears on the display.<br />
• Press the Up-key to show the net status and date/time<br />
• The date and time the call was received are linked to each call.<br />
• Briefly press the Down key to browse other numbers on the list.<br />
Topcom Butler <strong>4012</strong> USB VoIP 31<br />
ENGLISH
Topcom Butler <strong>4012</strong> USB VoIP<br />
• If neither the Up or Down key is pressed for 15 seconds, the<br />
telephone will return to standby mode.<br />
• After a call is received, the number of the caller remains on the display<br />
for 15 seconds after the last ring.<br />
• Caller ID is not available while you are on the line.<br />
Calling a number from the Call List<br />
• Briefly press the Up key . Select ‘PC-IN’ and press OK.<br />
• Press the Down key to look up the desired call.<br />
• Once the number is on the display, press the VoIP VoIP-key to make the call. (The<br />
symbols and ‘EXT’ appear on the display and the call timer starts.)<br />
7.3.5 Setting the Net status via handset<br />
• Press the Programming key .<br />
• Press the Up or Down key repeatedly until ‘NET STATUS’ appears on the display.<br />
• Press the OK.<br />
• Press the Up or Down key repeatedly to select the desired Net status<br />
• Press OK to confirm.<br />
• The currently Net status will appear on the display in standby<br />
When setting the net status to ‘offline’ or ‘do not disturb’, the handset will<br />
not ring during incoming Skype call.<br />
7.3.6 Skype Voicemail access<br />
To have voicemail you need to have voicemail subscription.<br />
When you have voicemail subscription and you have received a new message, the<br />
appears on the display.<br />
-icon<br />
You can also send a voicemail message to one of your skype buddies by the menu (outbox)<br />
without calling them first.<br />
Listen to your voicemail messages<br />
• Press the Programming key .<br />
• Press the Up or Down key repeatedly until ‘VOICE MAIL’ appears on the display.<br />
• Press the OK.<br />
• Press the Up or Down key repeatedly and select ‘INBOX’<br />
• Press OK to confirm and to enter the list of messages.<br />
• Press to scroll through the list, or press to see the netstatus and date/time of the<br />
message. New unread messages are shown with the -icon.<br />
• Press the VoIP<br />
VoIP-key to listen to the message<br />
32 Topcom Butler <strong>4012</strong> USB VoIP
Send a voicemail message directly<br />
Topcom Butler <strong>4012</strong> USB VoIP<br />
You can also enter the voicemail menu directly by pressing and holding the<br />
‘1’ or -key.<br />
• Press the Programming key .<br />
• Press the Up or Down key repeatedly until ‘VOICE MAIL’ appears on the display.<br />
• Press the OK.<br />
• Press the Up or Down key repeatedly and select ‘OUTBOX’<br />
• Press OK to confirm and to enter the list of all buddies<br />
• Press the Up or Down key<br />
voice message<br />
repeatedly to scroll to the buddy you want to send a<br />
• Press the VoIP VoIP-key to start the recording<br />
• To end the recording, press the VoIP VoIP-key again. To voicemail message will be send.<br />
7.4 SJ-Phone/Net2Phone interface<br />
This section describes the operation under SJ-Phone/Net2Phone!<br />
MAKE SURE YOU HAVE SELECTED ‘SJ-Phone’ or ‘Net2Phone in the Butler <strong>4012</strong> program:<br />
7.4.1 Incoming call<br />
• When you receive an incoming call the ‘EXT’ will blink together with the ‘PC’ logo to<br />
indicate it’s a PC call.<br />
• Press the VoIP VoIP-key to answer the call<br />
• To end the call press the line or VoIP VoIP-key<br />
7.4.2 Making a PC call<br />
• Enter the telephone number you want to dial<br />
• Press the VoIP VoIP-key to dial out the number<br />
• To end the call press the line or VoIP<br />
VoIP-key<br />
Topcom Butler <strong>4012</strong> USB VoIP 33<br />
ENGLISH
Topcom Butler <strong>4012</strong> USB VoIP<br />
7.5 MSN Messenger interface<br />
This section describes the operation under MSN Messenger !<br />
MAKE SURE YOU HAVE SELECTED ‘MSN Messenger’ in the Butler <strong>4012</strong> program:<br />
The interworking between MSN messenger and the telephone only works if<br />
MSN messenger is opened and minimized in the application tray:<br />
7.5.1 Incoming call<br />
• When you receive an incoming only the PC screen will show that someone is calling<br />
• Press the VoIP VoIP-key to enter the contact list<br />
• Press the Up or Down key<br />
VoIP VoIP-key<br />
repeatedly to scroll to the calling person and press the<br />
• To end the call press the line or VoIP VoIP-key<br />
7.5.2 Making a PC call<br />
• Press the VoIP VoIP-key to enter the contact list<br />
• Press the Up or Down key repeatedly to scroll to contact person you want to call<br />
and press the VoIP VoIP-key<br />
• To end the call press the line or VoIP<br />
VoIP-key<br />
34 Topcom Butler <strong>4012</strong> USB VoIP
8 Trouble shooting<br />
Topcom Butler <strong>4012</strong> USB VoIP<br />
Symptom Possible cause Solution<br />
No display Batteries uncharged Check the position of the<br />
batteries<br />
Recharge the batteries<br />
Handset turned OFF Turn ON the handset<br />
No tone Telephone cord badly<br />
Check the telephone<br />
connected<br />
cord connection<br />
The line is occupied<br />
Wait until the other handset<br />
by another handset<br />
hangs up<br />
The icon flashes Handset out of range Bring the handset closer to the<br />
base<br />
Base or handset<br />
do not ring<br />
Tone is good, but<br />
there is no<br />
communication<br />
Telephone does not<br />
react to pressing<br />
the keys<br />
Flash (R) Key does<br />
not work<br />
No audio for PC calls in<br />
the DECT phone<br />
The base has no power<br />
supply<br />
The handset is not<br />
registered to the base<br />
The ringing volume is<br />
zero or low<br />
The dialling mode is<br />
wrong<br />
Check the mains connection<br />
to the base<br />
Register the handset to the<br />
base<br />
Adjust the ringing volume<br />
Adjust the dialling mode<br />
(pulse/tone)<br />
Manipulation error Remove the batteries and<br />
but them back in place<br />
Keypad lock ON Turn OFF the Keypad Lock<br />
Wrong Flash time Change the flash time<br />
The audio device for Speech is<br />
not set correct in Windows to<br />
‘USB phone’ or ’C-media USB<br />
headset’<br />
The Skype application doesn’t use<br />
the telephone as audio device<br />
Go to ‘Control panel’, and select<br />
’Audio and sound devices’ -><br />
select ‘Speech’ -> make sure both<br />
playback and voice recording are<br />
set to ‘C-media USB headset’<br />
Open Skype and select ‘Tools’<br />
-> ‘Options’. At the ‘Privacy’<br />
settings, select ‘manage other<br />
programs access skype’ and<br />
make sure only Butler <strong>4012</strong> is<br />
shown in the list<br />
Topcom Butler <strong>4012</strong> USB VoIP 35<br />
ENGLISH
Topcom Butler <strong>4012</strong> USB VoIP<br />
No PC sound anymore<br />
when using other<br />
applications<br />
9 Technical characteristics<br />
Standard: DECT ( Digital Enhanced Cordless Telecommunications )<br />
GAP ( Generic Access Profile )<br />
Frequency range: 1880 MHZ to 1900 MHz<br />
Number of channels: 120 duplex channels<br />
Modulation: GFSK<br />
Speech coding: 32 kbit/s<br />
Emission power: 10 mW ( average power per channel )<br />
Range: 300 m in open space /50 m maximum inhouse<br />
Base power supply: 230 V / 50 Hz for the base<br />
Handset Batteries: 2 rechargeable batteries AAA, NiMh 600mAh<br />
Handset autonomy: 120 hours in standby<br />
Talk time: 13 hours<br />
Charging time: 6-8 hours<br />
Normal conditions of use: +5 °C to +45 °C<br />
Dialling mode: Pulse / Tone<br />
10 Topcom warranty<br />
The skype audio devices are not<br />
set to the USB phone<br />
The audio device for Audio is not<br />
set correct in Windows to you PC<br />
audio card<br />
Open Skype and select ‘Tools’<br />
-> ‘Options’. At the ‘Sound<br />
devices’ settings, make sure all<br />
are set to the ‘C-media USB<br />
headset’<br />
Go to ‘Control panel’, and select<br />
’Audio and sound devices’ -><br />
select ‘Audio’ -> make sure both<br />
playback and recording are set to<br />
your PC audio card<br />
10.1 Warranty period<br />
The Topcom units have a 24-month warranty period. The warranty period starts on the day the new unit<br />
is purchased. The warranty on batteries is limited to 6 months after purchase. Consumables or defects<br />
causing a negligible effect on operation or value of the equipment are not covered.<br />
The warranty has to be proven by presentation of the original purchase receipt, on which the date of<br />
purchase and the unit-model are indicated.<br />
10.2 Warranty handling<br />
A faulty unit needs to be returned to a Topcom service centre including a valid purchase note.<br />
If the unit develops a fault during the warranty period, Topcom or its officially appointed service centre<br />
will repair any defects caused by material or manufacturing faults free of charge.<br />
Topcom will at its discretion fulfil its warranty obligations by either repairing or exchanging the faulty units<br />
or parts of the faulty units. In case of replacement, colour and model can be different from the original<br />
purchased unit.<br />
The initial purchase date shall determine the start of the warranty period. The warranty period is not<br />
extended if the unit is exchanged or repaired by Topcom or its appointed service centres.<br />
36 Topcom Butler <strong>4012</strong> USB VoIP
Topcom Butler <strong>4012</strong> USB VoIP<br />
10.3 Warranty exclusions<br />
Damage or defects caused by incorrect treatment or operation and damage resulting from use of nonoriginal<br />
parts or accessories not recommended by Topcom are not covered by the warranty.<br />
Topcom cordless phones are designed to work with rechargeable batteries only. The damage caused<br />
by the use of non-rechargeable batteries is not covered under warranty.<br />
The warranty does not cover damage caused by outside factors, such as lightning, water and fire, nor<br />
any damage caused during transportation.<br />
No warranty can be claimed if the serial number on the units has been changed, removed or rendered<br />
illegible.<br />
Any warranty claims will be invalid if the unit has been repaired, altered or modified by the buyer or by<br />
unqualified, non-officially appointed Topcom service centres.<br />
Topcom Butler <strong>4012</strong> USB VoIP 37<br />
ENGLISH
U8006500/UK<br />
visit our website<br />
www.topcom.net