MAX S500 HD - FTE Maximal
MAX S500 HD - FTE Maximal
MAX S500 HD - FTE Maximal

Create successful ePaper yourself
Turn your PDF publications into a flip-book with our unique Google optimized e-Paper software.
ev 1.3<br />
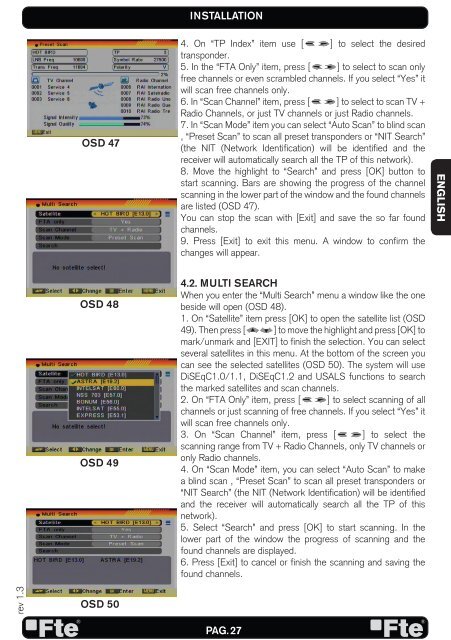
OSD 47<br />
OSD 48<br />
OSD 49<br />
OSD 50<br />
INSTALLATION<br />
4. On “TP Index” item use [ ] to select the desired<br />
transponder.<br />
5. In the “FTA Only” item, press [ ] to select to scan only<br />
free channels or even scrambled channels. If you select “Yes” it<br />
will scan free channels only.<br />
6. In “Scan Channel” item, press [ ] to select to scan TV +<br />
Radio Channels, or just TV channels or just Radio channels.<br />
7. In “Scan Mode” item you can select “Auto Scan” to blind scan<br />
, “Preset Scan” to scan all preset transponders or “NIT Search”<br />
(the NIT (Network Identification) will be identified and the<br />
receiver will automatically search all the TP of this network).<br />
8. Move the highlight to “Search” and press [OK] button to<br />
start scanning. Bars are showing the progress of the channel<br />
scanning in the lower part of the window and the found channels<br />
are listed (OSD 47).<br />
You can stop the scan with [Exit] and save the so far found<br />
channels.<br />
9. Press [Exit] to exit this menu. A window to confirm the<br />
changes will appear.<br />
4.2. MULTI SEARCH<br />
When you enter the “Multi Search” menu a window like the one<br />
beside will open (OSD 48).<br />
1. On “Satellite” item press [OK] to open the satellite list (OSD<br />
49). Then press [ ] to move the highlight and press [OK] to<br />
mark/unmark and [EXIT] to finish the selection. You can select<br />
several satellites in this menu. At the bottom of the screen you<br />
can see the selected satellites (OSD 50). The system will use<br />
DiSEqC1.0/1.1, DiSEqC1.2 and USALS functions to search<br />
the marked satellites and scan channels.<br />
2. On “FTA Only” item, press [ ] to select scanning of all<br />
channels or just scanning of free channels. If you select “Yes” it<br />
will scan free channels only.<br />
3. On “Scan Channel” item, press [ ] to select the<br />
scanning range from TV + Radio Channels, only TV channels or<br />
only Radio channels.<br />
4. On “Scan Mode” item, you can select “Auto Scan” to make<br />
a blind scan , “Preset Scan” to scan all preset transponders or<br />
“NIT Search” (the NIT (Network Identification) will be identified<br />
and the receiver will automatically search all the TP of this<br />
network).<br />
5. Select “Search” and press [OK] to start scanning. In the<br />
lower part of the window the progress of scanning and the<br />
found channels are displayed.<br />
6. Press [Exit] to cancel or finish the scanning and saving the<br />
found channels.<br />
PAG. 27<br />
ENGLISH