MAX S500 HD - FTE Maximal
MAX S500 HD - FTE Maximal
MAX S500 HD - FTE Maximal

Create successful ePaper yourself
Turn your PDF publications into a flip-book with our unique Google optimized e-Paper software.
ev 1.3<br />
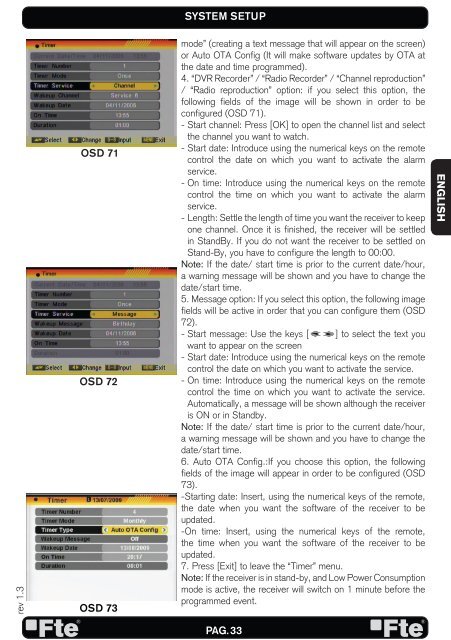
OSD 71<br />
OSD 72<br />
OSD 73<br />
SYSTEM SETUP<br />
mode” (creating a text message that will appear on the screen)<br />
or Auto OTA Config (It will make software updates by OTA at<br />
the date and time programmed).<br />
4. “DVR Recorder” / “Radio Recorder” / “Channel reproduction”<br />
/ “Radio reproduction” option: if you select this option, the<br />
following fields of the image will be shown in order to be<br />
configured (OSD 71).<br />
- Start channel: Press [OK] to open the channel list and select<br />
the channel you want to watch.<br />
- Start date: Introduce using the numerical keys on the remote<br />
control the date on which you want to activate the alarm<br />
service.<br />
- On time: Introduce using the numerical keys on the remote<br />
control the time on which you want to activate the alarm<br />
service.<br />
- Length: Settle the length of time you want the receiver to keep<br />
one channel. Once it is finished, the receiver will be settled<br />
in StandBy. If you do not want the receiver to be settled on<br />
Stand-By, you have to configure the length to 00:00.<br />
Note: If the date/ start time is prior to the current date/hour,<br />
a warning message will be shown and you have to change the<br />
date/start time.<br />
5. Message option: If you select this option, the following image<br />
fields will be active in order that you can configure them (OSD<br />
72).<br />
- Start message: Use the keys [ ] to select the text you<br />
want to appear on the screen<br />
- Start date: Introduce using the numerical keys on the remote<br />
control the date on which you want to activate the service.<br />
- On time: Introduce using the numerical keys on the remote<br />
control the time on which you want to activate the service.<br />
Automatically, a message will be shown although the receiver<br />
is ON or in Standby.<br />
Note: If the date/ start time is prior to the current date/hour,<br />
a warning message will be shown and you have to change the<br />
date/start time.<br />
6. Auto OTA Config.:If you choose this option, the following<br />
fields of the image will appear in order to be configured (OSD<br />
73).<br />
-Starting date: Insert, using the numerical keys of the remote,<br />
the date when you want the software of the receiver to be<br />
updated.<br />
-On time: Insert, using the numerical keys of the remote,<br />
the time when you want the software of the receiver to be<br />
updated.<br />
7. Press [Exit] to leave the “Timer” menu.<br />
Note: If the receiver is in stand-by, and Low Power Consumption<br />
mode is active, the receiver will switch on 1 minute before the<br />
programmed event.<br />
PAG. 33<br />
ENGLISH