DVB-T Receiver IRD 410T - FTE Maximal
DVB-T Receiver IRD 410T - FTE Maximal
DVB-T Receiver IRD 410T - FTE Maximal

You also want an ePaper? Increase the reach of your titles
YUMPU automatically turns print PDFs into web optimized ePapers that Google loves.
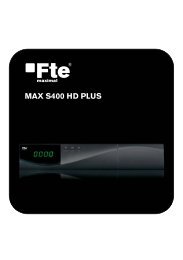
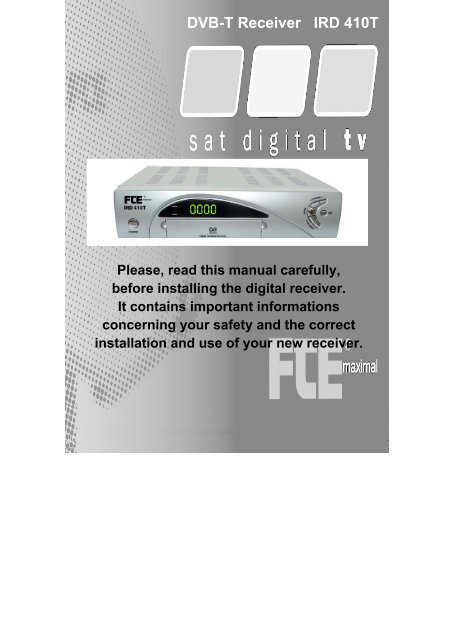
<strong>DVB</strong>-T <strong>Receiver</strong> <strong>IRD</strong> <strong>410T</strong><br />
Please, read this manual carefully,<br />
before installing the digital receiver.<br />
It contains important informations<br />
concerning your safety and the correct<br />
installation and use of your new receiver.<br />
1 Version 1.0 © <strong>FTE</strong>maximal
0<br />
Table of contents<br />
Important notes and informations of interest are labelled with this icon:<br />
Menu options in the receiver software, as well as keys and connections<br />
descriptions are written in italic.<br />
1. Safety references ………………………………………<br />
1.1 Important …………………………………………………………………………<br />
2. Accessories<br />
2.1 Everything there? ………………………………………………………………..<br />
3. Connections and controls……………………………………<br />
3.1 <strong>Receiver</strong> frontal ………………………………………………………………….<br />
3.2 <strong>Receiver</strong> back ……………………………………………………………………<br />
3.3 Remote control …………………………………………………………………..<br />
4. The installation<br />
4.1 First steps ………………………………………………………………………..<br />
4.2 Installation wizard ……………………………………………………………….<br />
5. Basic operations<br />
5.1 Selecting a program …………………………………………………………….<br />
5.2 EPG / MUTE …………………………………………………………………….<br />
5.3 Timer ...........................................................................................................<br />
5.4 Zoom / Pause / Info .....................................................................................<br />
5.5 Calendar / Audio ..........................................................................................<br />
6. Menus and OSD<br />
6.1 Main Menu ..................................................................................................<br />
6.2 TV and Radio channels ...............................................................................<br />
6.3 Installation menu .........................................................................................<br />
6.4 System menu ..............................................................................................<br />
6.5 Parental control ...........................................................................................<br />
6.6 OSD ............................................................................................................<br />
7. Troubleshooting<br />
7.1 Self help ......................................................................................................<br />
8. Technical specifications<br />
8.1 Characteristics of the receiver .....................................................................<br />
2 Version 1.0 © <strong>FTE</strong>maximal<br />
3<br />
5<br />
6<br />
7<br />
8<br />
9<br />
11<br />
15<br />
16<br />
17<br />
19<br />
20<br />
21<br />
22<br />
25<br />
28<br />
33<br />
35<br />
36<br />
38
1.1<br />
Safety references<br />
Important !<br />
Read the manual before you begin to work with the receiver.<br />
Caution: never open the device; else danger exists through<br />
electric stroke.<br />
When you work with the receiver, you have to move<br />
always the power plug (230V) from the mains voltage.<br />
Unplug the receiver from the mains in case of long periods<br />
without operating the receiver (for example, during holidays)<br />
To prevent shock hazard, do not touch the power plug with wet<br />
hands.<br />
Unplug always the receiver before cleaning the device or work<br />
on the connections.<br />
Do not install the receiver close to strong heat sources, and<br />
ensure a good aeration if you plan to install it in a small cabinet.<br />
3 Version 1.0 © <strong>FTE</strong>maximal
1.1<br />
Safety references<br />
Important !<br />
Before you start operating the receiver, make sure that the<br />
receiving antenna is properly built up, connected and aligned<br />
optimally.<br />
The correct place to install the receiver is, of course, near your<br />
TV set and any other A/V signal sources (DVD, VCR; CD;<br />
game console, etc).<br />
Choose an stable support, where you can easily lay the<br />
necessary connecting cables without stumbling-danger. The<br />
receiver should be installed near to an easily accessible outlet.<br />
Do not install the receiver in a place where it can be reached by<br />
liquid spills.<br />
Do not put any heavy objects as, for example, a TV-device over<br />
the receiver because the receiver could be damaged.<br />
Do not install the receiver:<br />
- On an unstable surface<br />
- Subject to direct sunlinght<br />
- In a high humidity environment<br />
- Outside the receiver’s temperature range (+5°...+40°)<br />
If the receiver is subjected to severe temperature changes, it<br />
can suffer from water condensation inside. Switch off the<br />
receiver in these cases for at least 2 hours before resuming<br />
operation.<br />
4 Version 1.0 © <strong>FTE</strong>maximal
2.1<br />
Accessories<br />
Manual:<br />
Remote Control:<br />
2 Batteries of 1,5V:<br />
Connecting cable for modulator:<br />
Everything there?<br />
5 Version 1.0 © <strong>FTE</strong>maximal
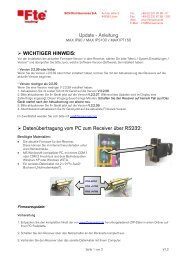
3.1<br />
Connections and controls<br />
<strong>Receiver</strong> frontal<br />
1 2 3 4 5 6<br />
1. POWER: Switch the receiver on, or enter the standby mode. To switch off the<br />
receiver you have to use the switch of the back side of this engine.<br />
2. POWER LED: Indicates that the mains voltage (90-230VAC) is available.<br />
3. SIGNAL LED: Indicates a sufficient signal level.<br />
4. DISPLAY: 4 Digits to display the program numbers.<br />
5. IR-SENSOR: Reception sensor for the IR remote control signals.<br />
6. BUTTONS: These buttons allow to control the main functions of the receiver, and<br />
provide the same functionality as the remote control ones.<br />
The <strong>IRD</strong> 420T/SM receiver do not have any card or module behind<br />
the front lid, so please do not attempt to open it. It could damage<br />
the lid.<br />
6 Version 1.0 © <strong>FTE</strong>maximal
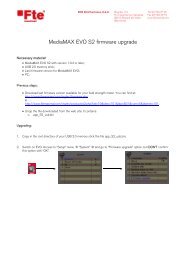
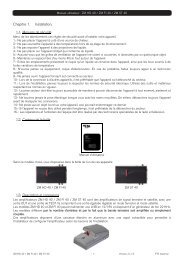
3.2<br />
TERR.<br />
Connections and controls<br />
Home- or indoor antenna VCR<br />
1 2 3 4 5 6 7<br />
8 9 10 11 12<br />
PC<br />
1. RS-232: Serial Port to upgrade the software.<br />
2. ANT IN: Input of modulators.<br />
3. TO TV: Modulator output for TV set.<br />
4. COAXIAL S/PDIF: Coaxial output for digital audio (AC3).<br />
5. VIDEO: Output for monitor.<br />
6. AC IN: Mains input cable.<br />
7. POWER ON/OFF: Allow to completely switch off the receiver.<br />
8. ANTENNA IN: Terr. input of the digital tuner.<br />
9. LOOP OUT: Terr. output for other devices.<br />
10. TV SCART: SCART output for TV set.<br />
11. VCR SCART: Output SCART for the connection of a video recorder.<br />
12. AUDIO: Output for stereo set.<br />
TV<br />
<strong>Receiver</strong> back<br />
Home Cinema<br />
HiFi<br />
7 Version 1.0 © <strong>FTE</strong>maximal
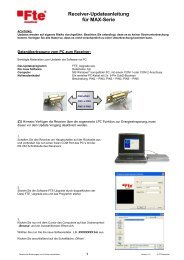
3.3<br />
Connections and controls<br />
You can control the following functions with the remote control.<br />
1. POWER:<br />
Switches the receiver on or enters stand by<br />
mode.<br />
1<br />
2. MUTE:<br />
The Audio will be muted.<br />
3. INFO:<br />
Shows information about the current reception.<br />
In the EPG: Shows detailed information.<br />
4. TV/RADIO:<br />
Changes between TV or Radio channels.<br />
5. FAV:<br />
Open the favourite channel list.<br />
18<br />
6. CH:<br />
Changes the program, and On / Off inside a<br />
menu.<br />
9<br />
7. VOL:<br />
Volume level.<br />
8. PAUSE:<br />
Freezes the image.<br />
9. ZOOM:<br />
Picture zooming-function.<br />
10. PGUP & PGDN:<br />
Move the cursor in a page by page way inside the<br />
menus. Switches the picture ratio between 4:3,<br />
16:9 and AUTO.<br />
11. OK :<br />
Confirmation of the menu items.<br />
Opens the program listing.<br />
12. AUDIO:<br />
Allows the selection of the AUDIO edition.<br />
13. EXIT:<br />
Exits menus.<br />
14. MENU:<br />
Starts the main menu.<br />
15. Number block:<br />
For direct input of values.<br />
16. RECALL:<br />
Goes to the previous program.<br />
In the EPG: Programming event for timers.<br />
17. EPG:<br />
Shows the EPG program information.<br />
18. SAT:<br />
-<br />
13<br />
14<br />
5<br />
16<br />
15<br />
Remote control<br />
Backside: Battery holder<br />
8 Version 1.0 © <strong>FTE</strong>maximal<br />
6<br />
7 7<br />
6<br />
10<br />
17<br />
8<br />
2<br />
11<br />
12<br />
10<br />
4<br />
3
4.1<br />
The following steps assume, that ...<br />
... the receiver is properly set up.<br />
Important:<br />
The installation<br />
Unplug the receiver if you wish to carry out connection tasks.<br />
Connection ...<br />
... for connecting your receiver to the antenna you need a long coaxial cable suitable for<br />
digital reception (for example, <strong>FTE</strong> K 290). If the F connectors are not mounted into the<br />
connecting cables yet, please proceed to mount the connector as follows:<br />
Please connect the F connector from antenna, to connection 1 of the back side of the<br />
receiver. Install the small connecting cable between the connectors 10 and 2 .<br />
Indoor antenna will be supported by <strong>IRD</strong> 420T/SM on connector 3.<br />
To use 5V , you need a DC injector. It will be placed between connector 1 and the F<br />
connector of the coaxial cable.<br />
Connecting television receiver and video tape recorder<br />
You will achieve an optimal transmission quality if you connect the television receiver and<br />
the video tape recorder with an Scart-cable using the corresponding socket of the<br />
receiver.<br />
a) Use a scart cable<br />
A single scart-cable is enough for the connection to the TV set.<br />
First steps<br />
b) About the antenna cable<br />
Here you can also combine the terrestrial receiver with your TV set or video tape recorder.<br />
However, the transmission quality is a little poorer.<br />
9 Version 1.0 © <strong>FTE</strong>maximal
4.1<br />
The installation<br />
c) RCA connectors<br />
The video and audio signals that you have with the scart-cable are available again<br />
through this connector. It will be interesting to connect an additional monitor or stereo set.<br />
You combine the 5 RCA-video connector with the corresponding input at your monitor<br />
and the 13 RCA-audio connector with the input at your Stereo set.<br />
Home Cinema System ...<br />
... like Dolby Digital 5.1 system can be connected at the connections 6 and 7 .<br />
Connection to the 230V mains<br />
The power cord is built into the receiver. Be careful when you work with the power cord<br />
and pay attention to the following guidelines:<br />
... never put objects over the power cord.<br />
... never use the power cord over sharp objects.<br />
... be sure that the power outlet is easily reachable, in order to be able to unplug the<br />
device in case of danger.<br />
Never pull at the power cord !<br />
… if you plan to unplug the cord, pull directly the plug, not the cord.<br />
… be sure the power plug is securely and firmly connected.<br />
… do not use wobbly plug adapters to avoid fire risks.<br />
First steps<br />
10 Version 1.0 © <strong>FTE</strong>maximal
4.2<br />
The installation<br />
The receiver includes a setup wizard that helps you to configure the different parameters<br />
of the receiver.<br />
The first time the receiver is turned on (using the power switch in the receiver’s back<br />
panel), the following menu will be displayed:<br />
English Select your Language<br />
Deutsch Wählen Sie Ihre Sprache aus<br />
Francais Selectionnez votre Langue<br />
Spanish Seleccione su idioma<br />
Português Seleccione o seu idioma<br />
Italiano Selezioneare lingua<br />
Turkish Bir dil Seciniz<br />
Arab<br />
Select your Language<br />
Installation wizard<br />
With the CH buttons you can choose the desired language of the screen menu<br />
and confirm your selection with the OK button on the remote control.<br />
Once you select a language/country, the receiver<br />
automatically sets the typical settings for your country.<br />
11 Version 1.0 © <strong>FTE</strong>maximal
4.2<br />
Installation wizard: Audio language<br />
With the CH buttons you can choose your<br />
favourite audio language for TV and Radio channels.<br />
With the VOL buttons you can change between<br />
BACK and NEXT.<br />
Choose NEXT and press OK to go to the<br />
next menu.<br />
Installation wizard: Time zone<br />
Time zone<br />
The receiver needs to know the precise time for the<br />
EPG (Electronic program guide).<br />
The delay displayed is referenced to<br />
the Greenwich time (GMT).<br />
For Spain:<br />
Summer time = GMT + 02<br />
Winter time = GMT + 01<br />
The installation<br />
Installation wizard<br />
Audio Language<br />
01 English<br />
02 Deutsch<br />
03 Francais<br />
04 Spanish<br />
05 Português<br />
06 Italiano<br />
08 Turkish<br />
09 Arab<br />
BACK NEXT<br />
Time zone<br />
01 GMT +00<br />
02 GMT +01<br />
03 GMT +02<br />
04 GMT +03<br />
05 GMT +04<br />
06 GMT +05<br />
07 GMT +06<br />
08 GMT +07<br />
BACK NEXT<br />
With the CH buttons you can choose your time zone. Once selected, choose<br />
NEXT and press OK.<br />
If you plan to use the EPG (Electronic Program Guide), you will have to<br />
keep the time zone information up to date, specially between winter and<br />
summer time periods.<br />
12 Version 1.0 © <strong>FTE</strong>maximal
4.2<br />
The installation<br />
Installation wizard: Channel Table<br />
Select here in which area you will use the receiver.<br />
With the CH buttons you can choose your<br />
Area/zone. When you select it, then press the OK<br />
button.<br />
Installation wizard: Search or Load<br />
There are three possibilities to complete the installation<br />
of the receiver:<br />
1. Load Saved Program<br />
Select this menu item to load the programs you<br />
previously saved. It it is the first time you use the<br />
receiver, there will be no programs saved.<br />
If you load a list with saved programs, select with the CH buttons the<br />
Load Saved Program menu and press OK on the remote control.<br />
A screen announcement will appear<br />
announcing that the program list is being<br />
loaded.<br />
The receiver setup is now ready.<br />
Installation wizard<br />
Channel Table<br />
01 Europa<br />
02 China<br />
03 USA<br />
04 Canada<br />
05 Japan<br />
06 Australia<br />
Back Next<br />
User Search or Load<br />
Load Saved Program<br />
Search All<br />
Cancel<br />
BACK NEXT<br />
Loading Data please wait.....<br />
13 Version 1.0 © <strong>FTE</strong>maximal
4.2<br />
The installation<br />
2. Search All<br />
With Search All you can scan for channels.<br />
It is necessary to do the first time you use the <strong>IRD</strong> 420T/SM, because the frequency<br />
reception varies in function of the zone you are in.<br />
When you do an scan, you can select if the receiver<br />
have to save only the free programs (FTA) or all<br />
the programs.<br />
The receiver searches now for channels.<br />
Search: TV 0003<br />
Here the receiver indicates that 3<br />
TV-programs were found.<br />
Search: Progress, upper display bar<br />
Here you are informed about the<br />
progress of the search.<br />
Search: Quality, middle display bar<br />
Here you can see the signal-quality.<br />
Search: Strength, under display bar<br />
Here you can see the thickness of the<br />
signal.<br />
After the process of search is finished, press any button.<br />
3. Cancel<br />
With this function you can go directly to the main menu.<br />
Installation wizard<br />
Only FTA channels search?<br />
Yes No<br />
Searching New Channels<br />
TV 0003 Radio 0002<br />
Frequency: 212500, Total: 01/01, Auto, Auto, 7M<br />
Progress 54%<br />
Quality 92%<br />
Strength 65%<br />
14 Version 1.0 © <strong>FTE</strong>maximal
5.1<br />
Choose a channel<br />
To select a channel you have 3 possibilities:<br />
1. Pressing the OK button you will open the channel list.<br />
Now you can choose with the CH buttons<br />
the program you want to view. Few seconds later, the<br />
channel will be displayed automatically.<br />
With the PGUP / PGDN buttons you can go page by<br />
page through the channels list.<br />
If you want to leave the program list, press the OK<br />
button and then EXIT.<br />
2. If you know the number of the channel you are looking<br />
for, you can enter the program number directly with the<br />
number keys in the remote control.<br />
3. You can also zap with the CH buttons the program numbers up and down,<br />
until you find the channel you wish.<br />
RECALL<br />
With the remote control RECALL button you have the possibility to go back to the<br />
previous program. Therefore, you can change between two channels alternately (for<br />
example, during an advertising interruption).<br />
Favourite program lists<br />
Basic operations<br />
Selecting a program<br />
0001 Das Erste<br />
0002 ZDF<br />
All TV Channel<br />
Total: 452<br />
Pressing the FAV button you will access the favourite program lists.<br />
You can select among eight different lists by pressing FAV+ and FAV- buttons.<br />
If you want that a program appears into an specific list, it is necessary to add it to the<br />
desired favourite list.<br />
F<br />
F<br />
F<br />
0003 ProSieben F<br />
0004 RTL F<br />
0005 RTL2 F<br />
0006 SAT.1 F<br />
0007 Super RTL F<br />
0008 NTV F<br />
0009 Kabel 1 F<br />
0010 Viva F<br />
If you want to change between TV- and Radio programs, it is necessary<br />
to exit all menus . Press then the TV/Radio button to switch from TV to<br />
Radio or vice versa.<br />
15 Version 1.0 © <strong>FTE</strong>maximal
5.2<br />
Basic operations<br />
EPG<br />
You can access the EPG menu (Electronic Program Guide) if you are outside all other<br />
menus and press the EPG button on the remote control.<br />
TV program<br />
EPG List<br />
02/12 Tue 14:19<br />
13:55 – 14:57<br />
Arabella<br />
NO. CH Name<br />
13:00 --02/12 Di-- 14:30<br />
0002 ZDF F ◄<br />
►<br />
0003 ProSieben F ◄ SAM Arabella ►<br />
0004 RTL F ◄<br />
►<br />
0005 RTL2 F ◄<br />
►<br />
0006 SAT.1 F ◄<br />
►<br />
0007 Viva F ◄ No EPG<br />
►<br />
Help Set Timer View EPG<br />
EPG / MUTE<br />
If you want to change the programs, use the CH buttons.<br />
With the VOL buttons you can select among the individual programs of a channel.<br />
If you press the Info button on the remote control, you get access to detailed information<br />
on the respective programs.<br />
EPG information is only available when the broadcaster sends it.<br />
If you switch off the receiver with the Power button putting it in<br />
Stand By Mode, the EPG information remains stored.<br />
The program information is thus available much faster.<br />
MUTE (Audio muting)<br />
Pressing the MUTE button on the remote control you will switch the audio output ON and<br />
OFF.<br />
CAUTION: Do not employ the Mute button during a recording, because all video out<br />
connections are affected by the OSD controls.<br />
16 Version 1.0 © <strong>FTE</strong>maximal
5.3<br />
Timer<br />
You have 2 possibilities to make the recording timer active. The better one is inside the<br />
EPG menu: start it and choose a program. Then, press the RECALL button and it will<br />
appear the following window.<br />
ProgName CANAL CANARIAS<br />
Start Date 01/12 (DD/MM)<br />
Start Time 17:00 (HH/MM)<br />
Stop Date 01/12 (DD/MM)<br />
Stop Time 17:59 (HH/MM)<br />
Repeat Style 1x<br />
With the VOL buttons you can select, for example, the Repeat Style.<br />
Inside this submenu, you have these options:<br />
1x = Only one time<br />
D = Every day<br />
1W = One week<br />
1-5 = From Monday to Friday<br />
6-7 = From Saturday to Sunday<br />
Choose the option you want and then press the OK button: the event recording will be<br />
stored.<br />
If you prefer to configure the timer manually or to check the stored events, you can do it as<br />
follows:<br />
Go to the Timer menu by pressing the MENU button and choose the System option with<br />
the CH buttons in the Main menu.<br />
Then choose the Timer menu and the following menu will appear:<br />
01/12 Mo 10:57 Timer<br />
Channel Date Start Date Stop Rpt<br />
ProSieben 01/12 17:00 01/12 17:59 1 x<br />
Add a timer<br />
Basic operations<br />
Add Edit<br />
Delete<br />
Timer<br />
17 Version 1.0 © <strong>FTE</strong>maximal
5.3<br />
Basic operations<br />
With the VOL buttons you can select Add, Edit and Delete.<br />
Timer: Add<br />
Select this option with the VOL buttons and press OK.<br />
Source TV<br />
Channel ProSieben<br />
Start Date 01/12 (DD/MM)<br />
Start Time 17:00 (HH/MM)<br />
Stop Date 01/12 (DD/MM)<br />
Stop Time 17:59 (HH/MM)<br />
Rpt 1x<br />
Only one Time<br />
Move up and down into the menu with the CH buttons, and change the values<br />
of the options with VOL ones or with the keypad 0-9 buttons.<br />
To save your selections, press OK. If you want to break off, press EXIT.<br />
Source: Select this option if you want a TV or Radio channel.<br />
Channel: With the CH buttons choose a program. Confirm your<br />
selection by pressing the OK button.<br />
Start Date: Write the Start Date with 0-9 buttons.<br />
Start Time: Write the Start Time with 0-9 buttons.<br />
Stop Date: Write the Stop Date with 0-9 buttons.<br />
Stop Time: Write the Stop Time with 0-9 buttons.<br />
Timer<br />
Timer: Edit<br />
Select this option if you want to modify an existing event. Do it with the CH<br />
buttons and then press OK. The menu is the same that Add.<br />
Timer: Delete<br />
Select this option if you want to delete an existing event. Do it with the CH<br />
buttons. The event will be deleted by pressing the OK button.<br />
18 Version 1.0 © <strong>FTE</strong>maximal
5.4<br />
Basic operations<br />
ZOOM<br />
Press the Zoom button on the remote control to get a picture-zooming function.<br />
When you press the Zoom button, a magnifier icon will appear on the centre of the<br />
screen.<br />
You can move the magnifier position over the screen using the CH and<br />
VOL buttons.<br />
The first zooming-stage (2x) is activated by pressing the OK button. One further zooming<br />
stage (4x) can be achieved by pressing a second time the OK button. If you press again<br />
the OK button the picture on the screen will be brought back to the original size.<br />
Press the EXIT button to leave the picture zooming function.<br />
PAUSE<br />
Press the Pause button on the remote control to freeze the image on the screen.<br />
Pressing again will bring back the normal image status.<br />
You can combine the Pause and ZOOM functions.<br />
INFO<br />
The info menu displays relevant information about the currently selected program.<br />
Press the INFO button and you will see the following window:<br />
Here you can see all the information about the<br />
program you watch (frequency, signal quality,<br />
strenght, etc).<br />
Zoom / Pause / Info<br />
TV PRO Sieben<br />
MUX 44<br />
Frequency 658000<br />
Mode 8K<br />
Guard 1/8<br />
IQInvert Normal<br />
VID PID 385 AUD PID 386<br />
PCR PID 385 TEL PID 387<br />
Quality 93%<br />
Strength 73%<br />
19 Version 1.0 © <strong>FTE</strong>maximal
5.5<br />
Calendar<br />
Your new receiver makes available an "eternal" calendar to you.<br />
To open it, press the MENU button and choose System with the CH buttons in<br />
the Main menu.<br />
Choose now the Calendar menu item and press again the OK button.<br />
It appears the following window:<br />
With the CH buttons you<br />
can change the year and with the<br />
VOL buttons the month.<br />
Basic operations<br />
Audio menu<br />
Press the AUDIO button on the remote control to change the audio mode for a program.<br />
The following window will appear:<br />
Audio menu: Audio<br />
If the program provides different languages you can change these with the VOL<br />
buttons.<br />
Audio menu: Mode<br />
You can choose the audio mode available.<br />
Month: Dezember Year: 2003<br />
Audio menu: When stereo<br />
Into this option you can select during a Stereo-program if you want just the left or right<br />
channel or the full stereo.<br />
Audio menu: When Dual<br />
Select here whether to hear left or right channel during a dual program.<br />
Mon<br />
01<br />
08<br />
15<br />
22<br />
Calendar / Audio<br />
Tue Wen Thu Fri Sat Sun<br />
02 03 04 05 06 07<br />
09 10 11 12 13 14<br />
16 17 18 19 20 21<br />
23 24 25 26 27 28<br />
29 30 31<br />
20 Version 1.0 © <strong>FTE</strong>maximal
6.1<br />
Menus and OSD<br />
To display the main menu press the MENU button on the remote control.<br />
The menu system of the receiver is organized in a tree fashion. With the Main menu you<br />
can reach the following items:<br />
TV Channels<br />
This menu allows you to access, edit, move,<br />
delete or lock a program. It also lets you add<br />
favourite channels to one of the favourite channels<br />
lists.<br />
Radio Channel<br />
This menu has the same functions as TV<br />
Channels, but is only for Radio programs.<br />
Installation Menu<br />
Here you install and search the programs.<br />
System:<br />
The system menu has the following items:<br />
System Setting<br />
RF-System, TV-Screen format, TV-System, Time zone.<br />
Timer<br />
Record timer configuration.<br />
Calendar<br />
Display an eternal calendar.<br />
Factory Default<br />
System reset with the factory default values.<br />
User Save & Load<br />
Load and store the user settings and program list.<br />
About <strong>DVB</strong><br />
Information about the currently loaded software version.<br />
Parental Control<br />
Password protection for menus and programs.<br />
OSD<br />
Changes colours and language in the menus.<br />
Main Menu<br />
TV Channels<br />
Main menu<br />
Radio Channels<br />
Installation Menu<br />
System<br />
Parental Control<br />
OSD<br />
Key: ▲▼◄► EXIT OK<br />
How to navigate through the menus:<br />
The navigation through the menus is mainly done<br />
with the CH buttons for up and down,<br />
while selections are made with the VOL or OK<br />
buttons.<br />
To leave a menu press the EXIT button.<br />
21 Version 1.0 © <strong>FTE</strong>maximal
6.2<br />
Menus and OSD<br />
If you wish to edit the stored TV or Radio programs, select TV Channels option in the main<br />
menu. The TV channels and Radio channels menu entries in the main menu are identical.<br />
Choose, with the VOL buttons, between these functions:<br />
Select<br />
With the CH buttons<br />
you select the program, and the<br />
NO. Name Status<br />
receiver automatically switches to it. 0001 Das Erste F<br />
0002 ZDF F TV Channel<br />
FAV 1<br />
0003 ProSieben F<br />
With this function selected, you can 0004 RTL F<br />
add or remove programs from one of 0005 RTL2 F<br />
the favourite programs list.<br />
0006 SAT.1 F<br />
0007 Super RTL F<br />
With the FAV+ and FAV- buttons on Select a Channel to play<br />
your remote control you can change<br />
from the favourite list 1 up to the 8. All<br />
Key ▲▼◄►EXIT OK PGUP PGDN<br />
programs included in the selected favourite list are marked with a heart symbol ().<br />
In order to add or remove programs from the list, highlight the program using the<br />
CH buttons and press the OK button.<br />
Lock<br />
In order to block a program, choose the program you wish to lock with the CH<br />
buttons and press OK.<br />
The locked programs include a lock symbol () .<br />
Caution:<br />
The locking becomes only active if the Parental Control was previously activated in the<br />
Main Menu.<br />
Delete<br />
In order to delete a program, choose the program with the CH buttons and<br />
press OK.<br />
The program to be deleted will include a cross symbol () .<br />
TV and Radio channels<br />
TV Channel Total TV channel: 1427<br />
Select FAV1 Lock Delete Move Modify Rename Sort<br />
You can mark several programs to be deleted. They will be deleted as soon as you leave<br />
the TV programs menu.<br />
22 Version 1.0 © <strong>FTE</strong>maximal
6.2<br />
Move<br />
In order to move a program within the program list, choose the program to be moved with<br />
the CH buttons.<br />
Select the new location for the program in the pop up<br />
window and press the OK button.<br />
Press EXIT to cancel.<br />
Menus and OSD<br />
Modify<br />
To change the information for a program, choose it with the CH buttons and<br />
press OK.<br />
Select the parameters to be changed, and enter the<br />
new values with the number buttons of the remote<br />
control. Press OK to save the changes or EXIT to<br />
cancel.<br />
Caution:<br />
Usually no changes are necessary here.<br />
Rename<br />
In order to change the name of a program, choose it with the CH buttons and<br />
press OK.<br />
The current name of the program stands<br />
on the upper line.<br />
In the second line you can change the<br />
existing name.<br />
Choose now the individual characters with<br />
the VOL and CH buttons<br />
and press OK to write each one of them.<br />
ProSieben<br />
[ 7 ProSieben ] Move to<br />
Modify PID<br />
Video PID 0255 (0—8191)<br />
Audio PID 0256 (0—8191)<br />
PCR PID 0255 (0—8191)<br />
Tele PID 0032 (0—8191)<br />
ProSieben<br />
With the Caps Off option you can switch between under case and uppercase characters<br />
and other additional characters.<br />
With the Extend option you also get additional characters. A total of 15 can be employed.<br />
A<br />
I<br />
Q<br />
Y<br />
B<br />
J<br />
R<br />
Z<br />
C<br />
K<br />
S<br />
D<br />
L<br />
T<br />
-<br />
E<br />
M<br />
U<br />
#<br />
020<br />
Extend<br />
23 Version 1.0 © <strong>FTE</strong>maximal<br />
F<br />
N<br />
V<br />
&<br />
G<br />
O<br />
W<br />
2 3 4 5 6 7 8<br />
TV and Radio channels<br />
0<br />
H<br />
P<br />
X<br />
1<br />
9<br />
Caps Off<br />
Back<br />
OK<br />
Chancel
6.2<br />
Menus and OSD<br />
Sort<br />
If you want to sort your programs accordind to various<br />
criteria, select the wished sorting method with the<br />
CH buttons and press OK.<br />
The program list will be newly built up.<br />
Caution:<br />
You can not undo the sorting, except if you load the pre-installed<br />
programs.<br />
You can sort your programs in several ways.<br />
Sort Menu<br />
TV and Radio channels<br />
Sort by FTA<br />
Sort by Multiplex<br />
Sort by Favourite<br />
Sort by Alphabet<br />
24 Version 1.0 © <strong>FTE</strong>maximal
6.3<br />
To open the Installation menu (Multiplex List) press the MENU button and choose the<br />
Installation menu entry in the Main menu with the CH buttons.<br />
Press now OK and the Multiplex List will appear.<br />
Inside the Multiplex List you can find the information for signals stored. The receiver<br />
needs it to find programs.<br />
Search / Search All<br />
With these options you can search<br />
for programs. The difference is that<br />
with Search you scan only one<br />
frequency and with Search All you<br />
scan the complete list.<br />
If you want to start a scan, select<br />
the option you prefer (Search or<br />
Search All) with the CH<br />
buttons and press OK.<br />
Select now if you want that the receiver deletes all the existing programs before searching<br />
into the chosen transponder or not.<br />
Use the VOL buttons to do it and then press OK.<br />
Go out with the EXIT button.<br />
Menus and OSD<br />
Choose now if you want that the receiver store<br />
free programs (FTA) or all founded programs.<br />
The receiver searches now for programs (Go to page 15 of this manual if you want more<br />
information about this topic).<br />
After the searching is finished, press any button.<br />
Search Edit Signal PID SearchAll<br />
MUX Frequency Mode Guard Bandwidth<br />
5 177500 Auto Auto 7M<br />
6 184500 Auto Auto 7M<br />
7 191500 Auto Auto 7M<br />
8 198500 Auto Auto 7M<br />
9 205500 Auto Auto 7M<br />
10 212500 Auto Auto 7M<br />
Search one multiplex channels<br />
Multiplex List<br />
Key: ▲ ▼ ◄ ► EXIT OK PGUP PGDN<br />
Installation Menu<br />
Delete the existing programs<br />
before searching?<br />
Yes No<br />
Only FTA channels search?<br />
Yes No<br />
25 Version 1.0 © <strong>FTE</strong>maximal
6.3<br />
Edit<br />
With the Edit function you can change the values of a transponder. Choose this option<br />
with the VOL buttons and open this menu with OK.<br />
The following submenu appears.<br />
Insert now all necessary information with the<br />
remote control.<br />
If you are ready, press the OK button and the new<br />
values will be saved.<br />
Go out by pressing EXIT.<br />
Menus and OSD<br />
Signal<br />
With the Signal option you can see the level of the channels.<br />
Edit Multiplex<br />
MUX 21<br />
Frequency 17750<br />
Mode Auto<br />
Guard Auto<br />
B/W 7M<br />
Multiplex List<br />
Search Edit Signal PID SearchAll<br />
MUX Frequency Mode Guard Bandwidth<br />
5 177500 Auto Auto 7M<br />
6 184500 Auto Auto 7M<br />
7 191500 Auto Auto 7M<br />
8 198500 Auto Auto 7M<br />
9 205500 Auto Auto 7M<br />
10 212500 Auto Auto 7M<br />
Signal 82%<br />
Key: ▲ ▼ ◄ ► EXIT OK PGUP PGDN<br />
Installation menu<br />
Choose a MUX with the CH buttons and press OK. If you want to check another<br />
one, just choose it and press the OK button again.<br />
26 Version 1.0 © <strong>FTE</strong>maximal
6.3<br />
Menus and OSD<br />
PID<br />
With the PID option you can add a program.<br />
Do it if you have not found the wished program through the Search menu (for example, if<br />
the signal is very weak).<br />
Choose the PID option with the VOL buttons. Then, select the MUX you want to edit<br />
and press OK. The following submenu appears:<br />
Insert all necessary information with the<br />
remote control. If you are ready, press OK<br />
and the new values will be saved.<br />
The new data entry will be added at the end of<br />
the program list and its name will be TV CH.<br />
Add PID<br />
To change it use the Rename option inside the TV Channel menu.<br />
Installation menu<br />
Video PID 8191 (0—8191)<br />
Audio PID 8191 (0—8191)<br />
PCR PID 8191 (0—8191)<br />
Tele PID 8191 (0—8191)<br />
27 Version 1.0 © <strong>FTE</strong>maximal
6.4<br />
To open the System menu press the MENU button and choose the option (inside the<br />
Main menu) with the CH buttons.<br />
Then, press OK.<br />
Go back with the EXIT button.<br />
Menus and OSD<br />
The following fields were described<br />
already at the previous pages of this manual:<br />
Timer menu on page 18 and Calendars<br />
on page 21.<br />
When you have chosen the System Setting<br />
option the following submenu appears:<br />
TV System<br />
Choose which TV system supports your<br />
television.<br />
Select NTSC, PAL or Auto.<br />
In United Kingdom usually is PAL.<br />
Change values with the VOL buttons.<br />
System Menu<br />
System Setting<br />
TV Screen Format<br />
Choose which TV Format have your TV set.<br />
Select 4:3, 16:9 or Auto.<br />
Change values with the VOL buttons.<br />
You can change the format at any time by pressing the PGDW button.<br />
RF System<br />
If you have combined your TV or video device with the receiver, you must indicate which<br />
TV system use them.<br />
Select M, B/G, I or D/K .<br />
In United Kingdom usually is PAL B/G.<br />
Change values with the VOL buttons.<br />
Timer<br />
Calendar<br />
Factory Default<br />
User Save&Load<br />
About <strong>DVB</strong><br />
Key: ▲ ▼ ◄ ► EXIT OK<br />
System Setting<br />
TV System ►AUTO ◄<br />
TV Screen Format ►AUTO ◄<br />
RF Channel 21 (21-69)<br />
RF System Pal B/G<br />
Time Zone GMT+ 02<br />
Remote Control Switch Position 2<br />
Scart Output FBAS<br />
Key: ▲▼◄►EXIT OK<br />
System menu<br />
28 Version 1.0 © <strong>FTE</strong>maximal
6.4<br />
Menus and OSD<br />
RF Channel<br />
Choose which initial channel will occupy the built-in modulator.<br />
This is only important if you want to connect the receptor to an existing TV network.<br />
Select one channel from 21 to 69.<br />
Change the data with VOL buttons or through the numeric ones of the remote<br />
control.<br />
Time Zone<br />
The receiver have to know the precise time for the EPG (Electronic Program Guide).<br />
That’s why you have to specify the time zone where you are in.<br />
For example, in Spain is valid:<br />
Summer time = GMT + 02<br />
Winter time = GMT + 01<br />
Please consider it and change the winter and summer time if it is necessary. Do it with the<br />
VOL buttons.<br />
Remote Control Switch<br />
In order to avoid interferences between<br />
remote controls, you have the possibility<br />
to change the code of yours.<br />
You can do it with the VOL buttons.<br />
Remind that you will have to change the<br />
position of the switch in the battery holder<br />
of the remote control too.<br />
If you have changed the code of the remote control,<br />
a security message will appear in the menu.<br />
Switch in remote control<br />
Scart Output<br />
If you want to have an optimal quality image, use the RGB option, because the colors are<br />
transmitted separately to the TV, the opposite to the CVBS option.<br />
Use the VOL buttons to select RGB or CVBS.<br />
Press OK when you want to save the changes.<br />
System menu<br />
29 Version 1.0 © <strong>FTE</strong>maximal
6.4<br />
Menus and OSD<br />
The Factory default option (inside the System menu) offers the possibility to erase all<br />
the changes you have made from the original configuration of the receiver.<br />
All dates are extinguished permanently !<br />
To make one factory reset press the MENU button and choose the System menu option<br />
with the CH buttons.<br />
Choose now Factory default and press OK.<br />
The following message will appear.<br />
System menu<br />
FACTORY DEFAULT<br />
If you select , all channel data<br />
And settings will be lost.<br />
Do you really want Factory Default?<br />
Yes No<br />
If you don’t want to erase all the changes you have made, you still have the possibility to<br />
go back choosing the option NO or pressing the EXIT button.<br />
If you really want a factory reset, press the OK button when you will be over YES.<br />
If after the Factory Default is done there is no configuration changes,<br />
unplug the receiver and repeat the same steps.<br />
30 Version 1.0 © <strong>FTE</strong>maximal
6.4<br />
Menus and OSD<br />
To save the programs list, press the MENU button and choose the System menu option<br />
with the CH buttons. Then press OK.<br />
Choose User Save&Load and press the OK button again.<br />
User Save&Load<br />
Save Prog & Config<br />
Load Prog & Config<br />
User Guide<br />
Key: ▲ ▼ ◄ ► EXIT OK<br />
The menu item User Save&Load in the System menu is very important, because here is<br />
where your data is saved.<br />
Save Prog & Config<br />
When you have personalized the configuration of your receptor, you have the possibility<br />
to memorize the data of your channels. Select the option you want inside the menu item<br />
and press OK.<br />
It will appear a security message and, when you answer YES, all the memorized channels<br />
will be rewrited with the new values.<br />
Load Prog & Config<br />
If you want to rebuild the memorized channels, select this option and press OK.<br />
It will appear a security message. When you answer YES, it will load the memorized<br />
channels list.<br />
User Guide<br />
With the assistant you have the possibility to configure the receptor as at the startup,<br />
except for the modification of the program list.<br />
Select the option you prefer inside the menu and press OK.<br />
When you arrive here, follow the steps described on page 12.<br />
System menu<br />
31 Version 1.0 © <strong>FTE</strong>maximal
6.4<br />
If you want to know which is the software that is installed in your receiver, go to System<br />
menu – About <strong>DVB</strong>.<br />
To open the System menu press the<br />
MENU button and choose, inside the Main menu,<br />
the System menu option with the CH<br />
buttons.<br />
Then, press OK.<br />
Menus and OSD<br />
Select now About <strong>DVB</strong> with the CH<br />
buttons and press OK again.<br />
The current version of software 5.0.3, from April 27th 2004.<br />
To leave the menu press the EXIT button.<br />
System Info<br />
System Menu<br />
Timer<br />
System menu<br />
System Setting<br />
Calendar<br />
Factory Default<br />
User Save&Load<br />
About <strong>DVB</strong><br />
Key: ▲ ▼ ◄ ► EXIT OK<br />
Company <strong>FTE</strong> maximal<br />
Model <strong>IRD</strong> 420T/SM<br />
Software 5.0.3<br />
Software Last update 27 Apr. 2004<br />
Hardware Tst16b70TSam9251Mv2170B<br />
Loader 1.1.0<br />
www.<strong>FTE</strong>maximal.com<br />
32 Version 1.0 © <strong>FTE</strong>maximal
6.5<br />
Menus and OSD<br />
If you want to lock the access to some channels of the receiver, activate the password<br />
protection in the Parental Control menu.<br />
To open the menu Parental Control press the MENU button and choose, inside the<br />
Main menu, the Parental Control option with the CH buttons. Then press OK.<br />
If it is the first time you open this menu, it will<br />
look like this one:<br />
Password Lock<br />
It activates or deactivates the complete<br />
password protection.<br />
Change the value to with the VOL<br />
buttons.<br />
At this point all fields will be visible and you will<br />
be able to activate them.<br />
Edit Channel Lock<br />
Turn to the password protection<br />
to lock some channels.<br />
If you want to lock a program, it must be marked<br />
into the channels list.<br />
If you want more information, please have a<br />
look to page 23 (TV and Radio Channels).<br />
Parental Control<br />
Parental control<br />
Password Lock ►Off◄<br />
Key: ▲ ▼ ◄ ► EXIT OK<br />
Parental Control<br />
Password Lock ►On◄<br />
Edit Channel Lock Off<br />
Installation Lock Off<br />
Change password Off<br />
Key: ▲ ▼ ◄ ► EXIT OK<br />
Remember that you have the possibility to change the values to or with the<br />
VOL buttons.<br />
33 Version 1.0 © <strong>FTE</strong>maximal
6.5<br />
Menus and OSD<br />
Installation Lock<br />
Turn on the password protection for the Installation menu.<br />
To do it, use the VOL buttons.<br />
Change Password<br />
When you want to change the existing password (0000), turn on the value to with<br />
the VOL buttons.<br />
Insert New Password<br />
Now that all the fields are visible for the introduction<br />
of the new password, enter 4 digits with the numeric<br />
buttons on the remote control.<br />
Confirm Password<br />
You must rewrite the password one more time in<br />
order to check that you have introduced it correctly.<br />
Parental Control<br />
Password Lock ►On◄<br />
Edit Channel Lock Off<br />
Installation Lock Off<br />
Change password On<br />
Insert new passwort -------<br />
Confirm password -------<br />
Key: ▲ ▼ ◄ ► EXIT OK<br />
Parental control<br />
The default password is 0000.<br />
If you forgot yours, use the master one (1976).<br />
34 Version 1.0 © <strong>FTE</strong>maximal
6.6<br />
If you want to change the language of the OSD display, the colour of the menu or the<br />
transparency factor of your receiver, go to the OSD Setting menu.<br />
Press the MENU button and choose, inside the Main menu, the OSD option with the<br />
CH buttons.<br />
Then, press OK.<br />
Menus and OSD<br />
OSD Setting<br />
Menu Language<br />
Menu Language<br />
Select here your favourite menu language with the VOL buttons.<br />
Audio Language<br />
Select here your favourite audio language with the VOL buttons.<br />
Menu Color<br />
Choose your favourite colour profile with the VOL buttons.<br />
Transparency<br />
Enter the level of transparency for OSD when it is superposed to the image of the screen.<br />
You can do it with the VOL buttons.<br />
Background<br />
Indicate if you want to watch a picture in the background of the screen when there are no<br />
image (for example, radio channels).<br />
You can turn On/Off this value with the VOL buttons.<br />
If you want to leave the menu, press EXIT.<br />
►English◄<br />
Audio Language English<br />
Menu Color C-01<br />
Transparency 08<br />
Background Enable<br />
Key: ▲ ▼ ◄ ► EXIT OK<br />
OSD<br />
35 Version 1.0 © <strong>FTE</strong>maximal
7.1<br />
Troubleshooting<br />
Self help<br />
In case of problems with the receiver, and before further search, check first that ...<br />
... the receiver’s set up has been carried out accordingly to the instructions of this<br />
manual and that the connections are accurate.<br />
... the satellite antenna conforms to the requirements of the installation, is well<br />
mounted and aligned.<br />
Without these two requisites, the following troubleshooting guide cannot lead to success.<br />
In the case that the problem persists, please refer to your authorized local dealer... He will<br />
help you with pleasure!<br />
The receiver’s leds do not light up, and there is a malfunction ...<br />
a) Is the power plug properly connected?<br />
Check that there is a good contact and that the plug is firmly seated in its socket.<br />
a) Is the main power switch on the receiver’s back in the position?<br />
b) Is the socket / house protection functional?<br />
Connect another device (for example, a radio) to the same socket and check it<br />
works.<br />
d) Is the power cord damaged?<br />
Pull the power plug off the socket under the greatest caution !<br />
Only a specialist may repair this damage !<br />
There is no picture, no audio, or bad quality<br />
a) Check that the combination between the receiver and the TV set and the antenna is<br />
correct. Check the connections to the TV set and to the antenna as well.<br />
b) Is the satellite antenna optimally aligned?<br />
The receiver shows, at the INFO menu, whether the signal level is weak or enough.<br />
Please, refer also to the installation guide of your satellite antenna.<br />
If problems persist, please, ask a specialist.<br />
c) How mucho strong is the <strong>DVB</strong>-T signal in your zone?<br />
It is possible that you need a bigger antenna.<br />
Ask to your dealer what antenna do you need.<br />
d) Have you pressed the MUTE button?<br />
Please, press this same button in order to restore the audio.<br />
f) Does the picture flicker or colour is gone?<br />
Please, refer to chapter System Menu>System Setting and check the values<br />
corresponding to TV System, RF System and Scart output.<br />
36 Version 1.0 © <strong>FTE</strong>maximal
7.1<br />
Troubleshooting<br />
Self help<br />
The remote control does not work or works badly, the receiver turns on randomly...<br />
a) Are there any obstacles between the remote control and your Sat-receiver?<br />
b) Have you placed the receiver too far away from you?<br />
Make sure that the distance between the receiver and its remote control does not<br />
exceed eight meters, and that the angle is not wider than 15º.<br />
c) Are the batteries exhausted?<br />
Then, replace the batteries.<br />
Battery Type: AAA UM-4 1,5 V<br />
Caution: Batteries should always be thrown away in specially designated containers,<br />
for their disposal, not in the house waste bin!<br />
d) Does the receiver operate randomly due to another device’s remote control?<br />
This is possible since all remote controls must use the same frequency range.<br />
You can change the transmission code as described in chapter System>System<br />
Setting.<br />
37 Version 1.0 © <strong>FTE</strong>maximal
8.1<br />
Technical specifications<br />
VIDEO<br />
Decoding MPEG-2 & MEPG-1 compatible<br />
Bit Rate Max 15Mbps<br />
Output NTSC/PAL<br />
Screen format 4:3 / 16:9 / Auto<br />
Resolution 720X480 @ 30fps; 720X576 @ 25fps<br />
Connectors<br />
AUDIO<br />
Scart or RCA<br />
Decoding MPEG-2/MEPG-1 layer I&II<br />
Sampling rate<br />
DEMODULATION<br />
32 / 44,1 / 48<br />
Demodulation COFDM 2k, 8k<br />
Guard 1/4, 1/8, 1/16, 1/32<br />
Input data rate<br />
INPUT SIGNAL<br />
5-31<br />
Frequency VHF-UHF<br />
Input level<br />
RF MODULATOR<br />
-78dBm -20dBm<br />
Output band UHF C21-69<br />
TV Standard PAL BG / I / DK, NTSC M<br />
Output channels<br />
DIVERS<br />
21~69(PAL), 14~83(NTSC)<br />
Memory 5000<br />
Code for remote control 3 times change able<br />
DC output 18V for indoor antenna<br />
Power supply 100~240VAC 50Hz~60Hz<br />
Consumption 10 W max.<br />
Size (B×D×H) 280×210×70mm<br />
Weight 1.3Kg<br />
Characteristics receiver<br />
38 Version 1.0 © <strong>FTE</strong>maximal