user´s manual fixturlaser xa geometry
user´s manual fixturlaser xa geometry
user´s manual fixturlaser xa geometry

Create successful ePaper yourself
Turn your PDF publications into a flip-book with our unique Google optimized e-Paper software.
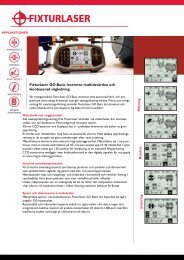
COARSE ADJUSTMENT<br />
Three reference points<br />
1. Position the laser transmitter at<br />
one end of the measurement<br />
object, on the object or on a<br />
tripod.<br />
2. Mark the measurement points<br />
and name them as they will be<br />
shown in the flatness software<br />
(A1, A2 etc).<br />
3. Position the receiver as close<br />
as possible to the laser<br />
transmitter. Adjust the height<br />
of the laser transmitter and the<br />
receiver until the laser beam<br />
hits the centre of the target.<br />
4. Move the receiver to a second<br />
point on the measurement<br />
object far from the transmitter.<br />
Adjust the angle of the laser<br />
beam, with one of the<br />
adjustment screws, until it hits<br />
the centre of the target.<br />
5. Move the receiver to a third<br />
point on the measurement<br />
object in a direction<br />
perpendicular to the other two<br />
points far from the transmitter.<br />
Adjust the angle of the laser<br />
beam, with the second<br />
adjustment screw, until it hits<br />
the centre of the target.<br />
6. Repeat the procedure until the<br />
laser beam hits the centre of<br />
the target at all three points.<br />
Check that the beam falls into<br />
the target centre at all<br />
measurement points before<br />
starting the flatness<br />
measurement.<br />
Fixturlaser XA Geometry Manual 5.7