solaris 24PC 30PC - Heatline
solaris 24PC 30PC - Heatline
solaris 24PC 30PC - Heatline

Create successful ePaper yourself
Turn your PDF publications into a flip-book with our unique Google optimized e-Paper software.
<strong>solaris</strong> <strong>24PC</strong>, <strong>30PC</strong><br />
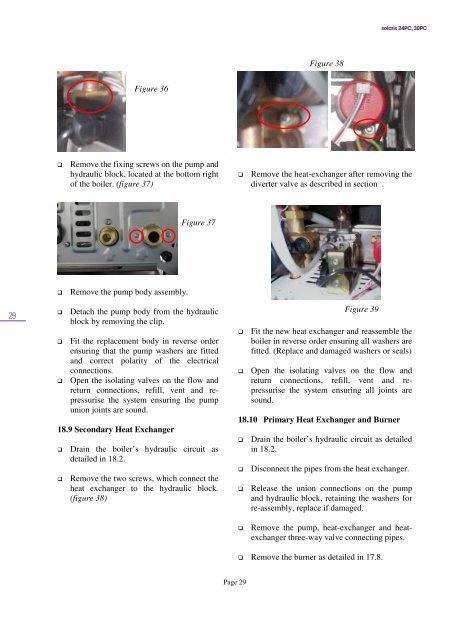
Figure 38<br />
Figure 36<br />
<br />
Remove the fixing screws on the pump and<br />
hydraulic block, located at the bottom right<br />
of the boiler. (figure 37)<br />
<br />
Remove the heat-exchanger after removing the<br />
diverter valve as described in section .<br />
Figure 37<br />
<br />
Remove the pump body assembly.<br />
29<br />
<br />
<br />
<br />
Detach the pump body from the hydraulic<br />
block by removing the clip.<br />
Fit the replacement body in reverse order<br />
ensuring that the pump washers are fitted<br />
and correct polarity of the electrical<br />
connections.<br />
Open the isolating valves on the flow and<br />
return connections, refill, vent and repressurise<br />
the system ensuring the pump<br />
union joints are sound.<br />
18.9 Secondary Heat Exchanger<br />
<br />
<br />
Drain the boiler’s hydraulic circuit as<br />
detailed in 18.2.<br />
Remove the two screws, which connect the<br />
heat exchanger to the hydraulic block.<br />
(figure 38)<br />
<br />
<br />
Fit the new heat exchanger and reassemble the<br />
boiler in reverse order ensuring all washers are<br />
fitted. (Replace and damaged washers or seals)<br />
Open the isolating valves on the flow and<br />
return connections, refill, vent and repressurise<br />
the system ensuring all joints are<br />
sound.<br />
18.10 Primary Heat Exchanger and Burner<br />
<br />
<br />
<br />
Figure 39<br />
Drain the boiler’s hydraulic circuit as detailed<br />
in 18.2.<br />
Disconnect the pipes from the heat exchanger.<br />
Release the union connections on the pump<br />
and hydraulic block, retaining the washers for<br />
re-assembly, replace if damaged.<br />
<br />
Remove the pump, heat-exchanger and heatexchanger<br />
three-way valve connecting pipes.<br />
Remove the burner as detailed in 17.8.<br />
Page 29