solaris 24PC 30PC - Heatline
solaris 24PC 30PC - Heatline
solaris 24PC 30PC - Heatline

Create successful ePaper yourself
Turn your PDF publications into a flip-book with our unique Google optimized e-Paper software.
<strong>solaris</strong> <strong>24PC</strong>, <strong>30PC</strong><br />
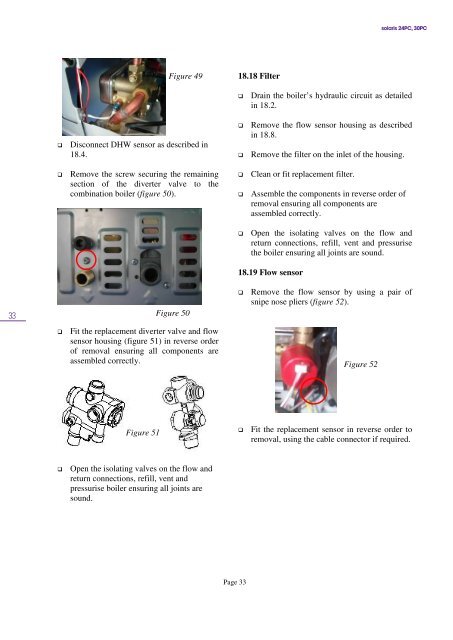
Figure 49<br />
18.18 Filter<br />
<br />
Drain the boiler’s hydraulic circuit as detailed<br />
in 18.2.<br />
<br />
Disconnect DHW sensor as described in<br />
18.4.<br />
<br />
<br />
Remove the flow sensor housing as described<br />
in 18.8.<br />
Remove the filter on the inlet of the housing.<br />
<br />
Remove the screw securing the remaining<br />
section of the diverter valve to the<br />
combination boiler (figure 50).<br />
<br />
<br />
Clean or fit replacement filter.<br />
Assemble the components in reverse order of<br />
removal ensuring all components are<br />
assembled correctly.<br />
<br />
Open the isolating valves on the flow and<br />
return connections, refill, vent and pressurise<br />
the boiler ensuring all joints are sound.<br />
18.19 Flow sensor<br />
33<br />
Figure 50<br />
<br />
Remove the flow sensor by using a pair of<br />
snipe nose pliers (figure 52).<br />
<br />
Fit the replacement diverter valve and flow<br />
sensor housing (figure 51) in reverse order<br />
of removal ensuring all components are<br />
assembled correctly.<br />
Figure 52<br />
Figure 51<br />
<br />
Fit the replacement sensor in reverse order to<br />
removal, using the cable connector if required.<br />
<br />
Open the isolating valves on the flow and<br />
return connections, refill, vent and<br />
pressurise boiler ensuring all joints are<br />
sound.<br />
Page 33