solaris 24PC 30PC - Heatline
solaris 24PC 30PC - Heatline
solaris 24PC 30PC - Heatline

Create successful ePaper yourself
Turn your PDF publications into a flip-book with our unique Google optimized e-Paper software.
<strong>solaris</strong> <strong>24PC</strong>, <strong>30PC</strong><br />
<br />
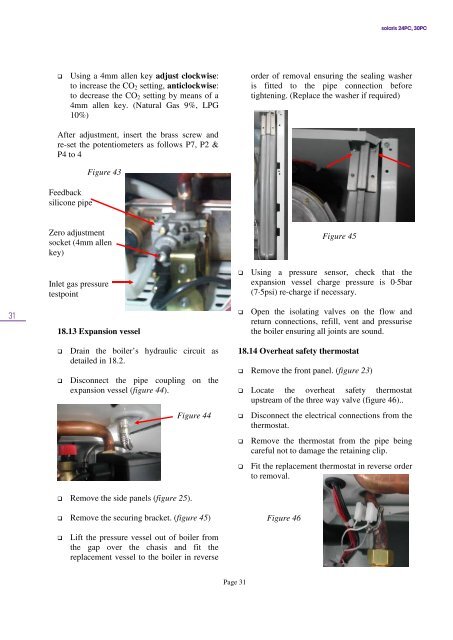
Using a 4mm allen key adjust clockwise:<br />
to increase the CO 2 setting, anticlockwise:<br />
to decrease the CO 2 setting by means of a<br />
4mm allen key. (Natural Gas 9%, LPG<br />
10%)<br />
order of removal ensuring the sealing washer<br />
is fitted to the pipe connection before<br />
tightening. (Replace the washer if required)<br />
After adjustment, insert the brass screw and<br />
re-set the potentiometers as follows P7, P2 &<br />
P4 to 4<br />
Feedback<br />
silicone pipe<br />
Figure 43<br />
Zero adjustment<br />
socket (4mm allen<br />
key)<br />
Figure 45<br />
Inlet gas pressure<br />
testpoint<br />
<br />
Using a pressure sensor, check that the<br />
expansion vessel charge pressure is 0·5bar<br />
(7·5psi) re-charge if necessary.<br />
31<br />
18.13 Expansion vessel<br />
<br />
Open the isolating valves on the flow and<br />
return connections, refill, vent and pressurise<br />
the boiler ensuring all joints are sound.<br />
<br />
<br />
Drain the boiler’s hydraulic circuit as<br />
detailed in 18.2.<br />
Disconnect the pipe coupling on the<br />
expansion vessel (figure 44).<br />
Figure 44<br />
18.14 Overheat safety thermostat<br />
Remove the front panel. (figure 23)<br />
Locate the overheat safety thermostat<br />
upstream of the three way valve (figure 46)..<br />
<br />
<br />
<br />
Disconnect the electrical connections from the<br />
thermostat.<br />
Remove the thermostat from the pipe being<br />
careful not to damage the retaining clip.<br />
Fit the replacement thermostat in reverse order<br />
to removal.<br />
Remove the side panels (figure 25).<br />
Remove the securing bracket. (figure 45)<br />
Figure 46<br />
<br />
Lift the pressure vessel out of boiler from<br />
the gap over the chasis and fit the<br />
replacement vessel to the boiler in reverse<br />
Page 31