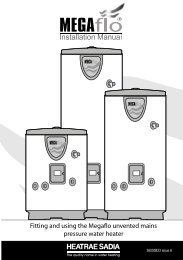
Heatrae Sadia Electromax Installation Guide - Advanced Water
Heatrae Sadia Electromax Installation Guide - Advanced Water
Heatrae Sadia Electromax Installation Guide - Advanced Water

You also want an ePaper? Increase the reach of your titles
YUMPU automatically turns print PDFs into web optimized ePapers that Google loves.
Off Peak supply connection<br />
A suitable electrical connection must be taken<br />
from the Off Peak supply to the <strong>Electromax</strong><br />
terminal block. The supply cable should<br />
be 1.5mm 2 cross sectional area 3 core<br />
HOFR sheathed cable and must be routed<br />
into the <strong>Electromax</strong> via one of the 20mm<br />
<br />
3.3, page 10). The Live (Brown) conductor<br />
should be connected to the termination<br />
marked “OFF PEAK SUPPLY L”; the Neutral<br />
(Blue) conductor should be connected to the<br />
termination marked “OFF PEAK NEUTRAL<br />
N”; the Earth (Green/Yellow) conductor<br />
should be connected to one of the terminations<br />
marked “EARTH CONNECTIONS “. See<br />
section 6.1, page 19 for MCB and isolation<br />
requirements.<br />
24 Hour supply connection (NB NOT Boiler<br />
connection)<br />
A suitable electrical connection must be taken<br />
from the 24 Hour supply to the <strong>Electromax</strong><br />
terminal block. The supply cable should<br />
be 1.5mm 2 cross sectional area 3 core<br />
HOFR sheathed cable and must be routed<br />
into the <strong>Electromax</strong> via one of the 20mm<br />
<br />
3.3, page 10). The Live (Brown) conductor<br />
should be connected to the termination<br />
marked “24 HOUR SUPPLY L”; the Neutral<br />
(Blue) conductor should be connected to the<br />
termination marked “ 24 HOUR NEUTRAL<br />
N”; the Earth (Green/Yellow) conductor should<br />
be connected to one of the terminations<br />
marked “EARTH CONNECTIONS “. See<br />
section 6.1, page 19 for MCB and isolation<br />
requirements.<br />
Pum p Fuse (3 Am p) Thermostat‘L’Fuse (3 Am p)<br />
Diagram 13 Electrical Supply Connection Block<br />
20 <strong>Installation</strong> & Servicing Instructions