You also want an ePaper? Increase the reach of your titles
YUMPU automatically turns print PDFs into web optimized ePapers that Google loves.
STANDBY<br />
HF<br />
LF<br />
SURROUND SOUND PROCESSOR <strong>RSP</strong>-<strong>1068</strong><br />
SURROUND SOUND RECEIVER RSX-1055<br />
CD<br />
TUNER<br />
TAPE<br />
2CH<br />
DOLBY<br />
PLIIx/3ST<br />
DTS<br />
NEO 6<br />
VIDEO1 VIDEO2 VIDEO3 VIDEO4<br />
VIDEO5<br />
DSP<br />
MULTI DYNAMIC<br />
INPUT RANGE MUTE ZONE REC<br />
Owner’s manual<br />
<strong>RSP</strong>-<strong>1068</strong><br />
Surround Sound Processor
Notice<br />
The COMPUTER I/O connection should be handled by authorized person<br />
only.<br />
FCC Information<br />
This equipment has been tested and found to comply with the limits for a<br />
Class B digital device, pursuant to Part 15 of the FCC Rules. These limits<br />
are designed to provide reasonable protection against harmful interference<br />
in a residential installation. This equipment generates, uses and can radiate<br />
radio frequency energy and, if not installed and used in accordance<br />
with the instruction, may cause harmful interference to radio communications.<br />
However, there is no guarantee that interference will not occur in a particular<br />
installation. If this equipment does cause harmful interference to radio<br />
or television reception, which can be determined by turning the equipment<br />
off and on, the user is encouraged to try to correct the interference by one<br />
or more of the following measures:<br />
• Reorient or relocate the receiving antenna.(TV, radio, etc.)<br />
• Increase the separation between the equipment and receiver<br />
• Connect the equipment to an outlet on circuit different from that to which<br />
the receiver is connected.<br />
• Consult the dealer or an experienced radio/TV technician for additional<br />
help.<br />
Caution<br />
This device complies with part 15 of the FCC Rules operation is subject to<br />
the following to conditions: (1) This device may not cause harmful interference,<br />
and (2) this device must accept any interference received, including<br />
interference that may cause undesired operation.<br />
Important Safety Instructions<br />
WARNING: There are no user serviceable parts inside. Refer all servicing<br />
to qualified service personnel.<br />
WARNING: To reduce the risk of fire or electric shock, do not expose the<br />
unit to moisture or water. Do not allow foreign objects to get into the enclosure.<br />
If the unit is exposed to moisture, or a foreign object gets into the<br />
enclosure, immediately disconnect the power cord from the wall. Take the<br />
unit to a qualified service person for inspection and necessary repairs.<br />
Read all the instructions before connecting or operating the component.<br />
Keep this manual so you can refer to these safety instructions.<br />
Heed all warnings and safety information in these instructions and on the<br />
product itself. Follow all operating instructions.<br />
Clean the enclosure only with a dry cloth or a vacuum cleaner.<br />
Do not use this unit near water.<br />
You must allow a minimum of 10 cm or 4 inches of unobstructed clearance<br />
around the unit. Do not place the unit on a bed, sofa, rug, or similar surface<br />
that could block the ventilation openings. If the unit is placed in a bookcase<br />
or cabinet, there must be ventilation of the cabinet to allow proper cooling.<br />
Keep the component away from radiators, heat registers, stoves, or any<br />
other appliance that produces heat.<br />
The unit must be connected to a power supply only of the type and voltage<br />
specified on the rear panel. (USA: 115 V/60Hz, EC: 230V/50Hz)<br />
Connect the component to the power outlet only with the supplied power<br />
supply cable or an exact equivalent. Do not modify the supplied cable. A<br />
polarized plug has two blades, with one wider than the other. A grounding<br />
plug has two blades plus a third grounding prong. These are provided<br />
for your safety. Do not defeat grounding and/or polarization safety provisions.<br />
If the supplied plug does not fit your outlet, please consult an electrician<br />
for replacement of the obsolete outlet. Do not use extension cords.<br />
The main plug of the power cordset is a disconnect device of the apparatus.<br />
In order to completely disconnect the apparatus from the supply mains,<br />
the main plug of the power cordset should be unplugged from the mains<br />
(AC) outlet. The stand-by LED indicator will not be lit up to show the power<br />
cord is unplugged.<br />
Do not route the power cord where it will be crushed, pinched, bent, exposed<br />
to heat, or damaged in any way. Pay particular attention to the power<br />
cord at the plug and where the cord exits the back of the unit.<br />
The power cord should be unplugged from the wall outlet during a lightning<br />
storm or if the unit is to be left unused for a long period of time.<br />
Use only accessories specified by the manufacturer.<br />
Use only with a cart, stand, rack, bracket or shelf system recommended by<br />
<strong>Rotel</strong>. Use caution when moving the unit in a stand or rack to avoid injury<br />
from a tip-over.<br />
Immediately stop using the component and have it inspected and/or serviced<br />
by a qualified service agency if:<br />
• The power supply cord or plug has been damaged.<br />
• Objects have fallen or liquid has been spilled into the unit.<br />
• The unit has been exposed to rain.<br />
• The unit shows signs of improper operation<br />
• The unit has been dropped or damaged in any way
<strong>RSP</strong>-<strong>1068</strong> Surround Sound Processor<br />
4<br />
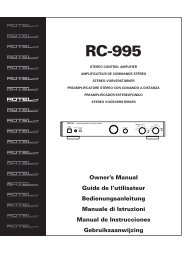
1: Controls and Connections<br />
1 2<br />
3<br />
4<br />
SURROUND SOUND PROCESSOR <strong>RSP</strong>-<strong>1068</strong><br />
SURROUND SOUND RECEIVER RSX-1055<br />
STANDBY<br />
HF<br />
CD<br />
TUNER<br />
TAPE<br />
VIDEO4<br />
VIDEO1 VIDEO2 VIDEO3 VIDEO5<br />
LF<br />
2CH<br />
DOLBY<br />
PLIIx/3ST<br />
DTS<br />
NEO 6<br />
DSP<br />
MULTI<br />
ZONE<br />
INPUT MUTE REC<br />
5 6 7 8 9 10 11 12 13 14<br />
15<br />
16 18<br />
20 21 22 23 24 25<br />
17<br />
19<br />
FRONT L<br />
MULTI INPUT<br />
REAR L CB 1<br />
CENTER<br />
PRE OUT<br />
FRONT L REAR L CB 1 CENTER 1 SUB 1<br />
Y<br />
COMPONENT VIDEO IN<br />
PB PR Y PB PR<br />
1<br />
3<br />
POWER<br />
FRONT R<br />
1<br />
REAR R CB 2 SUB<br />
DIGITAL INPUT<br />
1 2<br />
2<br />
FRONT R REAR R CB 2 CENTER 2 SUB 2<br />
DIGITAL OUT COM I/O<br />
3<br />
ZONE<br />
12V TRIG<br />
1<br />
REM IN<br />
EXT ZONE<br />
SOFTWARE<br />
UPGRADABLE<br />
1<br />
2<br />
S-VIDEO IN<br />
2 3 4 5<br />
S-VIDEO OUT<br />
1 2 3<br />
MON<br />
OUT<br />
SURROUND SOUND<br />
PROCESSOR<br />
MODEL NO. <strong>RSP</strong>-<strong>1068</strong><br />
POWER CONSUMPTION: 48 WATTS<br />
ON<br />
OFF<br />
2<br />
L<br />
OPTICAL<br />
COAXIAL COAXIAL OPTICAL<br />
1<br />
IR OUT<br />
2<br />
ZONE OUT<br />
VIDEO<br />
1<br />
COMPOSITE IN<br />
2 3 4 5<br />
1<br />
COMPOSITE OUT<br />
2 3<br />
MONITOR<br />
OUT<br />
R<br />
TUNER<br />
CD<br />
IN<br />
OUT<br />
TAPE<br />
1 2 3 4 5<br />
VIDEO IN<br />
1 2 3<br />
VIDEO OUT<br />
ZONE<br />
OUT<br />
36<br />
26 27 28 29<br />
30 31 32 33 34 35 37<br />
38
5 English<br />
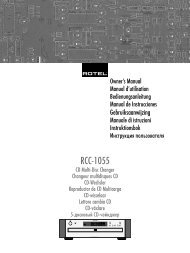
2: RR-1050 Remote<br />
CLONE REPT<br />
TRANSMITTER LOADING RECEIVER<br />
EDIT LEARN<br />
WAITING<br />
A<br />
AUD CD TUN TAPE EXT<br />
DEVICE / INPUT<br />
V1 V2 V3 V4 V5<br />
G<br />
CLONE REPT<br />
TRANSMITTER LOADING RECEIVER<br />
1 2 3<br />
POWER<br />
ON OFF<br />
EDIT<br />
LEARN<br />
WAITING<br />
4 5 6<br />
H<br />
7 8 9<br />
CH<br />
VOL<br />
I<br />
MACRO<br />
+10 0 X M MUTE<br />
J<br />
FRQ DIRECT<br />
GUIDE<br />
MENU<br />
B<br />
C<br />
TUNE<br />
PRESET<br />
FM MONO BAND<br />
C<br />
CTR<br />
S<br />
UP<br />
M<br />
- ENT +<br />
SEARCH –<br />
DWN<br />
OSD<br />
SEARCH +<br />
R<br />
K<br />
L<br />
M<br />
SUB<br />
SUR<br />
D<br />
E<br />
F<br />
CD<br />
DISC 1<br />
DISC 2<br />
DISC 3 DISC 4 DISC 5<br />
EQ DYN REC ZONE SUR+<br />
2CH PL C PL M 5CH 7CH<br />
PROG RANDOM REPEAT DISC- DISC+<br />
DISPLAY AUDIO ANGLE SBTITLE ZOOM<br />
DISP TAPE2 PHONO TONE D-SLT<br />
RESUME REPEAT A -B GOTO SLOW<br />
SCAN PTY P-TUN TP<br />
INPUT 1 INPUT 2 INPUT 3 TV/VCR RECORD<br />
DVD<br />
TA<br />
N<br />
O<br />
P<br />
Q<br />
R<br />
POWER<br />
/ CLONE<br />
EDIT<br />
LEARN<br />
CLEAR<br />
LANG<br />
PRELOAD<br />
RESET<br />
PAGE 1/2<br />
S<br />
T
<strong>RSP</strong>-<strong>1068</strong> Surround Sound Processor<br />
6<br />
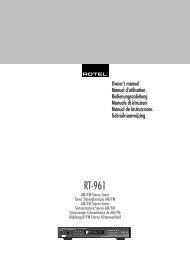
3: Connecting a CD Player<br />
FRONT L<br />
MULTI INPUT<br />
REAR L CB 1<br />
CENTER<br />
PRE OUT<br />
FRONT L REAR L CB 1 CENTER 1 SUB 1<br />
Y<br />
COMPONENT VIDEO IN<br />
PB PR Y PB PR<br />
1<br />
3<br />
POWER<br />
FRONT R<br />
1<br />
REAR R CB 2 SUB<br />
DIGITAL INPUT<br />
1 2<br />
2<br />
FRONT R REAR R CB 2 CENTER 2 SUB 2<br />
DIGITAL OUT COM I/O<br />
3<br />
ZONE<br />
12V TRIG<br />
1<br />
REM IN<br />
EXT ZONE<br />
SOFTWARE<br />
UPGRADABLE<br />
1<br />
2<br />
S-VIDEO IN<br />
2 3 4 5<br />
S-VIDEO OUT<br />
1 2 3<br />
MON<br />
OUT<br />
SURROUND SOUND<br />
PROCESSOR<br />
MODEL NO. <strong>RSP</strong>-<strong>1068</strong><br />
POWER CONSUMPTION: 48 WATTS<br />
ON<br />
OFF<br />
2<br />
L<br />
OPTICAL<br />
COAXIAL COAXIAL OPTICAL<br />
1<br />
IR OUT<br />
2<br />
ZONE OUT<br />
VIDEO<br />
1<br />
COMPOSITE IN<br />
2 3 4 5<br />
1<br />
COMPOSITE OUT<br />
2 3<br />
MONITOR<br />
OUT<br />
R<br />
TUNER<br />
CD<br />
IN<br />
OUT<br />
TAPE<br />
1 2 3 4 5<br />
VIDEO IN<br />
1 2 3<br />
VIDEO OUT<br />
ZONE<br />
OUT<br />
RIGHT<br />
LEFT<br />
ANALOG<br />
DIGITAL<br />
AUDIO OUTPUTS<br />
4: Connecting a DVD Player<br />
FRONT L<br />
MULTI INPUT<br />
REAR L CB 1<br />
CENTER<br />
PRE OUT<br />
FRONT L REAR L CB 1 CENTER 1 SUB 1<br />
Y<br />
COMPONENT VIDEO IN<br />
PB PR Y PB PR<br />
1<br />
3<br />
POWER<br />
FRONT R<br />
1<br />
REAR R CB 2 SUB<br />
DIGITAL INPUT<br />
1 2<br />
2<br />
FRONT R REAR R CB 2 CENTER 2 SUB 2<br />
DIGITAL OUT COM I/O<br />
3<br />
ZONE<br />
12V TRIG<br />
1<br />
REM IN<br />
EXT ZONE<br />
SOFTWARE<br />
UPGRADABLE<br />
1<br />
2<br />
S-VIDEO IN<br />
2 3 4 5<br />
S-VIDEO OUT<br />
1 2 3<br />
MON<br />
OUT<br />
SURROUND SOUND<br />
PROCESSOR<br />
MODEL NO. <strong>RSP</strong>-<strong>1068</strong><br />
POWER CONSUMPTION: 48 WATTS<br />
ON<br />
OFF<br />
2<br />
L<br />
OPTICAL<br />
COAXIAL COAXIAL OPTICAL<br />
1<br />
IR OUT<br />
2<br />
ZONE OUT<br />
VIDEO<br />
1<br />
COMPOSITE IN<br />
2 3 4 5<br />
1<br />
COMPOSITE OUT<br />
2 3<br />
MONITOR<br />
OUT<br />
R<br />
TUNER<br />
CD<br />
IN<br />
OUT<br />
TAPE<br />
1 2 3 4 5<br />
VIDEO IN<br />
1 2 3<br />
VIDEO OUT<br />
ZONE<br />
OUT<br />
RIGHT LEFT<br />
ANALOG<br />
DIGITAL<br />
COMPOSITE<br />
VIDEO<br />
S-VIDEO<br />
Y PB PR<br />
COMPONENT VIDEO IN<br />
AUDIO OUTPUTS<br />
VIDEO OUTPUTS
7 English<br />
5: Connecting a Cable, Satellite, or HDTV Tuner<br />
FRONT L<br />
MULTI INPUT<br />
REAR L CB 1<br />
CENTER<br />
PRE OUT<br />
FRONT L REAR L CB 1 CENTER 1 SUB 1<br />
Y<br />
COMPONENT VIDEO IN<br />
PB PR Y PB PR<br />
1<br />
3<br />
POWER<br />
FRONT R<br />
1<br />
REAR R CB 2 SUB<br />
DIGITAL INPUT<br />
1 2<br />
2<br />
FRONT R REAR R CB 2 CENTER 2 SUB 2<br />
DIGITAL OUT COM I/O<br />
3<br />
ZONE<br />
12V TRIG<br />
1<br />
REM IN<br />
EXT ZONE<br />
SOFTWARE<br />
UPGRADABLE<br />
1<br />
2<br />
S-VIDEO IN<br />
2 3 4 5<br />
S-VIDEO OUT<br />
1 2 3<br />
MON<br />
OUT<br />
SURROUND SOUND<br />
PROCESSOR<br />
MODEL NO. <strong>RSP</strong>-<strong>1068</strong><br />
POWER CONSUMPTION: 48 WATTS<br />
ON<br />
OFF<br />
2<br />
L<br />
OPTICAL<br />
COAXIAL COAXIAL OPTICAL<br />
1<br />
IR OUT<br />
2<br />
ZONE OUT<br />
VIDEO<br />
1<br />
COMPOSITE IN<br />
2 3 4 5<br />
1<br />
COMPOSITE OUT<br />
2 3<br />
MONITOR<br />
OUT<br />
R<br />
TUNER<br />
CD<br />
IN<br />
OUT<br />
TAPE<br />
1 2 3 4 5<br />
VIDEO IN<br />
1 2 3<br />
VIDEO OUT<br />
ZONE<br />
OUT<br />
RIGHT LEFT<br />
ANALOG<br />
DIGITAL<br />
COMPOSITE<br />
VIDEO<br />
S-VIDEO<br />
Y PB PR<br />
COMPONENT VIDEO IN<br />
AUDIO OUTPUTS<br />
VIDEO OUTPUTS<br />
6: Connecting an AM/FM Tuner<br />
FRONT L<br />
MULTI INPUT<br />
REAR L CB 1<br />
CENTER<br />
PRE OUT<br />
FRONT L REAR L CB 1 CENTER 1 SUB 1<br />
Y<br />
COMPONENT VIDEO IN<br />
PB PR Y PB PR<br />
1<br />
3<br />
POWER<br />
FRONT R<br />
1<br />
REAR R CB 2 SUB<br />
DIGITAL INPUT<br />
1 2<br />
2<br />
FRONT R REAR R CB 2 CENTER 2 SUB 2<br />
DIGITAL OUT COM I/O<br />
3<br />
ZONE<br />
12V TRIG<br />
1<br />
REM IN<br />
EXT ZONE<br />
SOFTWARE<br />
UPGRADABLE<br />
1<br />
2<br />
S-VIDEO IN<br />
2 3 4 5<br />
S-VIDEO OUT<br />
1 2 3<br />
MON<br />
OUT<br />
SURROUND SOUND<br />
PROCESSOR<br />
MODEL NO. <strong>RSP</strong>-<strong>1068</strong><br />
POWER CONSUMPTION: 48 WATTS<br />
ON<br />
OFF<br />
2<br />
L<br />
OPTICAL<br />
COAXIAL COAXIAL OPTICAL<br />
1<br />
IR OUT<br />
2<br />
ZONE OUT<br />
VIDEO<br />
1<br />
COMPOSITE IN<br />
2 3 4 5<br />
1<br />
COMPOSITE OUT<br />
2 3<br />
MONITOR<br />
OUT<br />
R<br />
TUNER<br />
CD<br />
IN<br />
OUT<br />
TAPE<br />
1 2 3 4 5<br />
VIDEO IN<br />
1 2 3<br />
VIDEO OUT<br />
ZONE<br />
OUT<br />
RIGHT<br />
LEFT<br />
AUDIO OUTPUTS
<strong>RSP</strong>-<strong>1068</strong> Surround Sound Processor<br />
8<br />
7: Connecting an Audio Recorder<br />
FRONT L<br />
MULTI INPUT<br />
REAR L CB 1<br />
CENTER<br />
PRE OUT<br />
FRONT L REAR L CB 1 CENTER 1 SUB 1<br />
Y<br />
COMPONENT VIDEO IN<br />
PB PR Y PB PR<br />
1<br />
3<br />
POWER<br />
FRONT R<br />
1<br />
REAR R CB 2 SUB<br />
DIGITAL INPUT<br />
1 2<br />
2<br />
FRONT R REAR R CB 2 CENTER 2 SUB 2<br />
DIGITAL OUT COM I/O<br />
3<br />
ZONE<br />
12V TRIG<br />
1<br />
REM IN<br />
EXT ZONE<br />
SOFTWARE<br />
UPGRADABLE<br />
1<br />
2<br />
S-VIDEO IN<br />
2 3 4 5<br />
S-VIDEO OUT<br />
1 2 3<br />
MON<br />
OUT<br />
SURROUND SOUND<br />
PROCESSOR<br />
MODEL NO. <strong>RSP</strong>-<strong>1068</strong><br />
POWER CONSUMPTION: 48 WATTS<br />
ON<br />
OFF<br />
2<br />
L<br />
OPTICAL<br />
COAXIAL COAXIAL OPTICAL<br />
1<br />
IR OUT<br />
2<br />
ZONE OUT<br />
VIDEO<br />
1<br />
COMPOSITE IN<br />
2 3 4 5<br />
1<br />
COMPOSITE OUT<br />
2 3<br />
MONITOR<br />
OUT<br />
R<br />
TUNER<br />
CD<br />
IN<br />
OUT<br />
TAPE<br />
1 2 3 4 5<br />
VIDEO IN<br />
1 2 3<br />
VIDEO OUT<br />
ZONE<br />
OUT<br />
RIGHT<br />
LEFT<br />
RIGHT<br />
LEFT<br />
REC IN<br />
OUT<br />
LINE OUT<br />
REC IN<br />
AUDIO<br />
DIGITAL<br />
8: Connecting a VCR<br />
FRONT L<br />
MULTI INPUT<br />
REAR L CB 1<br />
CENTER<br />
PRE OUT<br />
FRONT L REAR L CB 1 CENTER 1 SUB 1<br />
Y<br />
COMPONENT VIDEO IN<br />
PB PR Y PB PR<br />
1<br />
3<br />
POWER<br />
FRONT R<br />
1<br />
REAR R CB 2 SUB<br />
DIGITAL INPUT<br />
1 2<br />
2<br />
FRONT R REAR R CB 2 CENTER 2 SUB 2<br />
DIGITAL OUT COM I/O<br />
3<br />
ZONE<br />
12V TRIG<br />
1<br />
REM IN<br />
EXT ZONE<br />
SOFTWARE<br />
UPGRADABLE<br />
1<br />
2<br />
S-VIDEO IN<br />
2 3 4 5<br />
S-VIDEO OUT<br />
1 2 3<br />
MON<br />
OUT<br />
SURROUND SOUND<br />
PROCESSOR<br />
MODEL NO. <strong>RSP</strong>-<strong>1068</strong><br />
POWER CONSUMPTION: 48 WATTS<br />
ON<br />
OFF<br />
2<br />
L<br />
OPTICAL<br />
COAXIAL COAXIAL OPTICAL<br />
1<br />
IR OUT<br />
2<br />
ZONE OUT<br />
VIDEO<br />
1<br />
COMPOSITE IN<br />
2 3 4 5<br />
1<br />
COMPOSITE OUT<br />
2 3<br />
MONITOR<br />
OUT<br />
R<br />
TUNER<br />
CD<br />
IN<br />
OUT<br />
TAPE<br />
1 2 3 4 5<br />
VIDEO IN<br />
1 2 3<br />
VIDEO OUT<br />
ZONE<br />
OUT<br />
RIGHT<br />
LINE OUT<br />
LEFT<br />
RIGHT<br />
REC IN<br />
LEFT<br />
LINE OUT REC IN LINE OUT REC IN<br />
COMPOSITE<br />
S-VIDEO<br />
AUDIO<br />
VIDEO
9 English<br />
9: Connecting a DVD-A or SACD Player<br />
FRONT L<br />
MULTI INPUT<br />
REAR L CB 1<br />
CENTER<br />
PRE OUT<br />
FRONT L REAR L CB 1 CENTER 1 SUB 1<br />
Y<br />
COMPONENT VIDEO IN<br />
PB PR Y PB PR<br />
1<br />
3<br />
POWER<br />
FRONT R<br />
1<br />
REAR R CB 2 SUB<br />
DIGITAL INPUT<br />
1 2<br />
2<br />
FRONT R REAR R CB 2 CENTER 2 SUB 2<br />
DIGITAL OUT COM I/O<br />
3<br />
ZONE<br />
12V TRIG<br />
1<br />
REM IN<br />
EXT ZONE<br />
SOFTWARE<br />
UPGRADABLE<br />
1<br />
2<br />
S-VIDEO IN<br />
2 3 4 5<br />
S-VIDEO OUT<br />
1 2 3<br />
MON<br />
OUT<br />
SURROUND SOUND<br />
PROCESSOR<br />
MODEL NO. <strong>RSP</strong>-<strong>1068</strong><br />
POWER CONSUMPTION: 48 WATTS<br />
ON<br />
OFF<br />
2<br />
L<br />
OPTICAL<br />
COAXIAL COAXIAL OPTICAL<br />
1<br />
IR OUT<br />
2<br />
ZONE OUT<br />
VIDEO<br />
1<br />
COMPOSITE IN<br />
2 3 4 5<br />
1<br />
COMPOSITE OUT<br />
2 3<br />
MONITOR<br />
OUT<br />
R<br />
TUNER<br />
CD<br />
IN<br />
OUT<br />
TAPE<br />
1 2 3 4 5<br />
VIDEO IN<br />
1 2 3<br />
VIDEO OUT<br />
ZONE<br />
OUT<br />
FRONT R<br />
REAR R SUB CENTER REAR L FRONT L<br />
MULTICHANNEL ANALOG OUTPUTS<br />
10: Connecting a TV Monitor<br />
FRONT L<br />
MULTI INPUT<br />
REAR L CB 1<br />
CENTER<br />
PRE OUT<br />
FRONT L REAR L CB 1 CENTER 1 SUB 1<br />
Y<br />
COMPONENT VIDEO IN<br />
PB PR Y PB PR<br />
1<br />
3<br />
POWER<br />
FRONT R<br />
1<br />
REAR R CB 2 SUB<br />
DIGITAL INPUT<br />
1 2<br />
2<br />
FRONT R REAR R CB 2 CENTER 2 SUB 2<br />
DIGITAL OUT COM I/O<br />
3<br />
ZONE<br />
12V TRIG<br />
1<br />
REM IN<br />
EXT ZONE<br />
SOFTWARE<br />
UPGRADABLE<br />
1<br />
2<br />
S-VIDEO IN<br />
2 3 4 5<br />
S-VIDEO OUT<br />
1 2 3<br />
MON<br />
OUT<br />
SURROUND SOUND<br />
PROCESSOR<br />
MODEL NO. <strong>RSP</strong>-<strong>1068</strong><br />
POWER CONSUMPTION: 48 WATTS<br />
ON<br />
OFF<br />
2<br />
L<br />
OPTICAL<br />
COAXIAL COAXIAL OPTICAL<br />
1<br />
IR OUT<br />
2<br />
ZONE OUT<br />
VIDEO<br />
1<br />
COMPOSITE IN<br />
2 3 4 5<br />
1<br />
COMPOSITE OUT<br />
2 3<br />
MONITOR<br />
OUT<br />
R<br />
TUNER<br />
CD<br />
IN<br />
OUT<br />
TAPE<br />
1 2 3 4 5<br />
VIDEO IN<br />
1 2 3<br />
VIDEO OUT<br />
ZONE<br />
OUT<br />
RIGHT<br />
LEFT<br />
Y PB PR<br />
COMPONENT VIDEO<br />
COMPOSITE<br />
VIDEO<br />
S-VIDEO<br />
AUDIO OUTPUTS<br />
VIDEO INPUTS
<strong>RSP</strong>-<strong>1068</strong> Surround Sound Processor<br />
10<br />
11: Connecting Amplifiers and Subwoofer<br />
CENTER<br />
AMPLIFIER<br />
SUBWOOFER<br />
INPUT<br />
FRONT LEFT<br />
AMPLIFIER<br />
FRONT RIGHT<br />
AMPLIFIER<br />
FRONT L<br />
MULTI INPUT<br />
REAR L CB 1<br />
CENTER<br />
PRE OUT<br />
FRONT L REAR L CB 1 CENTER 1 SUB 1<br />
Y<br />
COMPONENT VIDEO IN<br />
PB PR Y PB PR<br />
1<br />
3<br />
POWER<br />
FRONT R<br />
1<br />
REAR R CB 2 SUB<br />
DIGITAL INPUT<br />
1 2<br />
2<br />
FRONT R REAR R CB 2 CENTER 2 SUB 2<br />
DIGITAL OUT COM I/O<br />
3<br />
ZONE<br />
12V TRIG<br />
1<br />
REM IN<br />
EXT ZONE<br />
SOFTWARE<br />
UPGRADABLE<br />
1<br />
2<br />
S-VIDEO IN<br />
2 3 4 5<br />
S-VIDEO OUT<br />
1 2 3<br />
MON<br />
OUT<br />
SURROUND SOUND<br />
PROCESSOR<br />
MODEL NO. <strong>RSP</strong>-<strong>1068</strong><br />
POWER CONSUMPTION: 48 WATTS<br />
ON<br />
OFF<br />
2<br />
L<br />
OPTICAL<br />
COAXIAL COAXIAL OPTICAL<br />
1<br />
IR OUT<br />
2<br />
ZONE OUT<br />
VIDEO<br />
1<br />
COMPOSITE IN<br />
2 3 4 5<br />
1<br />
COMPOSITE OUT<br />
2 3<br />
MONITOR<br />
OUT<br />
R<br />
TUNER<br />
CD<br />
IN<br />
OUT<br />
TAPE<br />
1 2 3 4 5<br />
VIDEO IN<br />
1 2 3<br />
VIDEO OUT<br />
ZONE<br />
OUT<br />
REAR LEFT<br />
AMPLIFIER<br />
REAR RIGHT<br />
AMPLIFIER<br />
CB 1<br />
AMPLIFIER<br />
CB 2<br />
AMPLIFIER
POWER AMPLIFIER<br />
POWER<br />
11 English<br />
12: Zone 2 Connections<br />
LEFT<br />
CHANNEL<br />
RIGHT<br />
CHANNEL<br />
FRONT L<br />
MULTI INPUT<br />
REAR L CB 1<br />
CENTER<br />
PRE OUT<br />
FRONT L REAR L CB 1 CENTER 1 SUB 1<br />
Y<br />
COMPONENT VIDEO IN<br />
PB PR Y PB PR<br />
1<br />
3<br />
POWER<br />
FRONT R<br />
1<br />
REAR R CB 2 SUB<br />
DIGITAL INPUT<br />
1 2<br />
2<br />
FRONT R REAR R CB 2 CENTER 2 SUB 2<br />
DIGITAL OUT COM I/O<br />
3<br />
ZONE<br />
12V TRIG<br />
1<br />
REM IN<br />
EXT ZONE<br />
SOFTWARE<br />
UPGRADABLE<br />
1<br />
2<br />
S-VIDEO IN<br />
2 3 4 5<br />
S-VIDEO OUT<br />
1 2 3<br />
MON<br />
OUT<br />
SURROUND SOUND<br />
PROCESSOR<br />
MODEL NO. <strong>RSP</strong>-<strong>1068</strong><br />
POWER CONSUMPTION: 48 WATTS<br />
ON<br />
OFF<br />
2<br />
L<br />
OPTICAL<br />
COAXIAL COAXIAL OPTICAL<br />
1<br />
IR OUT<br />
2<br />
ZONE OUT<br />
VIDEO<br />
1<br />
COMPOSITE IN<br />
2 3 4 5<br />
1<br />
COMPOSITE OUT<br />
2 3<br />
MONITOR<br />
OUT<br />
R<br />
TUNER<br />
CD<br />
IN<br />
OUT<br />
TAPE<br />
1 2 3 4 5<br />
VIDEO IN<br />
1 2 3<br />
VIDEO OUT<br />
ZONE<br />
OUT<br />
Y PB PR<br />
COMPONENT VIDEO<br />
COMPOSITE<br />
VIDEO<br />
S-VIDEO<br />
VIDEO INPUTS<br />
ZONE 2 IR
<strong>RSP</strong>-<strong>1068</strong> Surround Sound Processor<br />
12<br />
13: On-Screen Display Menus<br />
SYSTEM STATUS<br />
LISTEN:Tuner<br />
VID INPUT:Video 1<br />
RECORD:Source<br />
MODE:Dolby Digital<br />
INPUT:Coaxial 2<br />
VOLUME:65<br />
ZONE 2:Off<br />
SPEAKERS:FL CNT SUB FR<br />
SL CB1 CB2 SR<br />
MAIN MENU<br />
INPUT SPEAKER<br />
DELAY TEST TONE<br />
SUB SETUP ZONE 2<br />
OTHER DEFAULT<br />
CONTOUR<br />
EXIT<br />
INPUT SETUP<br />
LISTEN:CD<br />
VID INPUT:Video 1<br />
INPUT LABEL:_______<br />
INPUT:Coaxial 2<br />
CINEMA EQ:Off<br />
12V TRIGGER:1<br />
DEFAULT MODE:Dolby 3 Stereo<br />
GROUP DELAY:200ms<br />
MAIN MENU<br />
SPEAKER SETUP<br />
FRONT:Large<br />
CENTER:Large<br />
SURROUND:Large<br />
CENTER BACK:Large1<br />
SUBWOOFER:Yes<br />
ADVANCED:Enter<br />
MAIN MENU<br />
CONTOUR SETUP<br />
SPEAKER:Front<br />
DEFEAT:On<br />
HF CONTOUR:+5<br />
LF CONTOUR: 0<br />
MAIN MENU<br />
INPUT SETUP<br />
LISTEN:Multi Input<br />
VID INPUT:Video 1<br />
INPUT LABEL:_______<br />
12V TRIGGER:1<br />
LFE REDIRECT:On<br />
MAIN MENU<br />
ADV SPEAKER SETUP<br />
SPEAKER:Front<br />
CROSSOVER:100Hz<br />
DOLBY:Small<br />
DTS:Small<br />
STEREO/MPEG:Large<br />
MUSIC:Small<br />
SPEAKER SETUP MENU<br />
OTHER OPTIONS<br />
RECORD:Source<br />
TURN ON VOL:Last<br />
MAX VOL:Max<br />
VOL SPEED:Slow<br />
POWER:Standby<br />
LANGUAGE:English<br />
VIDEO:NTSC<br />
OSD:On<br />
PROGRESSIVE:NO<br />
MAIN MENU<br />
INPUT SETUP<br />
LISTEN:CD<br />
VID INPUT:Video 1<br />
INPUT LABEL:_______<br />
INPUT:Coaxial 2<br />
CINEMA EQ:Off<br />
12V TRIGGER:1<br />
DEFAULT MODE:Dolby PLII Cinema<br />
GROUP DELAY:200mS<br />
MAIN MENU<br />
OPTION<br />
SUBWOOFER SETUP<br />
CROSSOVER:100hZ<br />
DOLBY DIGITAL: 0dB<br />
DOLBY PL II(X): 0dB<br />
DTS: 0dB<br />
STEREO/MPEG:+ 2dB<br />
MUSIC: Off<br />
MULTI INPUT:- 2dB<br />
MAIN MENU<br />
ZONE2 SETUP<br />
SOURCE:Off<br />
VOLUME SETUP:Variable<br />
VOLUME:60<br />
TURN ON VOL:Last<br />
MAX VOL:Max<br />
12V TRIGGER:Off<br />
MAIN MENU<br />
DOLBY PRO LOGIC II(X)<br />
MODE:Music<br />
OPTIONAL PARAMETERS<br />
PANORAMA:Off<br />
DIMENSION:3<br />
CENTER WIDTH:0<br />
INPUT SETUP MENU<br />
TEST TONE<br />
LEFT:+ 1dB<br />
CENTER:- 1dB<br />
RIGHT:+ 2dB<br />
R SURROUND:+ 5dB<br />
R CTR BACK:+ 2dB<br />
L CTR BACK:+ 2dB<br />
L SURROUND:+ 4dB<br />
SUBWOOFER:+ 9dB<br />
MAIN MENU<br />
DEFAULT SETUP<br />
FACTORY DEFAULT:No<br />
USER DEFAULT:No<br />
SET USER DEFAULT:No<br />
MAIN MENU<br />
DTS Neo:6<br />
MODE:Cinema<br />
INPUT SETUP MENU<br />
DELAY SETUP<br />
LEFT: 12ft 3.6m<br />
CENTER: 11ft 3.3m<br />
RIGHT: 11ft 3.3m<br />
R SURROUND: 6ft 1.8m<br />
R CTR BACK: 8ft 2.4m<br />
L CTR BACK: 9ft 2.7m<br />
L SURROUND: 5ft 1.5m<br />
SUBWOOFER: 5ft 1.5m<br />
MAIN MENU
13 English<br />
Contents<br />
Boxed numbers refer to <strong>RSP</strong>-<strong>1068</strong> illustration.<br />
Boxed letters refer to RR-1050 illustration.<br />
1: Controls and Connections ............................... 4<br />
2: RR-1050 Remote ........................................... 5<br />
3: Connecting a CD Player .................................. 6<br />
4: Connecting a DVD Player ............................... 6<br />
5: Connecting a Cable, Satellite, or HDTV Tuner .. 7<br />
6: Connecting an AM/FM Tuner .......................... 7<br />
7: Connecting an Audio Recorder ....................... 8<br />
8: Connecting a VCR ........................................... 8<br />
9: Connecting a DVD-A or SACD Player ............... 9<br />
10: Connecting a TV Monitor .............................. 9<br />
11: Connecting Amplifiers and Subwoofer ........ 10<br />
12: Zone 2 Connections ................................... 11<br />
13: On-Screen Display Menus ........................... 12<br />
About <strong>Rotel</strong> .........................................15<br />
Getting Started ....................................15<br />
Video features ................................................. 15<br />
Audio features ................................................. 15<br />
Surround features ............................................ 15<br />
Other features ................................................. 16<br />
Unpacking ....................................................... 16<br />
Placement ....................................................... 16<br />
CONNECTIONS 16<br />
Analog Audio Inputs & Outputs ............16<br />
Tuner Inputs .............................................. 16<br />
CD Inputs .................................................. 16<br />
TAPE Inputs ............................................... 16<br />
TAPE Outputs ............................................ 16<br />
VIDEO 1–5 Audio Inputs ........................... 17<br />
VIDEO 1–3 Audio Outputs ......................... 17<br />
MULTI Inputs ............................................. 17<br />
Preamp Outputs ........................................ 17<br />
ZONE 2 Audio Outputs ............................... 17<br />
Video Inputs & Outputs ........................17<br />
VIDEO 1–5 Composite Video Inputs ........... 17<br />
VIDEO 1–3 Composite Video Outputs ......... 17<br />
VIDEO 1–5 S-Video Inputs ......................... 18<br />
VIDEO 1–3 S-Video Outputs ...................... 18<br />
VIDEO 1–3 Component Video Inputs ......... 18<br />
TV Monitor Outputs ............................ 18<br />
ZONE OUT Video Output ............................ 18<br />
Digital Audio Input & Outputs ...............18<br />
Digital Inputs ............................................ 18<br />
Digital Outputs .......................................... 18<br />
Other Connections ................................18<br />
AC Input ................................................... 18<br />
Master Power Switch ................................. 19<br />
12V TRIGGER Connections ......................... 19<br />
REM IN Jacks ............................................ 19<br />
IR OUT Jacks ............................................. 19<br />
Computer I/O ........................................... 19<br />
Making Connections..............................19<br />
CD Player ........................................... 19<br />
DVD Player .................... 19<br />
Cable, Satellite, or HDTV Tuner<br />
...................................... 19<br />
AM/FM Tuner ............................................ 20<br />
Audio Recorder ............................ 20<br />
Video Recorder<br />
.................. 20<br />
DVD-A or SACD Player ............................... 20<br />
TV Monitor ......................................... 20<br />
Connecting Amplifiers ............................... 20<br />
Connecting a Subwoofer ............................ 21<br />
Zone 2 Connections ............................ 21<br />
OPERATING<br />
THE <strong>RSP</strong>-<strong>1068</strong> 21<br />
Front Panel Overview ..........................21<br />
Front-panel Display ................................... 21<br />
Remote Sensor .......................................... 21<br />
Remote Control Overview ....................21<br />
Using the RR-1050<br />
AUDIO Button ........................................... 22<br />
Programming the RR-1050<br />
PRELOAD Button ....................................... 22<br />
Overview of Buttons and Controls ........22<br />
STANDBY Button<br />
POWER Button .......................................... 22<br />
ON/OFF Buttons ....................................... 22<br />
VOLUME Knob<br />
VOLUME Button ......................................... 22<br />
MUTE Button ...................................... 22<br />
DEVICE/INPUT Buttons .......... 22<br />
REC Button ......................................... 22<br />
ZONE Button ...................................... 22<br />
UP/DOWN Buttons .................................... 22<br />
+/– Buttons ............................................. 22<br />
Speaker Selection Buttons ......................... 22<br />
EQ Button ................................................. 22<br />
LF/HF Knobs ............................................. 22<br />
TONE Button ............................................. 23<br />
Surround Mode Buttons .. 23<br />
SUR+ Button ............................................. 23<br />
DYN Button ............................................... 23<br />
MENU/OSD button .................................... 23<br />
ENTER Button ............................................ 23<br />
Basic Operations ..................................23<br />
Power and Standby On/Off<br />
............................................. 23<br />
Volume Adjustments ........................... 23<br />
Muting the Sound ...................................... 23
<strong>RSP</strong>-<strong>1068</strong> Surround Sound Processor<br />
14<br />
Selecting Inputs ....................................23<br />
Selecting a Source Input from the Front Panel<br />
............................................. 24<br />
Selecting a Source from the Remote<br />
............................................. 24<br />
Overview of Surround Formats .............24<br />
Dolby Surround<br />
Dolby Pro Logic II ............................................ 24<br />
Dolby Digital ................................................... 24<br />
DTS 5.1<br />
DTS 96/24 ...................................................... 25<br />
DTS Neo:6 ....................................................... 25<br />
Dolby Digital Surround EX<br />
DTS-ES<br />
6.1 and 7.1 Surround ...................................... 25<br />
Dolby Pro Logic IIx<br />
6.1 and 7.1 Surround ...................................... 25<br />
<strong>Rotel</strong> XS<br />
6.1 and 7.1 Surround ...................................... 25<br />
DSP Music Modes ............................................. 26<br />
2Ch/5Ch/7Ch Stereo Formats .......................... 26<br />
Other Digital Formats ...................................... 26<br />
Automatic Surround Modes ...................26<br />
Manually Selecting Surround Modes ......27<br />
Dolby Digital 5.1 discs<br />
Dolby Digital Surround EX discs ........................ 27<br />
Dolby Digital 2.0 discs .......... 28<br />
DTS 5.1 discs<br />
DTS 96/24 discs<br />
DTS-ES 6.1 discs<br />
...................................... 28<br />
MPEG Multichannel discs<br />
...................................... 28<br />
Digital Stereo discs<br />
(PCM, MP3, and HDCD)<br />
......................... 28<br />
Analog Stereo ......... 29<br />
Other Settings......................................29<br />
Temporary Speaker Level ................... 29<br />
Temporary Group Delay ..................... 30<br />
Dynamic Range .................................. 30<br />
Contour/Tone Settings ................. 30<br />
Cinema EQ ................................................ 30<br />
Zone 2 Operation .................................30<br />
Zone 2 Power On/Off Operation ...................... 31<br />
Controlling Zone 2 from the Main Room<br />
......................... 31<br />
Controlling Zone 2 from the Remote Location<br />
............................................. 31<br />
SETUP 32<br />
Menu Basics .........................................32<br />
Navigation Buttons ............... 32<br />
System Status .................................................. 32<br />
Main Menu ...................................................... 33<br />
Configuring Inputs ................................33<br />
Input Setup ...................................................... 33<br />
Multi Input Setup ............................................. 34<br />
Dolby Pro Logic II (x) ...................................... 34<br />
DTS Neo:6 ....................................................... 35<br />
Configuring<br />
Speakers and Audio ..............................35<br />
Understanding Speaker Configuration .............. 35<br />
Speaker Setup ................................................. 36<br />
Advance Speaker Setup .................................... 36<br />
Subwoofer Setup ............................................. 37<br />
Test Tone ......................................................... 38<br />
Delay Setup ..................................................... 38<br />
Contour Setup .................................................. 39<br />
Miscellaneous Settings .........................39<br />
Other Options .................................................. 39<br />
Zone 2 Setup ................................................... 40<br />
Default Setup .................................................. 40<br />
MORE INFORMATION 41<br />
Troubleshooting ....................................41<br />
Specifications .......................................41<br />
Audio .............................................................. 41<br />
Video ............................................................... 41<br />
General ........................................................... 41
15 English<br />
About <strong>Rotel</strong><br />
A family whose passionate interest in music<br />
led them to manufacture high fidelity components<br />
of uncompromising quality founded <strong>Rotel</strong><br />
40 years ago. Through the years that passion<br />
has remained undiminished and the family goal<br />
of providing exceptional value for audiophiles<br />
and music lovers regardless of their budget,<br />
is shared by all <strong>Rotel</strong> employees.<br />
The engineers work as a close team, listening<br />
to, and fine tuning each new product until<br />
it reaches their exacting musical standards.<br />
They are free to choose components from<br />
around the world in order to make that product<br />
the best they can. You are likely to find<br />
capacitors from the United Kingdom and<br />
Germany, semi conductors from Japan or the<br />
United States, while toroidal power transformers<br />
are manufactured in <strong>Rotel</strong>’s own factory.<br />
<strong>Rotel</strong>’s reputation for excellence has been<br />
earned through hundreds of good reviews and<br />
awards from the most respected reviewers in<br />
the industry, who listen to music every day.<br />
Their comments keep the company true to its<br />
goal - the pursuit of equipment that is musical,<br />
reliable and affordable.<br />
All of us at <strong>Rotel</strong>, thank you for buying this<br />
product and hope it will bring you many years<br />
of enjoyment.<br />
“DTS”, “DTS-ES Extended Surround”, “DTS ES ® Matrix 6.1”,<br />
and “DTS ES ® Discrete 6.1”, and “DTS Neo:6 ® ”are<br />
trademarks of Digital Theater Systems, Inc.<br />
Manufactured under license from Dolby Laboratories.<br />
“Dolby”, “Pro Logic”, and the double-D symbol are<br />
trademarks of Dolby Laboratories.<br />
, HDCD ® , High Definition Compatible Digital ® and<br />
Pacific Microsonics are either registered trademarks or<br />
trademarks of Pacific Microsonics, Inc. in the United States<br />
and/or other countries. HDCD system manufactured under<br />
license from Pacific Microsonics, Inc. This product is covered<br />
by one or more of the following: In the USA: 5,479,168,<br />
5,638,074, 5,640,161, 5,808,574, 5,838,274,<br />
5,854,600, 5,864,311, 5,872,531, and in Australia:<br />
669114. Other patents pending.<br />
Getting Started<br />
Thank you for purchasing the <strong>Rotel</strong> <strong>RSP</strong>-<strong>1068</strong><br />
Surround Sound Processor. The <strong>RSP</strong>-<strong>1068</strong> is<br />
full-featured audio/video control center for<br />
analog and digital source components. It features<br />
digital processing for a wide range of<br />
formats including Dolby Surround ® , Dolby<br />
Digital ® , DTS ® and HDCD ® source material.<br />
Video features<br />
• Wideband 100 mHz video processing for<br />
HDTV signals.<br />
• Full complement of composite, S-Video, and<br />
Component Video inputs and outputs<br />
• Conversion of composite and S-Video signals<br />
to Component Video for output to TV<br />
monitor.<br />
Audio features<br />
• <strong>Rotel</strong>’s Balanced Design Concept combines<br />
advanced circuit board layout, comprehensive<br />
parts evaluation, and extensive listening<br />
tests for superior sound and reliability.<br />
• 24-bit/128x oversampling analog-to-digital<br />
converters from AKM and Crystal Semiconductor<br />
24-bit/192 kHz digital-to-analog<br />
converters<br />
• Analog bypass mode for pure 2-speaker<br />
stereo with no digital processing.<br />
• Optical and coax digital inputs and outputs.<br />
• MULTI Input for 7.1 channel analog signals<br />
from DVD-A and SACD players. Subwoofer<br />
options include .1 channel pass through<br />
or bass redirect feature with an analog lowpass<br />
filter for a summed subwoofer output<br />
from seven channels.<br />
• Automatic HDCD ® decoding for signals from<br />
High Definition Compatible Digital ® compact<br />
discs.<br />
• Automatic decoding of digital signals from<br />
MP3 (MPEG-1 Audio Layer 3) players.<br />
Surround features<br />
• Automatic Dolby Digital ® decoding for<br />
Dolby Digital ® 2.0, Dolby Digital ® 5.1, and<br />
Dolby Digital Surround EX ® recordings.<br />
• Dolby ® Pro Logic IIx ® decoding for Dolby<br />
Surround ® matrix encoded recordings and<br />
for optimum 6.1 and 7.1 channel systems<br />
with any source material. Can be optimized<br />
for Music or Cinema sources.<br />
• Automatic decoding for DTS ® 5.1 channel,<br />
DTS-ES ® Matrix 6.1 channel, DTS-ES ®<br />
Discrete 6.1 channel, and DTS 96/24<br />
digital recordings.<br />
• DTS ® Neo:6 ® Surround modes for deriving<br />
surround channels for 5.1, 6.1 or 7.1<br />
channel systems from 2-channel stereo or<br />
matrix surround recordings. Can be optimized<br />
for Music or Cinema sources.<br />
• Automatic decoding for MPEG Multichannel<br />
digital recordings.<br />
• <strong>Rotel</strong> XS (eXtra Surround) automatically ensures<br />
proper decoding and optimum performance<br />
from any multichannel digital<br />
signal on 6.1 and 7.1 channel systems.<br />
Always active in any system with center<br />
back speaker(s), <strong>Rotel</strong> XS even works with<br />
signals that would not otherwise activate<br />
the proper decoding (such as non-flagged<br />
DTS-ES and Dolby Surround EX discs) or<br />
for which there is no extended surround<br />
decoder (such as DTS 5.1, Dolby Digital<br />
5.1, and even Dolby Pro Logic II decoded<br />
Dolby Digital 2.0 recordings).<br />
• Surround modes for playback of surround<br />
sound material on 2 channel and 3 channel<br />
systems for total compatibility.<br />
• Four DSP Music modes.
<strong>RSP</strong>-<strong>1068</strong> Surround Sound Processor<br />
16<br />
Other features<br />
• Multi-zone, multi-source capability with<br />
independent input selection and volume.<br />
• User friendly ON-SCREEN DISPLAY (OSD)<br />
menu system with programmable labels for<br />
all inputs. Choice of languages.<br />
• Learning remote control to operate the<br />
<strong>RSP</strong>-<strong>1068</strong> and other components.<br />
• Upgradeable microprocessor software to<br />
accommodate future upgrades.<br />
• Assignable 12V trigger outputs for remote<br />
turn-on of power amplifiers and other components.<br />
Unpacking<br />
Remove the unit carefully from its packing. Find<br />
the remote control and other accessories. Save<br />
the box as it will protect the <strong>RSP</strong>-<strong>1068</strong> if you<br />
move or need to return it for maintenance.<br />
Placement<br />
Place the <strong>RSP</strong>-<strong>1068</strong> on a solid, level surface<br />
away from sunlight, heat, moisture, or vibration.<br />
Make sure that the shelf can support the<br />
weight of the unit.<br />
Place the <strong>RSP</strong>-<strong>1068</strong> close to the other components<br />
in your system and, if possible, on its<br />
own shelf. This will make initial hookup, and<br />
subsequent system changes easier.<br />
The <strong>RSP</strong>-<strong>1068</strong> can generate heat during normal<br />
operation. Do not block ventilation openings.<br />
Allow a minimum of 10 cm (4 inches)<br />
of unobstructed space around the unit. If installed<br />
in a cabinet, make sure that there is<br />
adequate ventilation.<br />
Don’t stack other components or objects on<br />
top of the <strong>RSP</strong>-<strong>1068</strong>. Don’t let any liquid fall<br />
into the unit.<br />
CONNECTIONS<br />
Although the <strong>RSP</strong>-<strong>1068</strong>’s rear panel looks<br />
daunting, connecting the unit to your system<br />
is straightforward. Each of the source components<br />
in the system are connected to the<br />
<strong>RSP</strong>-<strong>1068</strong> inputs with a pair of standard RCA<br />
cables for analog audio, a video connection<br />
(composite, S-Video, or Component Video),<br />
and an optional digital audio cable (coax or<br />
optical).<br />
NOTE: Surround formats like Dolby Digital and<br />
DTS are digital formats and the <strong>RSP</strong>-<strong>1068</strong><br />
can only decode them when a digital input<br />
signal is available. For this reason, you should<br />
always connect your DVD player’s digital<br />
outputs to the <strong>RSP</strong>-<strong>1068</strong>, using either the optical<br />
or coax inputs.<br />
The outputs of <strong>RSP</strong>-<strong>1068</strong> are sent to power<br />
amplifier(s) with standard RCA cables from<br />
preamp audio outputs. The video signal from<br />
the <strong>RSP</strong>-<strong>1068</strong> is sent to the TV monitor using<br />
composite video, S-Video, or Component Video<br />
connections.<br />
In addition, the <strong>RSP</strong>-<strong>1068</strong> has MULTI input connections<br />
for a source component that does its<br />
own surround decoding, remote IR sensor<br />
inputs, and 12V trigger connections for remote<br />
turn-on of other <strong>Rotel</strong> components.<br />
NOTE: Do not plug any system component<br />
into an AC source until all connections have<br />
been properly made.<br />
Video cables should have a 75 ohm impedance.<br />
The S/PDIF digital audio interface standard<br />
also specifies a 75 ohm impedance and<br />
all good digital cables adhere to this requirement.<br />
Do NOT substitute conventional audio<br />
interconnect cables for digital or video signals.<br />
Standard audio interconnects will pass these<br />
signals, but their limited bandwidth reduce performance.<br />
When making signal connections, connect LEFT<br />
channels to LEFT channel jacks and RIGHT channels<br />
to RIGHT channel jacks. All RCA-type<br />
connections on the <strong>RSP</strong>-<strong>1068</strong> follow these standard<br />
color codes:<br />
Left channel audio: white RCA jack<br />
Right channel audio: red RCA jack<br />
Composite video: yellow RCA jack<br />
NOTE: Each source input must be properly<br />
configured using the Input Setup menu of the<br />
OSD menu system. We recommend going to<br />
this menu after connecting each source to configure<br />
it as desired. See Input Setup of the<br />
Setup section for information.<br />
Analog Audio Inputs &<br />
Outputs<br />
The following connections are used for connecting<br />
analog audio signals to and from the<br />
<strong>RSP</strong>-<strong>1068</strong>. See the Making Connections topic<br />
for specific instructions on connecting each type<br />
of component.<br />
NOTE: Normally, the <strong>RSP</strong>-<strong>1068</strong> converts analog<br />
inputs to digital signals. All of the digital<br />
processing is available including bass management,<br />
digital crossovers, speaker level and<br />
delay settings, and a number surround mode<br />
options. Alternatively, there is an analog bypass<br />
surround mode that routes 2-ch and Multi<br />
Input analog signals directly to the Volume control<br />
and preamp outputs, bypassing the digital<br />
processing entirely for pure analog stereo.<br />
Tuner Inputs<br />
A left/right pair of RCA analog audio inputs<br />
for connecting an AM/FM tuner.<br />
CD Inputs<br />
A left/right pair of RCA analog audio inputs<br />
for connecting a CD player.<br />
TAPE Inputs<br />
A pair of RCA inputs, labeled TAPE IN, for<br />
connecting the left/right analog audio signals<br />
from an audio tape deck or recording device.<br />
TAPE Outputs<br />
A pair of RCA inputs, labeled TAPE OUT, for<br />
sending left/right line level analog audio signals<br />
for recording on a tape deck or recording<br />
device.<br />
NOTE: These outputs should be connected to<br />
the inputs of the same tape deck connected<br />
to the TAPE IN inputs.
17 English<br />
VIDEO 1–5 Audio Inputs<br />
Five pairs of RCA inputs (VIDEO IN 1–5) provide<br />
connections for left/right analog audio<br />
signals from five additional source components.<br />
These inputs have corresponding video inputs<br />
and are used for VCRs, satellite TV tuners, DVD<br />
players, etc. However, they may also be used<br />
for additional audio only components, simply<br />
by omitting the corresponding video connections.<br />
VIDEO 1–3 Audio Outputs<br />
Three pairs of RCA jacks (VIDEO OUT 1–3)<br />
provide connections for sending line level left<br />
and right analog audio signals for recording<br />
to a VCR.<br />
These connections correspond to the VIDEO<br />
IN 1-3 connections. Make sure that you are<br />
consistent. If you hook up a particular VCR to<br />
the VIDEO 1 inputs, hook up the VIDEO 1 outputs<br />
to the same VCR.<br />
NOTE: There are no analog audio outputs for<br />
VIDEO 4 & 5. Therefore, in an elaborate system,<br />
hook up all of the VCRs and recording<br />
devices to VIDEO 1–3 and use VIDEO 4 & 5<br />
for playback only components.<br />
NOTE: Video 1–3 can be used for audio-only<br />
tape decks, simply omitting the corresponding<br />
video connections.<br />
MULTI Inputs<br />
A set of RCA inputs accept up to 7.1 channels<br />
of analog signals from a DVD-A or SACD<br />
player. There are inputs for FRONT L & R,<br />
CENTER, SUB, REAR L & R, and CENTER BACK<br />
1 & 2.<br />
These inputs bypass all digital processing in<br />
the <strong>RSP</strong>-<strong>1068</strong> and are routed directly to the<br />
Volume control and preamp outputs.<br />
There are two subwoofer options for the MULTI<br />
input. Normally, the .1 channel input is passed<br />
through directly to the subwoofer output. An<br />
optional bass redirect feature duplicates the<br />
7 main channels, sums them, and sends this<br />
mono signal through a 100 Hz analog low<br />
filter to the subwoofer output. This provides<br />
an unaltered analog bypass for the seven main<br />
channels along with a subwoofer signal derived<br />
from those channels.<br />
Preamp Outputs<br />
A group of ten RCA analog audio outputs sends<br />
the <strong>RSP</strong>-<strong>1068</strong>’s line level output signals to<br />
external amplifiers and powered subwoofers.<br />
These outputs are variable level, adjusted by<br />
the <strong>RSP</strong>-<strong>1068</strong> volume control. The eight connectors<br />
provide output for: FRONT L & R, CEN-<br />
TER 1 & 2, SURROUND L & R, CENTER BACK<br />
CB1 & CB2, and SUBWOOFER 1 & 2.<br />
NOTE: Depending on your system configuration,<br />
you may use some or all of these connections.<br />
For example, if you only have one<br />
center channel, connect it to the CENTER 1<br />
output. If you only have one center back channel,<br />
connect it to the CB1 output.<br />
ZONE 2 Audio Outputs<br />
A pair of RCA inputs, labeled AUDIO OUT/<br />
ZONE 2, sending analog audio signals to an<br />
external amplifier for a remote zone. These<br />
outputs can be configured as either fixed or<br />
variable level using the ZONE 2 SETUP menu.<br />
NOTE: Only analog input signals are available<br />
at the Zone 2 outputs. Source components<br />
connected to only the digital inputs are<br />
not available in Zone 2.<br />
To configure your system for Zone 2 operation,<br />
connect the left and right Zone 2 outputs<br />
on the <strong>RSP</strong>-<strong>1068</strong> to the left and right channel<br />
inputs of the amplifier powering the remote<br />
speakers, using standard RCA audio cables.<br />
Video Inputs & Outputs<br />
These connections are used for connecting<br />
video signals to and from the <strong>RSP</strong>-<strong>1068</strong>. See<br />
the Making Connections section for specific<br />
instructions for each type of component.<br />
The <strong>RSP</strong>-<strong>1068</strong> provides Composite, S-Video,<br />
and Component Video connections. Composite<br />
video connections simplify system configuration;<br />
however, S-Video connections typically<br />
provide better picture quality. Component Video<br />
connections are required for HDTV or progressive<br />
scanned DVD video. Be aware of the following<br />
in the configuration of your system:<br />
On Screen Display: The <strong>RSP</strong>-<strong>1068</strong> OSD<br />
system is available on the TV monitor, regardless<br />
of what type of connection is made from the<br />
TV MONITOR outputs to the TV set.<br />
NOTE: When using a progressive scan or 1080i<br />
video signal from the Component Video inputs,<br />
the TV monitor cannot display the video<br />
signal and the OSD menus at the same time.<br />
A “progressive” setting in the Other Options<br />
setup menu allows the use of the main OSD<br />
setup menus, even with progressive or HDTV<br />
signals. When the main OSD setup menus are<br />
activated, the progressive scan video input is<br />
interrupted and restored when the OSD menus<br />
are cancelled. The temporary OSD information<br />
displays (such as volume setting, etc.) are<br />
not displayed.<br />
Output Conversion: The <strong>RSP</strong>-<strong>1068</strong> converts<br />
composite and S-Video signals to Component<br />
Video signals for output to an NTSC<br />
or PAL standard TV monitor. For maximum convenience,<br />
connect the <strong>RSP</strong>-<strong>1068</strong> to the TV monitor<br />
with Component Video connections. S-Video<br />
signals cannot be converted to composite outputs<br />
and vice versa.<br />
NOTE: When a video input or inputs are selected<br />
for progressive mode on the Other<br />
Options menu, the conversion from composite<br />
or S-Video to Component Video output is<br />
not available for those inputs. The conversion<br />
from composite or S-VIDEO to Component<br />
Video output is only available for the other<br />
video inputs.<br />
Many digital HDTV monitors adjust scan rates<br />
and other video parameters depending on the<br />
type of input connection. You may wish to make<br />
multiple connections between the <strong>RSP</strong>-<strong>1068</strong><br />
and the TV monitor, switching inputs on the<br />
TV to take advantage of these features.<br />
VIDEO 1–5<br />
Composite Video Inputs<br />
Five inputs accepts standard composite video<br />
signals from source components using standard<br />
75 ohm RCA video cables.<br />
VIDEO 1–3<br />
Composite Video Outputs<br />
Three RCA jacks, labeled COMPOSITE VIDEO<br />
OUT 1–3, provide connections for sending<br />
composite video signals for recording on a<br />
VCR or other recording device.<br />
These connections correspond to the VIDEO<br />
IN 1-3 connections. Make sure that you are<br />
consistent. If you hook up a particular VCR to<br />
the VIDEO 1 inputs, hook up the VIDEO 1 output<br />
to the same VCR.
<strong>RSP</strong>-<strong>1068</strong> Surround Sound Processor<br />
18<br />
NOTE: The <strong>RSP</strong>-<strong>1068</strong> cannot convert S-Video<br />
or Component Video signals to composite<br />
video. Therefore, only signals received at the<br />
composite video inputs are available at these<br />
outputs.<br />
VIDEO 1–5 S-Video Inputs<br />
Five inputs, labeled S-VIDEO IN 1–5 accept<br />
S-Video signals from source components.<br />
VIDEO 1–3 S-Video Outputs<br />
Three S-VIDEO jacks, labeled S-VIDEO OUT<br />
1–3, provide connections for sending S-Video<br />
signals for recording on a VCR or other recording<br />
device.<br />
These connections correspond to the VIDEO<br />
IN 1-3 connections. Make sure that you are<br />
consistent. If you hook up a particular VCR to<br />
the VIDEO 1 inputs, hook up the VIDEO 1 output<br />
to the same VCR.<br />
NOTE: The <strong>RSP</strong>-<strong>1068</strong> cannot convert composite<br />
video or Component Video signals to<br />
S-Video. Only signals received at the S-Video<br />
inputs are available at these outputs.<br />
VIDEO 1–3<br />
Component Video Inputs<br />
Component Video connections split the video<br />
into three signals – luminance (Y) and separate<br />
chrominance (PB and PR) signals, allowing<br />
delivery of a reference-quality picture with<br />
high definition signals. Component Video connections<br />
should be used for progressive scan<br />
DVD players and high-definition digital television<br />
receivers. Each of these signals is carried<br />
by a separate 75 ohm video cable with<br />
RCA connectors.<br />
Three sets of inputs, labeled COMPONENT<br />
VIDEO IN 1–3 accept Component video signals<br />
from source components.<br />
NOTE: When using a progressive scan or<br />
1080i HDTV video signal from the Component<br />
Video inputs, the TV monitor cannot display<br />
the video signal and the OSD menus at<br />
the same time. A “progressive” setting in the<br />
Other Options setup menu allows the use of<br />
the main OSD setup menus, even with progressive<br />
or HDTV signals. When the main<br />
OSD setup menus are displayed, the progressive<br />
video signal is interrupted and restored<br />
when the OSD menus are cancelled. The temporary<br />
OSD information displays (such as volume<br />
setting, etc.) are not displayed.<br />
TV Monitor Outputs<br />
The TV MONITOR outputs of the <strong>RSP</strong>-<strong>1068</strong><br />
send the video signal to your TV monitor. Three<br />
types of video output connections are provided<br />
– RCA composite video, S-Video, and Component<br />
Video.<br />
The composite video output only sends signals<br />
from composite video inputs to the TV monitor.<br />
The S-Video output only sends signals from<br />
S-Video video inputs to the TV. The Component<br />
Video output converts signals from ANY<br />
type of source input to the TV. If you have<br />
connected all of your source components with<br />
the same type of connection, then you only<br />
need to make one connection from the<br />
<strong>RSP</strong>-<strong>1068</strong> to the TV monitor. If you connect<br />
the <strong>RSP</strong>-<strong>1068</strong> to the TV monitor with Component<br />
Video connections, you also only need<br />
to make one type of connection because composite<br />
and S-Video signals are converted to<br />
Component Video.<br />
NOTE: When a video input or inputs are selected<br />
for progressive mode on the Other<br />
Options menu, the conversion from composite<br />
or S-Video to Component Video output is<br />
not available for those inputs. The conversion<br />
from composite or S-VIDEO to Component<br />
Video output is only available for the other<br />
video inputs.<br />
ZONE OUT Video Output<br />
The ZONE OUT Video output of the <strong>RSP</strong>-<strong>1068</strong><br />
sends a composite video signal to a TV monitor<br />
in Zone 2.<br />
NOTE: Only composite video input signals are<br />
available at the Zone 2 composite video output.<br />
Digital Audio<br />
Input & Outputs<br />
The <strong>RSP</strong>-<strong>1068</strong> provides digital connections<br />
which may be used in place of, or in addition<br />
to, the analog audio input and output connections<br />
described in the previous sections.<br />
These connections include five digital inputs<br />
and two digital outputs (for recording).<br />
These digital connections can be used with<br />
any source component that supplies a digital<br />
signal, such as a DVD player, CD player, or<br />
satellite TV tuner.<br />
NOTE: With a digital connection, the <strong>RSP</strong>-<strong>1068</strong><br />
will be used to decode the signal, rather than<br />
the source component’s internal decoders.<br />
You must use digital connections for a DVD<br />
player that supplies a Dolby Digital or DTS<br />
signal; otherwise the <strong>RSP</strong>-<strong>1068</strong> will not be<br />
able to decode these formats.<br />
Digital Inputs<br />
The <strong>RSP</strong>-<strong>1068</strong> accepts digital inputs from source<br />
components such as CD players, satellite TV<br />
tuners, and DVD players. The built-in digital<br />
processor senses the correct sampling rates.<br />
There are five digital inputs on the rear panel,<br />
three coaxial and two optical. These digital<br />
inputs can be assigned to any of the input<br />
sources using the INPUT SETUP screen during<br />
the setup process. For example, you can assign<br />
the COAXIAL 1 digital input connector<br />
to the VIDEO 1 source and the OPTICAL 2<br />
digital input to the VIDEO 3 source.<br />
NOTE: When using digital connections, you<br />
should also make the analog audio input connections<br />
described previously. The analog<br />
connection is necessary to record to an analog<br />
recorder in some circumstances or for<br />
ZONE 2 operation<br />
Digital Outputs<br />
The <strong>RSP</strong>-<strong>1068</strong> has two digital outputs (one<br />
coaxial and one optical) to send the digital<br />
signal from any of the digital inputs to a digital<br />
recorder or outboard digital processor.<br />
When a digital input source signal is selected<br />
for listening, that signal is automatically sent<br />
to both digital outputs for recording.<br />
NOTE: Only digital signals from source components<br />
are available at these outputs. Analog<br />
signals cannot be converted and are not<br />
available at the digital outputs.<br />
Other Connections<br />
AC Input<br />
Your <strong>RSP</strong>-<strong>1068</strong> is configured at the factory for<br />
the proper AC line voltage in the country where<br />
you purchased it (USA: 115 volts/60Hz AC<br />
or CE: 230 volts/50 Hz AC ). The AC line<br />
configuration is noted on a decal on the back<br />
of your unit.
19 English<br />
Plug the supplied cord into the AC INPUT<br />
receptacle on the back of the unit.<br />
NOTE: Memorized settings and video labels<br />
are preserved indefinitely, even if the<br />
<strong>RSP</strong>-<strong>1068</strong> is disconnected from AC power.<br />
Master Power Switch<br />
The large rocker switch on the rear panel is a<br />
master power switch. When it is in the OFF<br />
position, power to the unit is completely off.<br />
When it is in the ON position, the front panel<br />
STANDBY and remote control ON/OFF buttons<br />
can be used to activate the unit or put it<br />
into standby mode.<br />
NOTE: After all connections are completed,<br />
the rear panel master power switch should<br />
be put in the ON position and usually left in<br />
that position.<br />
12V TRIGGER Connections<br />
Many <strong>Rotel</strong> amplifiers offer the option of turning<br />
them on and off using a 12 volt trigger. These<br />
three connections provide this 12 volt trigger<br />
signal from the <strong>RSP</strong>-<strong>1068</strong>. When the <strong>RSP</strong>-<strong>1068</strong><br />
is activated, a 12 volt DC signal is sent to the<br />
amplifiers to turn them on. When the <strong>RSP</strong>-<strong>1068</strong><br />
is put in STANDBY mode, the trigger signal<br />
is interrupted and the amplifiers turn off.<br />
To use the remote turn on feature, connect one<br />
of the <strong>RSP</strong>-<strong>1068</strong>’s 12V TRIG OUT jacks to the<br />
12 volt trigger input of a <strong>Rotel</strong> amplifier, using<br />
a cable with mono 3.5 mm mini-plugs on<br />
both ends. The +12 V DC signal appears at<br />
the “tip” connector.<br />
NOTE: The 12V Trigger outputs can be configured<br />
to turn on only when specific input<br />
sources are activated. See the Input Setup<br />
and Zone 2 Setup menus in the Setup section<br />
of this manual for details.<br />
REM IN Jacks<br />
Two 3.5 mm mini-jacks (labeled ZONE and EXT)<br />
receive command codes from an industry-standard<br />
infrared receivers (Xantech, etc.), used<br />
when the IR signals from a hand held remote<br />
control cannot reach the front panel IR sensor.<br />
EXT: The EXT jack is used with an outboard<br />
IR receiver to duplicate the front panel IR sensor.<br />
This feature is useful when the unit is installed<br />
in a cabinet and the front panel sensor<br />
is blocked or when IR signals need to be<br />
relayed to other components.<br />
ZONE: The ZONE jack is used with IR repeater<br />
systems to receiver signals from IR control systems<br />
in remote location. For example, remote<br />
control signals sent to the ZONE REM IN control<br />
the ZONE 2 features of the <strong>RSP</strong>-<strong>1068</strong> and can<br />
be relayed to other components.<br />
Consult your authorized <strong>Rotel</strong> dealer for information<br />
on external receivers and the proper<br />
wiring of a 3.5 mm mini-plugs to fit the REM<br />
IN jacks.<br />
NOTE: The IR signals from the EXT REMOTE<br />
IN and ZONE REMOTE IN jacks can be relayed<br />
to source components using external<br />
IR emitters or hard-wired connections from<br />
the IR OUT jacks. See the following section<br />
for additional information.<br />
IR OUT Jacks<br />
The IR OUT 1 & 2 jacks send IR signals received<br />
at the ZONE REM IN or the EXT REM<br />
IN jacks to an infrared blaster or emitter placed<br />
in front of a source component’s IR sensor. In<br />
addition, the IR OUT can be hard-wired to <strong>Rotel</strong><br />
CD players, DVD players, or tuners with a compatible<br />
connector.<br />
These outputs are used to allow IR signals from<br />
Zone 2 to be sent to the source components,<br />
or to pass along IR signals from a remote in<br />
the main room when the sensors on the source<br />
components are blocked by installation in a<br />
cabinet.<br />
See your authorized <strong>Rotel</strong> dealer for information<br />
on IR emitters and repeater systems.<br />
Computer I/O<br />
The <strong>RSP</strong>-<strong>1068</strong> can be operated from a computer<br />
with audio system control software from<br />
third-party developers. This control is accomplished<br />
by sending operating codes from the<br />
computer via a hard-wired RS-232 serial connection.<br />
In addition, the <strong>RSP</strong>-<strong>1068</strong> can be updated<br />
using special software from <strong>Rotel</strong>.<br />
The COMPUTER I/O input provides the necessary<br />
network connections on the rear panel.<br />
It accepts standard RJ-45 8-pin modular plugs,<br />
such as those commonly used in 10-BaseT UTP<br />
Ethernet cabling.<br />
For additional information on the connections,<br />
cabling, software, and operating codes for<br />
computer control or updating of the <strong>RSP</strong>-<strong>1068</strong>,<br />
contact your authorized <strong>Rotel</strong> dealer.<br />
Making Connections<br />
CD Player<br />
See Figure 3<br />
Connect the left and right analog outputs from<br />
the CD player to the AUDIO IN jacks labeled<br />
CD (left and right).<br />
Optional: Connect the digital output of the<br />
CD player to any of the Optical or Coax digital<br />
inputs on the <strong>RSP</strong>-<strong>1068</strong>. Use the INPUT SETUP<br />
menu to assign the digital input to the CD.<br />
There are no video connections for a CD Player.<br />
DVD Player<br />
See Figure 4<br />
DVD connections can be made to the VIDEO<br />
1, 2, 3, 4, or 5 inputs. In elaborate systems,<br />
you may wish to use VIDEO 4 or VIDEO 5<br />
for DVD players, since these inputs do not have<br />
corresponding OUTPUT connections. If you<br />
choose VIDEO 1, make sure that you use<br />
VIDEO 1 inputs and outputs for all analog audio<br />
and video connections.<br />
Connect a video cable (Composite, S-Video,<br />
and/or Component Video from the output of<br />
the DVD player to the appropriate VIDEO IN<br />
1–5 input. If you intend to use the progressive<br />
scan feature with an HDTV monitor, you<br />
should use Component Video connections.<br />
Connect the digital output of the DVD player<br />
to any one of the OPTICAL IN or COAXIAL<br />
IN digital inputs on the <strong>RSP</strong>-<strong>1068</strong>. Use the<br />
INPUT SETUP screen to assign the digital input<br />
to the same video input source used above.<br />
For example, if you use the Video 4 inputs,<br />
assign the digital input to the VIDEO 4 input.<br />
If you want to record the audio signal from<br />
the DVD player, connect the left and right<br />
analog outputs from the DVD player to the left<br />
and right AUDIO IN jacks corresponding to<br />
the VIDEO IN input selected above.<br />
Cable, Satellite, or HDTV Tuner<br />
See Figure 5<br />
TV tuner connections can be made to the VIDEO<br />
1, 2, 3, 4, or 5 inputs. In elaborate systems,<br />
you may wish to use VIDEO 4 or VIDEO 5<br />
for TV tuners, since these inputs do not have<br />
corresponding OUTPUT connections. If you
<strong>RSP</strong>-<strong>1068</strong> Surround Sound Processor<br />
20<br />
choose VIDEO 1, make sure that you use<br />
VIDEO 1 inputs and outputs for all analog audio<br />
and video connections.<br />
Connect a video cable (Composite Video,<br />
S-Video, and/or Component Video) from the<br />
output of the TV tuner to the appropriate VIDEO<br />
IN 1–5 input. For HDTV signals, you should<br />
use Component Video connections.<br />
Connect the left and right analog outputs from<br />
the TV tuner to the left and right AUDIO IN<br />
jacks corresponding to the VIDEO IN input selected<br />
above.<br />
Optional: Connect the digital output of the<br />
TV tuner to any one of the OPTICAL IN or<br />
COAXIAL IN digital inputs on the <strong>RSP</strong>-<strong>1068</strong>.<br />
Use the INPUT SETUP screen to assign that<br />
digital input to the same video input source<br />
used above. For example, if you use the Video<br />
4 inputs above, assign the digital input to the<br />
VIDEO 4 input.<br />
AM/FM Tuner<br />
See Figure 6<br />
Connect the left and right analog outputs from<br />
the tuner to the AUDIO IN jacks labeled TUNER<br />
(left and right).<br />
There are no digital connections or video<br />
connections for an AM/FM tuner.<br />
Audio Recorder<br />
See Figure 7<br />
Connect the left and right analog outputs from<br />
an audio tape deck to the AUDIO IN jacks<br />
labeled TAPE IN (left and right).<br />
Connect the left/right AUDIO OUT/TAPE OUT<br />
jacks to the inputs on the audio tape deck.<br />
Optional: For a digital recording device, connect<br />
the digital output of the recorder to one<br />
of the OPTICAL IN or COAXIAL IN digital inputs<br />
on the <strong>RSP</strong>-<strong>1068</strong>. Use the INPUT SETUP screen<br />
to assign that digital input to the TAPE source.<br />
If the recording device accepts a digital recording<br />
input, connect one of the OPTICAL OUT<br />
or COAXIAL OUT connections to the digital<br />
input of the recorder.<br />
No video connections are required for an audio<br />
recording device.<br />
Video Recorder<br />
See Figure 8<br />
VCR connections can be made to the VIDEO<br />
1, VIDEO 2, or VIDEO 3 inputs and outputs.<br />
If you choose VIDEO 1, make sure that you<br />
use VIDEO 1 inputs and outputs for all analog<br />
audio and video connections.<br />
Connect video cables (Composite Video,<br />
S-Video, and/or Component Video) from the<br />
output of the VCR to the appropriate VIDEO<br />
IN 1–3 input. If you choose S-Video or Component<br />
Video connections, you should also<br />
make a standard Composite Video connection<br />
so that the TV signals can be displayed<br />
on the <strong>RSP</strong>-<strong>1068</strong> front panel display. [DELETE]<br />
Connect video cables (Composite Video,<br />
S-Video, and/or Component Video) from the<br />
VIDEO OUT jacks to the VCR inputs.<br />
Connect the left and right analog outputs from<br />
the VCR to one pair of the AUDIO IN jacks<br />
labeled VIDEO 1–3.<br />
Connect the left and right AUDIO OUT jacks<br />
for VIDEO 1–3 to the analog inputs on the VCR.<br />
Optional: For a digital recording device, connect<br />
the digital output of the recorder to one<br />
of the OPTICAL IN or COAXIAL IN digital inputs<br />
on the <strong>RSP</strong>-<strong>1068</strong>. Use the INPUT SETUP screen<br />
to assign that digital input to the VIDEO source<br />
(VIDEO 1, 2, or 3) used for the previous connections.<br />
If the recording device accepts a<br />
digital recording input, connect one of the<br />
OPTICAL OUT or COAXIAL OUT connections<br />
to the digital input of the recorder.<br />
DVD-A or SACD Player<br />
See Figure 9<br />
To hook up a DVD-A, an SACD player (or any<br />
external surround decoder), use audio RCA<br />
cables to connect the outputs of the player to<br />
the RCA jacks labeled MULTI INPUT, making<br />
sure that you observe proper channel consistency,<br />
i.e. connect the right front channel to the<br />
R FRONT input, etc. Depending on your system<br />
configuration, make six connections (FRONT<br />
L & R, SURROUND L & R, CENTER, and SUB-<br />
WOOFER), seven connections (adding a CEN-<br />
TER BACK connection), or eight connections<br />
(adding two CENTER BACK connections).<br />
The MULTI inputs are analog bypass inputs,<br />
passing signals directly through to the Volume<br />
Control and preamp outputs, bypassing all of<br />
the digital processing. The <strong>RSP</strong>-<strong>1068</strong> provides<br />
an optional bass redirect feature that duplicates<br />
the seven main channels and passes them<br />
through an analog 100 Hz low pass filter,<br />
creating a summed mono subwoofer output<br />
derived from the main channels. See the IN-<br />
PUT SETUP menu in the Setup section of this<br />
manual for details on bass redirect feature.<br />
TV Monitor<br />
See Figure 10<br />
Connect the TV MONITOR output to the corresponding<br />
input on your television monitor,<br />
using composite video, S-Video, and/or Component<br />
Video cables.<br />
NOTE: The RCA composite video output only<br />
sends signals from RCA composite video<br />
source inputs to the TV monitor. The S-Video<br />
output only sends signals from S-Video source<br />
inputs to the TV. The <strong>RSP</strong>-<strong>1068</strong> upconverts<br />
composite and S-Video signals to Component<br />
Video signals. Therefore, the Component<br />
Video output sends signals from any source<br />
input to the TV.<br />
When configuring the unit, you must specify<br />
either an NTSC or a PAL standard TV monitor.<br />
See the Other Options menu in the Setup<br />
section of this manual.<br />
Connecting Amplifiers<br />
See Figure 11<br />
The <strong>RSP</strong>-<strong>1068</strong> has preamp outputs for connections<br />
to power amplifiers to drive up to seven<br />
speakers in a 5.1, 6.1, or 7.1 channel surround<br />
sound audio system: right/left front channels,<br />
center channel, right/left surround channels,<br />
plus one or two center back channels.<br />
To hook up amplifiers, connect an audio cable<br />
from each PREOUT jack to the input of the amplifier<br />
channel that will power the corresponding<br />
speaker. In a full home theater system, you will<br />
make up to seven different connections in<br />
addition to the subwoofer. These connections<br />
are labeled FRONT L &R, CENTER, and REAR<br />
L & R. There are two CENTER jacks, use either<br />
jack for a single center channel or both<br />
if you have two center channels. In six or seven<br />
channel systems, make one or two additional<br />
connections for center back channels(s). These<br />
jacks are labeled CB1 and CB2. Use CB1 for<br />
a single center back channel.<br />
Make sure that you have each output connected<br />
to the correct amplifier channel:
21 English<br />
1. Connect the front right amplifier to the<br />
FRONT R jack<br />
2. Connect the front left amplifier to the FRONT<br />
L jack.<br />
3. Connect the center channel amplifier to the<br />
CENTER 1 or CENTER 2 jack.<br />
4. Connect the surround right amplifier to the<br />
REAR R jack.<br />
5. Connect the surround left amplifier to the<br />
REAR L jack.<br />
6. Connect the center back right amplifier to<br />
the CB2 jack.<br />
7. Connect the center back left amplifier to<br />
the CB1 jack.<br />
After you have connected the preamp outputs,<br />
you need to configure the <strong>RSP</strong>-<strong>1068</strong> for the<br />
size and style of speakers in your system and<br />
calibrate the relative volume levels of the speakers<br />
using the built-in test tones. See the Setup<br />
section of this manual.<br />
Connecting a Subwoofer<br />
See Figure 11<br />
To hook up a powered subwoofer, connect a<br />
standard RCA audio cable from either of the<br />
two PREOUT jacks labeled SUB to the input<br />
on the subwoofer’s power amp. Both SUB<br />
outputs provide the same signal. Use either<br />
connnection for a single subwoofer. Use both<br />
connections to hook up two subwoofers.<br />
After you have connected the subwoofer, you<br />
need to configure the <strong>RSP</strong>-<strong>1068</strong> to use the subwoofer<br />
and calibrate the relative volume level<br />
of the subwoofer using the built-in test tones.<br />
See the Setup section of this manual.<br />
Zone 2 Connections<br />
See Figure 12<br />
For audio connections to a remote<br />
zone, connect the left and right ZONE OUT<br />
jacks to the left and right channels of a remote<br />
zone amplifier with an RCA audio cable.<br />
For video connections to a remote<br />
zone, connect the ZONE VIDEO OUT jack<br />
to the input of a TV in the remote zone using<br />
a composite video cable.<br />
OPERATING<br />
THE <strong>RSP</strong>-<strong>1068</strong><br />
Considering its large number of features, settings,<br />
and options, the <strong>RSP</strong>-<strong>1068</strong> is remarkably<br />
easy to operate. The key to operating the<br />
<strong>RSP</strong>-<strong>1068</strong> is its system of On-Screen Displays<br />
(OSD) which guide you through various<br />
choices.<br />
The <strong>RSP</strong>-<strong>1068</strong> can be operated from the front<br />
panel or the remote control. Front panel controls<br />
are unusually simple to use, with just a<br />
few knobs and buttons to guide you through<br />
OSD menu options. The remote control provides<br />
more complete control options.<br />
To guide you through the operation of the<br />
<strong>RSP</strong>-<strong>1068</strong>, this section of the manual starts with<br />
explaining the basic layout and function of the<br />
front panel and the remote control. Then, we<br />
explain the basic operations such as turning<br />
the unit on and off, adjusting volume, selecting<br />
a source for listening, etc. Following that<br />
is a detailed explanation of surround sound<br />
modes and how to configure the <strong>RSP</strong>-<strong>1068</strong><br />
for various types of recordings. Finally, there<br />
are instructions for additional features and Zone<br />
2 operations. All of these are features that may<br />
be used in normal use. The last section of the<br />
manual (Configuration) details options that may<br />
be selected during initial setup and configuration<br />
of the unit, many of which will be set<br />
once and left untouched.<br />
Throughout this manual, numbers in gray boxes<br />
refer to the <strong>RSP</strong>-<strong>1068</strong> illustration at the front<br />
of this manual. Letters refer to the RR-1050 remote<br />
illustration. When both appear, the function<br />
is found on both the <strong>RSP</strong>-<strong>1068</strong> and the<br />
remote. When only one appears, that function<br />
is found only on the <strong>RSP</strong>-<strong>1068</strong> or the remote.<br />
Front Panel Overview<br />
The following is a brief overview of the control<br />
and features on the front panel of the<br />
<strong>RSP</strong>-<strong>1068</strong>. Details concerning the use of these<br />
controls are provided in subsequent sections<br />
of this manual describing various tasks.<br />
Front-panel Display<br />
The fluorescent (FL) display on the front panel<br />
of the <strong>RSP</strong>-<strong>1068</strong> provides information useful<br />
for operating the unit. The main portion of the<br />
display has two rows of alpha-numeric text<br />
displays. The top line shows the currently selected<br />
source input on the left and the volume<br />
setting on the right. The second line shows the<br />
current surround mode or other settings as they<br />
are changed (record source selection, Zone<br />
2 source selection, dynamic range settings,<br />
etc.)<br />
Icons along the left side of the display show<br />
the current surround mode. Icons along the<br />
bottom left of the display show the current digital<br />
input. Icons along the right bottom of the display<br />
show individual surround channels when<br />
configuring the system.<br />
The FL display can be turned off, if desired.<br />
See the MENU button section for instructions.<br />
Remote Sensor<br />
This sensor receives IR signals from the remote<br />
control. Do not block this sensor.<br />
NOTE: The remainder of the buttons and controls<br />
on the front panel are described in the<br />
Overview of Buttons and Controls section.<br />
Remote Control Overview<br />
The <strong>RSP</strong>-<strong>1068</strong> includes a full-function learning<br />
remote control that can operate the <strong>RSP</strong>-<strong>1068</strong><br />
plus nine other audio/video components.<br />
A separate manual gives detailed instructions<br />
on programming and using the RR-1050 to<br />
replace all of the remote controls in your system.<br />
The RR-1050 manual covers many extra<br />
features (such as custom labeling of remote<br />
buttons that appear in its LCD display). To avoid<br />
duplication, we provide only basic information<br />
about using the RR-1050 to operate the<br />
<strong>RSP</strong>-<strong>1068</strong> in this manual.<br />
Many of the RR-1050 functions duplicate the<br />
front panel controls. For that reason, we cover<br />
the controls on the remote under appropriate<br />
topics throughout this manual. Letters in gray<br />
boxes next to the name of a function refers to<br />
the labeled illustration of the remote at the<br />
front of this manual.
<strong>RSP</strong>-<strong>1068</strong> Surround Sound Processor<br />
22<br />
Using the RR-1050<br />
AUDIO Button<br />
To operate the <strong>RSP</strong>-<strong>1068</strong> with the remote, make<br />
sure that the AUDIO mode is active by pressing<br />
the AUD button on the remote before you<br />
start. If one of the other buttons (CD, TAPE,<br />
etc.) is pressed, the remote will control another<br />
component, not the <strong>RSP</strong>-<strong>1068</strong>. The AUDIO<br />
mode will stay active until another DEVICE/<br />
INPUT button is pressed.<br />
Programming the RR-1050<br />
PRELOAD Button<br />
The RR-1050 is programmed at the factory to<br />
operate the <strong>RSP</strong>-<strong>1068</strong>. Should the AUDIO<br />
command set on your RR-1050 not operate<br />
the <strong>RSP</strong>-<strong>1068</strong>, the programming may have<br />
been inadvertently changed. To restore the<br />
<strong>RSP</strong>-<strong>1068</strong> programming, press the recessed<br />
PRELOAD button on the remote with the tip<br />
of a ballpoint pen.<br />
NOTE: Pushing the PRELOAD button will erase<br />
all custom programming and learned commands,<br />
restoring the RR-1050 to its factory<br />
condition.<br />
Overview of Buttons and<br />
Controls<br />
This section provides a basic overview of the<br />
buttons and controls on the front panel and<br />
the remote control. Detailed instructions on the<br />
use of these buttons a provided in the more<br />
complete operating instructions in the following<br />
sections. Buttons or controls identified with<br />
a number appear on the front panel. Those<br />
identified with a letter appear on the remote<br />
control. When both a number and a letter<br />
appear, the control is duplicated on both the<br />
front panel and the remote control.<br />
STANDBY Button<br />
POWER Button<br />
The front panel STANDBY button and the remote<br />
control POWER button activate or deactivate<br />
the unit. The rear panel master POWER<br />
switch must be in the ON position for the remote<br />
standby function to operate.<br />
ON/OFF Buttons<br />
The power ON and OFF buttons on the remote<br />
provide discrete ON and OFF commands<br />
to activate the unit or put it in standby mode.<br />
The rear panel master POWER switch must<br />
be in the ON position for the remote standby<br />
function to operate.<br />
VOLUME Knob<br />
VOLUME Button<br />
The large rocker button on the remote and the<br />
large rotary control on the front panel provide<br />
the master VOLUME control, adjusting the<br />
output level of all channels simultaneously.<br />
MUTE Button<br />
Push the MUTE button on the front panel or<br />
the remote once to turn the sound off. An indication<br />
appears in the front panel and onscreen<br />
displays. Press the button again to restore<br />
previous volume levels.<br />
NOTE: Pressing the volume buttons on the remote<br />
also cancels the muting function.<br />
DEVICE/INPUT Buttons<br />
The top row of buttons on the front panel plus<br />
the MULTI INPUT button are used to select<br />
source inputs for listening/viewing.<br />
These buttons are duplicated on the remote,<br />
except that the MULTI INPUT button is labeled<br />
EXT. The buttons on the remote have two functions:<br />
Short press: A short press of any button<br />
changes the device that the remote operates,<br />
but does not change the <strong>RSP</strong>-<strong>1068</strong>’s input<br />
selection.<br />
Long press: A longer press changes the remote<br />
control device and changes the <strong>RSP</strong>-<strong>1068</strong><br />
source input for listening/viewing in the main<br />
room.<br />
NOTE: A long press of the EXT button changes<br />
the input to the 7.1 channel analog MULTI<br />
INPUT. Pressing the AUD button only changes<br />
the remote device; there is no input source<br />
associated with this button.<br />
REC Button<br />
Press this button before a long press of any<br />
DEVICE/INPUT button to select a source for<br />
recording. The signal from the selected source<br />
appears at the TAPE OUT and VIDEO OUT<br />
audio connectors.<br />
ZONE Button<br />
Press this button before a long press of any<br />
DEVICE/INPUT button to select a source for<br />
ZONE 2.<br />
UP/DOWN Buttons<br />
These two buttons on the remote are used to<br />
move the cursor up or down to select lines in<br />
the OSD menus. These buttons are also used<br />
in conjunction with the TONE button to make<br />
CONTOUR/TONE adjustments.<br />
+/– Buttons<br />
These two buttons on the remote are used to<br />
change settings on a selected line in the OSD<br />
menus. Also used for selecting options in some<br />
surround modes.<br />
Speaker Selection Buttons<br />
These three buttons on the remote are used<br />
to select a speaker or group of speakers for<br />
temporary level adjustments. In addition, the<br />
C button is used in conjunction with the UP/<br />
DOWN buttons for temporary adjustment of<br />
group delay/lip synch.<br />
EQ Button<br />
This button on the remote is used to turn on<br />
and off the Cinema EQ feature, a high-cut filter<br />
useful for older movie soundtracks.<br />
LF/HF Knobs<br />
These two front panel rotary controls are used<br />
to make temporary adjustments to the tone or<br />
contour settings, boosting or cutting high frequencies<br />
(HF) and low frequencies (LF) of the<br />
speaker or speakers selected in the Contour<br />
Setup menu.<br />
NOTE: Permanent contour adjustments can be<br />
made using the Contour Setup menu.
23 English<br />
TONE Button<br />
This button on the remote is used for temporary<br />
Contour adjustments. It toggles between<br />
high frequency (HF) and low frequency (LF)<br />
modes. Once a mode is selected, the UP/<br />
DOWN buttons are used to make the adjustments<br />
to the speaker or speakers selected in<br />
the Contour Setup menu.<br />
NOTE: Permanent contour adjustments can be<br />
made using the Contour Setup menu.<br />
Surround Mode Buttons<br />
Five buttons on the remote (2CH, PLC, PLM,<br />
5CH, 7CH) and four buttons on the front panel<br />
(2CH, DOLBY PLII/3ST, DTS/Neo 6, DSP) allow<br />
direct selection of certain surround modes. The<br />
function of these buttons varies depending on<br />
the type of recording being played. See the<br />
Manually Selecting Surround Modes section<br />
for detailed information.<br />
SUR+ Button<br />
This button on the remote is used in conjunction<br />
with the +/– buttons for manual selection<br />
of surround modes and features. See the Manually<br />
Selecting Surround Modes section for<br />
information.<br />
DYN Button<br />
Press the DYN button on the remote to select<br />
the dynamic range control setting in Dolby Digital<br />
surround mode.<br />
MENU/OSD button<br />
Push this button on the remote to turn on the<br />
OSD menu system. If the menu system is already<br />
visible, push this button to cancel the<br />
display. Press and hold the button to turn off<br />
the front panel display.<br />
ENTER Button<br />
The ENTER button is used to confirm and<br />
memorize various settings in the setup and<br />
operation of the <strong>RSP</strong>-<strong>1068</strong>. Its use is described<br />
in detail in the relevant sections.<br />
Basic Operations<br />
This section covers the basic operating controls<br />
of the <strong>RSP</strong>-<strong>1068</strong> and the remote.<br />
Power and Standby On/Off<br />
The rear panel POWER switch on the <strong>RSP</strong>-<strong>1068</strong><br />
is a master power switch. The button must be<br />
in the ON position for the unit to operate. When<br />
it is in the OFF position, the unit is fully off and<br />
cannot be activated from the front panel or<br />
remote control.<br />
In normal operation, the rear panel POWER<br />
switch is always left in the ON position. The<br />
<strong>RSP</strong>-<strong>1068</strong> is activated and deactivated using<br />
the front panel STANDBY button, the remote<br />
control POWER button, or the remote ON/<br />
OFF buttons. When activated, the <strong>RSP</strong>-<strong>1068</strong><br />
is fully functional and the front panel display<br />
illuminated. When deactivated, the unit goes<br />
into a standby mode, with minimal power<br />
applied to the microprocessor.<br />
NOTE: When the unit has AC power applied<br />
and the rear panel POWER switch is on, the<br />
front panel STANDBY LED lights, regardless<br />
of whether the unit is in standby mode or<br />
activated.<br />
The front panel STANDBY button and the remote<br />
control POWER button function as toggle<br />
switches. Press either button to activate the unit.<br />
Press either button again to put the unit in<br />
standby mode.<br />
The ON/OFF buttons on the remote serve the<br />
same function, but provide discrete ON (active)<br />
or OFF (standby) commands.<br />
When using the Zone 2 capability of the<br />
<strong>RSP</strong>-<strong>1068</strong>, the standby activation is completely<br />
independent for the main room and<br />
Zone 2. ON/OFF commands sent from the<br />
remote in the main room will not affect Zone<br />
2. Pressing the ON/OFF buttons on a remote<br />
located in Zone 2 will only affect that zone<br />
and not the main room. When the unit is activated<br />
in ZONE 2, the ZONE 2 LED on the<br />
front panel is lit.<br />
There are three available power mode options,<br />
which may be useful in configuring the<br />
<strong>RSP</strong>-<strong>1068</strong> for special system configurations.<br />
See the Other Options menu in the Setup section<br />
of this manual for additional details on changing<br />
the default standby behavior.<br />
Volume Adjustments<br />
The listening volume of the <strong>RSP</strong>-<strong>1068</strong> can be<br />
adjusted from the front panel or the remote.<br />
Front Panel: Rotate the front panel VOLUME<br />
knob clockwise to increase the volume, counterclockwise<br />
to decrease.<br />
Remote: Press the VOL UP button to increase<br />
the volume; press the VOL DOWN button to<br />
decrease.<br />
When you adjust the volume, the setting is<br />
shown on the TV monitor and the front panel<br />
display. The current volume setting is also shown<br />
on the SYSTEM STATUS OSD screen.<br />
NOTE: The VOLUME controls can be used to<br />
change the volume in Zone 2. Press the frontpanel<br />
or remote control ZONE button and<br />
adjust the volume. After 10 seconds, the<br />
VOLUME control reverts to normal operation.<br />
Muting the Sound<br />
The volume of the <strong>RSP</strong>-<strong>1068</strong> can be turned<br />
off or muted. Push the MUTE button on the<br />
remote once to turn the sound off. A MUTE<br />
indication appears in the OSD and the front<br />
panel displays. Press the MUTE button again,<br />
or adjust the volume settings, to restore output<br />
levels.<br />
Selecting Inputs<br />
You can select any of nine source inputs for<br />
listening and/or watching: CD, TUNER, TAPE,<br />
VIDEO 1, VIDEO 2, VIDEO 3, VIDEO 4, VIDEO<br />
5, or MULTI INPUT.<br />
The front-panel display and the ON-SCREEN<br />
DISPLAY show the name of the current listening<br />
source selection. The labels for VIDEO<br />
sources can be customized to match your<br />
components.<br />
All of the source inputs can be customized using<br />
the ON-SCREEN DISPLAY configuration menus<br />
to accept either analog signals or digital signals<br />
from one of the five assignable digital<br />
inputs. When a digital input is assigned, the<br />
<strong>RSP</strong>-<strong>1068</strong> checks for the presence of a digital<br />
signal at that input. If a digital signal is present<br />
when the source is selected, it is automatically<br />
activated and the proper surround mode en-
<strong>RSP</strong>-<strong>1068</strong> Surround Sound Processor<br />
24<br />
abled. If no digital signal is present, the analog<br />
inputs for that source are selected. This<br />
auto-sensing is the preferred configuration for<br />
digital source inputs such as DVD players.<br />
When an ANALOG input is assigned, the unit<br />
will not access a digital signal, even though<br />
one may be available at the digital input.<br />
By default, the source input buttons are factory<br />
configured to select the following inputs:<br />
CD: Analog input<br />
Tuner: Analog input<br />
Tape: Analog input<br />
Video 1: Digital Coaxial 1<br />
Video 2: Digital Coaxial 2<br />
Video 3: Digital Coaxial 3<br />
Video 4: Digital Optical 1<br />
Video 5: Digital Optical 2<br />
Each source input should be configured using<br />
the ON-SCREEN DISPLAY menu system to<br />
use the desired input type (analog or digital<br />
auto-sensing). See the INPUT MENU section<br />
for configuration instructions.<br />
NOTE: In addition to selecting analog or digital<br />
signals, the configuration options also permit<br />
custom labeling and selection of a default surround<br />
mode for each of the inputs.<br />
The input source buttons can also be used with<br />
the REC button to select an analog input source<br />
signal to be available at the outputs for recording.<br />
Additionally, the input source buttons can<br />
be used with the ZONE button to select an<br />
analog input source for ZONE 2.<br />
Selecting a Source Input from<br />
the Front Panel<br />
To select a source for LISTENING: Press<br />
one of the eight INPUT buttons or the MULTI<br />
INPUT button.<br />
To select a source for RECORDING: Press<br />
the REC button and then press one of the eight<br />
INPUT buttons within 10 seconds.<br />
To select a source for Zone 2: Press the<br />
ZONE button and then press one of the IN-<br />
PUT buttons within 10 seconds.<br />
NOTE: See the section on Zone 2 operations<br />
for details of selecting a source for the remote<br />
zone.<br />
Selecting a Source from the<br />
Remote<br />
To select a source for LISTENING in the<br />
main room: press and hold one of the DE-<br />
VICE/INPUT buttons for more than one second.<br />
To select the MULTI INPUT, press and hold<br />
the EXT button.<br />
NOTE: A short press of a DEVICE/INPUT button<br />
changes the remote control device only,<br />
but does not change the source input.<br />
To select a source for RECORDING: Press<br />
the REC button. Then, press and hold one of<br />
the DEVICE/INPUT buttons within 10 seconds.<br />
Alternatively, you can press the REC button and<br />
then use the +/– buttons to scroll through the<br />
available source options. Select any input (CD,<br />
TUNER, TAPE, or VIDEO 1–5). Selecting the<br />
SOURCE option links the recording source to<br />
the input selected for main room listening.<br />
Whatever input is selected for listening is also<br />
sent to the record outputs.<br />
To select a source for Zone 2: Press the<br />
ZONE button. Then, press and hold one of<br />
the DEVICE/INPUT buttons within 10 seconds.<br />
Alternatively, you can press the ZONE button<br />
and then use the +/– buttons to scroll through<br />
the available source options. Select any input<br />
(CD, TUNER, TAPE, or VIDEO 1–5). Selecting<br />
the SOURCE option links the Zone 2 source<br />
to the input selected for main room listening.<br />
Whatever input is selected for the main room<br />
is also sent to the Zone 2 outputs.<br />
Overview of<br />
Surround Formats<br />
To get the best performance from your<br />
<strong>RSP</strong>-<strong>1068</strong>, it helps to understand the many<br />
surround sound formats available today, to<br />
know which decoding process to use for a<br />
particular recording, and how to select it. This<br />
section provides basic background information<br />
about surround sound formats. The following<br />
sections provide detailed operating instructions<br />
for automatic and manual selection of<br />
surround modes.<br />
Dolby Surround<br />
Dolby Pro Logic II<br />
The most widely available surround sound<br />
format for consumer audio/video is Dolby<br />
Surround ® , available on nearly all commercial<br />
VHS tapes, many television broadcasts,<br />
and most DVDs. Dolby Surround is the consumer<br />
version of the analog Dolby Stereo system<br />
first introduced in the film industry in 1972. It<br />
is a matrix-encoding system that records front<br />
left, front center, front right, and a mono surround<br />
channel into a 2-channel stereo recording.<br />
During playback, a Dolby Pro Logic ® or<br />
Pro Logic II decoder extracts each channel and<br />
distributes it to the appropriate speakers.<br />
The original Dolby Pro Logic decoder delivered<br />
a mono signal with reduced high-frequency<br />
content to the surround speakers. A<br />
more advanced decoder in the <strong>RSP</strong>-<strong>1068</strong>,<br />
Dolby Pro Logic II, increases the separation<br />
and frequency response of the surround channels<br />
for significantly improved performance<br />
with Dolby Surround encoded recordings.<br />
Dolby Pro Logic II decoding should be used<br />
for any analog recording labeled “Dolby Surround”<br />
or any Dolby Digital 2.0 soundtrack.<br />
Dolby Pro Logic II does a superb job deriving<br />
surround sound from conventional 2-channel<br />
stereo recordings, using phase relationships<br />
to extract front, right, center, and surround channels.<br />
A “music mode” makes Pro Logic II an<br />
excellent choice for audio CDs.<br />
Dolby Digital<br />
In 1992, a digital recording system, called<br />
Dolby Digital, was first used in the film industry.<br />
Dolby Digital is a recording/playback system<br />
that uses compression techniques to store<br />
large amounts of audio data efficiently, much<br />
like the JPEG format stores large photographs<br />
in small files on a computer. Because it is<br />
capable of performance beyond that of audio<br />
CDs and can tailor its output for a wide<br />
ranges of system configurations, Dolby Digital<br />
is the standard audio format for DVDs and<br />
for digital television broadcasting in the United<br />
States.<br />
The Dolby Digital system can be used to record<br />
up to six discrete audio channels, but can also<br />
be used for fewer. For example, a Dolby Digital<br />
2.0 soundtrack is a digital 2-channel recording<br />
of a matrix encoded Dolby Surround<br />
soundtrack.. To play a Dolby Digital 2.0 recording,<br />
use Dolby Pro Logic II decoding as<br />
previously described.
25 English<br />
The most common use of Dolby Digital in newer<br />
films, in both the film industry and in home<br />
theater, is Dolby Digital 5.1. Instead of encoding<br />
multiple surround channels on a two-channel<br />
recording, Dolby Digital 5.1 records six discrete<br />
channels: front left, front center, front right,<br />
surround left, surround right, and a Low Frequency<br />
Effects (LFE) channel containing ultralow<br />
bass signals intended for a subwoofer.<br />
A Dolby Digital decoder extracts the channels<br />
from the digital bitstream, converts them to<br />
analog signals and routes them to the appropriate<br />
amplifiers and speakers. All channels<br />
provide full frequency response with total separation<br />
between all channels and large dynamic<br />
range capability. A Dolby Digital 5.1<br />
soundtrack can provide more impressive surround<br />
sound than matrix Dolby Surround.<br />
Decoding of Dolby Digital 5.1 soundtracks is<br />
automatic. When the <strong>RSP</strong>-<strong>1068</strong> detects a Dolby<br />
5.1 signal on one of its digital inputs, it activates<br />
the proper processing. Keep in mind that<br />
Dolby Digital is only available from digital<br />
sources (a DVD, a LaserDisc, or a Digital TV/<br />
Cable/SAT tuner). Also, you must connect the<br />
source with a digital cable (coax or optical)<br />
to an active digital input on the <strong>RSP</strong>-<strong>1068</strong>.<br />
NOTE: Many DVDs have a Dolby Digital 2.0<br />
matrix soundtrack as the default, which should<br />
be decoded with Pro Logic II. The Dolby Digital<br />
5.1 soundtrack may have to be selected<br />
as an option from the setup menus at the beginning<br />
of the DVD. Look for a Dolby Digital<br />
5.1 selection under “Audio” or “Languages”<br />
or “Setup Options” when you insert the disc.<br />
DTS 5.1<br />
DTS 96/24<br />
DTS ® (Digital Theater Systems) is an alternative<br />
digital format competing with Dolby Digital<br />
in both movie theaters and home theater<br />
markets. The basic functions of the DTS system<br />
are similar to those of Dolby Digital (for<br />
example, 5.1 discrete channels), however the<br />
technical details of the compression and decoding<br />
processes differ somewhat and a DTS<br />
decoder is required.<br />
A recent extension of the DTS encoding system<br />
is DTS 96/24. These recordings provide<br />
the performance of a 96kHz sampling rate<br />
while still using actual 48kHz sampling rate<br />
of standard DTS discs.<br />
Like Dolby Digital, DTS can only be used on<br />
a digital recording and, therefore, is only<br />
available for home use on LaserDiscs, DVDs,<br />
or other digital formats. To use the <strong>RSP</strong>-<strong>1068</strong>’s<br />
DTS decoder, you must connect your DVD<br />
player to the <strong>RSP</strong>-<strong>1068</strong>’s digital inputs.<br />
As with Dolby Digital 5.1, detection and proper<br />
decoding of DTS 5.1 signals is automatic.<br />
NOTE: DVDs with a DTS soundtrack almost<br />
always have it configured as an option to the<br />
standard matrix Dolby Surround format. To<br />
use DTS, you may have to go to the setup<br />
menus at the beginning of the DVD and select<br />
“DTS 5.1” instead of “Dolby Surround”<br />
or “Dolby Digital 5.1”. In addition, many DVD<br />
players have the DTS digital bitstream turned<br />
off by default and cannot output a DTS<br />
soundtrack (even if selected on the disc’s<br />
menu) until you activate the player’s DTS output.<br />
If you hear no sound the first time you<br />
attempt to play a DTS disc, go to the DVD<br />
player’s configuration menus and turn on the<br />
DTS bitstream. This is a one-time setting and<br />
need only be done once.<br />
DTS Neo:6<br />
The <strong>RSP</strong>-<strong>1068</strong> features a second type of DTS<br />
surround sound decoding: DTS Neo:6. This<br />
decoding system is similar to Dolby Pro Logic<br />
II and is designed for playback of any 2-channel<br />
stereo recording, either matrix-encoded or not.<br />
The Neo:6 decoder can be used with any<br />
conventional 2-channel source such a stereo<br />
TV or FM broadcast or a CD. It can also be<br />
used as an alternative method of decoding<br />
matrix-encoded Dolby Surround recordings or<br />
TV broadcasts. Activate the DTS Neo:6 decoding<br />
with the DTS Neo:6 button as detailed<br />
later in this section. DTS Neo:6 is not used<br />
with DTS 5.1 digital sources and the button<br />
need not be pressed for those recordings.<br />
Dolby Digital Surround EX<br />
DTS-ES<br />
6.1 and 7.1 Surround<br />
In 1999, the first Dolby Digital soundtrack was<br />
released to theaters with an additional center<br />
back surround channel, intended to increase<br />
the directional effects from behind the audience.<br />
This additional surround channel is encoded<br />
into the two existing surround channels<br />
in Dolby Digital 5.1, using a matrix encoding<br />
process similar to that used previously in<br />
Dolby Surround. This new extended surround<br />
capability is called Dolby Digital Surround EX.<br />
DTS has added a similar capability for recording<br />
this extended surround information called<br />
DTS-ES ® 6.1 Matrix. They have also taken it<br />
one step further and developed the capability<br />
to record this extended surround information<br />
as a discrete channel in a system called<br />
DTS-ES ® 6.1 Discrete.<br />
All of these systems are extensions of the existing<br />
Dolby Digital 5.1 and DTS 5.1 digital<br />
surround sound formats. Users with one center<br />
back speaker (a 6.1 configuration) or two<br />
center back speakers (a 7.1 configuration) can<br />
take advantage of this extended surround information.<br />
On traditional 5.1 channel systems,<br />
Dolby Digital Surround EX or DTS-ES 6.1 discs<br />
sound exactly the same as 5.1 channel discs<br />
in each respective format.<br />
If you have configured your system with one<br />
or two center back speakers, decoding of<br />
DTS-ES discs is automatic, just as it is with standard<br />
DTS soundtracks. Likewise, decoding of<br />
Dolby Digital Surround EX discs is automatic<br />
with one exception. Some Surround EX titles<br />
do not have the detection “flag” encoded on<br />
the disc. To activate the Dolby Digital Surround<br />
EX features for these discs (or for standard 5.1<br />
channel Dolby Digital discs), you must manually<br />
activate Dolby Surround EX processing.<br />
Dolby Pro Logic IIx<br />
6.1 and 7.1 Surround<br />
The latest technology from Dolby uses advanced<br />
matrix decoding for the surround channels in<br />
a 6.1 channel or 7.1 channel system. Working<br />
with any 2.0 channel or 5.1 channel recording,<br />
Dolby Pro Logic IIx processing distributes<br />
the surround channel information<br />
among three or four surround channels, with<br />
a Music mode optimized for musical recordings<br />
and a Cinema mode optimized for film<br />
soundtracks.<br />
<strong>Rotel</strong> XS<br />
6.1 and 7.1 Surround<br />
The <strong>RSP</strong>-<strong>1068</strong> also features <strong>Rotel</strong> XS (eXtra<br />
Surround) processing provides extended surround<br />
performance on 6.1 and 7.1 channel<br />
systems. The key benefit of <strong>Rotel</strong> XS is that it<br />
works at all times with all multichannel digital<br />
signals, even those that might not otherwise<br />
activate Dolby Digital EX or DTS-ES surround<br />
decoding for the center back channel(s). Always<br />
available when center back speaker(s)<br />
are configured in the system setup, <strong>Rotel</strong> XS<br />
decodes the surround channels and distributes
<strong>RSP</strong>-<strong>1068</strong> Surround Sound Processor<br />
26<br />
the extended surround channels to the center<br />
back speaker(s) in a way that tends to create<br />
a diffuse surround effect. <strong>Rotel</strong> XS works with<br />
matrix-encoded surround signals (such as nonflagged<br />
DTS-ES and Dolby Surround EX discs)<br />
as well as digital source material that is not<br />
Dolby Surround EX encoded (such as DTS 5.1,<br />
Dolby Digital 5.1, and even Dolby Pro Logic<br />
II decoded Dolby Digital 2.0 recordings).<br />
DSP Music Modes<br />
Unlike all of the formats mentioned above, the<br />
<strong>RSP</strong>-<strong>1068</strong> offers four surround modes that are<br />
not part of a specific recording/playback system.<br />
These modes (MUSIC 1–4) use digital signal<br />
processing that adds special acoustic effects<br />
to any signal. DSP processing can be used<br />
with Dolby Surround recordings, Dolby Digital<br />
recordings, CDs, radio broadcasts, or any<br />
other source material; however, typically DSP<br />
settings would be used with source material<br />
for which there is no specific surround decoder.<br />
The four MUSIC MODES in the <strong>RSP</strong>-<strong>1068</strong> use<br />
digital delay and reverberation effects to simulate<br />
progressively larger acoustic environments<br />
with MUSIC 1 being the smallest type of venue<br />
(such as a jazz club) and MUSIC 4 being a<br />
large venue (such as a stadium). Typically used<br />
to add ambience and a sense of space when<br />
listening to music sources or other sources that<br />
lack surround sound encoding.<br />
2Ch/5Ch/7Ch Stereo Formats<br />
The <strong>RSP</strong>-<strong>1068</strong> also provides four modes that<br />
disable all surround processing and deliver<br />
stereo signals to amplifiers and speakers. There<br />
are three options:<br />
2CH Stereo: Turns off the center channel and<br />
all surround channels in the system and delivers<br />
a conventional 2-channel signal to the front<br />
speakers. If the system is configured to route<br />
bass signals from the front speakers to the<br />
subwoofer, this capability remains in effect.<br />
Analog Bypass: For 2-channel analog inputs,<br />
there is a special stereo mode that bypasses<br />
ALL of the <strong>RSP</strong>-<strong>1068</strong>’s digital processing.<br />
The two front speakers receive pure analog<br />
stereo full-range signals with no subwoofer<br />
crossover, no delay, no level adjustments, and<br />
no contour adjustment.<br />
5CH Stereo: Distributes a stereo signal to<br />
5.1 channel systems. The left channel signal<br />
is sent, unchanged, to the front left and surround<br />
left speakers. The right channel is sent<br />
to the front right and surround right speakers.<br />
A mono sum of the two channels is sent to the<br />
center channel speaker.<br />
7CH Stereo: This mode is the same as 5CH<br />
Stereo described above except that it also<br />
distributes stereo signals to center back<br />
speaker(s) installed in the system.<br />
Other Digital Formats<br />
Several other digital formats are not surround<br />
sound formats at all, but rather systems for digital<br />
2-channel recordings.<br />
PCM 2-channel: This is an uncompressed<br />
2-channel digital signal such as that used for<br />
standard CD recordings and some DVD recordings,<br />
particularly of older films.<br />
HDCD ® : This system uses higher bit rates and<br />
a variety of enhancements to improve the sonic<br />
performance compared to standard audio CDs.<br />
These discs, labeled HDCD, can be played<br />
on standard CD players. However, when the<br />
digital signal is decoded using an HDCD<br />
decoder like that in the <strong>RSP</strong>-<strong>1068</strong>, they will<br />
provide exceptional musical reproduction.<br />
DTS Music 5.1 Discs: These discs are a<br />
variation of audio CDs that include a DTS 5.1<br />
channel recording. The <strong>RSP</strong>-<strong>1068</strong> decodes<br />
these discs just like a DTS movie soundtrack<br />
when played on a CD player or DVD player<br />
with a digital output connection.<br />
DVD-A music discs: Taking advantage of<br />
the increased storage capacity of the DVD disc,<br />
new high bit rate multichannel audio recordings<br />
are available on DVD-A discs. DVD-A discs<br />
may include multiple versions of the recording<br />
including standard PCM stereo, Dolby<br />
Digital 5.1, DTS 5.1, and 96kHz/24 bit (or<br />
higher) multichannel recordings using MLP<br />
compression. Several of these formats (standard<br />
PCM, Dolby Digital, and DTS 5.1 can<br />
be decoded by the <strong>RSP</strong>-<strong>1068</strong> when the DVD<br />
player is connected with a digital cable. However,<br />
the existing optical and coax digital<br />
connection standard does not provide sufficient<br />
bandwidth for multichannel high sampling<br />
rate MLP recordings. Therefore, DVD-A discs<br />
with these high-resolution audio soundtracks<br />
must be decoded by a the DVD player and<br />
the resulting analog signals sent to the<br />
<strong>RSP</strong>-<strong>1068</strong>’s MULTI INPUT.<br />
SACD ® : This is a proprietary high-resolution<br />
audio standard for use on SACD compatible<br />
disc players. As with high-resolution DVD-A discs,<br />
the bandwidth is too high for today’s digital<br />
connection. Thus, these discs must be decoded<br />
by SACD compatible player, with the output<br />
sent to the RPS-<strong>1068</strong>’s MULTI INPUTS.<br />
MP3: The <strong>RSP</strong>-<strong>1068</strong> also features a decoder<br />
for the digital MP3 (MPEG1- Audio Layer 3)<br />
compression format. MP3 format recordings<br />
are available on the Internet and can be played<br />
on portable MP3 players or some disc players<br />
that can read CD-ROM discs connected<br />
to the <strong>RSP</strong>-<strong>1068</strong>’s digital inputs.<br />
MPEG Multichannel: The <strong>RSP</strong>-<strong>1068</strong> can<br />
decode MPEG Multichannel digital recordings.<br />
Widely used in Europe, this format uses MPEG<br />
data compression to record up to 5.1 channels<br />
of discrete digital audio, similar in function<br />
to the Dolby Digital and DTS formats.<br />
Automatic Surround<br />
Modes<br />
Decoding of digital sources connected to the<br />
digital inputs is generally automatic, with<br />
detection triggered by a “flag” embedded in<br />
the digital recording telling the <strong>RSP</strong>-<strong>1068</strong> what<br />
decoding format is required. For example,<br />
when Dolby Digital 5.1 or DTS 5.1 channel<br />
surround is detected, the <strong>RSP</strong>-<strong>1068</strong> activates<br />
the proper decoding.<br />
The unit will also detect DTS-ES Matrix 6.1 or<br />
DTS-ES Discrete 6.1 discs and activate DTS-ES ®<br />
Extended Surround decoding. Dolby Digital<br />
Surround EX recordings also trigger automatic<br />
decoding (although not all Surround EX DVDs<br />
have the necessary flag and may require manually<br />
activating Surround EX decoding). Likewise,<br />
a digital input from an HDCD ® encoded<br />
compact disc, a standard CD, a DTS 96/24<br />
disc, or MP3 player will be auto-detected and<br />
properly decoded to 2CH stereo operation.<br />
Dolby Pro Logic IIx or <strong>Rotel</strong> XS processing can<br />
be configured to be automatically active in all<br />
6.1 or 7.1 channel systems configured with<br />
center back speaker(s) and will ensure proper<br />
extended surround decoding of all multichannel<br />
digital signals, even those that might not otherwise<br />
trigger the proper extended surround<br />
mode.<br />
In many cases, the <strong>RSP</strong>-<strong>1068</strong> will also recognize<br />
a digital signal with Dolby Surround encoding<br />
(such as the default soundtrack on many DVDs)<br />
and activate Dolby ® Pro Logic II ® decoding.
27 English<br />
NOTE: A digital signal coming into the<br />
<strong>RSP</strong>-<strong>1068</strong> will be recognized and properly<br />
decoded. However, on a DVD with multiple<br />
soundtracks, you must tell the DVD player<br />
which one to send to the <strong>RSP</strong>-<strong>1068</strong>. For example,<br />
you may need to use the DVD’s menu<br />
system to select the Dolby Digital 5.1 or DTS<br />
5.1 soundtrack rather than the default Dolby<br />
Digital 2.0 Dolby Surround soundtrack.<br />
Additionally, you can configure a default surround<br />
mode for each input using the INPUT<br />
SETUP menu (see the Setup section of this<br />
manual). Combined with the auto-detection of<br />
Dolby Digital 5.1 and DTS, this default surround<br />
setting makes operation of the <strong>RSP</strong>-<strong>1068</strong><br />
surround modes totally automatic. For example,<br />
if you set Dolby Pro Logic II movie mode as<br />
the default for all of your video inputs, the<br />
<strong>RSP</strong>-<strong>1068</strong> will automatically decode Dolby Digital<br />
5.1 and DTS soundtracks when they are<br />
played and use Pro Logic II matrix decoding<br />
for all other recordings. For stereo inputs such<br />
as CD and Tuner, you could select STEREO<br />
mode as the default for 2-channel playback<br />
or Dolby Pro Logic II music mode if you prefer<br />
to hear music sources in surround sound.<br />
Manually Selecting<br />
Surround Modes<br />
As described in the previous section, the combination<br />
of auto-detection of Dolby Digital and<br />
DTS recordings and setting default surround<br />
modes for each input during the setup of the<br />
<strong>RSP</strong>-<strong>1068</strong> makes operation of surround modes<br />
totally automatic. For many users, this automatic<br />
surround mode selection will meet all<br />
of their listening needs.<br />
For users who prefer a more active role in setting<br />
surround modes, buttons on the remote and<br />
the front panel provide manual selection of<br />
surround mode that are not automatically detected<br />
or, in some cases, to override an automatic<br />
setting.<br />
Manual settings available from the front panel<br />
and/or the remote might be used when you<br />
want to play:<br />
• Standard 2-channel stereo (left/right speakers<br />
only) with no surround processing.<br />
• Downmixed 2-channel playback of Dolby<br />
Digital 5.1 or DTS recordings.<br />
• Dolby 3-channel stereo (left/right/center)<br />
of 2-channel recordings.<br />
• 5-channel or 7-channel stereo from 2-channel<br />
recordings.<br />
• One of four MUSIC modes for DSP concert<br />
hall simulation from 2-channel recordings.<br />
• Dolby Pro Logic II cinema or music mode<br />
matrix decoding of 2-channel recordings.<br />
• DTS Neo:6 cinema or music mode matrix<br />
decoding of 2-channel recordings.<br />
• Dolby Digital Surround EX decoding of<br />
Dolby Digital 5.1 channel recordings or<br />
Dolby Digital Surround EX discs that do not<br />
trigger automatic decoding.<br />
NOTE: DTS, DTS-ES Matrix 6.1, DTS-ES Discrete<br />
6.1, DTS 96/24, Dolby Digital, MP3,<br />
MPEG Multichannel, HDCD (96kHz), and<br />
PCM 2-channel (96kHz) digital signals are<br />
auto-detected and cannot be overridden.<br />
However, you can choose to use Dolby Digital<br />
Surround EX decoding for any Dolby Digital<br />
5.1 source material. You can also downmix<br />
Dolby Digital 5.1 or DTS 5.1 recordings for<br />
2-channel playback.<br />
• HDCD (non 96kHz) and PCM 2-channel<br />
(non 96kHz) digital signals can be overridden<br />
to Dolby Pro Logic II, Dolby 3-Stereo,<br />
DTS Neo:6, Music 1 – 4, 5CH Stereo,<br />
7CH Stereo, and Stereo.<br />
• Dolby Digital 2-channel Stereo can be overridden<br />
to Dolby Pro Logic II, Dolby 3-Stereo,<br />
and Stereo.<br />
The following topics describe in detail the<br />
manual surround mode options available for<br />
each type of recording:<br />
Dolby Digital 5.1 discs<br />
Dolby Digital Surround EX discs<br />
Dolby Digital decoding is auto-detected and<br />
cannot be overridden. You may, however, select<br />
a 2 channel downmix of 5.1 channel recordings.<br />
In a 6.1ch or 7.1 ch system, you can<br />
also choose Dolby Surround EX, Dolby Pro<br />
Logic IIx Music, Dolby Pro Logic IIx Cinema<br />
(7.1ch only), or <strong>Rotel</strong> XS processing for center<br />
back channels.<br />
NOTE: In addition to the options that follow,<br />
you can press the 2CH button on the front<br />
panel or the remote to toggle between 2-channel<br />
downmix and multichannel playback.<br />
• On a 5.1 system. Press the SUR+ button<br />
on the remote, then press the +/– buttons<br />
to change between DD 5.1 channel<br />
or DD 2.0 channel downmix playback.<br />
• On a 6.1 system. Press the SUR+ button<br />
on the remote, then use the +/– buttons<br />
to step through five optons: DD 2.0<br />
channel downmix, DD 5.1 channel, DD Surround<br />
EX center back processing, DD with<br />
Pro Logic IIx Music center back processing<br />
or DD with <strong>Rotel</strong> XS center back processing.<br />
You should typically select Surround<br />
EX or discs that are labeled Dolby Digital<br />
Surround EX. For standard 5.1 channel<br />
discs, Dolby Pro Logic IIx Music or <strong>Rotel</strong><br />
XS processing will provide a more diffuse<br />
surround effect than the more highly localized<br />
Dolby EX decoding and will probably<br />
be the better 6.1 channel options for non-<br />
Surround EX discs. Selecting DD 5.1 forces<br />
the center back channel processing off for<br />
conventional 5.1 channel playback. You<br />
can also repeatedly press the DOLBY PLII/<br />
3ST button on the front panel until the desired<br />
center back channel option is selected.<br />
• On a 7.1 system. Press the SUR+ button<br />
on the remote, then use the +/– buttons<br />
to step through six optons: DD 2.0<br />
channel downmix, DD 5.1 channel, DD Surround<br />
EX center back processing, DD with<br />
Pro Logic IIx Music center back processing,<br />
DD with Pro Logic IIx Cinema back<br />
channel processing, or DD with <strong>Rotel</strong> XS<br />
center back processing. You should typically<br />
select Surround EX or discs that are<br />
labeled Dolby Digital Surround EX. For<br />
standard 5.1 channel discs, Dolby Pro Logic<br />
IIx Music or <strong>Rotel</strong> XS processing will provide<br />
a more diffuse surround effect than<br />
the more highly localized Dolby EX decoding<br />
and may be the better 7.1 channel<br />
options for non-Surround EX discs. Selecting<br />
DD 5.1 forces the center back channel<br />
processing off for conventional 5.1<br />
channel playback. You can also repeatedly<br />
press the DOLBY PLII/3ST button on the front<br />
panel until the desired center back channel<br />
option is selected.<br />
NOTE: When playing any Dolby Digital source,<br />
you can select one of three dynamic range<br />
control settings. See the Dynamic Range topic<br />
in the Other Settings section of this manual.
<strong>RSP</strong>-<strong>1068</strong> Surround Sound Processor<br />
28<br />
Dolby Digital 2.0 discs<br />
Dolby Digital decoding is auto-detected and<br />
cannot be overridden. You may, however, select<br />
2-channel playback, 5.1 channel playback with<br />
Pro Logic II matrix surround, 6.1/7.1 channel<br />
playback with Pro Logic IIx matrix surround,<br />
or Dolby 3-Stereo playback.<br />
• On a 5.1 system. Press the SUR+ button<br />
on the remote, then use the +/– buttons<br />
to step through four optons: DD 2.0<br />
channel, DD with Pro Logic II Cinema matrix<br />
surround, DD with Pro Logic II Music matrix<br />
surround, or Dolby Digital 3 channel<br />
stereo. You can also repeatedly press the<br />
2CH button on the front panel or the remote<br />
to select the same options.<br />
• On a 6.1/7.1 system. Press the SUR+<br />
button on the remote, then use the +/– buttons<br />
to step through four optons: DD 2.0<br />
channel, DD with Pro Logic IIx Cinema<br />
matrix surround, DD with Pro Logic IIx Music<br />
matrix surround, or Dolby Digital 3 channel<br />
stereo. You can also repeatedly press<br />
the 2CH button on the front panel or the<br />
remote to select the same options.<br />
• To select Cinema or Music options<br />
in Pro Logic II or Pro Logic IIx modes.<br />
Press the SUR+ button twice while in Pro<br />
Logic II or Pro Logic IIx modes. Then, use<br />
the +/– buttons to select the Music or Cinema<br />
options.<br />
NOTE: When playing any Dolby Digital source,<br />
you can select one of three dynamic range<br />
control settings. See the Dynamic Range topic<br />
in the Other Settings section of this manual.<br />
DTS 5.1 discs<br />
DTS 96/24 discs<br />
DTS-ES 6.1 discs<br />
DTS decoding is auto-detected and cannot be<br />
overridden. You may, however, select a 2<br />
channel downmix of 5.1 channel recordings<br />
or add <strong>Rotel</strong> XS center back processing for<br />
5.1 channel discs.<br />
NOTE: In addition to the options that follow,<br />
you can press the 2CH button on the remote<br />
to toggle between 2-channel downmix and<br />
multichannel playback.<br />
• On a 5.1 system. Press the SUR+ button<br />
on the remote, then press the +/– buttons<br />
to change between DTS 5.1 channel<br />
or DTS 2.0 channel downmix playback.<br />
• On a 6.1/7.1 system with a DTS 5.1<br />
disc. Press the SUR+ button on the remote,<br />
then use the +/– buttons to step through<br />
the optonal modes: DTS 2.0 channel downmix,<br />
DTS 5.1 channel, DTS with <strong>Rotel</strong> XS<br />
center back processing, DTS with Pro Logic<br />
IIx Music center back processing, or DTS<br />
with Pro Logic IIx Cinema center back processing<br />
(available only for 7.1 channel<br />
systems). Selecting DTS 5.1 forces the center<br />
back channel processing off for conventional<br />
5.1 channel playback. You can also<br />
repeatedly press the DTS Neo:6 button on<br />
the front panel until the desired option is<br />
selected.<br />
• On a 6.1/7.1 system with a DTS-<br />
ES disc. Press the SUR+ button on the remote,<br />
then use the +/– buttons to step<br />
through three optional modes: DTS 2.0<br />
channel downmix, DTS 5.1, or DTS-ES<br />
6.1ch/7.1ch playback. On the front panel,<br />
press the DTS Neo:6 button while playing<br />
a DTS source to step through the same<br />
options.<br />
• On a 6.1/7.1 system with a DTS 96/<br />
24 disc. Press the SUR+ button on the<br />
remote, then use the +/– buttons to step<br />
through the optonal modes: DTS 2.0 channel<br />
downmix, DTS 96, or DTS 96 with <strong>Rotel</strong><br />
XS center back processing. You can also<br />
repeatedly press the DTS Neo:6 button on<br />
the front panel until the desired option is<br />
selected.<br />
MPEG Multichannel discs<br />
MPEG decoding is auto-detected and cannot<br />
be overridden. You may, however, select a 2<br />
channel downmix of 5.1 channel recordings.<br />
If the system is configured with center back<br />
speaker(s), you can also force <strong>Rotel</strong> XS processing<br />
on or off.<br />
NOTE: In addition to the options that follow,<br />
you can press the 2CH button on the remote<br />
to toggle between 2-channel downmix and<br />
multichannel playback.<br />
• On a 5.1 system. Press the SUR+ button<br />
on the remote, then press the +/– buttons<br />
to change between MPEG 5.1 channel<br />
or MPEG 2.0 channel downmix playback.<br />
• On a 6.1/7.1 system. Press the SUR+<br />
button on the remote, then use the +/– buttons<br />
to step through the optonal modes:<br />
MPEG 2.0 channel downmix, MPEG 5.1<br />
channel, MPEG with <strong>Rotel</strong> XS center back<br />
processing, MPEG with Pro Logic IIx Music<br />
center back processing, or MPEG with<br />
Pro Logic IIx Cinema center back processing<br />
(available only for 7.1 channel systems).<br />
Selecting MPEG 5.1 forces the center back<br />
channel processing off for conventional 5.1<br />
channel playback. You can also repeatedly<br />
press the DSP button on the front panel until<br />
the desired option is selected.<br />
Digital Stereo discs<br />
(PCM, MP3, and HDCD)<br />
This group of recordings includes any non-Dolby<br />
Digital 2-channel signal from the <strong>RSP</strong>-<strong>1068</strong>’s<br />
digital inputs. You can play these recordings<br />
in 2-CH Stereo, Dolby 3-Stereo, 5-CH Stereo,<br />
7-CH Stereo modes. You can also use Dolby<br />
Pro Logic II matrix surround (5.1 ch systems),<br />
Dolby Pro Logic IIx Music (6.1/7.1 ch systems),<br />
Dolby Pro Logic IIx Cinema (6.1/7.1 ch systems),<br />
DTS Neo:6 surround, or one of the<br />
MUSIC 1-4 DSP modes.<br />
All of the bass management settings (speaker<br />
size, subwoofer, and crossover) are in effect<br />
with digital stereo inputs.<br />
NOTE: In addition to the options that follow,<br />
you can select 2-channel, Pro Logic II Cinema<br />
(for 5.1 ch systems), Pro Logic II Music<br />
(for 5.1 ch systems), Pro Logic IIx Music (for<br />
6.1/7.1 ch systems), Pro Logic IIx Cinema<br />
(for 7.1 ch systems), 5-channel stereo, or 7-<br />
channel stereo by pressing one of the surround<br />
mode buttons on the remote (2CH, PLC,<br />
PLM, 5CH, 7CH).<br />
• To select any mode for 2-channel<br />
digital recordings. Press the SUR+ button<br />
on the remote, then use the +/– buttons to<br />
step through the optonal modes until the<br />
desired mode is displayed.<br />
• To select STEREO mode for 2-channel<br />
digital recordings. Press the 2CH<br />
button on the front panel or remote.
29 English<br />
• To select Dolby multichannel modes<br />
for 2-channel digital recordings. You<br />
can also step through the Dolby options<br />
(Pro Logic II, Pro Logic IIx, or 3-Stereo) by<br />
repeatedly pressing the DOLBY PLIIx/3ST<br />
button on the front panel. You can select<br />
Pro Logic or Pro Logic IIx Cinema or Music<br />
modes by pressing the PLC or PLM<br />
buttons on the remote.<br />
To change the Cinema or Music option in<br />
Pro Logic II mode, press the SUR+ button<br />
the remote twice while in Pro Logic II or<br />
Pro Logic IIx modes. Then, press the +/–<br />
buttons to select the option.<br />
• To select DTS Neo:6 mode for 2-<br />
channel digital recordings. You can<br />
also step through the DTS options (Neo:6<br />
Cinema or Neo:6 Music) by repeatedly<br />
pressing the DTS Neo:6 button on the front<br />
panel.<br />
To change the Cinema or Music option in<br />
Neo:6 mode, press the SUR+ button the<br />
remote twice while in Neo:6 mode. Then,<br />
press the +/– buttons to select the option.<br />
• To select DSP multichannel modes<br />
for 2-channel digital recordings. You<br />
can also step through the DSP options<br />
(MUSIC 1-4, 5CH, 7CH) by repeatedly<br />
pressing the DSP button on the front panel.<br />
Directly select 5CH mode by pressing the<br />
5CH button on the remote. Directly select<br />
7CH mode by pressing the 7CH button on<br />
the remote.<br />
Analog Stereo<br />
This type of recording includes any conventional<br />
stereo signal from the <strong>RSP</strong>-<strong>1068</strong>’s analog<br />
inputs, including analog audio from CD<br />
players, FM tuners, VCRs, tape decks, etc.<br />
Analog stereo inputs require a choice about<br />
how the signal is routed through the <strong>RSP</strong>-<strong>1068</strong>.<br />
One option is the analog bypass mode. In this<br />
mode, the stereo signal is routed directly to<br />
the volume control and the outputs. It is pure<br />
2-channel stereo, bypassing all of the digital<br />
circuitry. None of the bass management features,<br />
speaker level settings, contour settings,<br />
or delay settings are active. There is no subwoofer<br />
output. A full-range signal is sent directly<br />
to two speakers.<br />
The other option converts the analog inputs<br />
to digital signals, passing them through the<br />
digital processors in the <strong>RSP</strong>-<strong>1068</strong>. This option<br />
allows all of the features to be active including<br />
bass management settings, crossovers,<br />
subwoofer outputs, contour settings, etc. In this<br />
mode, you can select several surround modes<br />
including 2-CH Stereo, Dolby 3-Stereo, 5-CH<br />
Stereo, 7-CH Stereo modes. You can also use<br />
Dolby Pro Logic II or Pro Logic IIx surround,<br />
DTS Neo:6 surround, or one of the MUSIC<br />
1-4 DSP modes.<br />
NOTE: In addition to the options that follow,<br />
you can select Pro Logic II Cinema, Pro Logic<br />
II Music, Pro Logic IIx Cinema, Pro Logic IIx<br />
Music, 5-channel stereo, or 7-channel stereo<br />
by pressing one of the surround mode buttons<br />
on the remote (PLC, PLM, 5CH, 7CH).<br />
• To select Stereo or Analog bypass<br />
mode for 2-channel analog recordings.<br />
Press the 2CH button on the remote<br />
to toggle between Stereo (with digital processing)<br />
or Analog Bypass (no digital processing)<br />
modes.<br />
• To select any mode for 2-channel<br />
analog recordings. Press the SUR+ button<br />
on the remote, then use the +/– buttons<br />
to step through the optonal modes until<br />
the desired mode is displayed.<br />
• To select Dolby multichannel modes<br />
for 2-channel analog recordings. You<br />
can also step through the Dolby options<br />
(Pro Logic II, Pro Logic IIx, or 3-Stereo) by<br />
repeatedly pressing the DOLBY PLIIx/3ST<br />
button on the front panel. You can select<br />
Pro Logic or Pro Logic IIx Cinema or Music<br />
modes by pressing the PLC or PLM<br />
buttons on the remote.<br />
To change the Cinema or Music option in<br />
Pro Logic II mode, press the SUR+ button<br />
the remote twice while in Pro Logic II or<br />
Pro Logic IIx modes. Then, press the +/–<br />
buttons to select the option.<br />
• To select DTS Neo:6 modes for 2-<br />
channel analog recordings. You can<br />
also step through the DTS options (Neo:6<br />
Cinema or Neo:6 Music) by repeatedly<br />
pressing the DTS Neo:6 button on the front<br />
panel.<br />
To change the Cinema or Music option in<br />
Neo:6 mode, press the SUR+ button the<br />
remote twice while in Neo:6 mode. Then,<br />
press the +/– buttons to select the option.<br />
• To select DSP multichannel modes<br />
for 2-channel analog recordings. You<br />
can also step through the DSP options<br />
(MUSIC 1-4, 5CH, 7CH) by repeatedly<br />
pressing the DSP button on the front panel.<br />
Directly select 5CH mode by pressing the<br />
5CH button on the remote. Directly select<br />
7CH mode by pressing the 7CH button on<br />
the remote.<br />
Other Settings<br />
Temporary Speaker Level<br />
The levels of all channels should be calibrated<br />
using the TEST TONE procedure during the<br />
initial setup of the <strong>RSP</strong>-<strong>1068</strong>. You can make<br />
a temporary change in the relative volume of<br />
the center, surround, center back, or subwoofer<br />
channels using buttons on the remote control<br />
or the front panel controls. These temporary<br />
adjustments only remain in effect until a different<br />
input is selected or until the <strong>RSP</strong>-<strong>1068</strong><br />
is turned off.<br />
To adjust speaker levels using the<br />
remote:<br />
1. Press a selection button on the remote to select<br />
a channel (or pair of channels) for adjustment.<br />
Press the C button to adjust the CEN-<br />
TER channel. Press the S button to adjust the<br />
SUBWOOFER channel. Press the R button<br />
to adjust the rear SURROUND or CENTER<br />
BACK channels (each press of the R button<br />
toggles between the SURROUND channels<br />
and the CENTER BACK channels). The selected<br />
speaker and its current setting appear<br />
briefly in the display.<br />
2. Use the UP or DOWN buttons on the remote<br />
to adjust the output level of the selected<br />
channel(s).<br />
NOTE: If no level adjustment is made for 10<br />
seconds, the levels revert to the default calibrated<br />
settings.<br />
As you select a speaker in the above adjustments,<br />
you may notice an addition choice,<br />
“group delay”. See the following for an explanation<br />
of this feature.
<strong>RSP</strong>-<strong>1068</strong> Surround Sound Processor<br />
30<br />
Temporary Group Delay<br />
The SPEAKER adjustments (described above)<br />
can also be used to make a temporary adjustment<br />
to the group delay or “lip-synch” delay.<br />
Group delay delays the overall audio signal<br />
(to all speakers) by a specified amount to correct<br />
for situations where the video and audio signals<br />
are out of synch. This can occur with<br />
upconverted digital TV signals or when trying<br />
to match a radio broadcast with the video from<br />
a sports event. The settings range from 0 to<br />
500 milliseconds in 5 ms increments.<br />
Like the speaker settings, this is a temporary<br />
adjustment that overrides the permanent default<br />
setting for a video source until a different<br />
input source is selected or the unit is turned<br />
off.<br />
To adjust group delay using the remote:<br />
1. Press the C button on the remote twice.<br />
2. Use the UP or DOWN buttons on the remote<br />
to adjust the amount of delay applied<br />
to all channels.<br />
Dynamic Range<br />
Dolby Digital recordings are capable of wide<br />
dynamic range (the difference between the softest<br />
and loudest sounds). In some cases, this<br />
may tax amplifiers and/or speakers. In other<br />
cases, you may want to reduce the dynamic<br />
range when listening at low volume levels. This<br />
is particularly useful in order to keep dialog<br />
loud enough to be intelligible while avoiding<br />
excessively loud sound effects. Dolby Digital<br />
dynamic compensation is a sophisticated feature<br />
that allows you to adjust the dynamic range<br />
while still preserving fidelity. The actual amount<br />
of compression relies on instructions embedded<br />
in the Dolby Digital recording and varies<br />
to best suit the specific program content.<br />
There are three dynamic range settings available<br />
for Dolby Digital recordings:<br />
MAX: full dynamic range<br />
MID: slightly reduced dynamic range, roughly<br />
comparable to the signal from a compact disc<br />
MIN: more heavily reduced dynamic range,<br />
but still comparable to the signal from a typical<br />
VHS Hi-Fi recording.<br />
To adjust dynamic range:<br />
Press the DYN button on the remote repeatedly<br />
until the desired setting appears in the<br />
front panel display. This setting remains in effect<br />
for all Dolby Digital program material until it<br />
is changed.<br />
NOTE: The dynamic range compensation feature<br />
is only available in Dolby Digital mode.<br />
The setting is ignored with all other types of<br />
recordings.<br />
Contour/Tone Settings<br />
The contour controls (available on the front<br />
panel and the remote control) can be used to<br />
make a temporary change the high or low frequency<br />
content at the frequency extremes.<br />
Adjustments to the contour settings are temporary;<br />
they remain in effect only until a different<br />
source input is selected or the unit is turned<br />
off. Permanent settings can be made using the<br />
Contour Setup menu.<br />
The settings can be adjusted up or down by<br />
a maximum of 6dB. Changing the high frequency<br />
contour (HF) increases or decreases<br />
the treble. Changing the low frequency contour<br />
(LF) increases or decreases the bass content.<br />
The changes affect only the speaker or<br />
speaker(s) selected for adjustment in the Contour<br />
Setup menu. The settings are shown on the<br />
front panel display as you adjust them.<br />
To adjust the contour settings from the<br />
remote:<br />
1. Press the TONE button on the remote. Either<br />
LF or HF appears in the OSD and front<br />
panel displays, depending on which adjustment<br />
is currently active. Press the TONE<br />
button again to toggle to the other adjustment.<br />
2. Press the UP/DOWN buttons on the remote<br />
to increase or decrease the setting. The<br />
display will revert to normal operation following<br />
several seconds of inactivity.<br />
To adjust the contour settings from the<br />
front panel:<br />
1. Turn the LF knob to increase or decrease<br />
the low frequency contour.<br />
2. Turn the HF knob to increase or decrease<br />
the high frequency contour.<br />
More extensive contour adjustments for all<br />
speakers or for any group of speakers (front,<br />
center, surround, etc.) can also be made from<br />
the Contour Settings OSD menu in the Setup<br />
section of this manual.<br />
NOTE: The tone adjustments are available for<br />
all surround modes and inputs, except the<br />
MULTI input and analog bypass mode.<br />
Cinema EQ<br />
The EQ button (remote only) activates or deactivates<br />
a special CINEMA EQ setting. This<br />
equalization may be desirable for playback<br />
of movie source material to compensate for<br />
the acoustic differences between a commercial<br />
cinema and a home theater environment<br />
by reducing the high-frequency content.<br />
The EQ setting is independent for each source<br />
input. Using the button only changes the setting<br />
for the currently active source input.<br />
Zone 2 Operation<br />
The <strong>RSP</strong>-<strong>1068</strong> provides Zone 2 multi-room<br />
capability, allowing you to enjoy music and<br />
operate the system from a second room. From<br />
the remote location, you can select a source<br />
component (independent from the source playing<br />
in the main room), adjust the volume level<br />
in the remote zone, and operate the source<br />
components.<br />
To use the Zone 2 capability, you need additional<br />
components: a pair of speakers installed<br />
in the remote zone, an amplifier to drive them,<br />
an optional TV monitor for video signals, and<br />
a third-party IR repeater system.<br />
Zone 2 can be controlled from the main room<br />
using <strong>RSP</strong>-<strong>1068</strong>’s front panel ZONE button or<br />
using the remote control in the main room. Operation<br />
from the remote zone requires the installation<br />
of an infrared repeater system<br />
(Xantech, Niles, etc.) which relays infrared<br />
remote control commands from Zone 2 to the<br />
ZONE REM IN connector on the back of the<br />
<strong>RSP</strong>-<strong>1068</strong>.
31 English<br />
Several points about the Zone 2 function:<br />
• There are two options for the Zone 2 output<br />
level, selectable from the OSD configuration<br />
menu. VARIABLE output provides full<br />
adjustment of the volume level. FIXED output<br />
disables the Zone 2 volume control with<br />
the output permanently set to a specified level.<br />
This might be useful for sending a line level<br />
signal to a preamp or integrated amp with<br />
its own volume control or to a distribution<br />
amplifier with multiple volume controls.<br />
• The RR-1050 remote control supplied with<br />
the <strong>RSP</strong>-<strong>1068</strong> will operate Zone 2 if used<br />
with a repeater system from the remote<br />
zone. It can also be programmed to operate<br />
<strong>Rotel</strong> source components via the<br />
<strong>RSP</strong>-<strong>1068</strong>'s IR OUT jack.<br />
• Any source component connected to the<br />
<strong>RSP</strong>-<strong>1068</strong>'s analog inputs can be sent to<br />
the Zone 2 outputs. ZONE 2 operates independently<br />
of the main room. You can<br />
select a different source or adjust Zone 2<br />
volume without affecting the MAIN outputs<br />
in any way.<br />
• Avoid sending the same infrared command<br />
to the <strong>RSP</strong>-<strong>1068</strong> front panel sensor and a<br />
Zone 2 repeater at the same time. This<br />
means that Zone 2 must be in a different<br />
room from the <strong>RSP</strong>-<strong>1068</strong>.<br />
Zone 2 Power On/Off<br />
Operation<br />
Once master power is applied to the unit by<br />
pressing the rear panel POWER switch button,<br />
the <strong>RSP</strong>-<strong>1068</strong> provides independent power<br />
on/off operation for both zones. Pressing the<br />
remote control ON/OFF buttons in the main<br />
room activates or deactivates the <strong>RSP</strong>-<strong>1068</strong><br />
in the main room only and has no effect on<br />
Zone 2. However, placing the rear panel master<br />
POWER switch in the OFF position completely<br />
shuts off the unit, for both zones.<br />
NOTE: For proper power on and off operation<br />
with Zone 2, the <strong>RSP</strong>-<strong>1068</strong>’s power mode<br />
should be set to the factory default DIRECT<br />
setting or to the STANDBY setting using the<br />
Other Options menu described in the Setup<br />
section of this manual.<br />
Controlling Zone 2<br />
from the Main Room<br />
You can control Zone 2 from the main room<br />
using front panel or remote control buttons to<br />
activate or deactivate Zone 2, change input<br />
sources, and adjust the volume. Controlling<br />
Zone 2 from the main room is accomplished<br />
by pressing the ZONE button on the front panel<br />
or remote, putting the <strong>RSP</strong>-<strong>1068</strong> in Zone 2 control<br />
mode temporarily. When the Zone 2 status<br />
is displayed, the OSD and/or front panel<br />
displays show the current source selection and<br />
volume in Zone 2 for ten seconds, during which<br />
time you can use the front panel VOLUME<br />
control and INPUT buttons to change the ZONE<br />
2 settings.<br />
To turn Zone 2 on or off:<br />
1. Press the front panel or remote ZONE button.<br />
Zone 2 status appears in the OSD and<br />
front panel displays.<br />
2. Within 10 seconds, press the front panel<br />
or remote ZONE button to toggle Zone 2<br />
on or off.<br />
3. Following 10 seconds with no commands,<br />
the <strong>RSP</strong>-<strong>1068</strong> reverts to normal operation.<br />
To change the Zone 2 input source:<br />
1. Press the front panel or remote ZONE button.<br />
Zone 2 status appears in the OSD and<br />
front panel displays.<br />
2. Within 10 seconds, press one of the IN-<br />
PUT buttons to select a new source for Zone<br />
2. The name of the selected source appears<br />
in the display. Instead of pressing an IN-<br />
PUT button, you can also push the +/–<br />
buttons on the remote to step through the<br />
inputs.<br />
3. Following 10 seconds with no commands,<br />
the <strong>RSP</strong>-<strong>1068</strong> reverts to normal operation.<br />
To change the Zone 2 volume:<br />
1. Press the front panel or remote ZONE button.<br />
Zone 2 status appears in the OSD and<br />
front panel displays.<br />
2. Within 10 seconds, adjust the volume<br />
control on the front panel or remote to<br />
change the Zone 2 output level. The new<br />
setting appears in the display.<br />
3. Following 10 seconds with no commands,<br />
the <strong>RSP</strong>-<strong>1068</strong> reverts to normal operation.<br />
Controlling Zone 2 from the<br />
Remote Location<br />
With a properly configured IR repeater system,<br />
you have full control of Zone 2 using an<br />
RR-1050 remote from the Zone 2 location. You<br />
can select and operate a source, adjust the<br />
volume, and turn Zone 2 on or off. Whatever<br />
commands you send from the RR-1050 will<br />
change Zone 2 and only Zone 2, just as if<br />
you were controlling a totally independent<br />
audio system in that room. These changes will<br />
have no effect on the main listening room.<br />
To turn Zone 2 on or off, press the ON/OFF<br />
buttons on the remote. To adjust the volume<br />
in Zone 2, press the VOLUME buttons on the<br />
remote. To select a different analog input source,<br />
press one of the DEVICE/INPUT buttons on<br />
the remote. You can also use the +/– buttons<br />
to step through the source inputs.<br />
NOTE: The volume adjustment is only available<br />
if the Zone 2 outputs are configured to<br />
use VARIABLE levels. With FIXED levels, the<br />
volume control for Zone 2 is disabled.
<strong>RSP</strong>-<strong>1068</strong> Surround Sound Processor<br />
32<br />
SETUP<br />
The <strong>RSP</strong>-<strong>1068</strong> features two types of information<br />
displays to help operate the system. The<br />
first consists of simple status displays that appear<br />
on the TV screen and/or front panel display<br />
whenever primary settings (Volume, Input, etc.)<br />
are changed. These status displays are selfexplanatory.<br />
A more comprehensive ON-SCREEN DISPLAY<br />
(OSD) menu system is available at any time<br />
by pressing the MENU/OSD button on the<br />
remote. These OSD menus guide you through<br />
the configuration and setup of the <strong>RSP</strong>-<strong>1068</strong>.<br />
In general, the settings made in the configuration<br />
process are memorized as default settings<br />
and need not be made again for normal<br />
operation of the unit.<br />
The OSD menus can be configured to display<br />
several different languages. The default English<br />
version of all the menus is shown at the front<br />
of this manual. If your language is available,<br />
those menus will be shown in the following<br />
instructions. If you would like to change from<br />
the default English language before proceeding,<br />
go to the instructions for the OTHER OP-<br />
TIONS menu later in this manual. From this<br />
menu, you can change the language display.<br />
Menu Basics<br />
Navigation Buttons<br />
The following remote control buttons are used<br />
to navigate the OSD menu system:<br />
L<br />
C<br />
GUIDE<br />
C<br />
S<br />
UP<br />
M<br />
- ENT +<br />
SEARCH –<br />
M<br />
DWN<br />
M<br />
MENU<br />
OSD<br />
PREV CH<br />
R<br />
SEARCH +<br />
MENU/OSD button: Press to display the<br />
SYSTEM STATUS screen. From the SYSTEM STA-<br />
TUS screen, press the ENTER button to display<br />
the MAIN MENU screen which has links to<br />
all other menus. If a menu is already visible,<br />
push this button to cancel the display. The<br />
MENU button on the front panel provides the<br />
same function.<br />
DOWN/UP Buttons: Press to move up and<br />
down in the lists of menu items that appear<br />
on the OSD screens.<br />
+/– Buttons: Press to change the current settings<br />
for a selected menu item on OSD screens.<br />
ENTER Button: From the SYSTEM STATUS<br />
screen, press ENTER to display the MAIN<br />
MENU screen. From any other OSD screen,<br />
press ENTER to confirm a setting and return<br />
to the MAIN menu.<br />
K<br />
C<br />
System Status<br />
SYSTEM STATUS<br />
LISTEN:Tuner<br />
VID INPUT:Video 1<br />
RECORD:Source<br />
MODE:Dolby Digital<br />
INPUT:Coaxial 2<br />
VOLUME:65<br />
ZONE 2:Off<br />
SPEAKERS:FR CNT SUB FL<br />
SR CB1 CB2 SL<br />
The SYSTEM STATUS menu provides a snapshot<br />
of the current system settings and a starting<br />
point for reaching all other screens and<br />
menus. This screen appears when you press<br />
the remote MENU/OSD or front panel MENU<br />
button [DELETE] and displays the following information:<br />
LISTEN: the input source selected for listening.<br />
VID INPUT: the video source selected for<br />
viewing. Can be VIDEO 1–5 or OFF (no video)<br />
as selected on the INPUT SETUP menu. Typically,<br />
the video source matches the audio from<br />
listening source; however a different video input<br />
can be selected.<br />
RECORD: the source selected for recording<br />
from the VIDEO and AUDIO outputs.<br />
MODE: the current surround sound mode.<br />
INPUT: the input selected for the current source:<br />
Optical Digital, Coaxial Digital, Analog, etc.<br />
VOLUME: the current volume setting.<br />
ZONE: the current status of ZONE 2, ON or<br />
OFF.<br />
SPEAKERS: highlights the speakers that are<br />
currently configured for the system (front right,<br />
center, subwoofer, front left, surround left, center<br />
back 1, center back 2, and surround right)<br />
No changes can be made using this screen;<br />
it only provides information. To go to the rest<br />
of the menus, press the ENTER button to go<br />
to the MAIN menu. Press the MENU/OSD<br />
button on the remote to cancel the display and<br />
return to normal operation.<br />
NOTE: The SYSTEM STATUS screen appears<br />
for five seconds when the unit is turned on<br />
and automatically turns off.
33 English<br />
Main Menu<br />
MAIN MENU<br />
INPUT SPEAKER<br />
DELAY TEST TONE<br />
SUB SETUP ZONE 2<br />
OTHER DEFAULT<br />
CONTOUR<br />
EXIT<br />
The MAIN MENU provides access to OSD<br />
screens for various configuration options. MAIN<br />
MENU is reached by pressing the ENTER button<br />
from the SYSTEM STATUS menu described<br />
above or from most other menus. To go to the<br />
desired menu, move the highlight using the<br />
UP/DOWN and +/– buttons on the remote<br />
and press the ENTER button. Press the MENU/<br />
OSD button on the remote to cancel the display<br />
and return to normal operation.<br />
Configuring Inputs<br />
A key step in setting up the <strong>RSP</strong>-<strong>1068</strong> is to<br />
configure each source input using the INPUT<br />
SETUP screens. Configuring the inputs allows<br />
you to set defaults for a number of settings<br />
including the type of input connector, the desired<br />
surround mode, custom labels that appear in<br />
the displays when a source is selected, and<br />
many more. The following OSD menus are used<br />
to configure the inputs.<br />
Input Setup<br />
INPUT SETUP<br />
LISTEN:CD<br />
VID INPUT:Video 1<br />
INPUT LABEL:_______<br />
INPUT:Coaxial 2<br />
CINEMA EQ:Off<br />
12V TRIGGER:1<br />
DEFAULT MODE:Dolby 3 Stereo<br />
GROUP DELAY:200ms<br />
MAIN MENU<br />
The INPUT SETUP menu configures the source<br />
inputs and is reached from the MAIN menu.<br />
The screen provides the following options, selected<br />
by placing the highlight on the desired<br />
line using the UP/DOWN buttons:<br />
LISTEN: changes the current listening input<br />
source (CD, TUNER, TAPE, VIDEO1–5, & MULTI<br />
INPUT). Changing this input also allows you<br />
to select a specific input for configuring.<br />
VID INPUT: select the video source to be<br />
displayed on the TV monitor with the listening<br />
source specified on the first line. Can be<br />
VIDEO 1–5 or OFF (no video). Typically, the<br />
video source matches the audio from listening<br />
source; however a different video input<br />
can be selected. For audio only sources (such<br />
as a CD player), you would typically specify<br />
OFF so that no video is displayed.<br />
INPUT LABEL: The eight character labels for<br />
the all eight inputs can be customized. Place<br />
the highlight on this line to begin labelling. The<br />
first character in the label will be flashing.<br />
1. Press the +/– buttons on the remote to<br />
change the first letter, scrolling through the<br />
list of available characters.<br />
2. Press the ENT button on the remote to confirm<br />
that letter and move to the next position.<br />
3. Repeat steps 1 and 2 until all eight characters<br />
(including blank spaces) have been<br />
completed. The final press of the ENT button<br />
saves the new label.<br />
INPUT: assigns a physical input connection<br />
to use as the default for the source displayed<br />
in the first line of the menu. The options are<br />
ANALOG input, three OPTICAL digital inputs<br />
(OPTICAL 1–3), and five COAXIAL digital inputs<br />
(COAXIAL 1–5).<br />
When a digital input is the default, the unit<br />
will check for a digital signal when the INPUT<br />
SOURCE is selected. If no digital signal is<br />
present, the unit will automatically revert to the<br />
analog input.<br />
When an ANALOG input is the default, the<br />
unit will not access a digital signal, even though<br />
one may be present at the digital input; thus,<br />
the ANALOG setting forces the unit to use an<br />
analog signal. Assigning a digital input (with<br />
its auto-sensing) is generally the preferred configuration<br />
for any source with a digital output.<br />
NOTE: If a source connected to a digital input<br />
is selected, that signal will automatically be<br />
sent to both digital outputs for recording.<br />
CINEMA EQ: The <strong>RSP</strong>-<strong>1068</strong> includes a CIN-<br />
EMA EQ feature which reduces the high-frequency<br />
content of movie soundtracks to simulate<br />
the frequency response of a large movie theater<br />
and/or eliminate sibilance. You can turn<br />
the CINEMA EQ on or off as the default setting<br />
for the selected input using this menu<br />
choice. In general, this setting should be OFF<br />
for most source inputs, unless you are consistently<br />
bothered by excessively bright sound from<br />
movie soundtracks.<br />
12V TRIGGER: The <strong>RSP</strong>-<strong>1068</strong> has three 12V<br />
trigger outputs (labeled 1, 2, and ZONE2) that<br />
supply a 12V DC signal to turn on <strong>Rotel</strong> components<br />
and other components as needed. This<br />
menu item turns on specific 12V trigger outputs<br />
whenever the indicated source is selected.<br />
For example, set up the VIDEO 1 input to turn<br />
on the 12V trigger for your DVD player. The<br />
options for this menu item are:<br />
1/2/ALL/NO.<br />
DEFAULT MODE: The DEFAULT MODE setting<br />
allows you to set a default surround sound<br />
mode for each source input. The default setting<br />
will be used unless the source material<br />
triggers automatic decoding of a particular type<br />
or unless the default setting is temporarily overridden<br />
by the front panel or remote surround<br />
mode buttons.<br />
NOTE: Default surround modes are stored independently<br />
for the analog and digital inputs<br />
for each source.<br />
Options for the default surround modes are:<br />
Dolby Pro Logic II, Dolby 3 Stereo, Music 1,<br />
Music 2, Music 3, Music 4, 5ch Stereo, 7ch<br />
Stereo, PCM 2 Channel, DTS Neo:6, Bypass<br />
(for analog input only), and Stereo.<br />
NOTE: The following types of digital discs or<br />
source material are generally detected automatically<br />
and the proper decoding activated<br />
with no action or setting required: DTS, DTS-ES<br />
Matrix 6.1, DTS-ES Discrete 6.1, Dolby Digital,<br />
Dolby Digital Surround EX, Dolby Digital<br />
2-channel, MPEG Multichannel, PCM 2-Channel,<br />
PCM 96kHz, MP3, HDCD, and HDCD<br />
96kHz.<br />
Since Dolby Digital 5.1 and DTS sources are<br />
detected and decoded automatically, the default<br />
setting typically tells the <strong>RSP</strong>-<strong>1068</strong> how<br />
to process a 2-channel stereo signal. For example,<br />
you might have your CD input default<br />
to 2-channel stereo, DVD and VCR inputs default<br />
to Dolby Pro Logic II processing for matrixencoded<br />
Dolby surround material, and TUNER<br />
input default to one of the MUSIC modes.<br />
In some cases, the default setting can be manually<br />
overridden by the front panel surround<br />
mode buttons or the SUR+ button on the remote.<br />
See the Manually Selecting Surround<br />
Modes section of this manual for more information<br />
on which settings can be overridden.
<strong>RSP</strong>-<strong>1068</strong> Surround Sound Processor<br />
34<br />
Two of the default surround mode settings<br />
available on this menu offer additional choices.<br />
Dolby Pro Logic II decoding offers a choice<br />
of CINEMA or MUSIC settings. DTS Neo:6<br />
decoding offers a choice of CINEMA or MUSIC<br />
settings. When either Dolby Pro Logic II or DTS<br />
Neo:6 is selected with this menu item, the<br />
current setting choice will also be displayed.<br />
In addition, the function of the ENTER button<br />
changes, taking you to a sub-menu where you<br />
can change the settings and/or additional<br />
parameters for Dolby Pro Logic II or DTS Neo:6<br />
decoding. See the following section for details.<br />
GROUP DELAY: Also known as “lip-sync”<br />
delay, this setting delays the audio signal for<br />
an input by the specified amount to match the<br />
video input. This feature can be useful when<br />
the video signal is delayed more than the audio<br />
signal as sometimes happens with upconverted<br />
digital TV processors or when trying to match<br />
a radio broadcast with the video from a sports<br />
event.<br />
The range of available settings is from 0ms<br />
to 500ms, in 5ms increments. The setting is<br />
individually stored for each input and is the<br />
default group delay each time that input is selected.<br />
The setting can be temporarily overridden<br />
from the front panel or the remote.<br />
OPTIONS: This selection is only visible when<br />
Pro Logic II or Neo:6 surround mode is selected.<br />
Highlight this line and press ENTER to go to<br />
submenus with additional options for these<br />
surround modes. See below.<br />
To return to the MAIN menu from the INPUT<br />
SETUP menu (except when Dolby Pro Logic II<br />
or DTS Neo:6 is selected in the SURR MODE<br />
field), press the ENTER button. Press the MENU/<br />
OSD button on the remote to cancel the menu<br />
display and return to normal operation.<br />
Multi Input Setup<br />
INPUT SETUP<br />
LISTEN:Multi Input<br />
VID INPUT:Video 1<br />
INPUT LABEL:_______<br />
12V TRIGGER:1<br />
LFE REDIRECT:On<br />
MAIN MENU<br />
When the MULTI INPUT source is selected on<br />
the INPUT SETUP menu, the available options<br />
change to reflect the fact that these inputs are<br />
direct analog inputs and bypass the <strong>RSP</strong>-<strong>1068</strong>’s<br />
digital processing. The INPUT, CINEMA EQ,<br />
and DEFAULT MODE options are not available<br />
since these are all digitally implemented features.<br />
The VID INPUT, INPUT LABEL, and 12V TRIG-<br />
GER options are still available and work as<br />
described on the previous menu.<br />
One additional option, LFE REDIRECT, provides<br />
an alternative bass management configuration.<br />
Typically, the eight channels of the MULTI<br />
INPUT are configured as pure analog bypass<br />
signals, going straight from the inputs to the<br />
volume control and the preamp outputs, bypassing<br />
all of the digital processing. There are<br />
no crossovers and no bass management; therefore,<br />
whatever signal goes into the subwoofer<br />
channel will be sent to the subwoofer preamp<br />
output.<br />
This configuration may not be ideal for multichannel<br />
systems configured with high-pass<br />
speakers, redirecting bass to a powered subwoofer.<br />
An option, called LFE REDIRECT, sends<br />
the seven main channels directly to the outputs<br />
as usual. In addition, it takes a duplicate<br />
copy of these seven channels, combines them<br />
into mono, and routes them through a 100<br />
Hz analog low-pass crossover to the subwoofer<br />
preamp output. This creates a summed mono<br />
subwoofer signal, derived from the seven main<br />
channels of the MULTI INPUT.<br />
Use the LFE REDIRECT off for the pure analog<br />
bypass configuration. Use the LFE REDIRECT<br />
on setting to derive the mono summed subwoofer<br />
output.<br />
Dolby Pro Logic II (x)<br />
DOLBY PRO LOGIC II(X)<br />
MODE:Music<br />
OPTIONAL PARAMETERS<br />
PANORAMA:Off<br />
DIMENSION:3<br />
CENTER WIDTH:0<br />
INPUT SETUP MENU<br />
When Dolby Pro Logic II (x) is selected as the<br />
default surround mode on the INPUT SETUP<br />
menu, there are additional settings and parameters<br />
to optimize the surround decoding<br />
for music or movie soundtracks. Dolby Pro Logic<br />
II uses matrix decoding algorithms to derive<br />
a center channel and surround channels from<br />
2-channel source material.<br />
The first line of the Dolby Pro Logic II (x) submenu<br />
selects CINEMA or MUSIC modes for<br />
matrix decoding. Use the +/– buttons on the<br />
remote to select a mode.<br />
Select CINEMA to optimize for Dolby Surround<br />
encoded movie soundtracks including increased<br />
surround separation and full-bandwidth<br />
surround channel frequency response.<br />
Select MUSIC to optimize for musical recordings.<br />
When the MUSIC mode is selected, three<br />
additional parameters will be available on the<br />
OSD screen. Use the UP/DOWN buttons on<br />
the remote to select a parameter. Use the +/<br />
– buttons to change the selected parameter<br />
as follows:<br />
• PANORAMA: The Panorama option<br />
extends the front stereo image to include<br />
the surround speakers for a dramatic “wraparound”<br />
effect. The options are OFF or ON.<br />
• DIMENSION: The Dimension option allows<br />
you to gradually adjust the soundfield<br />
towards the front or towards the rear. There<br />
are seven incremental settings from 0 to<br />
6. A setting of 0 shifts the soundfield towards<br />
the rear for maximum surround effect.<br />
A setting of 6 shifts the soundfield to<br />
the front for minimum surround effect. The<br />
default setting of 3 provides a “neutral”<br />
balance between the two extremes.<br />
• CENTER WIDTH: The Center Width option<br />
allows you to spread the signal intended for<br />
the center speaker to the left and right front<br />
speakers, widening the perceived soundfield.<br />
There are eight incremental settings from 0<br />
to 7. With the default setting of 0, there is<br />
no center width spreading and all of the center
35 English<br />
channel information is sent to the center<br />
speaker. The maximum setting of 7 shifts all<br />
of the center channel signal to the left and<br />
right speakers, essentially muting the center<br />
speaker and maximizing the soundfield width.<br />
Other settings provide incremental steps between<br />
the two extremes.<br />
When you have completed all the desired<br />
adjustments, highlight the INPUT SETUP MENU<br />
line at the bottom of the screen and press the<br />
ENTER button to return to the INPUT SETUP<br />
menu (or just press the ENTER button).<br />
DTS Neo:6<br />
DTS Neo:6<br />
MODE:Cinema<br />
INPUT SETUP MENU<br />
When DTS Neo:6 is selected as the default<br />
surround mode on the INPUT SETUP menu,<br />
there are additional option settings and parameters<br />
available to optimize the surround<br />
decoding for various types of recordings, music<br />
or movie soundtracks. DTS Neo:6 uses matrix<br />
decoding algorithms to derive a center<br />
channel and surround channels from 2-channel<br />
source material.<br />
In DTS Neo:6 surround mode, there will only<br />
be one choice available on the sub-menu:<br />
selecting CINEMA or MUSIC modes. Use the<br />
+/– buttons on the remote to change the settings.<br />
• Select CINEMA to optimize the DTS Neo:6<br />
decoding for movie soundtracks.<br />
• Select MUSIC to optimize the DTS Neo:6<br />
decoding for musical recordings.<br />
When you have completed the setting, highlight<br />
the INPUT SETUP MENU line at the bottom<br />
of the screen and press the ENTER button<br />
to return to the INPUT SETUP menu (or just<br />
press the ENTER button).<br />
Configuring<br />
Speakers and Audio<br />
This section of the setup process covers items<br />
concerning audio reproduction such as the<br />
number of speakers, bass management including<br />
subwoofer crossovers, establishing equal<br />
output levels for all channels, delay settings,<br />
and tone contour settings.<br />
Understanding Speaker<br />
Configuration<br />
Home theater systems vary in the number of<br />
speakers and the bass capabilities of those<br />
speakers. The <strong>RSP</strong>-<strong>1068</strong> offers surround modes<br />
tailored to systems with various numbers of<br />
speakers and bass management features which<br />
send bass information to the speaker(s) best<br />
able to handle it – subwoofers and/or large<br />
speakers. For optimum performance, you must<br />
tell the <strong>RSP</strong>-<strong>1068</strong> the number of speakers in<br />
your system and how bass should be distributed<br />
among them.<br />
NOTE: There are two types of bass in a surround<br />
system. The first is bass recorded in each<br />
of the main channels (front, center, and surround).<br />
This bass is present in all recordings<br />
and soundtracks. In addition, Dolby Digital 5.1<br />
and DTS 5.1 recordings may have a Low Frequency<br />
Effects (LFE) channel – the .1 channel.<br />
This LFE channel, typically played by a subwoofer,<br />
is used for effects such as explosions<br />
or rumble. The use of the LFE channel will vary<br />
from soundtrack to soundtrack. Recordings that<br />
are not encoded in Dolby Digital or DTS do<br />
not have the LFE channel.<br />
The following configuration instructions refer to<br />
LARGE and SMALL speakers, referring more<br />
to their desired bass configuration than their<br />
physical size. Specifically, use the LARGE setting<br />
for speakers that you want to play deep<br />
bass signals. Use the SMALL designation for<br />
speakers that would benefit from having their<br />
bass sent to more capable speakers. The bass<br />
management system redirects bass information<br />
away from all SMALL speakers and sends it to<br />
the LARGE speakers and/or the SUBWOOFER.<br />
It may be useful to think of LARGE as “full-range”<br />
and SMALL as “high-pass filtered.”<br />
Four typical examples of the many possible<br />
system configurations illustrate the principles<br />
behind bass management:<br />
• Five LARGE speakers and subwoofer:<br />
This system requires no bass redirection.<br />
All five speakers play the normal<br />
bass recorded in their respective channels.<br />
The subwoofer plays only the LFE<br />
channel bass. Depending on the<br />
soundtrack, there may be minimal use of<br />
the LFE channel, so the subwoofer would<br />
be under utilized. Meanwhile the normal<br />
bass places higher demands on the capabilities<br />
of the other speakers and the amplifiers<br />
driving them.<br />
• LARGE front, center, surround<br />
speakers, no subwoofer. The normal<br />
bass from the front, center, and surround<br />
channels is played in its respective speakers.<br />
With no subwoofer, the LFE bass is redirected<br />
to all five LARGE speakers. This<br />
places significant demands on these speakers<br />
and their amplifiers, as they must play<br />
their own normal bass plus the very demanding<br />
LFE bass.<br />
• All SMALL speakers and subwoofer.<br />
The normal bass from all channels is redirected<br />
to the subwoofer, which also plays<br />
the LFE channel. The subwoofer handles<br />
ALL of the bass in the system. This configuration<br />
provides several benefits: deep bass<br />
is played by the speaker most suited to do<br />
so, the main speakers may play louder with<br />
less distortion, and the need for amplifier<br />
power is reduced. This configuration should<br />
be used with bookshelf-size or smaller main<br />
speakers. It should also be considered in<br />
some cases with floorstanding front speakers.<br />
This configuration is advantageous<br />
when driving the system with moderate<br />
power amplifiers.<br />
• LARGE front speakers, SMALL center<br />
and surround speakers, and a<br />
subwoofer. The normal bass from the<br />
SMALL center and surround speakers is redirected<br />
to the LARGE front speakers and<br />
the subwoofer. The LARGE front speakers<br />
play their own normal bass plus the redirected<br />
bass from the SMALL speakers and<br />
LFE bass. The subwoofer plays the LFE bass<br />
plus the redirected bass from all of the other<br />
channels. This might be an appropriate configuration<br />
with a pair of very capable front<br />
speakers driven by a large power amplifier.<br />
A potential disadvantage with mixed<br />
LARGE and SMALL configurations is that<br />
the bass response may not be as consistent<br />
from channel to channel as it might<br />
be with the all SMALL configuration.
<strong>RSP</strong>-<strong>1068</strong> Surround Sound Processor<br />
36<br />
NOTE: As an alternative configuration with a<br />
satellite/subwoofer package as the front<br />
speakers, follow the speaker manufacturer’s<br />
instructions, connecting the high-level inputs<br />
of the powered subwoofer directly to the front<br />
speaker outputs of the <strong>RSP</strong>-<strong>1068</strong> and connecting<br />
the satellites to the subwoofer’s own<br />
crossover. In this arrangement, the speakers<br />
would be classified as LARGE and the subwoofer<br />
setting would be OFF for all surround<br />
modes. No information is lost during playback<br />
because the system redirects bass information<br />
to the front LARGE speakers. While<br />
this configuration ensures proper satellite<br />
speaker operation by using the speaker’s own<br />
crossovers, it has some disadvantages in terms<br />
of system calibration and would generally not<br />
be the preferred configuration.<br />
Speaker Setup<br />
SPEAKER SETUP<br />
FRONT:Large<br />
CENTER:Large<br />
SURROUND:Large<br />
CENTER BACK:Large1<br />
SUBWOOFER:Yes<br />
ADVANCED:Enter<br />
MAIN MENU<br />
The SPEAKER SETUP menu is used to configure<br />
the <strong>RSP</strong>-<strong>1068</strong> for use with your specific<br />
loudspeakers and to determine the bass management<br />
configuration as described in the<br />
previous overview. The menu is accessed from<br />
the MAIN menu.<br />
The following speaker options are available:<br />
FRONT SPEAKERS (small/large): Use the<br />
LARGE setting to have the front speakers play<br />
low bass (full-range). Use the SMALL setting<br />
to redirect normal bass away from these speakers<br />
to a subwoofer (high-pass filtered).<br />
CENTER SPEAKER(S) (large/small/<br />
none): Use the LARGE position (not available<br />
with SMALL front speakers) to have the center<br />
speaker play low bass (full-range). Use the<br />
SMALL position if your center channel speaker<br />
has limited low frequency capability, or if you<br />
prefer that the bass be sent to the subwoofer<br />
(high-pass). Select the NONE setting if your<br />
system does not have a center channel speaker<br />
(the surround modes will automatically divide<br />
all center channel information equally between<br />
the two front speakers, creating a phantom<br />
center channel).<br />
SURROUND SPEAKERS (large/small/<br />
none): Select the LARGE setting (not available<br />
with SMALL front speakers) to have the<br />
surround speakers play low bass (full-range).<br />
If your rear speakers have limited bass capability<br />
or if you would prefer that the bass go<br />
to a subwoofer, use the SMALL setting (highpass).<br />
If your system has no rear surround speakers,<br />
select the NONE setting (surround channels<br />
are added to the front speakers so none<br />
of the recording is lost).<br />
CENTER BACK SPEAKER(S) (large1/<br />
large2/small1/small2/none): Some<br />
systems have one or two additional center back<br />
surround speakers. Select the LARGE settings<br />
(not available with SMALL front speakers) to<br />
have your center back speaker(s) play low bass.<br />
Use LARGE 1 if you have one center back<br />
speaker (6.1) or LARGE 2 (7.1) if you have<br />
two center back speakers (7.1). If your center<br />
back speakers have limited bass capability<br />
or if you would prefer that the bass go to<br />
a subwoofer, use the SMALL setting (SMALL1<br />
for one speaker, SMALL2 for two speakers).<br />
If your system has no center back speakers,<br />
select the NONE setting. With center back<br />
speakers, the <strong>Rotel</strong> XS eXtra surround, Dolby<br />
Digital EX, DTS-ES, Dolby Pro Logic II, DTS<br />
Neo:6 or other decoders will provide center<br />
back signals for any surround mode.<br />
SUBWOOFER (yes/no/max): The YES setting<br />
is the standard setting if your system has<br />
a subwoofer. If your system does not have a<br />
subwoofer, select NO. Select the MAX setting<br />
for maximum bass output with normal bass<br />
being duplicated by both the subwoofer and<br />
any LARGE speakers in the system.<br />
ADVANCED: Speaker configuration is generally<br />
a global setting for all surround modes<br />
and need only be done once. However, for<br />
special circumstances, the <strong>RSP</strong>-<strong>1068</strong> provides<br />
the option of setting the speaker configuration<br />
independently for each of four surround modes.<br />
Select the ADVANCED line on the menu and<br />
press ENTER to go to the ADVANCED SPEAKER<br />
SETUP menu described in the following section.<br />
To change a setting on the SPEAKER SETUP<br />
menu, place the highlight on the desired line<br />
using the UP/DOWN buttons and use the +/<br />
– buttons to toggle through the available settings.<br />
To return to the MAIN menu, press the<br />
ENTER button. Press the MENU/OSD button<br />
on the remote to cancel the display and return<br />
to normal operation.<br />
Advance Speaker Setup<br />
ADV SPEAKER SETUP<br />
SPEAKER:Front<br />
CROSSOVER:100Hz<br />
DOLBY:Small<br />
DTS:Small<br />
STEREO/MPEG:Large<br />
MUSIC:Small<br />
SPEAKER SETUP MENU<br />
In most cases, the standard speaker configuration<br />
described above is a global setting and<br />
can be used for all surround modes. However,<br />
the <strong>RSP</strong>-<strong>1068</strong> provides the capability to customize<br />
these settings for four different surround<br />
modes: Dolby, DTS, Stereo, and Music. For<br />
example, you could set up the Dolby and DTS<br />
modes for 5.1 channel sound, while the Stereo<br />
mode changes to a 2-speaker setup with<br />
or without a subwoofer. In addition, the AD-<br />
VANCED SPEAKER SETUP allows you to select<br />
a customized high-pass crossover frequency<br />
for the front, center, surround, and surround<br />
back speakers.<br />
NOTE: In most systems, the default settings on<br />
this menu will provide the most predictable<br />
results and most users will not need to change<br />
any settings. You should fully understand bass<br />
management and have a specific reason for<br />
needing a custom configuration before changing<br />
these settings. Otherwise, skip to the following<br />
topic, SUBWOOFER SETUP.<br />
The available settings on the ADVANCED<br />
SPEAKER SETUP menu are as follows:<br />
SPEAKER (front/center/surround/center<br />
back/subwoofer): Select the set of<br />
speakers to be configured with custom settings.<br />
CROSSOVER (40Hz/60Hz/80Hz/<br />
100Hz/120Hz/150Hz/200Hz): Typically,<br />
the <strong>RSP</strong>-<strong>1068</strong> uses a single master setting<br />
for the high-pass and low-pass crossover<br />
point between all SMALL speakers and the<br />
subwoofer. This master crossover point is set<br />
on the SUBWOOFER SETUP menu described<br />
in the following section. When you first access<br />
the ADVANCED SPEAKER SETUP menu,<br />
the current master crossover point will be shown<br />
on this line. Change the value of this line only<br />
if you want the current speaker to have a different<br />
crossover point. For example, if your<br />
master crossover is set to 80Hz, but you want<br />
your front speakers to crossover to the subwoofer<br />
at 60 Hz, you would select 60Hz for<br />
the front speakers on this line. This setting ONLY
37 English<br />
affects redirected bass and does not affect the<br />
LFE channel in any way. The OFF setting (available<br />
only for the subwoofer) sends a full-range<br />
signal to your subwoofer so that you can use<br />
its built-in low-pass filter.<br />
NOTE: When a speaker is set to LARGE on<br />
the SPEAKER SETUP menu or on this MENU,<br />
the crossover setting is not available since,<br />
by definition, a LARGE speaker plays fullrange<br />
with no bass redirection to the subwoofer<br />
and no crossover. Likewise, the OFF<br />
setting for the subwoofer crossover is not available<br />
for SMALL speakers, since SMALL means<br />
that the speaker will redirect its bass below a<br />
given crossover point to the subwoofer. In<br />
addition, the CROSSOVER setting is not available<br />
for the MULTI INPUT.<br />
DOLBY (large/small/none): Sets the<br />
current speaker (shown in the first line) to<br />
LARGE, SMALL, or NONE, overriding the<br />
master setting from the SPEAKER SETUP menu.<br />
This setting will ONLY take effect with Dolby<br />
Digital or Dolby Pro Logic II decoding.<br />
DTS (large/small/none): The same options<br />
described for Dolby above, except these<br />
settings ONLY take effect with DTS and DTS<br />
Neo:6 decoding.<br />
STEREO/MPEG (large/small/none): The<br />
same options described for Dolby above,<br />
except these settings ONLY take effect in STE-<br />
REO surround mode.<br />
MUSIC (large/small/none): The same options<br />
described for Dolby above, except these<br />
settings ONLY take effect with any of the DSP<br />
MUSIC surround modes.<br />
NOTE: When the front speakers are set to use<br />
the master crossover frequency on the AD-<br />
VANCED SPEAKER SETUP menu, the surround<br />
mode specific “large/small/none” settings<br />
are not available for the other speakers. These<br />
speakers will use the setting determined in<br />
the basic SPEAKER SETUP menu.<br />
Subwoofer Setup<br />
SUBWOOFER SETUP<br />
CROSSOVER:100hZ<br />
DOLBY DIGITAL: 0dB<br />
DOLBY PL II(X): 0dB<br />
DTS: 0dB<br />
STEREO/MPEG:+ 2dB<br />
MUSIC: Off<br />
MULTI INPUT:- 2dB<br />
MAIN MENU<br />
The SUBWOOFER SETUP menu allows selection<br />
of the master subwoofer crossover frequency<br />
and independent adjustment of subwoofer<br />
level for each surround mode.<br />
CROSSOVER (40Hz/60Hz/80Hz/<br />
100Hz/120Hz/150Hz/200Hz/OFF):<br />
This setting specifies a master low-pass filter<br />
for the subwoofer and a corresponding highpass<br />
filter for all SMALL speakers in the system<br />
at the selected frequency. To adjust the<br />
crossover frequency, highlight the CROSSOVER<br />
line using the UP/DOWN buttons. Then, use<br />
the +/– buttons to chose the master crossover<br />
point. The 80Hz or 100Hz crossover points<br />
are the most common in home theater systems<br />
and should be used unless you have a specific<br />
reason to choose a different crossover<br />
point based on your specific speakers.<br />
The OFF setting sends a full-range signal to<br />
your subwoofer so that you can use its builtin<br />
low-pass filter. With the OFF setting, a 100<br />
Hz high-pass filter is activated for all SMALL<br />
speakers in the system.<br />
NOTE: The master crossover point can be overridden<br />
with a custom crossover frequency for<br />
the front, center, surround, or surround back<br />
speakers in the ADVANCED SPEAKER SETUP<br />
menu; however, in most systems the single<br />
master crossover point should work well<br />
DOLBY DIGITAL:<br />
DOLBY PLII:<br />
DTS:<br />
STEREO/MPEG:<br />
MUSIC:<br />
MULTI INPUT:<br />
These six lines allow you to override the master<br />
subwoofer level setting as determined on<br />
the TEST TONE menu (see below) for each<br />
specific surround mode. When going to the<br />
SUBWOOFER SETUP menu from the MAIN<br />
menu, the current surround mode is automatically<br />
highlighted. Use the +/– buttons to adjust<br />
the subwoofer level for the current surround<br />
mode. The options are OFF (which turns off<br />
the subwoofer for that mode) and a range of<br />
adjustments from –9dB to +9dB and MAX<br />
(+10dB). A setting of 0dB means that the specified<br />
surround mode will use the master subwoofer<br />
level. Any other setting is an offset to<br />
the master setting. For example, an adjustment<br />
of -2db for a particular surround mode means<br />
that the subwoofer level will be 2dB quieter<br />
than the master subwoofer level when that<br />
surround mode is selected. Use these subwoofer<br />
level settings to adjust the relative bass output<br />
of various surround modes. Changing the<br />
master subwoofer level will increase or decrease<br />
the level for all surround modes.<br />
NOTE: Only the current surround mode can<br />
be adjusted on this menu. You will need to<br />
change surround modes using the front panel<br />
or remote buttons to adjust a different mode.<br />
We recommend starting with the settings for<br />
all surround modes at the default 0dB setting<br />
during the test tone calibration of the system<br />
and for a period of familiarization after that.<br />
As you listen to a variety of source material<br />
over time, you may notice that certain surround<br />
modes consistently produce too much or too<br />
little bass from the subwoofer. If so, then use<br />
these menu settings to customize each surround<br />
mode. In general, if the master subwoofer level<br />
is set properly (i.e. not too loud), individual<br />
settings for each surround mode should not<br />
be necessary.<br />
NOTE: In Dolby Digital and DTS recordings,<br />
the LFE channel is used to produce spectacular<br />
low bass effects, placing considerable demands<br />
on your subwoofer system. If you hear<br />
distortion or other signs of distress from your<br />
subwoofer at loud listening levels, you may<br />
consider reducing the subwoofer level for the<br />
Dolby Digital and/or DTS surround modes.<br />
In other surround modes, there is no LFE channel<br />
and the subwoofer will only reproduce<br />
redirected bass from the other channels,<br />
which is not as likely to tax the subwoofer.<br />
To return to the MAIN menu, press the EN-<br />
TER button. Press the MENU/OSD button on<br />
the remote to cancel the display and return<br />
to normal operation.
<strong>RSP</strong>-<strong>1068</strong> Surround Sound Processor<br />
38<br />
Test Tone<br />
TEST TONE<br />
LEFT:+ 1dB<br />
CENTER:- 1dB<br />
RIGHT:+ 2dB<br />
R SURROUND:+ 5dB<br />
R CTR BACK:+ 2dB<br />
L CTR BACK:+ 2dB<br />
L SURROUND:+ 4dB<br />
SUBWOOFER:+ 9dB<br />
MAIN MENU<br />
This menu uses filtered pink noise test tones<br />
to set equal volume levels for all speakers (left<br />
front, center, right front, right surround, center<br />
back, left surround, and subwoofer) to ensure<br />
proper surround sound reproduction.<br />
Setting the output levels using the test procedure<br />
provides the most accurate adjustment<br />
so that digital surround sound material will be<br />
reproduced as it was intended and is a critical<br />
step in calibrating the system.<br />
NOTE: If you have configured your system to<br />
use two center back speakers, there will be<br />
an additional line in the menu, giving you the<br />
ability to independently adjust the CENTER<br />
BACK 1 and CENTER BACK 2 speakers.<br />
To access this menu and perform the test tone<br />
calibration, you can be in any surround mode<br />
except BYPASS with any input except the MULTI<br />
INPUT. Enter the OSD menu system and select<br />
TEST TONE from the MAIN MENU to reach<br />
this screen.<br />
When you enter the TEST TONE menu, you<br />
will hear a test tone coming from the highlighted<br />
speaker. Highlight different speakers by moving<br />
the cursor to the desired line using the UP/<br />
DOWN buttons. The test tone will shift accordingly<br />
to the selected speaker.<br />
Seated in the normal listening location, shift<br />
the test tone to the various speakers. Using the<br />
one speaker as a reference, listen for any speakers<br />
that are noticeably louder or quieter. If so,<br />
adjust that speaker’s levels up or down (in 1dB<br />
increments) using the +/– buttons. Continue<br />
switching among the speakers and adjusting<br />
until all speakers are the same volume.<br />
To return to the MAIN menu, press the EN-<br />
TER button. Press the MENU/OSD button on<br />
the remote to cancel the menu display and<br />
return to normal operation.<br />
Calibration with an SPL meter:<br />
Calibrating the system with an SPL meter, rather<br />
than by ear, provides more precise results and<br />
improves the system’s performance significantly.<br />
Inexpensive SPL meters are widely available<br />
and the procedure is quick and easy.<br />
Both Dolby and DTS specify a standard calibration<br />
level for all theaters to ensure that<br />
soundtracks can be played at the volume level<br />
intended by the director of the film. This reference<br />
level should result in spoken dialog<br />
played at a realistic level for normal speech<br />
with the loudest peaks in any single channel<br />
at about 105dB. The <strong>RSP</strong>-<strong>1068</strong>’s test tones are<br />
generated at a precise level (-30dBFs) relative<br />
to the loudest possible digitally recorded<br />
sound. At the Dolby or DTS reference level,<br />
these test tones should produce a 75dB reading<br />
on an SPL meter.<br />
Set the meter to its 70dB dial setting with SLOW<br />
response and C-weighting, held away from<br />
your body at your listening position (mounting<br />
the SPL meter on a camera tripod makes<br />
this easier). You can point the SPL meter at each<br />
speaker as it is being measured; however,<br />
positioning the meter in a fixed position pointing<br />
at the ceiling is easier and probably produces<br />
more consistent results.<br />
Increase the master volume control on the<br />
<strong>RSP</strong>-<strong>1068</strong> until the meter reads 75dB (+5dB<br />
on the meter scale) when playing the test tone<br />
through one of the front speakers. Then, use<br />
the individual channel adjustments on the TEST<br />
TONE menu to adjust each of the individual<br />
speakers, including the subwoofer, to the same<br />
75dB on the SPL meter.<br />
NOTE: Due to meter weighting curves and room<br />
effects, the actual level of the subwoofer may<br />
be slightly higher than you measure. To compensate,<br />
Dolby suggests setting the subwoofer<br />
several dB lower when calibrating with an SPL<br />
meter (i.e. set the subwoofer to read 72dB on<br />
the meter instead of 75dB). Ultimately, the<br />
proper subwoofer level must be determined<br />
by personal taste and some listeners prefer to<br />
set it above 75dB for film soundtracks. Exaggerated<br />
bass effects come at the expense of<br />
proper blending with the main speakers and<br />
place stress on the subwoofer and its amplifier.<br />
If you can localize bass from the subwoofer,<br />
the subwoofer level may be too high.<br />
Music can be useful for fine-tuning the subwoofer<br />
level as excessive bass is readily apparent.<br />
The proper setting will generally work<br />
well for music and movie soundtracks.<br />
Remember the setting of the master volume control<br />
used during this calibration. To play a Dolby<br />
Digital or DTS soundtrack at the reference volume<br />
level, simply return to that volume setting.<br />
Note that most home theater listeners find this<br />
setting to be excessively loud. Let your own<br />
ears be the judge for deciding how loud to<br />
playback movie soundtracks and adjust the<br />
master volume control accordingly. Regardless<br />
of your listening levels, using an SPL meter<br />
to calibrate equal levels for all speakers in the<br />
system is strongly recommended.<br />
Delay Setup<br />
DELAY SETUP<br />
LEFT: 12ft 3.6m<br />
CENTER: 11ft 3.3m<br />
RIGHT: 11ft 3.3m<br />
R SURROUND: 6ft 1.8m<br />
R CTR BACK: 8ft 2.4m<br />
L CTR BACK: 9ft 2.7m<br />
L SURROUND: 5ft 1.5m<br />
SUBWOOFER: 5ft 1.5m<br />
MAIN MENU<br />
The DELAY SETUP menu, which is reached from<br />
the MAIN menu, allows you to set the delay<br />
for individual speakers. This ensures that the<br />
sound from each speaker arrives simultaneously<br />
at the listening position, even when the speakers<br />
are not all placed at equal distances from the<br />
listener. Increase the delay to speakers located<br />
closer to the seating area and decrease the<br />
delay to speakers located farther from the<br />
seating area.<br />
The <strong>RSP</strong>-<strong>1068</strong> makes setting the delay time<br />
for each speaker very easy. Simply measure<br />
the distance (in feet or meters) from your seating<br />
position to each speaker in your system. Set<br />
the measured distance in the line for each<br />
speaker. The menu provides a line for each<br />
speaker configured in your system and provides<br />
a range of settings up to 99 feet (30<br />
meters) in 1 foot (0.3 m) increments with each<br />
increment equivalent to an additional delay<br />
of 1ms.<br />
To change a setting, place the highlight on the<br />
desired line using the UP/DOWN buttons and<br />
use the +/– buttons to increase or decrease<br />
the delay setting. To return to the MAIN menu,<br />
press the ENTER button. Press the MENU/OSD<br />
button on the remote to cancel the display and<br />
return to normal operation.
39 English<br />
Contour Setup<br />
CONTOUR SETUP<br />
SPEAKER:Front<br />
DEFEAT:On<br />
HF CONTOUR:+5<br />
LF CONTOUR: 0<br />
MAIN MENU<br />
The CONTOUR SETUP menu allows digital<br />
adjustment of the bass and treble response of<br />
each group of speakers in the system. For<br />
example, if your center channel speaker sounds<br />
too bright, you could roll off the extreme high<br />
frequencies.<br />
SPEAKER (front/center/surround/center<br />
back/all): Select which speaker or group<br />
of speakers to adjust. Selecting ALL permits<br />
adjustment of the entire system as a whole.<br />
DEFEAT (on/off): Selecting the ON setting<br />
defeats the contour adjustment, bypassing the<br />
contour processing entirely for that speaker<br />
or group of speakers.<br />
HF CONTOUR: Adjusts the extreme high frequency<br />
slope over a range of -6dB (MIN) to<br />
+6dB (MAX). Negative number settings reduce<br />
the high frequency output; positive number<br />
settings increase it.<br />
LF CONTOUR: Adjusts the extreme low frequency<br />
slope over a range of -6dB (MIN) to<br />
+6dB (MAX). Negative number settings reduce<br />
the low frequency output; positive number<br />
settings increase it.<br />
The contour adjustments are designed to work<br />
at the frequency extremes and be relatively<br />
subtle so that they do not have a negative impact<br />
on midrange sounds. We recommend acclimating<br />
to the sound of the system with the<br />
contour adjustments defeated and then making<br />
adjustments, if necessary, to address specific<br />
speaker response issues or personal taste.<br />
NOTE: You can also make temporary contour<br />
adjustments using the TONE and UP/DOWN<br />
buttons on the remote. See the Contour/Tone<br />
Settings section of this manual for details.<br />
Miscellaneous Settings<br />
Other Options<br />
OTHER OPTIONS<br />
RECORD:Source<br />
TURN ON VOL:Last<br />
MAX VOL:Max<br />
VOL SPEED:Slow<br />
POWER:Standby<br />
LANGUAGE:English<br />
VIDEO:NTSC<br />
OSD:On<br />
PROGRESSIVE:NO<br />
MAIN MENU<br />
This OTHER OPTIONS menu, accessed from<br />
the MAIN menu, provides access to several<br />
miscellaneous settings as follows:<br />
RECORD: Select which source signal to be<br />
sent to the recording outputs by choosing one<br />
of the input sources. The options are: CD, TAPE,<br />
TUNER, VIDEO 1–5, and SOURCE. You can<br />
either select a specific component or select<br />
SOURCE which will send the signal to the<br />
record outputs from whatever source is selected<br />
for listening.<br />
TURN ON VOL: Specifies a default volume<br />
level to be used each time the <strong>RSP</strong>-<strong>1068</strong> is<br />
activated. You can select LAST to have the<br />
<strong>RSP</strong>-<strong>1068</strong> power up with the last previously<br />
used volume setting. Or, you specify a volume<br />
from MIN (full mute) to MAX, in 1dB increments.<br />
Note that this setting cannot exceed the MAX<br />
VOL established in the next line of the menu.<br />
MAX VOL: Specifies the maximum volume<br />
level for the <strong>RSP</strong>-<strong>1068</strong>. The volume cannot be<br />
adjusted above this level. Settings range from<br />
MIN to MAX, in 1dB increments.<br />
VOL SPEED: Provides three options for how<br />
rapidly the volume control responds to inputs.<br />
The SLOW setting adjusts the volume 1dB with<br />
each control input. The MID setting adjusts in<br />
2dB increments. The FAST setting adjusts in<br />
3dB increments.<br />
POWER: This setting determines how the<br />
<strong>RSP</strong>-<strong>1068</strong> powers up.<br />
With the default STANDBY setting, the unit<br />
powers up in standby mode when AC is applied<br />
and the rear panel POWER button is ON.<br />
The unit must be activated using the front panel<br />
STANDBY button or the remote ON/OFF<br />
buttons.<br />
With the DIRECT setting, the unit is fully activated<br />
when AC power is applied and the rear<br />
panel POWER button is ON; however, it may<br />
be put in standby mode using the front panel<br />
STANDBY button or the remote ON/OFF<br />
buttons.<br />
In ALWAYS-ON mode, the unit remains fully<br />
active whenever AC is present and the rear<br />
panel POWER button is ON; the front panel<br />
STANDBY button and the remote ON/OFF<br />
buttons are disabled and the unit cannot be<br />
put in standby mode.<br />
LANGUAGE: Selects a language for the On<br />
Screen Display.<br />
VIDEO: Specifies whether an NTSC or PAL<br />
television monitor is connected to the TV<br />
MONITOR outputs of the <strong>RSP</strong>-<strong>1068</strong>. This setting<br />
must be correct for the upconversion and<br />
OSD menus to work properly.<br />
OSD ON/OFF: Select whether or not status<br />
information (such as the volume setting) is<br />
displayed on the TV monitor.<br />
PROGRESSIVE: The OSD menus cannot be<br />
displayed on the TV monitor when progressive<br />
scan or 1080i HDTV video signals are<br />
being used at the Component Video inputs.<br />
This setting enables a feature that allows the<br />
display of the main OSD setup menus (but not<br />
the information displays such as volume, etc.)<br />
on the TV monitor by interrupting the progressive<br />
scan video signal and restoring it after the OSD<br />
menus are cancelled. Choose the video input<br />
or combination of video inputs for progressive<br />
scan or HDTV video signals (480p, 720p,<br />
1080i). All other video inputs will be assigned<br />
as standard interlaced video inputs. Video 4<br />
and 5 cannot be assigned as progressive scan<br />
inputs.<br />
NOTE: When a video input or inputs are selected<br />
for progressive mode, the conversion<br />
from composite or S-Video to Component<br />
Video output is not available for those inputs.<br />
The conversion from composite or S-VIDEO<br />
to Component Video output is only available<br />
for the other video inputs. For example, if<br />
Video 1 and Video 2 are selected for progressive<br />
scan signals (V1+V2), conversion<br />
from composite or S-Video is only available<br />
for Video 3, 4, and 5.
<strong>RSP</strong>-<strong>1068</strong> Surround Sound Processor<br />
40<br />
Change settings on the OTHER OPTIONS menu<br />
by highlighting the desired line using the UP/<br />
DOWN buttons and using the +/– buttons to<br />
step through the available settings. To return<br />
to the MAIN menu, press the ENTER button.<br />
Press the MENU/OSD button on the remote<br />
to cancel the display and return to normal<br />
operation.<br />
Zone 2 Setup<br />
ZONE2 SETUP<br />
SOURCE:Off<br />
VOLUME SETUP:Variable<br />
VOLUME:60<br />
TURN ON VOL:Last<br />
MAX VOL:Max<br />
12V TRIGGER:Off<br />
MAIN MENU<br />
The ZONE 2 SETUP menu provides settings<br />
and configuration options related to the operation<br />
of Zone 2. This menu is reached by<br />
highlighting the ZONE 2 line on the MAIN<br />
menu and pressing ENTER.<br />
SOURCE: Specifies a source for listening in<br />
Zone 2. Options are CD, TUNER, TAPE, VIDEO<br />
1–5, SOURCE, and OFF. Selecting the<br />
SOURCE option links the Zone 2 source to the<br />
source selected for the main zone so that Zone<br />
2 will hear the same source as the main zone.<br />
Selecting the OFF option turns Zone 2 off.<br />
VOLUME SETUP: configures the Zone 2<br />
outputs for VARIABLE or FIXED volume levels.<br />
VARIABLE allows control of the volume settings<br />
in Zone 2 from the <strong>RSP</strong>-<strong>1068</strong> front panel or<br />
from a remote control/IR repeater in Zone 2.<br />
FIXED output disables the Zone 2 volume<br />
control. In this mode, the Zone 2 level can be<br />
fixed at the level specified on the next line,<br />
thus optimizing system performance when sending<br />
a fixed level signal to a preamp or amplifier<br />
with its own volume adjustment.<br />
VOLUME: In VARIABLE output mode, this line<br />
shows the current volume setting for Zone 2.<br />
In FIXED output mode, this volume setting establishes<br />
a permanent fixed output level for<br />
Zone 2.<br />
Move the highlight to the desired line using<br />
the UP/DOWN buttons and use the +/– buttons<br />
to adjust the volume level. To return to the<br />
MAIN menu, press the ENTER button. Press<br />
the MENU/OSD button on the remote to cancel<br />
the display and return to normal operation.<br />
TURN ON VOL: Specifies a default volume<br />
level to be used each time Zone 2 is activated.<br />
You can select LAST to have Zone 2 activate<br />
with the last previously used volume setting.<br />
Or, you specify a volume from MIN (full mute)<br />
to MAX, in 1dB increments. Note that this setting<br />
cannot exceed the MAX VOL established in<br />
the next line of the menu.<br />
MAX VOL: Specifies the maximum volume<br />
level for Zone 2. The volume cannot be adjusted<br />
above this level. Settings range from MIN<br />
to MAX, in 1dB increments.<br />
12V TRIGGER: The 12V trigger labeled<br />
ZONE 2 can be assigned to sources selected<br />
from Zone 2 and will send a turn-on signal<br />
whenever Zone 2 is activated for that source.<br />
Select the ON setting for each source to have<br />
the ZONE 2 trigger output send the turn-on<br />
signal. Select the OFF setting to disable the<br />
12V trigger function for each source in Zone<br />
2.<br />
NOTE: From the factory, all 12V triggers are<br />
set to ON, including Zone 2 SOURCE:Off.<br />
Default Setup<br />
DEFAULT SETUP<br />
FACTORY DEFAULT:No<br />
USER DEFAULT:No<br />
SET USER DEFAULT:No<br />
MAIN MENU<br />
The DEFAULT SETUP menu provides access to<br />
three functions:<br />
• Restore all features and settings to the original<br />
FACTORY DEFAULT settings.<br />
• Memorize a custom group of settings as<br />
a USER DEFAULT.<br />
• Activate the memorized USER DEFAULT settings.<br />
To restore the FACTORY DEFAULT settings:<br />
Place the highlight on the FACTORY<br />
DEFAULT line using the UP/DOWN buttons<br />
and use the +/– buttons to change the setting<br />
to YES. Press the ENTER button to proceed with<br />
resetting the FACTORY DEFAULT settings. The<br />
unit will power off and then on, with the factory<br />
settings restored. To return to the MAIN<br />
menu without resetting the FACTORY DEFAULT<br />
settings, change the entry to NO and press<br />
the ENTER button.<br />
NOTE: Resetting to factory default settings will<br />
erase all stored settings including delay settings,<br />
speaker settings, balance settings, input<br />
settings and more. You will lose ALL system<br />
configuration settings. Be certain that you wish<br />
to do so before resetting the factory defaults.<br />
To memorize USER DEFAULT settings:<br />
Many of the current configuration settings can<br />
be stored as a USER DEFAULT, which can be<br />
activated at any time from this menu screen.<br />
To save the current settings as a USER DEFAULT,<br />
place the highlight on the SET USER DEFAULT<br />
line using the UP/DOWN buttons and use the<br />
+/– buttons to change the setting to YES. Press<br />
the ENTER button to store the new USER DE-<br />
FAULT settings. To return to the MAIN menu<br />
without saving any changes, change all entries<br />
on the screen to NO and press the EN-<br />
TER button.<br />
NOTE: If there is insufficient memory to store a<br />
USER DEFAULT configuration file, the SET<br />
USER DEFAULT option will not be available.<br />
To activate memorized USER DEFAULT<br />
settings: After you have stored a USER DE-<br />
FAULT configuration file, you can activate those<br />
settings at any time by placing the highlight<br />
on the USER DEFAULT line using the UP/<br />
DOWN buttons. Use the +/– buttons to change<br />
the setting to YES. Press the ENTER button to<br />
proceed with activating the USER DEFAULT<br />
settings. To return to the MAIN menu without<br />
activating the USER DEFAULT settings, change<br />
the entry to NO and press the ENTER button.
41 English<br />
MORE INFORMATION<br />
Troubleshooting<br />
The unit does not turn on.<br />
• Make sure the power cord is plugged into<br />
the rear panel and a live AC wall outlet.<br />
• Make sure the rear panel POWER switch<br />
is in the ON position<br />
No sound from any input.<br />
• Make sure that MUTING is off and VOL-<br />
UME is turned up.<br />
• Make sure that preamp outputs are connected<br />
to a power amplifier and that the<br />
amplifier is turned on.<br />
• Make sure source inputs are connected and<br />
configured correctly.<br />
No sound from digital sources.<br />
• Make sure that digital input connector is<br />
assigned to the proper source input and<br />
that the source input is configured to use<br />
the digital input rather than an analog input.<br />
• Check the configuration of the DVD player<br />
to ensure that the bitstream and/or DTS<br />
digital output is activated.<br />
No sound from some speakers.<br />
• Check all power amp and speaker connections.<br />
• Check Speaker Configuration settings in<br />
the Setup menus.<br />
No video output on TV monitor.<br />
• Make sure that the TV monitor is connected<br />
properly. Component video outputs can<br />
send any type of signal to the TV. Composite<br />
video connections can only send<br />
video from composite sources and S-Video<br />
connections can only send video from<br />
S-Video sources.<br />
• Make sure the NTSC/PAL switch is set<br />
properly.<br />
OSD menus are not displayed on TV<br />
Monitor.<br />
• Go to Setup menus and configure OSD<br />
menus to be displayed on the TV monitor.<br />
• In some PAL systems, the menus may not<br />
be displayed unless there is an active video<br />
signal.<br />
• When using progressive scan video signals,<br />
make sure that the progressive mode<br />
is selected for that video input in the OTHER<br />
OPTIONS setup menu. This allows the display<br />
of the main setup OSD menus on the<br />
TV monitor by interrupting the progressive<br />
scan video signal and restoring it after the<br />
OSD menus are cancelled. The temporary<br />
information screens (such as volume, etc.)<br />
cannot be displayed on the TV monitor when<br />
progressive scan signals are being used.<br />
Video and Audio do not match.<br />
• Check that the proper video source is selected<br />
for each input.<br />
• Check that the group delay (lip-synch) setting<br />
is not misadjusted.<br />
Clicking or popping sounds when<br />
switching inputs.<br />
• The unit uses relay switching to preserve<br />
maximum sound quality. The mechanical<br />
clicking of the relays is normal.<br />
• During switching, it may take a split second<br />
for digital signals to be recognized<br />
and properly decoded. Rapid repeated<br />
switching between inputs or settings can<br />
result in clicks or pops from the speakers<br />
as the unit attempts to lock on to the rapidly<br />
changing signals. This causes no harm.<br />
Controls do not operate.<br />
• Make sure that fresh batteries are installed<br />
in the remote.<br />
• Make sure that the IR sensor on the front<br />
panel is not blocked. Aim the remote at<br />
the sensor.<br />
• Make sure the sensor is not receiving strong<br />
IR light (sunlight, halogen lighting, etc.)<br />
• Unplug the unit from the AC outlet, wait<br />
30 seconds, and plug it back in to reset.<br />
Specifications<br />
Audio<br />
Total Harmonic Distortion<br />
The <strong>Rotel</strong> Co. Ltd.<br />
10-10 Shinsen-Cho<br />
Shibuya-Ku<br />
Tokyo 150-0045<br />
Japan<br />
Phone: +81 3-5458-5325<br />
Fax: +81 3-5458-5310<br />
<strong>Rotel</strong> of America<br />
54 Concord Street<br />
North Reading, MA 01864-2699<br />
USA<br />
Phone: +1 978-664-3820<br />
Fax: +1 978-664-4109<br />
<strong>Rotel</strong> Europe<br />
Dale Road<br />
Worthing, West Sussex BN11 2BH<br />
England<br />
Phone: +44 (0)1903 221600<br />
Fax: +44 (0)1903 221525<br />
<strong>Rotel</strong> Deutschland<br />
Kleine Heide 12<br />
D-33790 Halle/Westf.<br />
Germany<br />
Phone: +49 05201-87170<br />
Fax: +49 05201-73370<br />
www.rotel.com<br />
082 OM-<strong>RSP</strong>-<strong>1068</strong> 030104 English