![TH-V70R[B] revision - JVC](https://img.yumpu.com/23738839/21/500x640/th-v70rb-revision-jvc.jpg)

You also want an ePaper? Increase the reach of your titles
YUMPU automatically turns print PDFs into web optimized ePapers that Google loves.
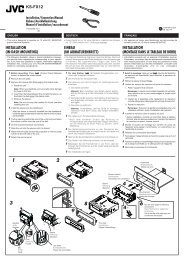
Installing the equipment on the wall<br />
When attaching the rear speakers to a wall<br />
Using the supplied speaker wall brackets, you can fix the rear speakers to the wall.<br />
CAUTION: Attaching the brackets to the wall<br />
When attaching the brackets to the wall, have them attached to the wall by a qualified person.<br />
DO NOT attach the brackets to the wall by yourself to avoid an unexpected damage due to their falling from the wall, caused by incorrect<br />
attachment or weakness in the wall.<br />
Location of attachment to wall:<br />
Take care when selecting a location for attaching rear speakers to the wall. Injury to personnel, or damage to equipment, may<br />
result if the speakers are attached in a location which interferes with daily activities.<br />
Attaching speakers to the brackets<br />
1 Use the supplied screws to attach the brackets to the rear speakers.<br />
2 Adjust the angle of the rear speakers.<br />
Loosen the screw slightly, make an adjustment, and then tighten the screw firmly.<br />
CAUTION:<br />
If the screws are not tightened firmly, this may cause injury to personnel or damage to equipment.<br />
When attaching the AM (MW) loop antenna to a wall<br />
You can attach the AM (MW) loop antenna to the wall.<br />
Mount the AM (MW) loop antenna to a wall using the screw (not supplied) as illustrated below.<br />
16