Nuclear Spectroscopy
Nuclear Spectroscopy
Nuclear Spectroscopy

You also want an ePaper? Increase the reach of your titles
YUMPU automatically turns print PDFs into web optimized ePapers that Google loves.
OPERATION ON A MACINTOSH MICROCOMPUTER<br />
Power on the UCS10 hardware and double-click on the UCS10 software to start the Macintosh application in the<br />
usual way. The window that appears lists all the UCS10 hardware units connected to the computer. If more<br />
than one appears, select one and click OK. If one is not connected or its power is off, click OK. The Acquisition<br />
Control window box and the menu bar for the program appear on the screen whether or not a UCS10 hardware<br />
unit is attached or powered on. A spectrum window will appear automatically only if a UCS10 hardware is<br />
attached and powered on.<br />
Once the program is running it will be necessary to configure the system parameters for correct operation and<br />
calibration. Place a gamma-emitting check source near the detector face. 137 Cs is a good choice for many<br />
applications.<br />
SETTINGS<br />
The SETTINGS menu selection in the menu bar gives you access to all the adjustable parameters that should<br />
be set prior to acquisition.<br />
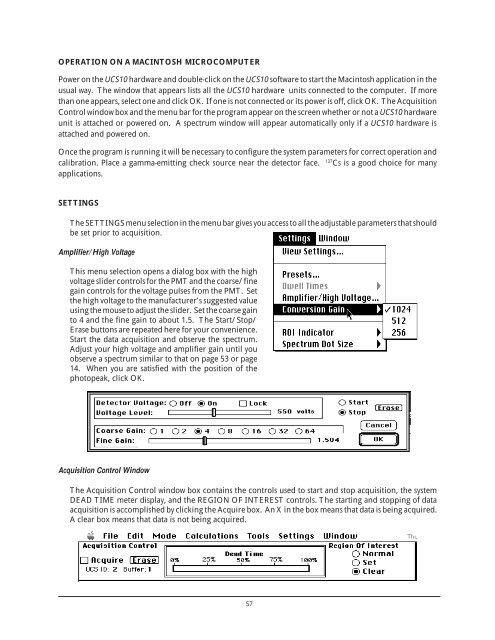
Amplifier/High Voltage<br />
This menu selection opens a dialog box with the high<br />
voltage slider controls for the PMT and the coarse/fine<br />
gain controls for the voltage pulses from the PMT. Set<br />
the high voltage to the manufacturer’s suggested value<br />
using the mouse to adjust the slider. Set the coarse gain<br />
to 4 and the fine gain to about 1.5. The Start/Stop/<br />
Erase buttons are repeated here for your convenience.<br />
Start the data acquisition and observe the spectrum.<br />
Adjust your high voltage and amplifier gain until you<br />
observe a spectrum similar to that on page 53 or page<br />
14. When you are satisfied with the position of the<br />
photopeak, click OK.<br />
Acquisition Control Window<br />
The Acquisition Control window box contains the controls used to start and stop acquisition, the system<br />
DEAD TIME meter display, and the REGION OF INTEREST controls. The starting and stopping of data<br />
acquisition is accomplished by clicking the Acquire box. An X in the box means that data is being acquired.<br />
A clear box means that data is not being acquired.<br />
57