61 Tabletop Stand: PDK-TS01 - Pioneer
61 Tabletop Stand: PDK-TS01 - Pioneer
61 Tabletop Stand: PDK-TS01 - Pioneer

You also want an ePaper? Increase the reach of your titles
YUMPU automatically turns print PDFs into web optimized ePapers that Google loves.
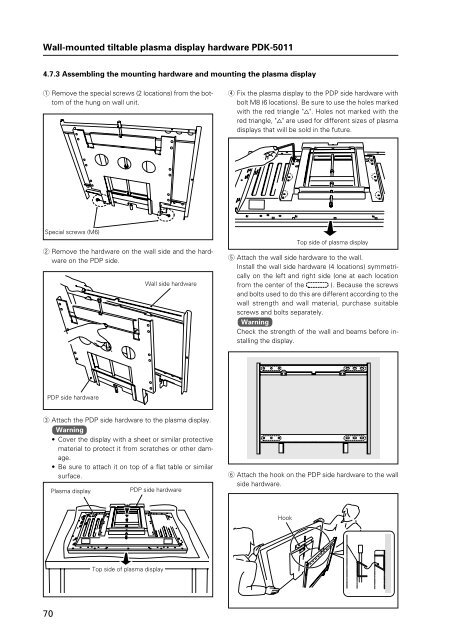
Wall-mounted tiltable plasma display hardware <strong>PDK</strong>-5011<br />
4.7.3 Assembling the mounting hardware and mounting the plasma display<br />
1 Remove the special screws (2 locations) from the bottom<br />
of the hung on wall unit.<br />
4 Fix the plasma display to the PDP side hardware with<br />
bolt M8 (6 locations). Be sure to use the holes marked<br />
with the red triangle "%". Holes not marked with the<br />
red triangle, "%" are used for different sizes of plasma<br />
displays that will be sold in the future.<br />
Special screws (M6)<br />
2 Remove the hardware on the wall side and the hardware<br />
on the PDP side.<br />
Wall side hardware<br />
Top side of plasma display<br />
5 Attach the wall side hardware to the wall.<br />
Install the wall side hardware (4 locations) symmetrically<br />
on the left and right side (one at each location<br />
from the center of the ). Because the screws<br />
and bolts used to do this are different according to the<br />
wall strength and wall material, purchase suitable<br />
screws and bolts separately.<br />
Warning<br />
Check the strength of the wall and beams before installing<br />
the display.<br />
PDP side hardware<br />
3 Attach the PDP side hardware to the plasma display.<br />
Warning<br />
• Cover the display with a sheet or similar protective<br />
material to protect it from scratches or other damage.<br />
• Be sure to attach it on top of a flat table or similar<br />
surface.<br />
Plasma display<br />
PDP side hardware<br />
6 Attach the hook on the PDP side hardware to the wall<br />
side hardware.<br />
Hook<br />
Top side of plasma display<br />
70