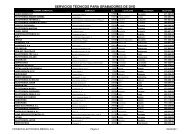
61 Tabletop Stand: PDK-TS01 - Pioneer
61 Tabletop Stand: PDK-TS01 - Pioneer
61 Tabletop Stand: PDK-TS01 - Pioneer

Create successful ePaper yourself
Turn your PDF publications into a flip-book with our unique Google optimized e-Paper software.
Mobile Cart: <strong>PDK</strong>-5014<br />
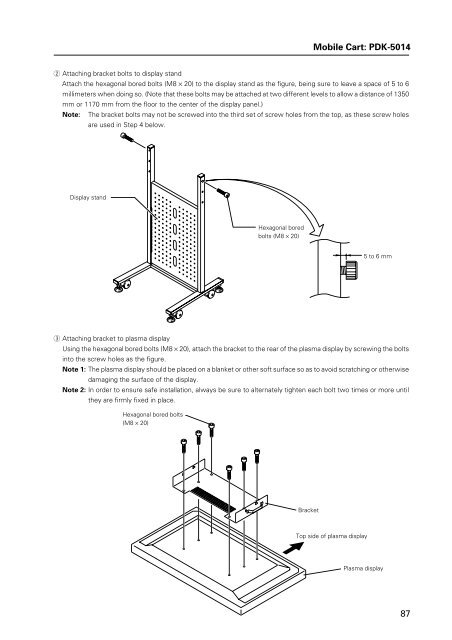
2 Attaching bracket bolts to display stand<br />
Attach the hexagonal bored bolts (M8 × 20) to the display stand as the figure, being sure to leave a space of 5 to 6<br />
millimeters when doing so. (Note that these bolts may be attached at two different levels to allow a distance of 1350<br />
mm or 1170 mm from the floor to the center of the display panel.)<br />
Note: The bracket bolts may not be screwed into the third set of screw holes from the top, as these screw holes<br />
are used in Step 4 below.<br />
Display stand<br />
Hexagonal bored<br />
bolts (M8 × 20)<br />
5 to 6 mm<br />
3 Attaching bracket to plasma display<br />
Using the hexagonal bored bolts (M8 × 20), attach the bracket to the rear of the plasma display by screwing the bolts<br />
into the screw holes as the figure.<br />
Note 1: The plasma display should be placed on a blanket or other soft surface so as to avoid scratching or otherwise<br />
damaging the surface of the display.<br />
Note 2: In order to ensure safe installation, always be sure to alternately tighten each bolt two times or more until<br />
they are firmly fixed in place.<br />
Hexagonal bored bolts<br />
(M8 × 20)<br />
Bracket<br />
Top side of plasma display<br />
Plasma display<br />
87