61 Tabletop Stand: PDK-TS01 - Pioneer
61 Tabletop Stand: PDK-TS01 - Pioneer
61 Tabletop Stand: PDK-TS01 - Pioneer

Create successful ePaper yourself
Turn your PDF publications into a flip-book with our unique Google optimized e-Paper software.
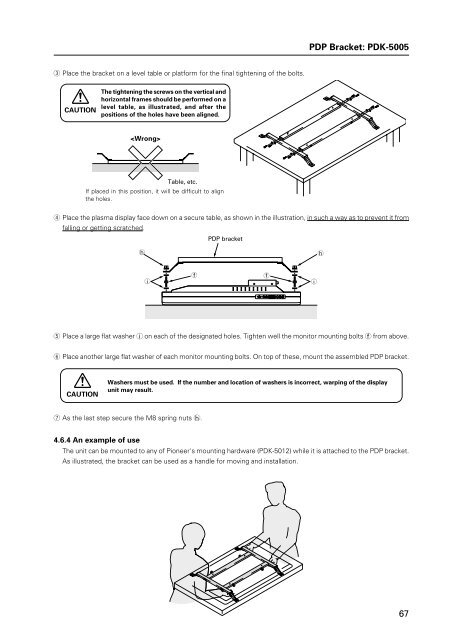
PDP Bracket: <strong>PDK</strong>-5005<br />
3 Place the bracket on a level table or platform for the final tightening of the bolts.<br />
CAUTION<br />
The tightening the screws on the vertical and<br />
horizontal frames should be performed on a<br />
level table, as illustrated, and after the<br />
positions of the holes have been aligned.<br />
<br />
Table, etc.<br />
If placed in this position, it will be difficult to align<br />
the holes.<br />
4 Place the plasma display face down on a secure table, as shown in the illustration, in such a way as to prevent it from<br />
falling or getting scratched.<br />
PDP bracket<br />
h<br />
h<br />
i<br />
f<br />
f<br />
i<br />
5 Place a large flat washer i on each of the designated holes. Tighten well the monitor mounting bolts f from above.<br />
6 Place another large flat washer of each monitor mounting bolts. On top of these, mount the assembled PDP bracket.<br />
CAUTION<br />
Washers must be used. If the number and location of washers is incorrect, warping of the display<br />
unit may result.<br />
7 As the last step secure the M8 spring nuts h.<br />
4.6.4 An example of use<br />
The unit can be mounted to any of <strong>Pioneer</strong>'s mounting hardware (<strong>PDK</strong>-5012) while it is attached to the PDP bracket.<br />
As illustrated, the bracket can be used as a handle for moving and installation.<br />
67