61 Tabletop Stand: PDK-TS01 - Pioneer
61 Tabletop Stand: PDK-TS01 - Pioneer
61 Tabletop Stand: PDK-TS01 - Pioneer

You also want an ePaper? Increase the reach of your titles
YUMPU automatically turns print PDFs into web optimized ePapers that Google loves.
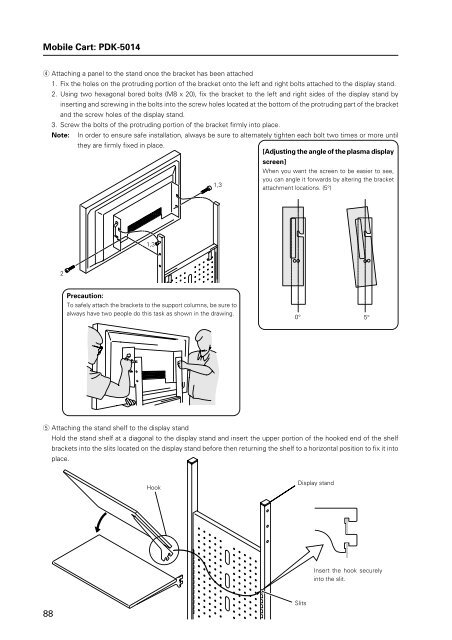
Mobile Cart: <strong>PDK</strong>-5014<br />
4 Attaching a panel to the stand once the bracket has been attached<br />
1. Fix the holes on the protruding portion of the bracket onto the left and right bolts attached to the display stand.<br />
2. Using two hexagonal bored bolts (M8 x 20), fix the bracket to the left and right sides of the display stand by<br />
inserting and screwing in the bolts into the screw holes located at the bottom of the protruding part of the bracket<br />
and the screw holes of the display stand.<br />
3. Screw the bolts of the protruding portion of the bracket firmly into place.<br />
Note: In order to ensure safe installation, always be sure to alternately tighten each bolt two times or more until<br />
they are firmly fixed in place.<br />
[Adjusting the angle of the plasma display<br />
screen]<br />
When you want the screen to be easier to see,<br />
you can angle it forwards by altering the bracket<br />
1,3<br />
attachment locations. (5°)<br />
1,3<br />
2<br />
Precaution:<br />
To safely attach the brackets to the support columns, be sure to<br />
always have two people do this task as shown in the drawing.<br />
0°<br />
5°<br />
5 Attaching the stand shelf to the display stand<br />
Hold the stand shelf at a diagonal to the display stand and insert the upper portion of the hooked end of the shelf<br />
brackets into the slits located on the display stand before then returning the shelf to a horizontal position to fix it into<br />
place.<br />
Hook<br />
Display stand<br />
Insert the hook securely<br />
into the slit.<br />
88<br />
Slits