XVS - 2 - Log in - Barco
XVS - 2 - Log in - Barco
XVS - 2 - Log in - Barco

You also want an ePaper? Increase the reach of your titles
YUMPU automatically turns print PDFs into web optimized ePapers that Google loves.
<strong>XVS</strong> - 2<br />
System overview & Installation<br />
R9852227<br />
R5976955/02<br />
14/03/2007
Product revision<br />
Software version: 2.3<br />
<strong>Barco</strong> nv Media<br />
Noordlaan 5, B-8520 Kuurne<br />
Phone: +32 56.36.89.70<br />
Fax: +32 56.36.83.86<br />
E-mail: sales.media@barco.com<br />
Visit us at the web: www.barco.com<br />
Pr<strong>in</strong>ted <strong>in</strong> Belgium
<strong>XVS</strong>-2 update<br />
The follow<strong>in</strong>g features are no longer supported by <strong>XVS</strong>-2. Any and all references to these features, related<br />
setup, and hardware <strong>in</strong>formation should be disregarded.<br />
- Standby operate <strong>in</strong>clud<strong>in</strong>g support for a separate Data Server.<br />
- Content storage <strong>in</strong>stallation (for Operate systems only Operate, XML Blaster, Live Data, and Data Services<br />
<strong>in</strong>stalls are needed and supported).<br />
- Live video capture for both Operate and Playback systems.<br />
- Digital Audio - support to play audio files or audio embedded <strong>in</strong> video files is still supported though as<br />
analog audio.<br />
May 2010
Copyright ©<br />
All rights reserved. No part of this document may be copied, reproduced or translated. It shall not otherwise<br />
be recorded, transmitted or stored <strong>in</strong> a retrieval system without the prior written consent of <strong>Barco</strong>.<br />
Changes<br />
<strong>Barco</strong> provides this manual ’as is’ without warranty of any k<strong>in</strong>d, either expressed or implied, <strong>in</strong>clud<strong>in</strong>g but not<br />
limited to the implied warranties or merchantability and fitness for a particular purpose. <strong>Barco</strong> may make improvements<br />
and/or changes to the product(s) and/or the program(s) described <strong>in</strong> this publication at any time<br />
without notice.<br />
This publication could conta<strong>in</strong> technical <strong>in</strong>accuracies or typographical errors. Changes are periodically made<br />
to the <strong>in</strong>formation <strong>in</strong> this publication; these changes are <strong>in</strong>corporated <strong>in</strong> new editions of this publication.<br />
Trademarks<br />
Brand and product names mentioned <strong>in</strong> this manual may be trademarks, registered trademarks or copyrights<br />
of their respective holders. All brand and product names mentioned <strong>in</strong> this manual serve as comments or<br />
examples and are not to be understood as advertis<strong>in</strong>g for the products or their manufactures.
Table of contents<br />
TABLE OF CONTENTS<br />
1. System Overview ...................................................................................5<br />
1.1 <strong>Barco</strong>’s solution ................................................................................................ 5<br />
1.2 System & workflow overview ................................................................................. 6<br />
1.2.1 <strong>XVS</strong> system overview.................................................................................... 6<br />
1.2.2 <strong>XVS</strong> workflow............................................................................................10<br />
1.2.3 Setup .....................................................................................................10<br />
1.2.4 Pre-game actions........................................................................................11<br />
1.2.5 In-game actions..........................................................................................11<br />
1.2.6 Post-game actions ......................................................................................12<br />
1.3 <strong>XVS</strong> Operate ..................................................................................................12<br />
1.3.1 General...................................................................................................12<br />
1.3.2 System Manager ........................................................................................12<br />
1.3.3 Message Editor..........................................................................................14<br />
1.3.4 Action Manager..........................................................................................14<br />
1.4 <strong>XVS</strong> RTD.......................................................................................................15<br />
1.4.1 RTD management.......................................................................................15<br />
1.4.2 RSS services ............................................................................................16<br />
1.4.3 RS232 service ...........................................................................................17<br />
1.5 <strong>XVS</strong> Play.......................................................................................................17<br />
1.5.1 General...................................................................................................17<br />
1.5.2 Ultimate visual creativity................................................................................18<br />
1.5.3 Optimized for fascia and perimeter solutions.........................................................18<br />
1.5.4 Optimized for video cube solutions....................................................................18<br />
1.5.5 Pr<strong>in</strong>ciple of segmentation...............................................................................18<br />
1.5.6 Pr<strong>in</strong>ciple of mirror<strong>in</strong>g (repeat<strong>in</strong>g).......................................................................19<br />
1.6 Director Toolset <strong>in</strong>tegration...................................................................................21<br />
1.6.1 About the use of Director Toolset......................................................................21<br />
1.6.2 How to make a configuration...........................................................................21<br />
2. <strong>XVS</strong> features ...................................................................................... 23<br />
2.1 Overview list...................................................................................................23<br />
2.2 Supported file formats ........................................................................................25<br />
3. <strong>XVS</strong> Hardware Configurations ................................................................ 27<br />
3.1 <strong>XVS</strong> hardware configuration overview......................................................................27<br />
3.2 <strong>XVS</strong> Operate ..................................................................................................30<br />
3.3 <strong>XVS</strong> Play.......................................................................................................32<br />
3.4 <strong>XVS</strong> lightweight Play..........................................................................................33<br />
3.5 <strong>XVS</strong> Playback Integrated m<strong>in</strong>iPC ...........................................................................34<br />
3.6 <strong>XVS</strong> Dataserver...............................................................................................35<br />
3.7 Specified hardware components ............................................................................36<br />
3.7.1 Digital audio card Playback computer.................................................................36<br />
3.7.2 Video card Operate computer..........................................................................37<br />
3.7.3 Video card Playback computer.........................................................................39<br />
4. Installation ......................................................................................... 41<br />
4.1 <strong>XVS</strong> Play.......................................................................................................41<br />
4.1.1 Hardware connections..................................................................................41<br />
4.1.2 Software <strong>in</strong>stallation.....................................................................................41<br />
4.2 <strong>XVS</strong> Operate ..................................................................................................46<br />
4.2.1 Hardware <strong>in</strong>stallation....................................................................................46<br />
4.2.2 Software <strong>in</strong>stallation.....................................................................................47<br />
4.3 Installation of H264 support <strong>in</strong> <strong>XVS</strong>-2.......................................................................56<br />
5. <strong>XVS</strong> - WAN support .............................................................................. 57<br />
5.1 Introduction ....................................................................................................57<br />
5.2 Supported WAN setups for n computers ...................................................................58<br />
5.3 About Internet providers......................................................................................58<br />
R5976955 <strong>XVS</strong> - 2 14/03/2007 1
Table of contents<br />
5.4 Possible ISP restrictions .....................................................................................59<br />
5.5 Installation and configuration ................................................................................61<br />
5.6 FTP <strong>in</strong>stallation and configuration...........................................................................61<br />
5.6.1 FTP <strong>in</strong>stallation on a Play computer...................................................................61<br />
5.6.2 FTP configuration on the Play side....................................................................62<br />
5.7 Configure Syncback with FTP profile on the Operate computer.........................................63<br />
5.8 Troubleshoot<strong>in</strong>g ...............................................................................................63<br />
5.8.1 Introduction...............................................................................................63<br />
5.8.2 Operate does not start up ..............................................................................64<br />
5.8.3 Display creation fails....................................................................................64<br />
5.8.4 Schedul<strong>in</strong>g fails..........................................................................................65<br />
5.8.5 Real time data fails......................................................................................65<br />
5.8.6 No feedback <strong>in</strong> Action Manager queue ...............................................................66<br />
5.8.7 No diagnostics <strong>in</strong> Operate..............................................................................67<br />
5.8.8 Report<strong>in</strong>g fails ...........................................................................................67<br />
5.8.9 Storage service on Play computer needs a different port...........................................67<br />
6. Automatic Playback Redundancy Installation ............................................ 69<br />
6.1 Some def<strong>in</strong>itions ..............................................................................................69<br />
6.2 Hardware.......................................................................................................70<br />
6.3 Configuration of the redundancy playbacks................................................................73<br />
6.4 States of the Redundancy Controller .......................................................................74<br />
7. Troubleshoot<strong>in</strong>g .................................................................................. 75<br />
7.1 General.........................................................................................................75<br />
7.1.1 Where to f<strong>in</strong>d back logg<strong>in</strong>g <strong>in</strong>formation <strong>in</strong> case of failure ...........................................75<br />
7.1.2 <strong>XVS</strong> fails when us<strong>in</strong>g VOB files with Dolby 5.1 or 7.1 sound on systems that have Cyberl<strong>in</strong>k<br />
PowerDVD <strong>in</strong>stalled........................................................................................76<br />
7.1.3 Errors dur<strong>in</strong>g upgrade...................................................................................76<br />
7.1.4 DVI resolution switch with Director Toolset <strong>in</strong> remote mode .......................................76<br />
7.2 <strong>XVS</strong> Operate ..................................................................................................77<br />
7.2.1 General...................................................................................................77<br />
7.2.1.1 Startup of <strong>XVS</strong> operate fails......................................................................77<br />
7.2.1.2 Startup of <strong>XVS</strong> Operate takes a long time ......................................................77<br />
7.2.1.3 Cannot connect to database after <strong>in</strong>stall<strong>in</strong>g video drivers .....................................78<br />
7.2.2 System Manager ........................................................................................78<br />
7.2.2.1 Menu bar appears at the wrong location........................................................78<br />
7.2.2.2 No events received <strong>in</strong> diagnostics panel........................................................79<br />
7.2.2.3 Display creation fails ..............................................................................79<br />
7.2.2.4 Cannot select items <strong>in</strong> Layout tree us<strong>in</strong>g keyboard shortcuts.................................81<br />
7.2.3 Message Editor..........................................................................................81<br />
7.2.3.1 Excessive CPU usage (100%) <strong>in</strong> text edit mode ...............................................81<br />
7.2.3.2 The preview of a scene that conta<strong>in</strong>s a video item has an offset of 10 seconds after dropp<strong>in</strong>g<br />
an empty scene <strong>in</strong> front of it. ........................................................................81<br />
7.2.4 Action Manager..........................................................................................82<br />
7.2.4.1 Some content actions triggered from System tab do not execute. ...........................82<br />
7.2.4.2 Schedul<strong>in</strong>g an item asap when loop first is checked does not override current schedule ..82<br />
7.2.4.3 Null po<strong>in</strong>ter exception when no active layout on a display ....................................83<br />
7.2.4.4 A changed preset configuration not reflected <strong>in</strong> the action....................................83<br />
7.3 <strong>XVS</strong> RTD.......................................................................................................83<br />
7.3.1 General...................................................................................................83<br />
7.3.1.1 RTD fails to startup ................................................................................83<br />
7.3.2 RSS feed manager......................................................................................84<br />
7.3.2.1 Problem delet<strong>in</strong>g RSS feeds when the same feed exists more than once...................84<br />
7.3.2.2 RTD does not start after <strong>in</strong>stall<strong>in</strong>g a webcam...................................................84<br />
7.3.3 RS232 Templates .......................................................................................84<br />
7.3.3.1 MP70 onl<strong>in</strong>e conflicts when mouse driver is <strong>in</strong>stalled on same COM port ..................84<br />
7.3.3.2 Newly <strong>in</strong>stalled MP70 device only visible after PC reboot.....................................85<br />
7.4 <strong>XVS</strong> Play.......................................................................................................85<br />
7.4.1 Large JPEG files do not play correctly................................................................85<br />
2 R5976955 <strong>XVS</strong> - 2 14/03/2007
Table of contents<br />
7.4.2 Director Toolset configuration must be done before sett<strong>in</strong>g <strong>XVS</strong> Play onl<strong>in</strong>e.....................86<br />
7.4.3 Newly imported (large) content file does not play when scheduled immediately.................86<br />
7.4.4 Playback generates many font errors .................................................................86<br />
7.4.5 Scroll<strong>in</strong>g text is not smooth.............................................................................87<br />
7.4.6 The procedure entry po<strong>in</strong>t FreeAddrInfoW could not be located <strong>in</strong> the DLL WS2_32.dll........87<br />
7.4.7 RS232 comb<strong>in</strong>er.........................................................................................87<br />
7.4.8 Both DVI outputs on different resolution ..............................................................87<br />
7.4.9 <strong>XVS</strong> Playback Integrated PC freezes after a few hours.............................................87<br />
7.4.10 MP4 content does not play.............................................................................88<br />
A. Adobe Flash® support <strong>in</strong> <strong>XVS</strong>-2 .............................................................. 89<br />
A.1 Overview of features and limitations........................................................................89<br />
Index .................................................................................................... 91<br />
R5976955 <strong>XVS</strong> - 2 14/03/2007 3
Table of contents<br />
4 R5976955 <strong>XVS</strong> - 2 14/03/2007
1. System Overview<br />
1. SYSTEM OVERVIEW<br />
Overview<br />
• <strong>Barco</strong>’s solution<br />
• System & workflow overview<br />
• <strong>XVS</strong> Operate<br />
• <strong>XVS</strong> RTD<br />
• <strong>XVS</strong> Play<br />
• Director Toolset <strong>in</strong>tegration<br />
1.1 <strong>Barco</strong>’s solution<br />
Overview<br />
<strong>Barco</strong>’s solution is specifically designed to control scor<strong>in</strong>g, tim<strong>in</strong>g & display devices for Sport facilities and<br />
out of house displays for the media market. The sports displays <strong>in</strong>clude <strong>in</strong>door or outdoor LED displays,<br />
LED scoreboard displays, ribbon and perimeter displays, tim<strong>in</strong>g devices, lobby displays, etc. .<br />
<strong>Barco</strong>’s solution <strong>in</strong>cludes both, the control hardware and software.<br />
<strong>Barco</strong>’s solution is optimized for a quick response to live events by provid<strong>in</strong>g real-time content management<br />
which <strong>in</strong>cludes content schedul<strong>in</strong>g and content creation.<br />
The operator can display by a simple click or by press<strong>in</strong>g a button, scor<strong>in</strong>g <strong>in</strong>formation, commercials, team<br />
logos, animations and so much more other content.<br />
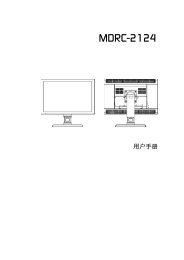
Image 1-1<br />
Stadium example<br />
R5976955 <strong>XVS</strong> - 2 14/03/2007 5
1. System Overview<br />
1 Video LED display<br />
2 Perimeter<br />
3 Fascia ribbon<br />
4 Message center<br />
5 Lounges and VIP suites equipped with LD or LC displays<br />
6 Operator room with <strong>Barco</strong>’s Control solution <strong>XVS</strong> - 2<br />
<strong>XVS</strong> - 2 components<br />
As <strong>XVS</strong> - 2 is a total solution, it comes with:<br />
• Software components:<br />
- <strong>XVS</strong> Operate: to set up & manage the complete environment.<br />
- <strong>XVS</strong> RTD: to <strong>in</strong>terface with real time data sources such as scoreboard control devices, RSS feeds.<br />
- <strong>XVS</strong> Play: for a creative visualization.<br />
• Hardware components:<br />
- <strong>XVS</strong> Operate PC<br />
- <strong>XVS</strong> Play Control PC<br />
- Optional <strong>XVS</strong> Operate Standby PC<br />
- Optional Data server<br />
- Optional MP70 scoreboard controller<br />
- All necessary peripheral equipment and cables<br />
<strong>XVS</strong> hardware is always supplied by <strong>Barco</strong>. <strong>Barco</strong> does not support nor guarantee compatibility<br />
of <strong>XVS</strong> software with third party hardware vendors.<br />
1.2 System & workflow overview<br />
1.2.1 <strong>XVS</strong> system overview<br />
Overview<br />
Two possible system setups are possible:<br />
• A typical system, Operate - Playback.<br />
• A typical system with standby possibility, Operate, Operate standby, Data server - Playback<br />
6 R5976955 <strong>XVS</strong> - 2 14/03/2007
1. System Overview<br />
A complete typical system conta<strong>in</strong>s 2 big parts<br />
• The <strong>XVS</strong> Operate side. This side conta<strong>in</strong>s:<br />
• an operate PC runn<strong>in</strong>g:<br />
o System manager<br />
o Message editor<br />
o Action manager<br />
o <strong>XVS</strong> RTD for real time data <strong>in</strong>terfac<strong>in</strong>g with RSS feeds and scoreboard controllers.<br />
- Scoreboard controller<br />
• The <strong>XVS</strong> Play side (multiple Play sides possible with one Operate). This side conta<strong>in</strong>s:<br />
• A Play computer runn<strong>in</strong>g<br />
o <strong>XVS</strong> Play<br />
- an image processor (e.g. D320 based or Ledpro)<br />
- A LED display such as perimeter, cube or LED wall.<br />
A complete typical system with standby possibility conta<strong>in</strong>s 3 big parts<br />
• The <strong>XVS</strong> Operate side. This side conta<strong>in</strong>s:<br />
• two operate PCs runn<strong>in</strong>g:<br />
o System manager<br />
o Message editor<br />
o Action manager<br />
• One Data Server PC<br />
o <strong>XVS</strong> RTD for real time data <strong>in</strong>terfac<strong>in</strong>g with RSS feeds and scoreboard controllers.<br />
o XML blaster<br />
o Data services<br />
o Content storage<br />
- Scoreboard controller, connected to the data server<br />
• The <strong>XVS</strong> Play side (multiple Play sides possible with one Operate). This side conta<strong>in</strong>s:<br />
• A Play computer runn<strong>in</strong>g<br />
o <strong>XVS</strong> Play<br />
- an image processor (e.g. D320 based or Ledpro)<br />
- A LED display such as perimeter, cube or LED wall.<br />
The system comes as a total package and conta<strong>in</strong>s at least 3 dedicated PC platforms, one server platform<br />
and software as well as the necessary cables and peripherals.<br />
In a typical configuration, the Operate PC is the workstation for the system where the majority of operator<br />
<strong>in</strong>terface occurs. In a system with standby function, when the ma<strong>in</strong> Operate PC fails, the standby Operate<br />
PC can take over all functionality without <strong>in</strong>terrupt<strong>in</strong>g the event. The Playback system assembles the <strong>in</strong>put<br />
from the Operate (data server) mach<strong>in</strong>e along with live data and captured video and feeds it to the image<br />
processor as one image.<br />
R5976955 <strong>XVS</strong> - 2 14/03/2007 7
1. System Overview<br />
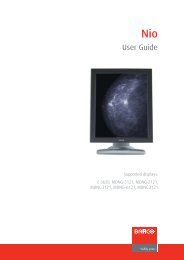
Typical system:<br />
Operate side<br />
System Manager<br />
Message Editor<br />
Scoreboard controller<br />
MP70<br />
Action Manager<br />
RS232<br />
<strong>XVS</strong> RTD<br />
Ethernet connection<br />
Operate<br />
Installed software<br />
RSS feed<br />
LAN network<br />
RS232<br />
DVI<br />
DVI<br />
Playback 1<br />
Perimeter<br />
RS232<br />
Playback 2<br />
DVI<br />
DVI<br />
Cube<br />
Playback side<br />
Image 1-2<br />
System overview<br />
8 R5976955 <strong>XVS</strong> - 2 14/03/2007
1. System Overview<br />
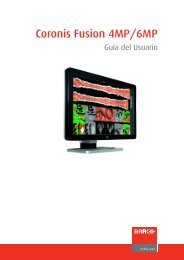
Typical system with standby function:<br />
Operate side<br />
System Manager<br />
Message Editor<br />
Operate<br />
Action Manager<br />
Operate Standby<br />
XML Blaster<br />
Data services<br />
Data server<br />
Content storage<br />
RS232<br />
Scoreboard controller<br />
MP70<br />
<strong>XVS</strong> RTD<br />
Installed software<br />
RSS feed<br />
LAN network<br />
RS232<br />
DVI<br />
DVI<br />
Playback 1<br />
Perimeter<br />
RS232<br />
Playback 2<br />
DVI<br />
DVI<br />
Cube<br />
Playback side<br />
Image 1-3<br />
System overview<br />
R5976955 <strong>XVS</strong> - 2 14/03/2007 9
1. System Overview<br />
1.2.2 <strong>XVS</strong> workflow<br />
Overview workflow<br />
Setup<br />
Hardware <strong>in</strong>stallation<br />
Software <strong>in</strong>stallation<br />
Support Eng<strong>in</strong>eer<br />
(only once)<br />
Pre-game<br />
Content creation<br />
Layout creation<br />
Action creation<br />
Test<strong>in</strong>g<br />
Content creatives<br />
&<br />
Operator<br />
In-game<br />
Trigger actions<br />
Monitors displays<br />
Manages RSS feed<br />
Operator<br />
Post-game<br />
Creat<strong>in</strong>g reports<br />
Diagnostics review<br />
Operator<br />
&<br />
Support eng<strong>in</strong>eer<br />
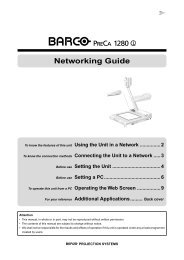
Image 1-4<br />
Workflow<br />
The workflow <strong>in</strong>cludes the follow<strong>in</strong>g 4 big steps:<br />
• Setup: hardware and software setup of <strong>XVS</strong> Operate and <strong>XVS</strong> Play, eventually data server setup (by<br />
support eng<strong>in</strong>eer and operator) (has to be done once)<br />
• Pre-game: create new content and import content delivered by third parties, create playlists and<br />
actions necessary for the com<strong>in</strong>g event, and organize, prepare the event (by operator and content<br />
creatives)<br />
• In-game: scoreboard control, runn<strong>in</strong>g playlists, start<strong>in</strong>g actions, monitor display status (by operator)<br />
• Post-game: create reports (by operator) and review diagnostics (by support eng<strong>in</strong>eer)<br />
1.2.3 Setup<br />
Physical system <strong>in</strong>stallation<br />
Setup to be done by the support eng<strong>in</strong>eer:<br />
• Display components, consult the <strong>in</strong>stallation manual of the correspond<strong>in</strong>g component.<br />
• Display configuration with Director Toolset. For more <strong>in</strong>formation, consult the Director Toolset reference<br />
manual.<br />
• Set up of the Play PC.<br />
• Set up of the Operate PC.<br />
• When a standby system:<br />
- Set up of the Operate Standby PC<br />
- Set up of the data server<br />
10 R5976955 <strong>XVS</strong> - 2 14/03/2007
1. System Overview<br />
Software <strong>in</strong>stallation<br />
Installation to be done by software eng<strong>in</strong>eer for a typical system (the software is normally pre-<strong>in</strong>stalled on<br />
the PC):<br />
• Installation of the playback software on the play PC.<br />
• Installation of the Database on the Operate PC.<br />
• Installation of the XML Blaster on the Operate PC.<br />
• Installation of <strong>XVS</strong> RTD on the Operate PC.<br />
• Installation of <strong>XVS</strong> Operate on the Operate PC.<br />
Installation to be done by software eng<strong>in</strong>eer for a typical system with standby option (the software is normally<br />
pre-<strong>in</strong>stalled on the PC):<br />
• Installation of the playback software on the play PC.<br />
• Installation of <strong>XVS</strong> Operate on the Operate PC.<br />
• Installation of <strong>XVS</strong> Operate on the Operate standby PC.<br />
• Installation of the Database on the Data server PC.<br />
• Installation of the XML Blaster on the Data server PC.<br />
• Installation of <strong>XVS</strong> RTD on the Data server PC.<br />
• Installation of Content storage on the Data server PC.<br />
Software configuration<br />
Configure the real time data such as scoreboard controller MP70, RSS feeds...<br />
1.2.4 Pre-game actions<br />
Create content<br />
Create content with:<br />
• 3rd party tools<br />
• Message editor, to build a message with text, video, graphics, real-time data and effects.<br />
Manage content with System Manager and Action Manager<br />
With System Manager, the Operator organizes the content <strong>in</strong>to dedicated folders and creates playlists.<br />
With Action Manager, he creates actions.<br />
The necessary displays must be created (connected). When it is a fixed <strong>in</strong>stallation with always the same<br />
hardware configuration, this can be done dur<strong>in</strong>g the setup phase.<br />
Create the layout which will be used dur<strong>in</strong>g the game and send this layout to the display.<br />
The necessary tests must be done to make sure that everyth<strong>in</strong>g works f<strong>in</strong>e. E.g. schedule the content or<br />
playlist and activate the created actions.<br />
1.2.5 In-game actions<br />
Control function with Action Manager<br />
The follow<strong>in</strong>g functions can be done by the operator dur<strong>in</strong>g the game:<br />
• Trigger actions on certa<strong>in</strong> events <strong>in</strong> the game<br />
• In-game schedul<strong>in</strong>g<br />
• Controll<strong>in</strong>g the video replays<br />
Scoreboard controll<strong>in</strong>g<br />
Operator monitors the <strong>in</strong>com<strong>in</strong>g scores and statistics from the MP70.<br />
The operator monitors the <strong>in</strong>com<strong>in</strong>g RSS feeds and sends them to the display when necessary.<br />
R5976955 <strong>XVS</strong> - 2 14/03/2007 11
1. System Overview<br />
The referee or jury operates the scoreboard controller which is connected to the Operate PC or data<br />
server.<br />
Monitor<strong>in</strong>g<br />
Operator monitors the display diagnostics and the D320 output.<br />
1.2.6 Post-game actions<br />
Report<strong>in</strong>g<br />
Operator creates the necessary proof-of-performance reports and operational reports.<br />
Diagnostics review by support eng<strong>in</strong>eer<br />
Diagnostics review such as text logg<strong>in</strong>g operate and play, event logg<strong>in</strong>g play and operational reports.<br />
1.3 <strong>XVS</strong> Operate<br />
1.3.1 General<br />
Overview<br />
<strong>XVS</strong> Operate is the ma<strong>in</strong> tool for the Operator. This tool is used dur<strong>in</strong>g the complete process, to:<br />
• Setup and monitor displays<br />
• Create layouts<br />
• Send layouts<br />
• Create playlist<br />
• Schedule content on a display<br />
• Create actions and trigger actions<br />
• Create complete messages that can conta<strong>in</strong> graphics, video, live data elements, text.<br />
Components<br />
<strong>XVS</strong> Operate conta<strong>in</strong>s 3 components:<br />
• System Manager<br />
• Message Editor<br />
• Action Manager<br />
1.3.2 System Manager<br />
Overview<br />
The System Manager conta<strong>in</strong>s 4 modules:<br />
• Display management<br />
• Content management<br />
• Playlist creation<br />
• Layout editor<br />
which are selectable via the navigation buttons <strong>in</strong> the button bar.<br />
12 R5976955 <strong>XVS</strong> - 2 14/03/2007
1. System Overview<br />
Image 1-5<br />
System manager<br />
Consult the System manager reference guide (R5976946) for more detailed <strong>in</strong>formation.<br />
Display management module<br />
This module allows to connect the different displays that must be controlled by <strong>XVS</strong>.<br />
It enables schedul<strong>in</strong>g layouts and content on any connected display.<br />
Diagnostics <strong>in</strong>formation and reports about each display can be consulted.<br />
Content management module<br />
This module allows to import almost any content and to organize this content <strong>in</strong>to typical folders. Names<br />
and descriptions of this content can be changed and almost any type of content can be previewed.<br />
Playlist creation<br />
This module allows to create a sequence of different contents which can be saved as a playlist. This<br />
playlist can then be scheduled as a s<strong>in</strong>gle content. Once scheduled, each item out of the playlist will play<br />
one after each other.<br />
A playlist can be organized and managed as content.<br />
Layout editor<br />
This module allows to create a layout for a s<strong>in</strong>gle display. This layout can be one channel layout or a multichannel<br />
layout on different layers. When us<strong>in</strong>g different layers, each layer will have a different Z-order.<br />
This Z-order is important for the playback of content as some content can overlap other content. This<br />
functionality becomes useful when trigger<strong>in</strong>g hot red actions which has to show content on the top layer.<br />
R5976955 <strong>XVS</strong> - 2 14/03/2007 13
1. System Overview<br />
1.3.3 Message Editor<br />
Overview<br />
The Message Editor is a ’What you see, what you get’ author<strong>in</strong>g tool that allows to create custom messages<br />
<strong>in</strong> a similar way as a Microsoft PowerPo<strong>in</strong>t presentation. These messages can conta<strong>in</strong> video, graphics,<br />
text and pa<strong>in</strong>t items, Live data elements as well as custom made items. Each of these items can have 3<br />
types of effects: entry, hold and exit effect. A lot of properties can be set so that the message reaches the<br />
expectations of the customer.<br />
To make it even more flexible, one message can conta<strong>in</strong> different scenes which will be played back one<br />
after each other.<br />
Image 1-6<br />
Message Editor<br />
1.3.4 Action Manager<br />
Overview<br />
The Action Manager is a real time <strong>in</strong>teractive tool to create and to organize custom actions or commands<br />
that can be executed on a display. An action is always created for a s<strong>in</strong>gle display or even for a specific<br />
layer on that display.<br />
Actions are represented by a thumbnail and can have 3 different priorities: normal, hot and red hot. Actions<br />
can be content related to show a specific content, or display related to control the display sett<strong>in</strong>gs.<br />
Actions can be stored <strong>in</strong> categories so that it is easy to f<strong>in</strong>d them back dur<strong>in</strong>g the game. Activat<strong>in</strong>g an<br />
action is as simple as double click<strong>in</strong>g on it. A triggered action will be added to the real time queue and<br />
can change the queue sequence depend<strong>in</strong>g on the priority of the action.<br />
With<strong>in</strong> the Action Manager, the different queues can be controlled.<br />
14 R5976955 <strong>XVS</strong> - 2 14/03/2007
1. System Overview<br />
Image 1-7<br />
Action manager<br />
For more <strong>in</strong>formation about the Action manager, consult the Action manager reference manual<br />
(R5976954).<br />
1.4 <strong>XVS</strong> RTD<br />
1.4.1 RTD management<br />
Overview<br />
<strong>XVS</strong> RTD allows the system to <strong>in</strong>terface with a 3rd party data source. This 3rd party source can be anyth<strong>in</strong>g,<br />
scoreboard <strong>in</strong>formation, statistics, official time as well as latest headl<strong>in</strong>es.<br />
Real time data can be delivered from a hardware device connected through RS232 such as MP70 or a<br />
software application as Internet RSS feeds.<br />
R5976955 <strong>XVS</strong> - 2 14/03/2007 15
1. System Overview<br />
Image 1-8<br />
RTD management<br />
Components<br />
The follow<strong>in</strong>g components are available:<br />
• RSS services: to import headl<strong>in</strong>es from <strong>in</strong>ternet sites.<br />
• RS232 services: to connect with external hardware.<br />
1.4.2 RSS services<br />
Overview<br />
An RSS service allows to def<strong>in</strong>e exist<strong>in</strong>g RSS feeds as a RTD service. RSS is an XML format designed for<br />
shar<strong>in</strong>g web content like news headl<strong>in</strong>es. An RSS service consists of a list of items, each with a headl<strong>in</strong>e,<br />
description and a l<strong>in</strong>k to a web page.<br />
16 R5976955 <strong>XVS</strong> - 2 14/03/2007
1. System Overview<br />
Image 1-9<br />
RSS services w<strong>in</strong>dow<br />
1.4.3 RS232 service<br />
Overview<br />
The RS232 service allows to def<strong>in</strong>e a RTD service from any RS232 device by def<strong>in</strong><strong>in</strong>g/configur<strong>in</strong>g the<br />
device specific protocol.<br />
The MP70 scoreboard controller is supported by default and each sport is pre-def<strong>in</strong>ed by a separate<br />
RS232 template. Any RS232 device can be supported by customiz<strong>in</strong>g an RS232 template.<br />
1.5 <strong>XVS</strong> Play<br />
1.5.1 General<br />
Overview<br />
<strong>XVS</strong> Play generates one DVI source which holds a mixture of animations, maybe a captured video source,<br />
graphics and real-time data sources. <strong>XVS</strong> Play supports standard scoreboard configurations, fascia and<br />
perimeters solutions around the sports theater as well as out of house displays.<br />
The <strong>XVS</strong> software is designed for<br />
• real-time segmentation of content with extreme aspect ratios, without stretch<strong>in</strong>g, mirror<strong>in</strong>g nor tilt<strong>in</strong>g<br />
of the content.<br />
• endless repetition of content across the board without suffer<strong>in</strong>g any performance<br />
R5976955 <strong>XVS</strong> - 2 14/03/2007 17
1. System Overview<br />
1.5.2 Ultimate visual creativity<br />
Overview<br />
• Supports complex layouts with multiple layers and each layer can conta<strong>in</strong> multiple channels.<br />
• Support for <strong>in</strong>dustry standard video formats, graphics formats and audio formats.<br />
• Support content mix<strong>in</strong>g, scal<strong>in</strong>g, order<strong>in</strong>g and position<strong>in</strong>g.<br />
• Support for multiple effects (entry, hold and exit) on any type of content.<br />
• Static and real-time character generation.<br />
• Support for audio playback: video encoded with audio and as background audio.<br />
1.5.3 Optimized for fascia and perimeter solutions<br />
Overview<br />
• Create complex layouts <strong>in</strong> real resolution, def<strong>in</strong>e multiple layers to put the content on.<br />
• Render contents <strong>in</strong> their native resolution (e.g. 30.000 x 64 pixels) on a fascia board, the player will<br />
convert <strong>in</strong> real-time to s<strong>in</strong>gle DVI output us<strong>in</strong>g real-time segmentation.<br />
• Repeat static and dynamic advertisements endlessly by mirror<strong>in</strong>g.<br />
1.5.4 Optimized for video cube solutions<br />
Overview<br />
Control a cube as 1 display, use <strong>in</strong>tegrated mirror<strong>in</strong>g to repeat/synchronize the content or use unique<br />
content.<br />
Use multiple layers and mix graphics, video files, live video capture, static and real-time text and effects.<br />
1.5.5 Pr<strong>in</strong>ciple of segmentation<br />
Overview<br />
When the (horizontal) resolution of the created signal is higher than the (horizontal) resolution of the video<br />
card, then the software will apply automatically segmentation on the source signal. The result on the<br />
display will look like the orig<strong>in</strong>al source.<br />
The software will render 1 file (content) with a higher resolution then the video card resolution.<br />
The content will <strong>in</strong>ternally be segmented (e.g. content A will be split <strong>in</strong>to A1, A2, A3, A4, A5).<br />
This new created DVI output will be sent to the display and the content will be correctly displayed.<br />
18 R5976955 <strong>XVS</strong> - 2 14/03/2007
1. System Overview<br />
Content file A<br />
A1<br />
A2<br />
A3<br />
Internal <strong>XVS</strong> Play computer<br />
A4<br />
A5<br />
Result to display<br />
Image 1-10<br />
Use Director Toolset for the segmentation of the tiles of the display.<br />
1.5.6 Pr<strong>in</strong>ciple of mirror<strong>in</strong>g (repeat<strong>in</strong>g)<br />
Overview<br />
When <strong>in</strong>dividual content is smaller than the resolution of the display, mirror<strong>in</strong>g or repeat<strong>in</strong>g becomes possible.<br />
One content can be sent to different locations on the display.<br />
A few examples will follow.<br />
Perimeter example:<br />
Take a display with a resolution of 30000x64. The display should display 10 pieces of content each<br />
3000x64. Some contents are the same, e.g. 4x content A, 3x content B and 2x content C.<br />
The result should be as:<br />
Ch1 Ch2 Ch3 Ch4 Ch5 Ch6 Ch7 Ch8 Ch9 Ch10<br />
A B A B C A A C B B<br />
Image 1-11<br />
How to handle:<br />
1. Create a layout with one layer.<br />
2. Add 3 clusters to that layer.<br />
3. To display content A, add channel 1, channel 3, channel 6 and channel 7 to cluster 1.<br />
4. To display content B, add channel 2, channel 4, channel 9 and channel 10 to cluster 2.<br />
5. To display content C, add channel 5 and channel 8 to cluster 3.<br />
That gives the follow<strong>in</strong>g layout tree:<br />
Layout<br />
Layer 1<br />
Cluster 1<br />
Channel 1<br />
R5976955 <strong>XVS</strong> - 2 14/03/2007 19
1. System Overview<br />
Channel 3<br />
Channel 6<br />
Channel 7<br />
Cluster 2<br />
Channel 2<br />
Channel 4<br />
Channel 9<br />
Channel 10<br />
Cluster 3<br />
Channel 5<br />
Channel 8<br />
Schedule content A on cluster 1, content B on cluster 2 and content C on cluster 3.<br />
Note that content scheduled on a cluster, each channel <strong>in</strong>side that cluster will display that content.<br />
Cube display example:<br />
A cube conta<strong>in</strong>s 4 displays. It is possible to display the same content on each display or to display different<br />
content on each display just by work<strong>in</strong>g creatively with the layers and channels.<br />
With Director Toolset, the 4 walls <strong>in</strong> the cube can be configured as one complete flat wall.<br />
Create the follow<strong>in</strong>g layout on that wall:<br />
Layer 1 Layer 2<br />
Channel 1 Channel 2<br />
Channel 5 Channel 6<br />
Channel 3 Channel 4<br />
Channel 7 Channel 8<br />
Image 1-12<br />
Layout<br />
Layer 1<br />
Cluster 1<br />
Channel 1<br />
Channel 2<br />
Channel 3<br />
Channel 4<br />
Layer 2<br />
Channel 5<br />
Channel 6<br />
Channel 7<br />
Channel 8<br />
20 R5976955 <strong>XVS</strong> - 2 14/03/2007
1. System Overview<br />
If you want to display the same content on all 4 side of the cube, sends content to cluster 1 and no content<br />
to channel 5, 6, 7 and 8.<br />
If different content on the 4 sides of the cube must be displayed, sends different content to channel 5, 6,<br />
7and8.<br />
If e.g. 2 sides must display the same content and both other sides different content, then send content to<br />
cluster 1 and content to channels 5 and 8. Due to the fact that layer 2 has a higher Z-order, channel 5 and<br />
8 will be displayed <strong>in</strong>stead of channel 1 and 4.<br />
1.6 Director Toolset <strong>in</strong>tegration<br />
1.6.1 About the use of Director Toolset<br />
Overview<br />
Director Toolset is a software tool, used to set up, configure, manage and control a <strong>Barco</strong> LED display<br />
system of any k<strong>in</strong>d.<br />
For the <strong>XVS</strong> <strong>in</strong>tegration, Director toolset must be configured <strong>in</strong> remote mode. Director Toolset is operated<br />
from the <strong>XVS</strong> Operate computer and controls the LED display through the <strong>XVS</strong> Play.<br />
Install Director Toolset on the <strong>XVS</strong> Operate computer.<br />
1.6.2 How to make a configuration<br />
Overview<br />
Create a new setup for each display connected to the <strong>XVS</strong> system.<br />
Select status onl<strong>in</strong>e.<br />
Set Driver connections. Select Remote connection and fill out the display’s host name.<br />
Fill out the serial connection setup. This connection is the serial connection between the <strong>XVS</strong> Play computer<br />
and the digitizer of the LED display system.<br />
Click OK to create the setup. Start creat<strong>in</strong>g a Configuration.<br />
Only one configuration allowed per <strong>XVS</strong> Play computer.<br />
For more <strong>in</strong>formation about Setups and Configurations, consult the Director Toolset Reference manual<br />
(R5976850).<br />
R5976955 <strong>XVS</strong> - 2 14/03/2007 21
1. System Overview<br />
22 R5976955 <strong>XVS</strong> - 2 14/03/2007
2. <strong>XVS</strong> features<br />
2. <strong>XVS</strong> FEATURES<br />
2.1 Overview list<br />
User <strong>in</strong>terface<br />
• W<strong>in</strong>dows-style application with menus, icons, pull-down menus, and mouse and keyboard operations.<br />
Output<br />
• Animation display rate of at least 60 frames a second.<br />
• Ability to <strong>in</strong>sert graphics and text over animation.<br />
• Ability to display live alphanumeric data feeds.<br />
Interconnectivity<br />
• Ability to control multiple signs and multiple sign sizes from one controller.<br />
Quick operations<br />
• User-def<strong>in</strong>ed thumbnail buttons which can be assigned a s<strong>in</strong>gle action or a series of cascad<strong>in</strong>g actions.<br />
• Quickly display the current content you are creat<strong>in</strong>g/edit<strong>in</strong>g on a sign (
2. <strong>XVS</strong> features<br />
Play/Preview function<br />
• Preview messages with the correct aspect view<strong>in</strong>g ratio.<br />
• Preview a message immediately after mak<strong>in</strong>g changes.<br />
Schedul<strong>in</strong>g<br />
• Schedule message files or display controls with assigned play properties such as date, time, number<br />
of times to play, etc.<br />
• Mix graphic, text, animation, audio files and display controls <strong>in</strong> a s<strong>in</strong>gle schedule.<br />
• Independently schedule on different zones.<br />
• Repeat content on zones.<br />
Layout<br />
• Partition a sign <strong>in</strong>to user-def<strong>in</strong>able zones that can be controlled <strong>in</strong>dependently.<br />
• Overlap zones with transparent backgrounds for a “picture-<strong>in</strong> picture” effect.<br />
Live Video<br />
• Accepts one video <strong>in</strong>put <strong>in</strong> all common video formats. (NTSC, PAL, SECAM, VGA as composite,<br />
component, and S-Video <strong>in</strong>puts).<br />
• Video and effects managed <strong>in</strong> same manner as all other content.<br />
• Send video feed <strong>in</strong> real time to full matrix display or any def<strong>in</strong>ed zone.<br />
Interactive functions<br />
• User-def<strong>in</strong>ed action buttons launch any comb<strong>in</strong>ation of content, play lists, and schedules for quick,<br />
easy display.<br />
• Trigger action on multiple displays at the same time.<br />
• Organize messages <strong>in</strong>to categories for <strong>in</strong>teractively display<strong>in</strong>g messages (e.g. score, half-time, concessions,<br />
advertisements, etc.).<br />
• Prioritize actions to play <strong>in</strong> sequence, after the current message, or <strong>in</strong>terrupt the current message.<br />
• Determ<strong>in</strong>e a hold time for static images.<br />
• Change the properties (priority, hold time, etc.) on multiple actions simultaneously.<br />
<strong>Log</strong>g<strong>in</strong>g and report<strong>in</strong>g<br />
• <strong>Log</strong>g<strong>in</strong>g of each message as it plays <strong>in</strong>clud<strong>in</strong>g time and status.<br />
• Create a log report that can be sorted by sign.<br />
Interfaces to real-time data sources<br />
• Time of day (from PC clock).<br />
• Count-down timer.<br />
• RSS feed.<br />
• <strong>Barco</strong> MP70 Sport Scor<strong>in</strong>g device (RS232).<br />
• Custom <strong>in</strong>terfac<strong>in</strong>g of live data stream or scor<strong>in</strong>g devices on demand.<br />
24 R5976955 <strong>XVS</strong> - 2 14/03/2007
2. <strong>XVS</strong> features<br />
2.2 Supported file formats<br />
Image formats<br />
File extension<br />
JPG/JPEG<br />
BMP<br />
DIB<br />
PNG<br />
DDS<br />
PPM<br />
HDR<br />
PFM<br />
GIF<br />
TGA<br />
PGM<br />
TIF/TIFF<br />
PCX<br />
PSD<br />
IFF<br />
RGB<br />
PIC/PICT/PCT<br />
WMF/EMF<br />
Video formats<br />
File<br />
extensions<br />
AVI<br />
Description<br />
Jo<strong>in</strong>t Photographics Experts Group compressed file format<br />
Microsoft W<strong>in</strong>dows bitmap format<br />
W<strong>in</strong>dows device-<strong>in</strong>dependent bitmap format<br />
Portable Network Graphics format<br />
Microsoft DirectDraw surface format<br />
Portable Pixel map format<br />
High Dynamic Range image format<br />
Portable float map format<br />
87a, 89a and Animated GIFs<br />
Truevision Targa format<br />
Portable Greymap format<br />
Tagged image file format<br />
ZSoft IBC PC Pa<strong>in</strong>tbrush format<br />
Adobe Photoshop file, f<strong>in</strong>al image only. Individual layers are not accessible<br />
Amiga Interchange File Format<br />
SGI RGB image file<br />
Apple Mac<strong>in</strong>tosh QuickDraw PICT file<br />
W<strong>in</strong>dows Meta-file. Only rendered at the default image resolution.<br />
Description<br />
Microsoft Audio Video Interleave format<br />
Video Codecs: Uncompressed, MPEG-1, MPEG-2, MPEG-4v1, MPEG-4v2,<br />
C<strong>in</strong>epak, Indeo 5.10 Also support for AVI files with a transparency channel (32 bit<br />
ARGB).<br />
Audio Codecs: PCM, MPEG-1 Layer 2, MPEG-1 Layer 3, WMA formats compatible<br />
with W<strong>in</strong>dows Media Player 9 exclud<strong>in</strong>g the W<strong>in</strong>dows Media Audio Voice 9 Codec.<br />
MPEG/MPG/MPE Motion Picture Experts Group video/audio formats)<br />
Video Codecs: MPEG-1, MPEG-2, MPEG-4v1, MPEG-4v2<br />
Audio Codecs: PCM, MPEG-1 Layer 2, MPEG-1 Layer 3<br />
R5976955 <strong>XVS</strong> - 2 14/03/2007 25
2. <strong>XVS</strong> features<br />
File<br />
extensions<br />
WMV<br />
Description<br />
Microsoft W<strong>in</strong>dows Media Video format<br />
Video Codecs: WMV7, WMV8, WMV9 Exclud<strong>in</strong>g HD video formats and W<strong>in</strong>dows<br />
MediaVideo9ImageCodec.<br />
Audio Codecs: WMA formats compatible with W<strong>in</strong>dows Media Player 9 exclud<strong>in</strong>g<br />
theW<strong>in</strong>dowsMediaAudioVoice9Codec.<br />
VOB<br />
DVD Video Object format<br />
Non-encrypted DVD format only.<br />
Video Codecs: MPEG-1 or MPEG-2<br />
Audio Codecs: MPEG-1 Layer 2, or PCM<br />
SWF Adobe Flash up to Flash Player 9<br />
SWF can be used with some limitations. See "Adobe Flash® support <strong>in</strong> <strong>XVS</strong>-2",<br />
page 89.<br />
MP4<br />
Optional with H264 codec.<br />
When the option is <strong>in</strong>stalled, MP4 standard files created with either Quicktime 7.1<br />
Pro or higher, or with Elecard H264 encoders are supported:<br />
• Video Codecs: all high or Ma<strong>in</strong> profiles of the H264/AVC codec.<br />
• Audio Codecs: AAC, <strong>in</strong>clud<strong>in</strong>g hi-def<strong>in</strong>ition multi-channel audio features.<br />
Audio formats<br />
File<br />
extensions<br />
WAV<br />
MP3<br />
WMA<br />
Description<br />
Raw PCM Format<br />
MPEG-1 Layer 3 format<br />
W<strong>in</strong>dows Media Audio<br />
All WMA formats compatible with W<strong>in</strong>dows Media Player 9 exclud<strong>in</strong>g the W<strong>in</strong>dows<br />
Media Audio Voice 9 Codec.<br />
MID / MIDI<br />
Any unsupported codecs may work but the stability cannot be guaranteed !<br />
26 R5976955 <strong>XVS</strong> - 2 14/03/2007
3. <strong>XVS</strong> Hardware Configurations<br />
3. <strong>XVS</strong> HARDWARE CONFIGURATIONS<br />
<strong>XVS</strong> hardware is always supplied by <strong>Barco</strong>. <strong>Barco</strong> does not support nor guarantee compatibility<br />
of <strong>XVS</strong> software with third party hardware vendors.<br />
The given hardware specification are m<strong>in</strong>imum hardware specification for the <strong>XVS</strong> application<br />
and are subject to change.<br />
Overview<br />
• <strong>XVS</strong> hardware configuration overview<br />
• <strong>XVS</strong> Operate<br />
• <strong>XVS</strong> Play<br />
• <strong>XVS</strong> lightweight Play<br />
• <strong>XVS</strong> Playback Integrated m<strong>in</strong>iPC<br />
• <strong>XVS</strong> Dataserver<br />
• Specified hardware components<br />
3.1 <strong>XVS</strong> hardware configuration overview<br />
Overview<br />
Two configuration are possible:<br />
• a typical configuration with one operate, act<strong>in</strong>g as data server as well.<br />
• a typical configuration with a standby function. A second operate can take over the full job of the first<br />
operate when this is down for a reason. Mostly used <strong>in</strong> critical applications.<br />
R5976955 <strong>XVS</strong> - 2 14/03/2007 27
3. <strong>XVS</strong> Hardware Configurations<br />
Typical configuration<br />
Operator Desk<br />
19" Peripheral Rack<br />
O p e r a t o r D e sk 1 9 " P e r ip h e r a l R a ck<br />
CCat5<br />
a t 5<br />
Reach R e TTX<br />
X<br />
CCat5<br />
a t 5<br />
Reach R e RRX<br />
X<br />
KVM Switch<br />
KVM sw<br />
it ch<br />
S p o r t sB o x<br />
<strong>XVS</strong><br />
a Playback<br />
D320<br />
D 3 2 0<br />
Short h o r t HHaul<br />
a u l<br />
Modem o d e m TTX<br />
X<br />
Short S h o r t HaulH a u l<br />
Modem M o d e m RXR X<br />
<strong>XVS</strong><br />
Operate<br />
S p o r t sB o x<br />
O p e r a t e<br />
Fiber TX<br />
Fib e r T X<br />
MP70<br />
M P 7 0<br />
NNetwork<br />
e t w o r k<br />
H u b<br />
Hub<br />
to t o LED L wall<br />
a NetworkN e t w o r k<br />
Image 3-1<br />
Hardware overview<br />
List of materials for a typical configuration<br />
Group Description Qty CHK<br />
Computers <strong>XVS</strong> Operate 1<br />
<strong>XVS</strong> Playback 1<br />
USB Keyboard (Country code) 1<br />
USB Mouse 1<br />
17” LCD monitor 1<br />
Scoreboard<br />
controller<br />
MP70 1<br />
Software <strong>XVS</strong> software DVD 1<br />
License <strong>XVS</strong> software license 1<br />
Manuals <strong>XVS</strong> Operate System Manager 1<br />
<strong>XVS</strong> Operate Action Manager 1<br />
<strong>XVS</strong> Operate Message Editor 1<br />
<strong>XVS</strong> RTD 1<br />
<strong>XVS</strong> system overview 1<br />
Cables KVM cable 3<br />
RS232 cable 2<br />
CAT5 cable 2<br />
28 R5976955 <strong>XVS</strong> - 2 14/03/2007
3. <strong>XVS</strong> Hardware Configurations<br />
Group Description Qty CHK<br />
Network <strong>in</strong>terfaces 1/4 KVM switch 1<br />
Gigabit switch (16 <strong>in</strong>puts) 1<br />
CAT5 reach TX 1<br />
CAT5 reach RX 1<br />
Nul Haul Modem TX 1<br />
Nul Haul Modem RX 1<br />
KVM<br />
Short for keyboard, video, mouse switch, a hardware device that enables a s<strong>in</strong>gle keyboard,<br />
video monitor and mouse to control more than one computer one at a time.<br />
Typical configuration with standby functionality<br />
Operator Desk<br />
19" Peripheral Rack<br />
O p e r a t o r D e sk 1 9 " P e r ip h e r a l R a ck<br />
CCat5<br />
a t 5<br />
Reach R e TTX<br />
X<br />
CCat5<br />
a t 5<br />
Reach R e RRX<br />
X<br />
KVM Switch<br />
KVM sw<br />
it ch<br />
S p o r t sB o x<br />
<strong>XVS</strong><br />
a Playback<br />
D320<br />
D 3 2 0<br />
Short h o r t HHaul<br />
a u l<br />
Modem o d e m TTX<br />
X<br />
Short S h o r t HaulH a u l<br />
Modem M o d e m RXR X<br />
Data<br />
server<br />
S p o r t sB o x<br />
O p e r a t e<br />
Fiber TX<br />
Fib e r T X<br />
MP70<br />
M P 7 0<br />
H u b<br />
S p <strong>XVS</strong> o r t sB o x<br />
OperateO p e r a t e<br />
to t o LED L wall<br />
a Network<br />
Hub<br />
<strong>XVS</strong> S p o rStandby<br />
t sB o x<br />
O p e r a t e<br />
Operate<br />
NetworkN e t w o r k<br />
Image 3-2<br />
Typical configuration with standby functionality<br />
R5976955 <strong>XVS</strong> - 2 14/03/2007 29
3. <strong>XVS</strong> Hardware Configurations<br />
List of materials for a typical configuration with standby functionality<br />
Group Description Qty CHK<br />
Computers <strong>XVS</strong> Operate 2<br />
<strong>XVS</strong> Playback 1<br />
Data server 1<br />
USB Keyboard (Country code) 1<br />
USB Mouse 1<br />
17” LCD monitor 1<br />
Scoreboard<br />
controller<br />
MP70 1<br />
Software <strong>XVS</strong> software DVD 1<br />
License <strong>XVS</strong> software license 1<br />
Manuals <strong>XVS</strong> Operate System Manager 1<br />
<strong>XVS</strong> Operate Action Manager 1<br />
<strong>XVS</strong> Operate Message Editor 1<br />
<strong>XVS</strong> RTD 1<br />
<strong>XVS</strong> system overview 1<br />
Cables KVM cable 5<br />
RS232 cable 2<br />
CAT5 cable 2<br />
Network <strong>in</strong>terfaces 1/4 KVM switch 1<br />
Gigabit switch (16 <strong>in</strong>puts) 1<br />
CAT5 reach TX 1<br />
CAT5 reach RX 1<br />
Nul Haul Modem TX 1<br />
Nul Haul Modem RX 1<br />
3.2 <strong>XVS</strong> Operate<br />
System specs<br />
Specification<br />
OS<br />
Detail<br />
W<strong>in</strong>dows XP Professional (SP2), English version<br />
Processor One Dual-Core Intel® Xeon Processor 3.00 GHz (667 MHz FSB /<br />
2x2 MB)<br />
30 R5976955 <strong>XVS</strong> - 2 14/03/2007
3. <strong>XVS</strong> Hardware Configurations<br />
Specification<br />
Memory<br />
Drive bays<br />
I/O ports and connectors<br />
Slots<br />
Dimensions<br />
Detail<br />
2.0 GB (2x1024 MB DIMM) 400 MHz DDR2 533 Quad Channel FBD<br />
Memory<br />
2 <strong>in</strong>ternal 3.5 <strong>in</strong>ch hard drive bays (2 x 1 <strong>in</strong>ch)<br />
• 2 x 9 p<strong>in</strong>s serial connectors; 16550 compatible<br />
• 25 p<strong>in</strong>s parallel connector (2 directions)<br />
• 6 p<strong>in</strong>s m<strong>in</strong>i-DIN PS/2 keyboard & mouse connector<br />
• RJ45 NIC connector<br />
• 8 x USB 2.0 connectors (4p<strong>in</strong>s)<br />
• 1/8 <strong>in</strong>ch m<strong>in</strong>ibus audio <strong>in</strong>put<br />
• 2 x 1/8 <strong>in</strong>ch m<strong>in</strong>ibus for headphone (front & back)<br />
• 1/8 m<strong>in</strong>ibus microphone <strong>in</strong>put<br />
• 1 PCI Express x16 slot with support for graphics up to 150W<br />
• 32-bits/33 MC PCI-slot<br />
• 64-bits/100 MC PCIx-slot<br />
hxwxd<br />
(44.7 x 16.8 x 44.5) cm<br />
(17.5 x 6.6 x 18.0) <strong>in</strong>ch<br />
Weight<br />
Power supply<br />
Hard drives<br />
SCSI controller<br />
Raid<br />
CD, DVD drives<br />
Video<br />
Monitor<br />
Network Card<br />
Keyboard<br />
Mouse<br />
18.6 kg (41 lbs)<br />
550 W power supply<br />
1 x 73GB (15.000 rpm) SAS hard drive<br />
U320 SCSI Controller Card<br />
SAS 5I R Controller<br />
48x CDRW/DVD Combo drive<br />
Video card Operate computer<br />
Dell E173FPC 17” LCD TFT<br />
Integrated network <strong>in</strong>terface - Intel® 82545GM, 64 bits, PCIx, Gigabit<br />
Ethernet (10/100/1000)<br />
Dell USB Enhanced Multimedia keyboard<br />
Dell 2 button USB Scroll mouse<br />
Operat<strong>in</strong>g temperature 10° to 35°C<br />
Storage temperature -40° to 65°C<br />
Relative humidity<br />
20% to 80% (non-condens<strong>in</strong>g)<br />
R5976955 <strong>XVS</strong> - 2 14/03/2007 31
3. <strong>XVS</strong> Hardware Configurations<br />
3.3 <strong>XVS</strong> Play<br />
System specs<br />
The given specifications are the m<strong>in</strong>imum specifications for the hardware. The delivered hardware can<br />
have better specifications.<br />
Specification<br />
OS<br />
Processor<br />
Memory<br />
I/O ports and connectors<br />
Slots<br />
Dimensions<br />
Detail<br />
W<strong>in</strong>dows XP Professional (SP2), English version<br />
Two Dual-Core Intel® Xeon Processor 3.00 GHz (667MHz, 2x2MB,<br />
<strong>in</strong>t NIC)<br />
2.0 GB DDR2 533 Quad Channel FBD Memory (2x1GB)<br />
• 2 x 9 p<strong>in</strong>s serial connectors; 16550 compatible<br />
• 25 p<strong>in</strong>s parallel connector (2 directions)<br />
• 6 p<strong>in</strong>s m<strong>in</strong>i-DIN PS/2 keyboard & mouse connector<br />
• RJ45 NIC connector<br />
• 8 x USB 2.0 connectors (4p<strong>in</strong>s)<br />
• 1/8 <strong>in</strong>ch m<strong>in</strong>ibus audio <strong>in</strong>put<br />
• 2 x 1/8 <strong>in</strong>ch m<strong>in</strong>ibus for headphone (front & back)<br />
• 1/8 m<strong>in</strong>ibus microphone <strong>in</strong>put<br />
• 1 PCI Express x16 slot with support for graphics up to 150W<br />
• 32-bits/33 MC PCI-slot<br />
• 64-bits/100 MC PCIx-slot<br />
hxwxd<br />
(44.7 x 16.8 x 44.5) cm<br />
(17.5 x 6.6 x 18.0) <strong>in</strong>ch<br />
Weight<br />
Power supply<br />
Hard drives<br />
SCSI controller<br />
CD, DVD drives<br />
Video<br />
Network Card<br />
Keyboard<br />
Mouse<br />
18.6 kg (41 lbs)<br />
550 W power supply<br />
3 x 73GB (15.000 rpm) U320 SCSI hard drive<br />
U320 SCSI Controller Card<br />
48 x CDRW/DVD drive<br />
Video card Playback computer<br />
Integrated network <strong>in</strong>terface - Intel® 82545GM, 64 bits, PCIx, Gigabit<br />
Ethernet (10/100/1000)<br />
Dell USB Enhanced Black Multimedia keyboard<br />
Dell 2 button USB Scroll mouse<br />
Operat<strong>in</strong>g temperature 10° to 35°C<br />
Storage temperature -40° to 65°C<br />
Relative humidity<br />
20% to 80% (non-condens<strong>in</strong>g)<br />
32 R5976955 <strong>XVS</strong> - 2 14/03/2007
3. <strong>XVS</strong> Hardware Configurations<br />
3.4 <strong>XVS</strong> lightweight Play<br />
System specs<br />
The given specifications are the m<strong>in</strong>imum specifications for the hardware. The delivered hardware can<br />
have better specifications.<br />
Specification<br />
OS<br />
Processor<br />
Memory<br />
I/O ports and connectors<br />
Slots<br />
Dimensions<br />
Detail<br />
W<strong>in</strong>dows XP Professional (SP2), English version<br />
1 Dual-Core Intel® Xeon Processor 3.00 GHz (667 MHz FSB /2x2 MB)<br />
1.0 GB (1x1024 MB DIMM) 400 MHz DDR2 533 Quad Channel FBD<br />
Memory<br />
• 2 x 9 p<strong>in</strong>s serial connectors; 16550 compatible<br />
• 25 p<strong>in</strong>s parallel connector (2 directions)<br />
• 6 p<strong>in</strong>s m<strong>in</strong>i-DIN PS/2 keyboard & mouse connector<br />
• RJ45 NIC connector<br />
• 8 x USB 2.0 connectors (4p<strong>in</strong>s)<br />
• 1/8 <strong>in</strong>ch m<strong>in</strong>ibus audio <strong>in</strong>put<br />
• 2 x 1/8 <strong>in</strong>ch m<strong>in</strong>ibus for headphone (front & back)<br />
• 1/8 m<strong>in</strong>ibus microphone <strong>in</strong>put<br />
• 1 PCI Express x16 slot with support for graphics up to 150W<br />
• 32-bits/33 MC PCI-slot<br />
• 64-bits/100 MC PCIx-slot<br />
hxwxd<br />
(44.7 x 16.8 x 44.5) cm<br />
(17.5 x 6.6 x 18.0) <strong>in</strong>ch<br />
Weight<br />
Power supply<br />
Hard drives<br />
SCSI controller<br />
CD, DVD drives<br />
Audio<br />
Video<br />
Network card<br />
Keyboard<br />
Mouse<br />
18.6 kg (41 lbs)<br />
550 W power supply<br />
1 x 73GB (15.000 rpm) U320 SCSI hard drive<br />
U320 SCSI Controller Card<br />
48 x CDRW/DVD drive<br />
No audio card<br />
Video card Playback computer<br />
Network <strong>in</strong>terface - Intel® 82545GM, 64 bits, PCIx, Gigabit Ethernet<br />
(10/100/1000)<br />
Dell USB Enhanced Black Multimedia keyboard<br />
Dell 2 button USB Scroll mouse<br />
Operat<strong>in</strong>g temperature 10° to 35°C<br />
Storage temperature -40° to 65°C<br />
Relative humidity 20% to 80% (non-condens<strong>in</strong>g)<br />
R5976955 <strong>XVS</strong> - 2 14/03/2007 33
3. <strong>XVS</strong> Hardware Configurations<br />
3.5 <strong>XVS</strong> Playback Integrated m<strong>in</strong>iPC<br />
System specs<br />
Specification<br />
OS<br />
Processor<br />
Memory<br />
I/O ports and connectors<br />
Slots<br />
Dimensions<br />
Weight<br />
Power supply<br />
Hard drives<br />
CDRW + DVD Drives<br />
Audio<br />
Video<br />
Network<br />
Detail<br />
W<strong>in</strong>dows XP Professional (SP2), English version<br />
1 Dual-Core Intel® Processor T5600 1.83 GHz (667 MHz /2x2 MB)<br />
1.0GBDDR2667SODIMM<br />
1xDVIorS-Sub<br />
1 x Multi-TV<br />
2xUSB2.0<br />
1 x IEEE 1394 6p<strong>in</strong>s<br />
• 1 x <strong>in</strong>ternal M<strong>in</strong>i PCI<br />
165 x 51 x 165 mm<br />
6.5” x 2.0” x 6.5”<br />
1.49 kg (3 pound)<br />
65 W power supply (19V, 3.5A) adapter<br />
110/240 AC auto sens<strong>in</strong>g<br />
60GB (7.000 rpm) 2.5” SATA hard drive<br />
Slim 24x12x24x8 CD-ReWritable Drive + DVD Combo<br />
AC97 5.1 CH<br />
1xL<strong>in</strong>e-<strong>in</strong><br />
1 x L<strong>in</strong>e-out<br />
1xMic-<strong>in</strong><br />
1 x Built-<strong>in</strong> Speaker<br />
1 x S/PDIF Optical Out<br />
Onboard Video Intel 945GM Chipset<br />
Intel® 10/100/1000 Mbps<br />
Operat<strong>in</strong>g temperature Ambient temperature < 40°C<br />
34 R5976955 <strong>XVS</strong> - 2 14/03/2007
3.6 <strong>XVS</strong> Dataserver<br />
System specs<br />
3. <strong>XVS</strong> Hardware Configurations<br />
The given specifications are the m<strong>in</strong>imum specifications for the hardware. The delivered hardware can<br />
have better specifications.<br />
Specification<br />
Detail<br />
OS<br />
Processor<br />
Additional processor<br />
Memory<br />
Internal hard drive<br />
Configuration<br />
Hard Drive Backplane<br />
1st Internal Ma<strong>in</strong> Bay<br />
Hard drive (hot plug)<br />
2nd Internal Ma<strong>in</strong> Bay<br />
Hard drive (hot plug)<br />
3rd Internal Ma<strong>in</strong> Bay<br />
Hard drive (hot plug)<br />
4th Internal Ma<strong>in</strong> Bay<br />
Hard drive (hot plug)<br />
Primary controller for<br />
<strong>in</strong>ternal hard drives<br />
CD/DVD drive<br />
Hot-Plug power supplies<br />
Un<strong>in</strong>terruptible power<br />
supplies<br />
I/O Riser Card options<br />
TCP/IP Offload Eng<strong>in</strong>e<br />
enablement<br />
Chassis Rack rails<br />
Bezel options<br />
Microsoft W<strong>in</strong>dows Server 2003 R2, Standard Edition with 5 client<br />
Licenses<br />
Dual-Core Intel® Xeon 5060 Processor 3.20 GHz (1066 MHz FSB<br />
/2x2 MB)<br />
Dual-Core Intel® Xeon 5060 Processor 3.20 GHz (1066 MHz FSB<br />
/2x2 MB)<br />
2 GB 533 MHz Memory (4x512MB s<strong>in</strong>gle rank DIMMs)<br />
C4 Integrated SAS/SATA, RAID 5, us<strong>in</strong>g add <strong>in</strong> PERC5/i<br />
controller, m<strong>in</strong>3/max4 Hard Drives<br />
1x4 Backplane for 2.5 <strong>in</strong>ch hard drives<br />
36 GB, SAS, 2.5 <strong>in</strong>ch, 10000 rpm Hard drive<br />
36 GB, SAS, 2.5 <strong>in</strong>ch, 10000 rpm Hard drive<br />
36 GB, SAS, 2.5 <strong>in</strong>ch, 10000 rpm Hard drive<br />
not <strong>in</strong>cluded<br />
PERC 5/i Integrated RAID Controller Card<br />
8x DVD Drive, Internal, half height<br />
Two hot plug Power supplies for redundancy<br />
APC Smrat-UPS 2200i, 1980 Watt, rack mounted (2U)<br />
Riser with PCIe Support (2x PCI Express slots)<br />
Broadcom Dual Port TCP/IP Offload eng<strong>in</strong>e not enabled<br />
Rack chassis with static rapid rails<br />
PE1950 bezel assembly<br />
R5976955 <strong>XVS</strong> - 2 14/03/2007 35
3. <strong>XVS</strong> Hardware Configurations<br />
3.7 Specified hardware components<br />
3.7.1 Digital audio card Playback computer<br />
Technical specifications<br />
Analog I/O, Number / Type<br />
Analog I/O, Level<br />
Analog I/O, Input<br />
Impedance<br />
Analog I/O, Output<br />
Impedance<br />
Analog I/O, Output Drive<br />
Capability<br />
Analog I/O, A/D and D/A<br />
Type<br />
Analog I/O, Sample Rates<br />
Analog I/O, Bit Depth<br />
Analog I/O, On-board<br />
Buffer Size<br />
Analog performance,<br />
Frequency Response<br />
Analog performance,<br />
Signal-to-Noise<br />
Analog performance,<br />
Channel Crosstalk<br />
Analog performance, Input<br />
Dynamic Range<br />
Analog performance, Input<br />
THD+N<br />
Analog performance,<br />
Output Dynamic Range<br />
Analog performance,<br />
Output THD+N<br />
Digital I/O, Number / Type<br />
Two <strong>in</strong>puts and two outputs / cross-coupled electronically balanced or<br />
unbalanced, XLR connectors on Audio cable<br />
+4 dBu nom<strong>in</strong>al /+20dBu max. or -10dBV nom<strong>in</strong>al / +6dBV max.<br />
Balanced mode: 24 kW , Unbalanced mode: 12 kW<br />
Balanced mode: 100 W , Unbalanced mode: 50 W<br />
600W impedance, 0.16 µF capacitance<br />
Crystal Semiconductor, 24-bit, 128X oversampl<strong>in</strong>g, delta-sigma<br />
8 kHz to 50 kHz, <strong>in</strong>clud<strong>in</strong>g all standard rates with high-resolution<br />
adjustment<br />
8, 16, 24 or 32 bits<br />
8 Kbytes X 2, for L/R <strong>in</strong>put and output<br />
20-20kHz,+0/-0.35dB<br />
>99 dB, A-wtd., analog <strong>in</strong> to analog out<br />
3. <strong>XVS</strong> Hardware Configurations<br />
Digital I/O, Sample Rates<br />
Digital I/O, Bit Depth<br />
Digital I/O, On-board<br />
Buffer Size<br />
Midi I/O, Number / Type<br />
Midi I/O, Buffer Size<br />
Clock I/O, Number<br />
Clock I/O, Level /<br />
Impedance<br />
Clock I/O, Input Frequency<br />
Range<br />
General, PCI Bus<br />
General, Power<br />
General, Size<br />
General, Shipp<strong>in</strong>g Weight<br />
General, Certifications<br />
Connections, Audio Port<br />
Connections, MIDI/Clock<br />
Port<br />
Cables, Audio (<strong>in</strong>cluded)<br />
Cables, MIDI/Clock<br />
(<strong>in</strong>cluded)<br />
32 kHz, 44.1 kHz, 48 kHz, 88.2 kHz, 96 kHz<br />
8, 16, 24 or 32 bits<br />
8 Kbytes X 2, one each for <strong>in</strong>put and output<br />
Two ports each with <strong>in</strong>put and output / Standard opto-isolated, 5-p<strong>in</strong><br />
female DIN connectors on MIDI/Clock cable<br />
64 bytes, receive and transmit<br />
External: one BNC <strong>in</strong>put and output on MIDI/Clock cable<br />
Internal: one <strong>in</strong>put and output on board-mounted headers<br />
TTL / 75W<br />
25 kHz to 27 MHz<br />
Version 2.1 compliant, Transfer rate: up to 132 Mbytes/sec<br />
+5V @ 400 mA, +12V @ 220 mA, -12V @ 95 mA<br />
5.0" H X 7.4" W X 0.75" D (half-size PCI card)<br />
2.7 lbs. with cables<br />
CE and FCC Class B<br />
Bracket-mounted 25-p<strong>in</strong> female D subm<strong>in</strong>iature connector for L/R<br />
analog <strong>in</strong>, L/R analog out, digital <strong>in</strong> and out<br />
Bracket-mounted 15-p<strong>in</strong> high-density female D subm<strong>in</strong>iature connector<br />
for MIDI port 1 <strong>in</strong> and out, MIDI port 2 <strong>in</strong> and out, clock <strong>in</strong> and out<br />
Six foot, 25-p<strong>in</strong> male D-sub to (3) male XLR and (3) female XLR<br />
connectors, shielded twisted pair cabl<strong>in</strong>g<br />
Two foot, 15-p<strong>in</strong> high-density male D-sub to (4) 5-p<strong>in</strong> female DIN<br />
connectors with shielded twisted pair cabl<strong>in</strong>g and (2) female BNC<br />
connectors with 75W coaxial cabl<strong>in</strong>g<br />
3.7.2 Video card Operate computer<br />
Technical specifications (m<strong>in</strong>imum specs)<br />
Bus type<br />
RAMDAC<br />
Memory<br />
Connectors<br />
Multi-monitor support<br />
PCI-Express x16,
3. <strong>XVS</strong> Hardware Configurations<br />
Additional product<br />
features • 128 KB BIOS 3.3V Flash ROM reprogrammable by SW<br />
• Hardware accelerated Overlay Planes<br />
• Hardware accelerated two-sided light<strong>in</strong>g<br />
• Hardware accelerated anti-aliased po<strong>in</strong>ts and l<strong>in</strong>es<br />
• Quad-buffered Stereo<br />
• 3D Volumetric Texture support<br />
• Hardware accelerated Occlusion Cull<strong>in</strong>g<br />
• Scalable L<strong>in</strong>k Interface (SLI) technology<br />
• Compliant with Microsoft®/Intel® PC2001 Workstation<br />
requirements<br />
• Video Tim<strong>in</strong>gs compliant with VESA DMT 1.0 and VESA GTF<br />
1.0 specifications<br />
• DDC2B+ Monitor support on all OS platforms<br />
• ACPI Version 1.0b Power Management support (all modes)<br />
Shad<strong>in</strong>g architecture<br />
Supported graphics APIs<br />
Available graphics drivers<br />
• Fully programmable GPU (OpenGL1.5/DirectX 9.0c class)<br />
• Long fragment programs (up to 65,536 <strong>in</strong>structions)<br />
• Long vertex programs (up to 65,536 <strong>in</strong>structions)<br />
• Loop<strong>in</strong>g and subrout<strong>in</strong>es (up to 256 loops per vertex program)<br />
• Dynamic flow control<br />
• Conditional execution<br />
• Optimized compilers for Cg, OpenGL shad<strong>in</strong>g language, and<br />
Microsoft HLSL<br />
• OpenGL 1.5 ICD with immediate mode support for all OGL<br />
primitive types<br />
• DirectX 9.0c<br />
HP-tested: Microsoft W<strong>in</strong>dows® XP, W<strong>in</strong>dows 2000 and L<strong>in</strong>ux.<br />
HP qualified drivers may be preloaded or available from the HP<br />
support Web site: http://welcome.hp.com/country/us/eng/software_drivers.html.<br />
Maximum resolution<br />
Dual DVI-I output - drivers dual digital displays at resolutions up to<br />
1920x1200@60 Hz<br />
Internal 400 MHz RAMDACs - drives dual analog displays up to<br />
2048x1536@85 Hz each<br />
38 R5976955 <strong>XVS</strong> - 2 14/03/2007
3. <strong>XVS</strong> Hardware Configurations<br />
3.7.3 Video card Playback computer<br />
Technical specifications (m<strong>in</strong>imum specs)<br />
• RADION TM X1900 GT core (575MHz)<br />
• 256MB GDDR3 onboard memory (1200 MHz)<br />
• 36 pixel shader processors<br />
• 256-bit Memory Bus<br />
• PCI Express x16<br />
• ATI CrossFire by pair<strong>in</strong>g the Radeon X1900GT with a Radeon X1900 CrossFire Edition card.<br />
• Video Acceleration of: MPEG-2, MPEG-4, DivX, WMV9, VC-1 and H.264<br />
• Dual display support<br />
• Dual DVI/VIVO/HDTV<br />
• Sapphire Select<br />
R5976955 <strong>XVS</strong> - 2 14/03/2007 39
3. <strong>XVS</strong> Hardware Configurations<br />
40 R5976955 <strong>XVS</strong> - 2 14/03/2007
4. Installation<br />
4. INSTALLATION<br />
Overview<br />
• <strong>XVS</strong> Play<br />
• <strong>XVS</strong> Operate<br />
• Installation of H264 support <strong>in</strong> <strong>XVS</strong>-2<br />
4.1 <strong>XVS</strong> Play<br />
Overview<br />
• Hardware connections<br />
• Software <strong>in</strong>stallation<br />
4.1.1 Hardware connections<br />
Overview<br />
• Connect the DVI output of the graphical card of the computer to the DVI <strong>in</strong>put of the digitizer.<br />
• Connect the RS232 output of the computer to the RS232 <strong>in</strong>put of the digitizer.<br />
• Connect the audio output of the computer to the audio amplifier <strong>in</strong>put.<br />
• Connect the computer the local LAN network us<strong>in</strong>g a UTP cable.<br />
• If live video is necessary, connect the video playback device to the video <strong>in</strong> of the graphical card of<br />
the computer.<br />
to LAN network<br />
RS232<br />
UTP cable<br />
Video cable<br />
DVI<br />
DVI<br />
Image 4-1<br />
Hardware <strong>in</strong>stallation<br />
Audio cable<br />
4.1.2 Software <strong>in</strong>stallation<br />
The software is pre-<strong>in</strong>stalled on the playback computer. The <strong>XVS</strong> Play DVD is only necessary<br />
to re<strong>in</strong>stall the software when someth<strong>in</strong>g happens with the computer.<br />
R5976955 <strong>XVS</strong> - 2 14/03/2007 41
4. Installation<br />
CAUTION: Software <strong>in</strong>stallation should be done by a <strong>Barco</strong> authorized service technician<br />
!<br />
How to <strong>in</strong>stall playback software<br />
1. Place the <strong>in</strong>stallation DVD <strong>in</strong> the DVD drive.<br />
2. Open My Computer andbrowsetotheDVDdrive.<br />
3. Open folder DVDWizard and double click on setup.exe .<br />
The <strong>in</strong>stall w<strong>in</strong>dow opens.<br />
Image 4-2<br />
DVD <strong>in</strong>stallation wizard<br />
4. Check Playback and click Next >.<br />
5. Click Install.<br />
The software checks if the correct version of IIS is <strong>in</strong>stalled <strong>in</strong> your w<strong>in</strong>dow environment. If not, a<br />
message is displayed and the <strong>in</strong>stallation will be <strong>in</strong>terrupted. Install first IIS, follow the procedure below.<br />
Image 4-3<br />
If all necessary components are available, follow now the <strong>in</strong>structions given <strong>in</strong> the different <strong>in</strong>stall w<strong>in</strong>dows.<br />
6. Enter the 3 parts of the serial number <strong>in</strong> the three boxes and click Next >.<br />
42 R5976955 <strong>XVS</strong> - 2 14/03/2007
4. Installation<br />
Image 4-4<br />
Enter serial number<br />
A welcome message is displayed.<br />
7. Click Next >.<br />
The license agreement is displayed.<br />
Image 4-5<br />
License agreement Playback<br />
8. Read this license agreement and if you agree, select the option I accept the terms of the license agreement<br />
and click Next > .<br />
9. Make a choice between Complete or Custom <strong>in</strong>stall and click Next >.<br />
R5976955 <strong>XVS</strong> - 2 14/03/2007 43
4. Installation<br />
Image 4-6<br />
Installation choice<br />
Complete: a full <strong>in</strong>stall of all necessary components will be done.<br />
Custom: allows to <strong>in</strong>stall some typical components, such as Power management, Time service client<br />
and Time service server. Check or uncheck the desired components and click Next >.<br />
10.Enter the name of the Operate host. When a s<strong>in</strong>gle operate system is used, fill out the name of this<br />
Operate as Operate host 1 and leave the Operate host 2 blank. When us<strong>in</strong>g an Operate with standby<br />
function, enter the host name of the ma<strong>in</strong> Operate as Operate host 1 and enter the standby Operate as<br />
Operate host 2. Click Next >.<br />
Image 4-7<br />
Operate computers<br />
11.Enter the name of the computer that is runn<strong>in</strong>g Live Data or click on the browse button and browse to<br />
the desired computer. Click Next >.<br />
44 R5976955 <strong>XVS</strong> - 2 14/03/2007
4. Installation<br />
Image 4-8<br />
Live data computer<br />
When us<strong>in</strong>g a typical configuration with a s<strong>in</strong>gle operate, enter the name of this Operate computer.<br />
When us<strong>in</strong>g a configuration with standby operate, enter the name of the data server computer which is<br />
runn<strong>in</strong>g live data.<br />
12.Enter the computer that will serve as Primary Time Server (eventually also the name of a Backup Time<br />
Server). Click Next >.<br />
Image 4-9<br />
Time server<br />
<strong>XVS</strong> Playback is <strong>in</strong>stalled. A reboot is necessary before the software can be used.<br />
Click on the radio button of your choice.<br />
13.Click F<strong>in</strong>ish.<br />
When restart is selected, the computer restarts and software can be used.<br />
How to <strong>in</strong>stall the Internet Information Services (IIS) software<br />
1. Click Start → Control panel.<br />
2. Select Add and Remove programs.<br />
3. Select Add/Remove w<strong>in</strong>dow components.<br />
4. Check Internet Information Services (IIS).<br />
R5976955 <strong>XVS</strong> - 2 14/03/2007 45
4. Installation<br />
Image 4-10<br />
W<strong>in</strong>dow components wizard<br />
5. Click Details and uncheck all items except Common Files, Internet Information Services Snap-In and<br />
World Wide Web Service.<br />
6. Click OK.<br />
7. Click Next.<br />
Note: The W<strong>in</strong>dows XP <strong>in</strong>stallation CD is necessary to f<strong>in</strong>ish the <strong>in</strong>stallation.<br />
4.2 <strong>XVS</strong> Operate<br />
Overview<br />
• Hardware <strong>in</strong>stallation<br />
• Software <strong>in</strong>stallation<br />
4.2.1 Hardware <strong>in</strong>stallation<br />
Connection overview typical <strong>in</strong>stallation<br />
• DVI connection from computer to monitor.<br />
• Ethernet connection with local LAN network via an UTP cable.<br />
• Serial connection from Score board controller to RS232 <strong>in</strong> on the computer.<br />
• Optional: If live video is necessary, connect the video playback device to the video <strong>in</strong> of the graphical<br />
card of the computer.<br />
• Optional: Audio connection with external audio device.<br />
46 R5976955 <strong>XVS</strong> - 2 14/03/2007
4. Installation<br />
Scoreboard controller<br />
MP70<br />
RS232<br />
DVI<br />
Image 4-11<br />
Hardware <strong>in</strong>stallation<br />
to LAN network<br />
Connection overview typical <strong>in</strong>stallation with standby possibility<br />
• Connect monitor, mouse and keyboard to KVM <strong>in</strong>put switch.<br />
• Connect each monitor output, mouse output and keyboard output of each computer to an <strong>in</strong>put of the<br />
KVM switch.<br />
• Ethernet connection of each computer with local LAN network via an UTP cable.<br />
• Serial connection from Score board controller to RS232 <strong>in</strong> on the data server computer.<br />
• Optional: If live video is necessary, connect the video playback device to the video <strong>in</strong> of the graphical<br />
card of the computer.<br />
• Optional: Audio connection with external audio device.<br />
KVM<br />
Scoreboard controller<br />
MP70<br />
RS232<br />
Image 4-12<br />
Hardware <strong>in</strong>stallation<br />
to LAN network<br />
4.2.2 Software <strong>in</strong>stallation<br />
About the software <strong>in</strong>stallation<br />
For a typical <strong>in</strong>stallation with a s<strong>in</strong>gle Operate, the follow<strong>in</strong>g software must be <strong>in</strong>stalled:<br />
• Content storage<br />
• Data services<br />
• XMLblaster<br />
• Live data<br />
• Operate<br />
R5976955 <strong>XVS</strong> - 2 14/03/2007 47
4. Installation<br />
For a typical <strong>in</strong>stallation with an Operate standby and data server, the follow<strong>in</strong>g must be <strong>in</strong>stalled on:<br />
the Operate and Operate Standby computer:<br />
• Operate<br />
the data server computer:<br />
• Content storage<br />
• Data services<br />
• XMLblaster<br />
• Live data<br />
The software is pre-<strong>in</strong>stalled on the computers. The <strong>XVS</strong> Operate DVD is only necessary<br />
to re<strong>in</strong>stall the software when someth<strong>in</strong>g happens with the computer.<br />
Installation order<br />
Always <strong>in</strong>stall <strong>in</strong> the follow<strong>in</strong>g order for a system with one Operate.<br />
1. Content storage: <strong>in</strong>stalls the content management.<br />
2. Data services: <strong>in</strong>stalls Oracle database, required to store all Operate data & monitorware for diagnostics.<br />
3. Xmlblaster: <strong>in</strong>stalls a communication service, required to communicate from <strong>XVS</strong> Operate to <strong>XVS</strong><br />
Players.<br />
4. <strong>XVS</strong> Live Data: <strong>in</strong>stalls the <strong>XVS</strong> real-time data manager which registers real-time data services like<br />
MP 70.<br />
5. <strong>XVS</strong> Operate: <strong>in</strong>stalls the <strong>XVS</strong> Operate UI conta<strong>in</strong><strong>in</strong>g System Manager, Message Editor and Action<br />
Manager.<br />
General <strong>in</strong>stallation steps<br />
1. Place the <strong>in</strong>stallation DVD <strong>in</strong> the DVD drive.<br />
2. Open My Computer andbrowsetotheDVDdrive.<br />
3. Open folder DVDWizard and double click on setup.exe .<br />
The <strong>in</strong>stall w<strong>in</strong>dow opens.<br />
4. For a s<strong>in</strong>gle Operate, check Content storage, Data services, Live Data, Operate and XML Blaster and<br />
click Next >.<br />
For a standby system, when <strong>in</strong>stall<strong>in</strong>g the Operate or standby Operate, check only Operate and click<br />
Next>.<br />
When <strong>in</strong>stall<strong>in</strong>g the data server, check Content storage, Data services, Live Data and XML Blaster and<br />
click Next>.<br />
Content storage<br />
To be <strong>in</strong>stalled on a s<strong>in</strong>gle Operate or on the data server.<br />
1. Read this license agreement and if you agree, select the option I accept the terms of the license agreement<br />
and click Next >.<br />
48 R5976955 <strong>XVS</strong> - 2 14/03/2007
4. Installation<br />
The software <strong>in</strong>stallation starts.<br />
Image 4-13<br />
Content storage <strong>in</strong>stallation<br />
2. Make the choice between reboot<strong>in</strong>g the PC immediately or later and click F<strong>in</strong>ish. A reboot is necessary<br />
before the software can be used.<br />
Data services<br />
To be <strong>in</strong>stalled on a s<strong>in</strong>gle Operate or on the data server.<br />
1. Read this license agreement and if you agree, select the option I accept the terms of the license agreement<br />
and click Next >.<br />
Image 4-14<br />
License agreement for Data services<br />
2. Wait until the Data services <strong>in</strong>stallation is f<strong>in</strong>ished.<br />
This process can take up to 30 m<strong>in</strong>utes.<br />
Then make the choice between reboot<strong>in</strong>g the PC immediately or later and click F<strong>in</strong>ish. A reboot is<br />
necessary before the software can be used.<br />
R5976955 <strong>XVS</strong> - 2 14/03/2007 49
4. Installation<br />
Image 4-15<br />
Installation message<br />
XML Blaster<br />
To be <strong>in</strong>stalled on a s<strong>in</strong>gle Operate or on the data server.<br />
1. Read this license agreement and if you agree, select the option I accept the terms of the license agreement<br />
and click Next > .<br />
Image 4-16<br />
XML blaster <strong>in</strong>stallation<br />
The <strong>in</strong>stallation starts. When the <strong>in</strong>stallation is completed a message w<strong>in</strong>dow is display.<br />
2. Click F<strong>in</strong>ish to cont<strong>in</strong>ue.<br />
<strong>XVS</strong> Live Data<br />
To be <strong>in</strong>stalled on a s<strong>in</strong>gle Operate or on the data server.<br />
1. Enter the 3 parts of the serial number <strong>in</strong> the three boxes and click Next >.<br />
50 R5976955 <strong>XVS</strong> - 2 14/03/2007
4. Installation<br />
Image 4-17<br />
Enter the serial number<br />
When it is a correct serial number, a welcome page is displayed.<br />
2. Click Next > on this welcome page.<br />
The license agreement is displayed.<br />
3. Read this license agreement and if you agree, select the option I accept the terms of the license agreement<br />
and click Next >.<br />
Image 4-18<br />
<strong>XVS</strong> Live Data License agreement<br />
4. Make a choice between Complete or Custom <strong>in</strong>stall and click Next >.<br />
R5976955 <strong>XVS</strong> - 2 14/03/2007 51
4. Installation<br />
Image 4-19<br />
Installation choice<br />
Complete: a full <strong>in</strong>stall of all necessary components will be done.<br />
Custom: allows to <strong>in</strong>stall some typical components. Select the desired components or deselect the<br />
non-desired components and click Next >.<br />
5. Make a choice between configur<strong>in</strong>g by computer name or by fixed IP address.<br />
Image 4-20<br />
Computer name or IP address<br />
If the network does not have a Name Server (DHCP) then you should configure the <strong>XVS</strong> software to<br />
use Fixed IP addresses. When a Name Server is available, then the choice exists between Computer<br />
name or fixed IP address. Both of these are displayed with the local systems values so there is no<br />
confusion as to what will be configured.<br />
6. Database selection. Select None as <strong>XVS</strong> uses its own database. Click Next >.<br />
7. Depend<strong>in</strong>g on the <strong>in</strong>stallation, select the Sports Network Option to <strong>in</strong>stall. Click Next >.<br />
52 R5976955 <strong>XVS</strong> - 2 14/03/2007
4. Installation<br />
Image 4-21<br />
Sports network option<br />
8. Enter the computer that will serve as Primary Time Server (eventually also the name of a Backup Time<br />
Server). Click Next >.<br />
Image 4-22<br />
Enter primary time server<br />
<strong>XVS</strong> Live Data is <strong>in</strong>stalled. A reboot is necessary before the software can be used.<br />
Click on the radio button of your choice.<br />
9. Click F<strong>in</strong>ish.<br />
<strong>XVS</strong> Operate<br />
To be <strong>in</strong>stalled on a s<strong>in</strong>gle Operate and on the standby Operate.<br />
1. Enter the 3 parts of the serial number <strong>in</strong> the three boxes and click Next >.<br />
R5976955 <strong>XVS</strong> - 2 14/03/2007 53
4. Installation<br />
Image 4-23<br />
Enter serial number<br />
A welcome page is displayed.<br />
2. Click Next >.<br />
The license agreement is displayed.<br />
Image 4-24<br />
License agreement<br />
3. Read this license agreement and if you agree, select the option I accept the terms of the license agreement<br />
and click Next > .<br />
4. Make a choice between Complete or Custom <strong>in</strong>stall and click Next >.<br />
54 R5976955 <strong>XVS</strong> - 2 14/03/2007
4. Installation<br />
Image 4-25<br />
Installation choice<br />
Complete: a full <strong>in</strong>stall of all necessary components will be done.<br />
Custom: allows to <strong>in</strong>stall some typical components such as Time server client and power management.<br />
Check the desired components and click Next >.<br />
5. Enter the name of the computer that will run XML blaster and the data services and then click Next >.<br />
In a s<strong>in</strong>gle Operate configuration, the Operate computer runs the XML blaster and the data services.<br />
In an Operate standby configuration, the data server computer runs the XML blaster and the data services.<br />
Image 4-26<br />
Enter Live Data computer<br />
6. Enter the computer that will serve as Primary Time Server (eventually also the name of a Backup Time<br />
Server).<br />
<strong>XVS</strong> Operate is <strong>in</strong>stalled. A reboot is necessary before the software can be used.<br />
Click on the radio button of your choice.<br />
7. Click F<strong>in</strong>ish.<br />
R5976955 <strong>XVS</strong> - 2 14/03/2007 55
4. Installation<br />
4.3 Installation of H264 support <strong>in</strong> <strong>XVS</strong>-2<br />
About H264 support<br />
<strong>XVS</strong>-2 can play MP4 files with H264 AVC and AAC streams. These files can be created by software tools<br />
such as Quicktime 7 or Elecard codecs. This option must be purchased by a customer as an add-on, and<br />
therefore, the codecs must be <strong>in</strong>stalled manually <strong>in</strong> the system.<br />
When the option is <strong>in</strong>stalled, MP4 standard files created with either Quicktime 7.1 Pro or higher, or with<br />
Elecard H264 encoders are supported:<br />
• Video Codecs: all high or Ma<strong>in</strong> profiles of the H264/AVC codec.<br />
• Audio Codecs: AAC, <strong>in</strong>clud<strong>in</strong>g hi-def<strong>in</strong>ition multi-channel audio features.<br />
How to <strong>in</strong>stall the support<br />
1. Close down the <strong>XVS</strong>-2 Playback and Operate Software on all computers.<br />
2. Unzip the delivered <strong>XVS</strong>-2_H264_Addon.zip file to a location on each operate and playback mach<strong>in</strong>e.<br />
3. Copy the “<strong>XVS</strong> Playback” folder <strong>in</strong> the zip file over the top of the C:\Program Files\<strong>Barco</strong>\<strong>XVS</strong> Playback<br />
folder on the playback computers.<br />
4. Copy the “<strong>XVS</strong> Operate” folder <strong>in</strong> the zip file over the top of the C:\Program Files\<strong>Barco</strong>\<strong>XVS</strong> Operate<br />
folder on the operate computers.<br />
5. On the Operate computers, open config\sysconfig.xml for edit<strong>in</strong>g, and add the follow<strong>in</strong>g to configuration:<br />
<br />
<br />
<br />
<br />
<br />
56 R5976955 <strong>XVS</strong> - 2 14/03/2007
5. <strong>XVS</strong> - WAN support<br />
5.<strong>XVS</strong>-WANSUPPORT<br />
Overview<br />
• Introduction<br />
• Supported WAN setups for n computers<br />
• About Internet providers<br />
• Possible ISP restrictions<br />
• Installation and configuration<br />
• FTP <strong>in</strong>stallation and configuration<br />
• Configure Syncback with FTP profile on the Operate computer<br />
• Troubleshoot<strong>in</strong>g<br />
5.1 Introduction<br />
Overview<br />
<strong>XVS</strong> setup can be extended from a LAN environment to a WAN environment by us<strong>in</strong>g the <strong>in</strong>ternet as<br />
transport medium. Both sides, the <strong>XVS</strong> Operate side and the <strong>XVS</strong> Play side are connected to an Internet<br />
Service Provider (ISP)<br />
When the connection is established, it is preferable to create a VPN tunnel for security reason when transferr<strong>in</strong>g<br />
the <strong>in</strong>formation through the <strong>in</strong>ternet.<br />
Us<strong>in</strong>g a WAN setup with dynamic IP addresses is a low cost solution tak<strong>in</strong>g the advantage of high bandwidths.<br />
The negative side is the performance, delay and throughput which is not guaranteed over the<br />
<strong>in</strong>ternet.<br />
<strong>XVS</strong> Operate<br />
<strong>XVS</strong> Play<br />
(<strong>XVS</strong> Plays)<br />
Firewall<br />
Firewall<br />
VPN Tunnel (optional)<br />
ADSL/<br />
Cable modem<br />
Leased l<strong>in</strong>e or<br />
ADSL/Cable<br />
with modem<br />
Internet<br />
ADSL l<strong>in</strong>e or Cable<br />
Image 5-1<br />
Setup example<br />
ISP<br />
Internet Service Provider<br />
R5976955 <strong>XVS</strong> - 2 14/03/2007 57
5. <strong>XVS</strong> - WAN support<br />
5.2 Supported WAN setups for n computers<br />
Overview<br />
The follow<strong>in</strong>g setups are possible:<br />
• WAN with n fixed IP addresses.<br />
• WAN with 1 fixed IP address (Operate) + n - 1 dynamic IP addresses (Playbacks).<br />
• WAN with n dynamic IP addresses.<br />
Considerations<br />
• All setup should be deployed with VPN us<strong>in</strong>g a hardware firewall/router.<br />
• When us<strong>in</strong>g dynamic IP addresses, a DNS + DHCP server must be used for dynamic hostname resolv<strong>in</strong>g.<br />
When us<strong>in</strong>g a firewall/router, NAT (network address translation) must be setup.<br />
Either your <strong>in</strong>ternet provider provides DNS support or the PIX firewall can be configured with a public<br />
DNS server. The public DNS server might by slower.<br />
• Options:<br />
- Public DNS server = 4.2.2.1, 4.2.2.2<br />
- Use dynamic DNS, register at dyndns.org<br />
VPN<br />
Virtual Private Network. A VPN is a way to use a public telecommunication <strong>in</strong>frastructure,<br />
such as the Internet, to provide remote offices or <strong>in</strong>dividual users with secure access to their<br />
organization’s network. A virtual private network can be contrasted with an expensive system<br />
of owned or leased l<strong>in</strong>es that can only be used by one organization. The goal of a VPN is to<br />
provide the organization with the same capabilities, but at a much lower cost.<br />
DNS server<br />
Computers, Projectors connected to a network are referenced by their IP address. The only<br />
problem is that remember<strong>in</strong>g IP addresses is not easy. If you need to use hundreds of addresses<br />
then it will become impossible to remember them. This is why doma<strong>in</strong> names are created.<br />
Internet names (doma<strong>in</strong> and host names) are just aliases to these IP addresses. When<br />
you use an Internet address it is automatically translated to an IP address. In fact a program<br />
or device that translates those Internet names to IP addresses is called a DNS Server.<br />
DHCP<br />
Dynamic host configuration protocol. DHCP is a communications protocol that lets network<br />
adm<strong>in</strong>istrators manage centrally and automate the assignment of IP addresses <strong>in</strong> an organization’s<br />
network. Us<strong>in</strong>g the Internet Protocol, each mach<strong>in</strong>e that can connect to the Internet<br />
needs a unique IP address. When an organization sets up its computer users with a connection<br />
to the Internet, an IP address must be assigned to each mach<strong>in</strong>e. Without DHCP, the IP address<br />
must be entered manually at each computer and, if computers move to another location<br />
<strong>in</strong> another part of the network, a new IP address must be entered. DHCP lets a network adm<strong>in</strong>istrator<br />
supervise and distribute IP addresses from a central po<strong>in</strong>t and automatically sends<br />
a new IP address when a computer is plugged <strong>in</strong>to a different place <strong>in</strong> the network.<br />
5.3 About Internet providers<br />
Cable/ADSL<br />
Cable and ADSL require different modems.<br />
58 R5976955 <strong>XVS</strong> - 2 14/03/2007
5. <strong>XVS</strong> - WAN support<br />
The choice depends on the ISP availability and on the cost feature. Dynamic IP address are used.<br />
One solution, a cable solution or ADSL solution, can be used exclusively <strong>in</strong> the WAN setup. Or, a mix can<br />
be made between cable and DSL solutions.<br />
Leased l<strong>in</strong>e<br />
A leased l<strong>in</strong>e must have a fixed, publicly known IP address. Bandwidth is not shorted and it the l<strong>in</strong>e is<br />
always active. Instead of a leased l<strong>in</strong>e connection, a DSL connection with fixed IP address is also possible.<br />
This is <strong>in</strong> most cases a professional cable/DSL solution which is more expensive than a normal cable/DSL<br />
connection.<br />
DSL<br />
Digital Subscriber l<strong>in</strong>e, a technology that exploits unused frequencies on copper telephone<br />
l<strong>in</strong>es to transmit traffic typically at multi-megabit speeds. DSL can allow voice and high-speed<br />
data to be sent simultaneously over the same l<strong>in</strong>e.<br />
5.4 Possible ISP restrictions<br />
Port block<strong>in</strong>g<br />
Some providers block some ports by default. These ports can even be standard ports like FTP ports, etc.<br />
. Ask your provider a list of all blocked ports.<br />
When ports or blocked, it is possible that the Customer Service Eng<strong>in</strong>eer has to:<br />
• configure other ports then the default ones on <strong>XVS</strong> Operate and <strong>XVS</strong> Play.<br />
• request the Internet Service Provider to unblock some ports for a range of IP address.<br />
The follow<strong>in</strong>g ports are used for outside communication:<br />
On the <strong>XVS</strong> Operate mach<strong>in</strong>e:<br />
Port number<br />
Description<br />
2345 Real-time data nameserver.<br />
3412 XMLblaster port, configured for COBRA communication.<br />
7607 XMLblaster port, configured for socket communication.<br />
On the <strong>XVS</strong> Play mach<strong>in</strong>e:<br />
Port number<br />
Description<br />
80 IIS HTTP port<br />
21 FTP server port<br />
5900 VNC server for remote connection<br />
VPN setup<br />
The cable/ADSL connection must offer a fully transparent IP connectivity <strong>in</strong> order to setup a VPN. IPSec<br />
and IKE may not be blocked as these are the key elements to setup the VPN or tunnel through the Internet.<br />
IKE<br />
Internet Key Exchange<br />
R5976955 <strong>XVS</strong> - 2 14/03/2007 59
5. <strong>XVS</strong> - WAN support<br />
IPSec<br />
Internet Protocol Security is a develop<strong>in</strong>g standard for security at the network or packet process<strong>in</strong>g<br />
layer of network communication.<br />
Data volume<br />
The data volume restrictions of some ISP’s must be checked to be sure the volume is large enough to<br />
meet the requirements for a particular setup.<br />
<strong>XVS</strong> Operate is synchroniz<strong>in</strong>g content files with all connected <strong>XVS</strong> Plays. That means that all content<br />
available on <strong>XVS</strong> Operate is synchronized/transferred automatically to all <strong>XVS</strong> Play sides even when this<br />
content is not explicitly scheduled.<br />
So, your monthly data volume must be equal the total size of all new content files that are imported <strong>in</strong> the<br />
<strong>XVS</strong> Operate system.<br />
Also check whether the ISP has different data volumes for upload and download. If so, the synchronization<br />
data volume will be limited by the upload data volume.<br />
Take the follow<strong>in</strong>g rule:<br />
Max synchronization data volume = max ISP data volume / number of Play sides<br />
Transfer speed (download and upload)<br />
ISPs typically handle different transfer speeds for download/upload. The upload speed is typically must<br />
lower.<br />
E.g. ADSL could have:<br />
• Download speed: 2 Mbps - 4 Mbps<br />
• Upload speed: 128 - 256 Mbps<br />
When <strong>XVS</strong> Operate synchronizes content with the Play sides, it will upload the files to the Play sides. A<br />
lot depends on the file format, video or graphics. Video takes a longer time than graphics to upload.<br />
Take the follow<strong>in</strong>g rule:<br />
Max synchronization speed = max upload speed / number of Play sides<br />
60 R5976955 <strong>XVS</strong> - 2 14/03/2007
5. <strong>XVS</strong> - WAN support<br />
5.5 Installation and configuration<br />
Some considerations<br />
• When no DNS service is available, use only IP addresses dur<strong>in</strong>g the <strong>in</strong>stallation and configuration of<br />
<strong>XVS</strong> Operate, <strong>XVS</strong> Play and <strong>XVS</strong> data services. A hostname can only be resolved locally but not<br />
remotely as there is no DNS available.<br />
• Before <strong>in</strong>stall<strong>in</strong>g and configur<strong>in</strong>g the <strong>XVS</strong> software (Operate, Dataservices, Play), make sure the network<br />
<strong>in</strong>frastructure is completely operational.<br />
• To the follow<strong>in</strong>g test:<br />
• Us<strong>in</strong>g fixed IP addresses<br />
o P<strong>in</strong>g IP address(es) of Play(s) from the Operate.<br />
o P<strong>in</strong>g IP address of Operate from one Play.<br />
• Us<strong>in</strong>g hostnames<br />
o P<strong>in</strong>g hostname(s) of Play(s) from Operate.<br />
o P<strong>in</strong>g hostname of Operate of one Play.<br />
• The computers are delivered with the software pre-<strong>in</strong>stalled. Always avoid configur<strong>in</strong>g network sett<strong>in</strong>gs<br />
manually. Use the <strong>in</strong>stall CD.<br />
• Network shar<strong>in</strong>g configuration for content transfer. When us<strong>in</strong>g a VPN, it should be possible to use<br />
network shar<strong>in</strong>g transparently. If not, it is advised to switch to a FTP configuration on the Play. For<br />
more <strong>in</strong>fo about the <strong>in</strong>stallation and configuration, see "FTP <strong>in</strong>stallation and configuration", page 61.<br />
5.6 FTP <strong>in</strong>stallation and configuration<br />
5.6.1 FTP <strong>in</strong>stallation on a Play computer<br />
How to <strong>in</strong>stall<br />
1. Click Start → Control Panel.<br />
2. Select Add or Remove programs.<br />
A new dialog w<strong>in</strong>dow opens with an overview of all <strong>in</strong>stalled programs.<br />
3. From the left icon list, choose Add/Remove w<strong>in</strong>dows components.<br />
The W<strong>in</strong>dows Component Wizard starts.<br />
4. Select Internet Information Services (IIS) and click the Details button.<br />
R5976955 <strong>XVS</strong> - 2 14/03/2007 61
5. <strong>XVS</strong> - WAN support<br />
Image 5-2<br />
FTP service setup<br />
5. Select File Transfer Protocol (FTP) services.<br />
6. Click OK to <strong>in</strong>stall the service.<br />
The system can ask for the W<strong>in</strong>dows <strong>in</strong>stallation disk.<br />
5.6.2 FTP configuration on the Play side<br />
How to configure<br />
1. Click Start → Control Panel.<br />
2. Select Adm<strong>in</strong>istrative Tools.<br />
3. Select Internet Information Services (IIS)<br />
4. Select the node of the tree.<br />
It is possible that the computer name is already listed. If not, right click to open the context menu and<br />
select Connect. Type <strong>in</strong> the hostname or the IP address of the Play computer.<br />
5. Click on the FTP sites node and open Default FTP Site. Right click this node to open the context menu<br />
and select Properties.<br />
6. On the Default FTP site Properties dialog, select FTP Site tab.<br />
When us<strong>in</strong>g fixed IP addresses, make sure to fill <strong>in</strong> the correct IP address. Do not use hostnames.<br />
When work<strong>in</strong>g with DNS, use the hostname.<br />
When the default FTP port (port 21) is blocked by the ISP, configure the FTP server with a different port<br />
that is not blocked.<br />
7. Click on the Home Directory tab end select the Local Path.<br />
The local path must po<strong>in</strong>t to the playbackmedia folder. The complete path can be found <strong>in</strong> the sysconfig.xml<br />
file <strong>in</strong>side the player <strong>in</strong>stall folder.<br />
<br />
C:\PlaybackMedia\<br />
<br />
8. Enable Read, Write and <strong>Log</strong> visits.<br />
62 R5976955 <strong>XVS</strong> - 2 14/03/2007
5. <strong>XVS</strong> - WAN support<br />
9. Click on the Security Accounts tab. Enable Allow Anonymous Connections.<br />
10.Click the Start button on the tool bar to start the FTP server.<br />
5.7 Configure Syncback with FTP profile on the Operate<br />
computer<br />
How to configure<br />
1. Open Syncback.<br />
2. In Profiles menu, select New.<br />
3. For Profile Type, selectSynchronisation.<br />
A New Profile dialog box opens.<br />
4. Enter a name that looks like Ftp_[playername].<br />
5. Fill out the top edit fields Source and Dest<strong>in</strong>ation.<br />
- Source: [Drive]:\<strong>Barco</strong>\Media\Contentmap<br />
- Dest<strong>in</strong>ation: \<br />
6. Select Simple tab and select Synchronize the source directories with the dest<strong>in</strong>ation directory.<br />
7. Select Advanced tab and select Delete file from dest<strong>in</strong>ation.<br />
8. Click on Expert to switch to Expert mode.<br />
9. Click Background tab and enable Run this profile every selection box. Select 5 seconds.<br />
10.Click FTP tab and enable The dest<strong>in</strong>ation directory is on a ftp server.<br />
Fill out:<br />
- Hostname<br />
- Username (anonymous if anonymously)<br />
- Password (blank if anonymously)<br />
- Port (change it only when not us<strong>in</strong>g the default)<br />
11.Press OK to create the profile.<br />
Delete all syncback profiles that do not beg<strong>in</strong> with Ftp_ .<br />
When a display is created <strong>in</strong> the Operate, a syncback profile is automatically created.<br />
5.8 Troubleshoot<strong>in</strong>g<br />
5.8.1 Introduction<br />
Before start<strong>in</strong>g with the troubleshoot<strong>in</strong>g<br />
Make sure that the follow<strong>in</strong>g works before you start:<br />
• P<strong>in</strong>g from Operate to Play(s) and from Play(s) to Operate.<br />
• All ports as listed <strong>in</strong> are open (not blocked/filtered)<br />
• Syncback is up and runn<strong>in</strong>g and correctly configured.<br />
R5976955 <strong>XVS</strong> - 2 14/03/2007 63
5. <strong>XVS</strong> - WAN support<br />
Location of log files<br />
Operate logg<strong>in</strong>g<br />
XMLblaster logs<br />
C:\Program Files\<strong>Barco</strong>\XML Blaster\logs\xmlBlasterServer.log<br />
C:\Program Files\<strong>Barco</strong>\XML Blaster\logs\wrapper.log<br />
Operate logs<br />
C:\Program Files\<strong>Barco</strong>\<strong>XVS</strong> Operate\deploy\operate.log<br />
Real-time data logg<strong>in</strong>g<br />
C:\Program Files\<strong>Barco</strong>\<strong>XVS</strong> Operate\deploy\renderer_std.log<br />
RDE logs<br />
C:\Program Files\<strong>Barco</strong>\<strong>XVS</strong> Live Data\rde\logs\RDE.log<br />
C:\Program Files\<strong>Barco</strong>\<strong>XVS</strong> Live Data\rde\logs\wrapper.log<br />
RTD logs<br />
C:\Program Files\<strong>Barco</strong>\<strong>XVS</strong> Live Data\rtd\deploy\rtd.log<br />
Player logg<strong>in</strong>g<br />
Player logs<br />
C:\Program Files\<strong>Barco</strong>\<strong>XVS</strong> Playback\playerframework\renderer_std.log<br />
5.8.2 Operate does not start up<br />
Overview<br />
• Check if the Oracle service is up and runn<strong>in</strong>g <strong>in</strong> W<strong>in</strong>dows services.<br />
• If Operate does not start, it is possible the service was configured with a different network configuration<br />
(e.g. configured on doma<strong>in</strong> and deployed on a workgroup).<br />
• Try Database configuration Assistant to re-configure the Oracle service.<br />
5.8.3 Display creation fails<br />
Overview<br />
• Check if XMLblaster is runn<strong>in</strong>g as a service <strong>in</strong> w<strong>in</strong>dows services. Check XMLblaster logs.<br />
• Check the Operate logs.<br />
• Check the Player logs. If a command is logged, communication to player is work<strong>in</strong>g.<br />
• Check if the player is configured correctly (XMLblaster server should be the Operate hostname or IP<br />
address).<br />
<br />
<br />
<br />
false<br />
<br />
<br />
OPERATE<br />
<br />
<br />
3412<br />
<br />
<br />
Player<br />
<br />
<br />
<br />
64 R5976955 <strong>XVS</strong> - 2 14/03/2007
5. <strong>XVS</strong> - WAN support<br />
5.8.4 Schedul<strong>in</strong>g fails<br />
Overview<br />
• Check:<br />
- Player logs<br />
- W<strong>in</strong>dows event log on player system<br />
• If no command is logged, it can be a communication error.<br />
• Check if the file is synchronized correctly. Check the syncback configuration.<br />
5.8.5 Real time data fails<br />
Overview<br />
• Check if the RDE service is runn<strong>in</strong>g W<strong>in</strong>dow services. Check the RDE logs for errors.<br />
• Check if the RTD software is runn<strong>in</strong>g. Check the RTD logs for errors.<br />
• Check the player configuration if the RDE server is correctly configured.<br />
• <br />
<br />
RDE hostname<br />
<br />
<br />
2345<br />
<br />
<br />
R5976955 <strong>XVS</strong> - 2 14/03/2007 65
5. <strong>XVS</strong> - WAN support<br />
• If no errors are found <strong>in</strong> RDE/RTD logs, check the player logs.<br />
- Fails to resolved RDE object. CORBA::Object_var rdeObject = _communicator->getObjectRef(rdeNameService,<br />
name);<br />
Check the RTD and RDE configuration files.<br />
Make sure that the RDE/RTD server are configured on the hostname or the IP address when us<strong>in</strong>g<br />
afixedIP!<br />
Do not use hostnames when NO DNS is available. Hostnames can still be resolved locally but not<br />
remotely !<br />
- FATAL 2006-09-06 17:12:24 [3136] root : CORBA exception raised <strong>in</strong> getObjectRef:<br />
TRANSIENT<br />
FATAL 2006-09-06 17:12:24 [3136] NTEvent<strong>Log</strong>ger : An error code has been<br />
reported<br />
: PFW01005<br />
Please consult the NT Event <strong>Log</strong> and documentation to resolve the issue.<br />
FATAL 2006-09-06 17:12:24 [3136] LiveDataMirror : Failed to f<strong>in</strong>d live<br />
data serve<br />
r(RDE) : ItfMirrorToRDE is nil.<br />
ThiscanbecausedbythefactthatthenameserverisconfiguredonahostnamewhennoDNSis<br />
configured ( so only locally resolved ). The nameserver is configured <strong>in</strong> the registry as a registry<br />
sett<strong>in</strong>g.<br />
o Registry key = HKLM\Software\Ace\tao<br />
• Registry value = -ORBEndpo<strong>in</strong>t iiop://[IP]:[port]<br />
o Make sure when us<strong>in</strong>g hostnames the correct hostname is filled <strong>in</strong> and <strong>in</strong> case of no DNS, use<br />
the IP. Possibly check if you are us<strong>in</strong>g the correct port cfg !<br />
o Chance will only be effective when restart<strong>in</strong>g the TAO nam<strong>in</strong>g service <strong>in</strong> w<strong>in</strong>dows services.<br />
• Enable TAO logg<strong>in</strong>g on Operate side for advanced debugg<strong>in</strong>g :<br />
• In HKLM\Software\Ace\Tao, enable logg<strong>in</strong>g by add<strong>in</strong>g the follow<strong>in</strong>g options :<br />
o -ORBDebug => to enable debug mode<br />
o -ORBDebugLevel 10 => the higher the number, the more logg<strong>in</strong>g<br />
o -ORB<strong>Log</strong>File c:\\taolog,txt => redirect logg<strong>in</strong>g to a text file<br />
5.8.6 No feedback <strong>in</strong> Action Manager queue<br />
Overview<br />
• Check the Operate logg<strong>in</strong>g for Action Manager logg<strong>in</strong>g.<br />
• If no Action Manager feedback, check the player configuration at the bottom. Make sure that the<br />
feedback is enabled (true) and the displaylistenerhost is configured as the operate xmlblaster orig<strong>in</strong> !<br />
• <br />
true<br />
<br />
<br />
Operate XML blaster orig<strong>in</strong><br />
<br />
• If the logg<strong>in</strong>g does not report any error, try to delete the display <strong>in</strong> display management and add it<br />
aga<strong>in</strong>. Check the action event queue aga<strong>in</strong>.<br />
• If the previous did not help, try restart<strong>in</strong>g the Operate computer to force start<strong>in</strong>g all services and software<br />
applications.<br />
66 R5976955 <strong>XVS</strong> - 2 14/03/2007
5. <strong>XVS</strong> - WAN support<br />
5.8.7 No diagnostics <strong>in</strong> Operate<br />
Overview<br />
• Make sure the events are actually logged <strong>in</strong> the player w<strong>in</strong>dows event log. If not, check the player<br />
Adiscon Monitorware configuration and player logg<strong>in</strong>g configuration !<br />
• For Player Monitorware configuration, check if the servername that is configured for send SETP action<br />
is correct. To see if the SETP action is actually forwarded, enable logg<strong>in</strong>g to a Monitorware debug file<br />
<strong>in</strong> General Options .<br />
5.8.8 Report<strong>in</strong>g fails<br />
Overview<br />
• Check if ISS web service is runn<strong>in</strong>g on the Play computer.<br />
• Check if Payload Sync service is runn<strong>in</strong>g on the Operate computer.<br />
5.8.9 Storage service on Play computer needs a different port<br />
Overview<br />
If us<strong>in</strong>g WAN support it is possible you may have to re-configure the storage service on the playback<br />
mach<strong>in</strong>e to use a port different than 80.<br />
How to change the storage service port<br />
1. Click Start → Control Panel → Adm<strong>in</strong>istrative Tools → Internet Information Services.<br />
2. Open the tree of the Play computer and go to Web Sites → Default Web Site.<br />
3. Right click to on Default Web Site to open the context menu and select Properties.<br />
4. Select the Web Site tab and change TCP Port to someth<strong>in</strong>g other than 80. Click OK and close all<br />
w<strong>in</strong>dows.<br />
5. Edit the playback sysconfig.xml file to use this new port and save the file.<br />
<br />
<br />
<br />
<br />
80<br />
<br />
<br />
<br />
6. Restart the Play computer.<br />
R5976955 <strong>XVS</strong> - 2 14/03/2007 67
5. <strong>XVS</strong> - WAN support<br />
68 R5976955 <strong>XVS</strong> - 2 14/03/2007
6. Automatic Playback Redundancy Installation<br />
6. AUTOMATIC PLAYBACK REDUNDANCY<br />
INSTALLATION<br />
Overview<br />
• Some def<strong>in</strong>itions<br />
• Hardware<br />
• Configuration of the redundancy playbacks<br />
• States of the Redundancy Controller<br />
6.1 Some def<strong>in</strong>itions<br />
Primary Playback<br />
Theplaybackwhichwhenthereisatie<strong>in</strong>try<strong>in</strong>gtobecomeactivewillw<strong>in</strong>.<br />
Standby Playback<br />
The playback which will rema<strong>in</strong> <strong>in</strong> a standby state should both systems attempt to become active at the<br />
same time.<br />
Active Playback<br />
The playback (primary or standby) which is currently send<strong>in</strong>g feedback, process<strong>in</strong>g display actions, logg<strong>in</strong>g<br />
payload <strong>in</strong>formation, and is outputt<strong>in</strong>g video to the Display.<br />
Inactive Playback<br />
The playback (primary or standby) which is actively render<strong>in</strong>g all content that the primary is but is perform<strong>in</strong>g<br />
the operations <strong>in</strong> a mode where it is ready to take over all functions of the primary should the primary<br />
fail.<br />
Redundant Pair<br />
A set of playback systems configured as Primary and Standby Playbacks which control a s<strong>in</strong>gle display.<br />
R5976955 <strong>XVS</strong> - 2 14/03/2007 69
6. Automatic Playback Redundancy Installation<br />
6.2 Hardware<br />
Overview<br />
<strong>XVS</strong>-2 Operate<br />
RS232<br />
DVI<br />
<strong>XVS</strong>-2 Play Primary<br />
RS232<br />
RS232<br />
RS232 comb<strong>in</strong>er<br />
DVI<br />
DVI<br />
DVI switch<br />
RS232<br />
RS232<br />
DVI<br />
RS232 comb<strong>in</strong>er<br />
<strong>XVS</strong>-2 Play Standby<br />
RS232<br />
Image 6-1<br />
Automatic redundant playback<br />
Stepstobetaken<br />
1. Install 2 Playback computers on the same LAN network<br />
2. Install a DVI switch<br />
3. Install the digitizer D320<br />
Installation playback computers<br />
The <strong>in</strong>stallation of a Redundant Playback is done us<strong>in</strong>g the same Install package as a normal Playback.<br />
1. In order to <strong>in</strong>stall a Playback as a redundant system you simply choose to do a Custom <strong>in</strong>stall. Then<br />
select the option Redundant Playback Support. Most steps will be equal to a s<strong>in</strong>gle playback <strong>in</strong>stallation<br />
except the next steps.<br />
70 R5976955 <strong>XVS</strong> - 2 14/03/2007
6. Automatic Playback Redundancy Installation<br />
Image 6-2<br />
Support for redundant playback<br />
2. Cont<strong>in</strong>ue the setup by enter<strong>in</strong>g all other computers <strong>in</strong> the system and when the choice for the playback<br />
computer must be made between Primary or Standby, select for the first computer Primary and for the<br />
second Standby.<br />
Image 6-3<br />
Setup selection Primary - Standby playback<br />
3. Enter the name of the other computer <strong>in</strong> the Redundant Pair<br />
R5976955 <strong>XVS</strong> - 2 14/03/2007 71
6. Automatic Playback Redundancy Installation<br />
Or,<br />
click on Browse and browse to the desired computer <strong>in</strong> the network.<br />
Image 6-4<br />
Redundant pair computer name<br />
4. Cont<strong>in</strong>ue with the normal <strong>in</strong>stallation.<br />
DVI switch, technical <strong>in</strong>fo<br />
• Frequency bandwidth: 1.65 Gbps (S<strong>in</strong>gle L<strong>in</strong>k)<br />
• Support<strong>in</strong>g Graphic Resolution: UXGA (1600 X 1200 at up to 85Hz) (1920 X 1080 at up to 60Hz)<br />
• Inputs: Dual DVI-D Female ports<br />
• Output: DVI-D Female port<br />
• Control <strong>in</strong>put: RS232 <strong>in</strong>put<br />
• Infrared Remote Control Included<br />
• Power supply: DC 5V, 2A Adapter <strong>in</strong>cluded.<br />
• Dimensions (W X D X H): 170.2 x 120.7 x 30.9 mm (6.7 X 4.75 X 1.2 Inches)<br />
• Weight: 613g (1.35 lbs)<br />
• HDCP (High-bandwidth Digital Content Protection) Compliant.<br />
RS232 Comb<strong>in</strong>er, technical <strong>in</strong>fo<br />
• Dimensions: 4.01 x 2.00 x 0.9 <strong>in</strong> (10.19 x 5.08 x 2.29 cm)<br />
• Connectors: 3 x DB-9 female, RS-232 DCE configuration<br />
• Power Supply (required): 12-17VDC<br />
• Current Draw: 95 mA<br />
• Operat<strong>in</strong>g Temp: 0-50 °C (32-122 °F)<br />
DVI switch <strong>in</strong>stallation<br />
1. Install a first RS232 Comb<strong>in</strong>er (with its power).<br />
2. Connect a straight RS232 cable from Playback Primary COM2 to port 1 on the first RS232 Comb<strong>in</strong>er.<br />
3. Connect a straight RS232 cable from Playback Standby COM2 to port 2 on the first RS232 Comb<strong>in</strong>er.<br />
4. Connect a Male/Male gender changer on the first RS232 comb<strong>in</strong>er master port.<br />
5. Connect a straight RS232 cable from the Male/Male gender changer on the first RS232 Comb<strong>in</strong>er to<br />
the RS232 <strong>in</strong>put on the DVI Switch.<br />
72 R5976955 <strong>XVS</strong> - 2 14/03/2007
6. Automatic Playback Redundancy Installation<br />
6. Connect a DVI cable from the Playback Primary video card DVI output 1 to the first port of the DVI<br />
switch.<br />
7. Connect a DVI cable from the Playback Standby video card DVI output 1 to the second port of the DVI<br />
switch.<br />
8. Connect a DVI cable from the DVI switch output to the D320 <strong>in</strong>put module.<br />
D320 <strong>in</strong>stallation<br />
1. Install a second RS232 Comb<strong>in</strong>er (with its power).<br />
2. Connect a straight RS232 cable from Playback Primary COM1 to port1 on the second RS232 Comb<strong>in</strong>er.<br />
3. Connect a straight RS232 cable from Playback Standby COM1 to port 2 on the second RS232 Comb<strong>in</strong>er.<br />
4. Connect a Male/Male gender changer on the RS232 Comb<strong>in</strong>er master port.<br />
5. Connect a Null Modem cable (crossover RS232) from the Male/Male gender changer on the RS232<br />
Comb<strong>in</strong>er.<br />
6. Attach a second Male/Male gender changer on the other end of the Null Modem cable.<br />
7. Connect the D320 RS232 Connector to the gender changer and plug the transmit cable <strong>in</strong>to COM1 of<br />
the D320.<br />
6.3 Configuration of the redundancy playbacks<br />
Overview<br />
Redundancy Controller can be configured us<strong>in</strong>g the file C:\Program Files\<strong>Barco</strong>\<strong>XVS</strong> Playback\RedundancyController\RedundancyController.exe.config<br />
.<br />
• Under appsett<strong>in</strong>gs set which ComPort to use <strong>in</strong> the “com_port_name” key.<br />
Should be the form COM1, COM2, etc. Normally the driver uses COM1 so the RedundancyController<br />
should use COM2.<br />
• Configure the signal sent to the DVI switch when activat<strong>in</strong>g by sett<strong>in</strong>g the “com_port_data” field. This<br />
is dependent on the DVI Switch.<br />
For the DVI switch we are us<strong>in</strong>g, Playback Primary (which is connected to DVI Switch <strong>in</strong>put 1) should<br />
be configured with @001* and Playback Standby (connected to DVI <strong>in</strong>put 2) should be configured with<br />
@002*.<br />
R5976955 <strong>XVS</strong> - 2 14/03/2007 73
6. Automatic Playback Redundancy Installation<br />
6.4 States of the Redundancy Controller<br />
Overview<br />
• The Redundancy Controller is the helper application which controls which Playback is Active and<br />
which is Standby. There are 3 possible states of the Redundancy Controller:<br />
- Active<br />
- Standby<br />
- Failure<br />
• The Redundancy Controller communicates its state with the Redundancy Controller on the other Playback<br />
System <strong>in</strong> the Redundant Pair. The communication of this state and the status of the local Renderer<br />
determ<strong>in</strong>e what the state of the Redundancy Controller is set to.<br />
• When the Redundancy Controller <strong>in</strong>itializes, it always starts <strong>in</strong> Failure mode.<br />
When the Renderer comes onl<strong>in</strong>e then the status will change to Standby. If the controller determ<strong>in</strong>es<br />
this Playback should be the active one it will upgrade its status to Active. This can be determ<strong>in</strong>ed by<br />
the other Controller transmitt<strong>in</strong>g a failed state or by not respond<strong>in</strong>g at all which is when the assumption<br />
is made that the other system is not operational.<br />
• The Redundancy Controller will go to a failure state if the Renderer becomes non-responsive or term<strong>in</strong>ates.<br />
• You can switch which Playback is active by forc<strong>in</strong>g the currently active Playback <strong>in</strong>to a standby mode.<br />
This is done by right click<strong>in</strong>g the Redundancy Controller’s system tray icon (<strong>Barco</strong> Eye) and click<strong>in</strong>g<br />
“Force Standby”. If force standby is not enabled then that system is not currently operat<strong>in</strong>g as an<br />
Active Playback.<br />
• The current state of the Redundancy Controller can be determ<strong>in</strong>ed by right click<strong>in</strong>g the system tray<br />
icon and expand<strong>in</strong>g the “Current State” fly out menu.<br />
• If both Redundancy Controllers are <strong>in</strong> a standby mode the Primary Playback will activate while the<br />
Standby Playback will rema<strong>in</strong> <strong>in</strong> standby.<br />
74 R5976955 <strong>XVS</strong> - 2 14/03/2007
7. Troubleshoot<strong>in</strong>g<br />
7. TROUBLESHOOTING<br />
Overview<br />
• General<br />
• <strong>XVS</strong> Operate<br />
• <strong>XVS</strong> RTD<br />
• <strong>XVS</strong> Play<br />
7.1 General<br />
Overview<br />
• Where to f<strong>in</strong>d back logg<strong>in</strong>g <strong>in</strong>formation <strong>in</strong> case of failure<br />
• <strong>XVS</strong> fails when us<strong>in</strong>g VOB files with Dolby 5.1 or 7.1 sound on systems that have Cyberl<strong>in</strong>k PowerDVD<br />
<strong>in</strong>stalled.<br />
• Errors dur<strong>in</strong>g upgrade<br />
• DVI resolution switch with Director Toolset <strong>in</strong> remote mode<br />
7.1.1 Where to f<strong>in</strong>d back logg<strong>in</strong>g <strong>in</strong>formation <strong>in</strong> case of failure<br />
The default <strong>in</strong>stall directory is c:\Program Files\<strong>Barco</strong>.<br />
<strong>XVS</strong> Operate<br />
dir1 = [<strong>in</strong>stall directory]\<strong>XVS</strong> Operate\deploy<br />
files1 = operate.log, renderer_std.log<br />
dir2 = [<strong>in</strong>stall directory]\XML Blaster\logs<br />
files2 = wrapper.log, xmlBlasterServer.log<br />
<strong>XVS</strong> Live Data<br />
dir1 = [<strong>in</strong>stall directory]\<strong>XVS</strong> Live Data\rtd\deploy<br />
files1 = rtd.log<br />
dir2 = [<strong>in</strong>stall directory]\<strong>XVS</strong> Live Data\rde\logs<br />
files2 = rde.log, wrapper.log<br />
<strong>XVS</strong> Play<br />
dir1 = [<strong>in</strong>stall dir]\<strong>XVS</strong> Playback\playerframework<br />
files1 = font_errors.log, renderer_std.log<br />
dir2 = [<strong>in</strong>stall dir]\<strong>XVS</strong> Playback\launcher<br />
files2 = launcherlogg<strong>in</strong>g.xml<br />
R5976955 <strong>XVS</strong> - 2 14/03/2007 75
7. Troubleshoot<strong>in</strong>g<br />
7.1.2 <strong>XVS</strong> fails when us<strong>in</strong>g VOB files with Dolby 5.1 or 7.1 sound on systems that<br />
have Cyberl<strong>in</strong>k PowerDVD <strong>in</strong>stalled.<br />
Description<br />
On a PC where Cyberl<strong>in</strong>k PowerDVD is <strong>in</strong>stalled, <strong>XVS</strong> fails when us<strong>in</strong>g VOB files with Dolby 5.1 sound.<br />
<strong>XVS</strong> Operate crashes when try<strong>in</strong>g to preview such a file <strong>in</strong> the System Manager or Message Editor.<br />
<strong>XVS</strong> Play crasheswhentry<strong>in</strong>gtoplaysuchafile.<br />
Cause<br />
Cyberl<strong>in</strong>k Power DVD comes with a codex (claud.ax) that is not compatible with <strong>XVS</strong>.<br />
Solution<br />
Cyberl<strong>in</strong>k Power DVD is not supported and not pre-<strong>in</strong>stalled.<br />
Un<strong>in</strong>tall Cyberl<strong>in</strong>k Power DVD.<br />
The Elecard codecx should be used as MPEG-2 decoder (both on <strong>XVS</strong> Operate and Play)<br />
7.1.3 Errors dur<strong>in</strong>g upgrade<br />
Description<br />
If one of the components of <strong>XVS</strong> (Operate, RTD or Play) is upgraded without remov<strong>in</strong>g the previous version,<br />
error messages are shown dur<strong>in</strong>g the upgrade.<br />
Cause<br />
<strong>XVS</strong> software is still runn<strong>in</strong>g dur<strong>in</strong>g the upgrade.<br />
Solution<br />
Stop all components of the <strong>XVS</strong> software (Operate, RTD and Play) us<strong>in</strong>g the Quit or Exit option from their<br />
system tray menu before start<strong>in</strong>g any upgrade.<br />
7.1.4 DVI resolution switch with Director Toolset <strong>in</strong> remote mode<br />
Description<br />
A standard <strong>XVS</strong> - 2 setup and Director Toolset configured <strong>in</strong> remote mode. Switch (change) the DVI<br />
resolution of the source. An error is thrown: “Could not open the DDC file ...”.<br />
Cause<br />
Director Toolset has problems access<strong>in</strong>g DDC and flash files <strong>in</strong> remote mode .<br />
Solution<br />
Copy the DDC sub-folder to the <strong>XVS</strong> Play computer to the follow<strong>in</strong>g location: "C:\Program Files\<strong>Barco</strong>\<strong>XVS</strong><br />
Playback\playerframework"<br />
76 R5976955 <strong>XVS</strong> - 2 14/03/2007
7. Troubleshoot<strong>in</strong>g<br />
7.2 <strong>XVS</strong> Operate<br />
Overview<br />
• General<br />
• System Manager<br />
• Message Editor<br />
• Action Manager<br />
7.2.1 General<br />
Overview<br />
• Startup of <strong>XVS</strong> operate fails<br />
• Startup of <strong>XVS</strong> Operate takes a long time<br />
• Cannot connect to database after <strong>in</strong>stall<strong>in</strong>g video drivers<br />
7.2.1.1 Startup of <strong>XVS</strong> operate fails<br />
Description<br />
Operate does not start and an error is reported.<br />
Cause<br />
The follow<strong>in</strong>g causes are possible:<br />
• Wrong video drivers are used (e.g. the bundled ASUS drivers)<br />
• The memory allocated to the JVM is too high (over 850 MB)<br />
Solution<br />
• Use the specified drivers. CATALYST 5.8.5.9 or 5.10 have been tested and approved.<br />
• Do not change the sett<strong>in</strong>g of the JVM memory (set the XMX to 850 or lower).<br />
7.2.1.2 Startup of <strong>XVS</strong> Operate takes a long time<br />
Description<br />
After start<strong>in</strong>g the <strong>XVS</strong> Operate an extremely long time elapses before the tool bar or system tray icon<br />
appear on the screen.<br />
Cause<br />
Too many items <strong>in</strong> schedul<strong>in</strong>g history for one or more of the displays.<br />
Solution<br />
Delete some of the items from schedul<strong>in</strong>g history or clear the schedul<strong>in</strong>g history by re-schedul<strong>in</strong>g the<br />
layout to the affected display(s).<br />
Preventive measures<br />
Limit<strong>in</strong>g the number of items <strong>in</strong> the schedul<strong>in</strong>g history through the sysconf.xml file of <strong>XVS</strong> Operate.<br />
<br />
50<br />
<br />
R5976955 <strong>XVS</strong> - 2 14/03/2007 77
7. Troubleshoot<strong>in</strong>g<br />
7.2.1.3 Cannot connect to database after <strong>in</strong>stall<strong>in</strong>g video drivers<br />
Description<br />
When video drivers are <strong>in</strong>stalled via the follow<strong>in</strong>g procedure:<br />
1. Un<strong>in</strong>stall the video drivers.<br />
2. Reboot PC.<br />
3. Install video drivers for ASUS ATI X850 XT.<br />
4. Reboot PC when prompted.<br />
5. Restart <strong>XVS</strong> Operate.<br />
No connection is possible with the database.<br />
Cause<br />
Cause is unknown.<br />
Solution<br />
1. Reboot the system<br />
2. If the reboot does not solve the problem, re-configuration of the Oracle Listener is necessary.<br />
a) Go to Start → Run on the mach<strong>in</strong>e conta<strong>in</strong><strong>in</strong>g the database and type <strong>in</strong> netca.<br />
3. After a few seconds a wizard will pop-up.<br />
a) Select Listener Configuration and click Next.<br />
b) Choose Reconfigure and click Next.<br />
c) Use the defaults on the rest of the pages and click Next.<br />
d) Click F<strong>in</strong>ish after the reconfiguration is completed.<br />
e) Reboot aga<strong>in</strong>.<br />
7.2.2 System Manager<br />
Overview<br />
• Menu bar appears at the wrong location<br />
• No events received <strong>in</strong> diagnostics panel<br />
• Display creation fails<br />
• Cannot select items <strong>in</strong> Layout tree us<strong>in</strong>g keyboard shortcuts<br />
7.2.2.1 Menu bar appears at the wrong location<br />
Description<br />
When start<strong>in</strong>g up System Manager, the menu bar is wrongly positioned. The default module is not shown<br />
or the display tree is wrongly positioned.<br />
Cause<br />
This can happen:<br />
• when the registry sett<strong>in</strong>gs for the preferences of the UI layout become corrupted.<br />
• when switch<strong>in</strong>g between different local sett<strong>in</strong>gs (e.g. from English to Ch<strong>in</strong>ese).<br />
• when upgrad<strong>in</strong>g or repair<strong>in</strong>g the <strong>XVS</strong> Operate software.<br />
78 R5976955 <strong>XVS</strong> - 2 14/03/2007
7. Troubleshoot<strong>in</strong>g<br />
Solution<br />
1. Stop <strong>XVS</strong> Operate us<strong>in</strong>g the Quit option from its system tray menu.<br />
2. Use RegEdit to correct the W<strong>in</strong>dows Registry<br />
a) Click Start → Run and type REGEDIT.<br />
3. Delete the follow<strong>in</strong>g entries:<br />
- HKEY_CURRENT_USER\Software\JavaSoft\Prefs\A/C/T/I/O/N_/M/A/N/A/G/E/R<br />
- HKEY_CURRENT_USER\Software\JavaSoft\Prefs\/Message/Editor<br />
- HKEY_CURRENT_USER\Software\JavaSoft\Prefs\barco-system-manager-2.0<br />
4. Start <strong>XVS</strong> Operate aga<strong>in</strong>.<br />
7.2.2.2 No events received <strong>in</strong> diagnostics panel<br />
Description<br />
In display diagnostics, no events are listed/received from the playback.<br />
The performance report is empty.<br />
Cause<br />
• The display name is different from the host name of the Player (computer name).<br />
Note: This only affects the diagnostics part of the software. This does not prohibit the correct function<strong>in</strong>g<br />
of the rest of the <strong>XVS</strong> software.<br />
• MonitorWare service is not runn<strong>in</strong>g.<br />
• Newly generated events for a selected display are not automatically shown <strong>in</strong> the event list.<br />
Solution<br />
Check MonitorWare service and start if necessary.<br />
Configure the display name to be the Player host name.<br />
Refresh the diagnostics panel by select<strong>in</strong>g the workspace <strong>in</strong> the display tree and then select the display<br />
aga<strong>in</strong>.<br />
7.2.2.3 Display creation fails<br />
Description<br />
The creation of a new display fails and the error message No response was received with<strong>in</strong> timeout ... is<br />
displayed.<br />
Cause<br />
Possible causes:<br />
• Config_0.xml file on playback computer is read only.<br />
• Player communication protocol is not correctly configured.<br />
Solution<br />
Make Config_0.xml on playback computer writable.<br />
Configure Player protocol correctly <strong>in</strong> Sysconfig.xml. Set to IOR <strong>in</strong>stead of SOCKET.<br />
On player side:<br />
<br />
<br />
<br />
<br />
R5976955 <strong>XVS</strong> - 2 14/03/2007 79
7. Troubleshoot<strong>in</strong>g<br />
false<br />
<br />
<br />
<br />
KUUCLT08801<br />
<br />
<br />
<br />
3412<br />
<br />
<br />
<br />
IOR<br />
<br />
<br />
<br />
KUUCLT08801<br />
<br />
<br />
<br />
On Operate side:<br />
<br />
<br />
<br />
3412<br />
<br />
<br />
<br />
IOR<br />
<br />
<br />
<br />
KUUCLT08801Operate<br />
<br />
<br />
<br />
80 R5976955 <strong>XVS</strong> - 2 14/03/2007
7. Troubleshoot<strong>in</strong>g<br />
7.2.2.4 Cannot select items <strong>in</strong> Layout tree us<strong>in</strong>g keyboard shortcuts<br />
Description<br />
• Press L <strong>in</strong> rapid succession to select different layouts.<br />
• Press C <strong>in</strong> rapid succession to select different channels.<br />
• Press L and then press C or vice versa, noth<strong>in</strong>g happens on second key press.<br />
Cause<br />
Issuewithtreeusedtodisplaylayout.<br />
Solution<br />
Wait a few seconds between two key presses.<br />
Use mouse or arrow keys to select different items.<br />
7.2.3 Message Editor<br />
Overview<br />
• Excessive CPU usage (100%) <strong>in</strong> text edit mode<br />
• The preview of a scene that conta<strong>in</strong>s a video item has an offset of 10 seconds after dropp<strong>in</strong>g an empty<br />
scene <strong>in</strong> front of it.<br />
7.2.3.1 Excessive CPU usage (100%) <strong>in</strong> text edit mode<br />
Description<br />
Excessive CPU usage occurs when creat<strong>in</strong>g a new text item <strong>in</strong> a message and switch<strong>in</strong>g that text item<br />
<strong>in</strong>to edit mode. When the mouse po<strong>in</strong>ter is on that text item, the CPU usage jumps to 100%.<br />
Cause<br />
This can happen with some graphics chip sets and is depend<strong>in</strong>g how DirectX is copy<strong>in</strong>g bits.<br />
That problem does not occur with the specified hardware.<br />
Solution<br />
In sysconfig.xml, settheforce_w<strong>in</strong>dow_stretch parameter to true.<br />
<br />
true<br />
<br />
7.2.3.2 The preview of a scene that conta<strong>in</strong>s a video item has an offset of 10<br />
seconds after dropp<strong>in</strong>g an empty scene <strong>in</strong> front of it.<br />
Description<br />
The video item can be previewed with a delay of 10 seconds <strong>in</strong> the follow<strong>in</strong>g case:<br />
• Create a scene with an embedded video item (duration > 10 seconds).<br />
• Enlarge the duration to e.g. 5 m<strong>in</strong>utes (default behavior: loop video item)<br />
• Add a new scene and drag and drop that scene just before the scene withthevideoitem.<br />
• Select now the scene that conta<strong>in</strong>s that video item. The preview is positioned at the beg<strong>in</strong>n<strong>in</strong>g of that<br />
scene.<br />
The preview of the video has an offset of 10 seconds (equal to the length of the empty scene).<br />
R5976955 <strong>XVS</strong> - 2 14/03/2007 81
7. Troubleshoot<strong>in</strong>g<br />
Cause<br />
”Positrack<strong>in</strong>g” <strong>in</strong> Message Editor is wrong.<br />
Solution<br />
Reorder the scenes to get the “positrack<strong>in</strong>g” back normal.<br />
7.2.4 Action Manager<br />
Overview<br />
• Some content actions triggered from System tab do not execute.<br />
• Schedul<strong>in</strong>g an item asap when loop first is checked does not override current schedule<br />
• Null po<strong>in</strong>ter exception when no active layout on a display<br />
• A changed preset configuration not reflected <strong>in</strong> the action<br />
7.2.4.1 Some content actions triggered from System tab do not execute.<br />
Description<br />
The target of a system tab content action a certa<strong>in</strong> channel on a display. Trigger<strong>in</strong>g this action does not<br />
start play<strong>in</strong>g the content.<br />
Cause<br />
The current active layout on the target display does not conta<strong>in</strong> the target channel for that action.<br />
That can happen when the operator works with different layouts on a s<strong>in</strong>gle channel and keep the actions<br />
from an obsolete layout <strong>in</strong> the system tab.<br />
Example:<br />
• Layout A has a full screen channel ch[1], a content action A[1] is def<strong>in</strong>ed on ch[1].<br />
• Layout B has 2 channels ch[1] & ch[2], 2 content actions B[1] and B[2] are def<strong>in</strong>ed on ch[1] and ch[2].<br />
If now layout A is the active layout and the operator triggers action B[2] on the system tab, noth<strong>in</strong>g will<br />
happen as there is no reference to channel 2.<br />
Solution<br />
As actions are not removed automatically from the system tab when a new layout is applied, handle as<br />
follow:<br />
• remove the actions manually (these actions can be restored later when necessary)<br />
• categorize the actions per layout type<br />
7.2.4.2 Schedul<strong>in</strong>g an item asap when loop first is checked does not override<br />
current schedule<br />
Description<br />
Schedule an item to play asap while another item was scheduled to play forever and loop first was checked.<br />
Current schedule is not overwritten even not when loop first is unchecked.<br />
Cause<br />
Schedule does not overwrite current action queue, so un-check<strong>in</strong>g has no effect.<br />
Solution<br />
Skip the content that was looped and restart schedul<strong>in</strong>g.<br />
82 R5976955 <strong>XVS</strong> - 2 14/03/2007
7. Troubleshoot<strong>in</strong>g<br />
7.2.4.3 Null po<strong>in</strong>ter exception when no active layout on a display<br />
Description<br />
Create a content action for a display with no active layout. When clos<strong>in</strong>g the Action Manager, a null po<strong>in</strong>ter<br />
exception is thrown <strong>in</strong> the log files.<br />
Cause<br />
Due to no active layout on the display, a null po<strong>in</strong>ter exception is thrown.<br />
Solution<br />
1. Stop <strong>XVS</strong> Operate us<strong>in</strong>g the Quit option of its system tray menu and restart aga<strong>in</strong>.<br />
2. Go to System manager and schedule a send a layout to the display.<br />
7.2.4.4 A changed preset configuration not reflected <strong>in</strong> the action<br />
Description<br />
A changed preset configuration <strong>in</strong> Director Toolset is not reflected <strong>in</strong> a created display action.<br />
Cause<br />
The content of a preset is loaded <strong>in</strong> the database dur<strong>in</strong>g the creation of the display action. This content<br />
cannot be overwritten.<br />
Solution<br />
After chang<strong>in</strong>g a preset with Director Toolset, recreate the display action <strong>in</strong> Action manager.<br />
7.3 <strong>XVS</strong> RTD<br />
Overview<br />
• General<br />
• RSS feed manager<br />
• RS232 Templates<br />
7.3.1 General<br />
Overview<br />
• RTD fails to startup<br />
7.3.1.1 RTD fails to startup<br />
Description<br />
Startup of RTD fails (even after a re-<strong>in</strong>stall)<br />
Cause<br />
RTD cannot read its database files. These have become corrupt.<br />
Solution<br />
1. Browse to c:\Program Files\<strong>Barco</strong>\<strong>XVS</strong> Live Data\rde\deploy.<br />
2. Delete all files with the extension .db .<br />
3. Start RTD aga<strong>in</strong>.<br />
R5976955 <strong>XVS</strong> - 2 14/03/2007 83
7. Troubleshoot<strong>in</strong>g<br />
7.3.2 RSS feed manager<br />
Overview<br />
• Problem delet<strong>in</strong>g RSS feeds when the same feed exists more than once.<br />
• RTD does not start after <strong>in</strong>stall<strong>in</strong>g a webcam<br />
7.3.2.1 Problem delet<strong>in</strong>g RSS feeds when the same feed exists more than once.<br />
Description<br />
When an RSS feed is created more than one time with other capitalization. Try to delete one of those<br />
creation. An exception is thrown. When try<strong>in</strong>g to delete the second feed, this <strong>in</strong>stance is not deleted.<br />
Cause<br />
Duplicated RSS feeds.<br />
Solution<br />
Currently now solution for it. Try to avoid <strong>in</strong> the future to create twice the same RSS feed.<br />
7.3.2.2 RTD does not start after <strong>in</strong>stall<strong>in</strong>g a webcam<br />
Description<br />
Install the webcam and the driver for it on the RTD mach<strong>in</strong>e. Reboot the mach<strong>in</strong>e as required after the<br />
driver <strong>in</strong>stallation.<br />
Try to restart RTD management. Restart fails<br />
Cause<br />
The <strong>in</strong>stallation of a webcam creates another local area connection with a bad IP address.<br />
Solution<br />
Reboot the PC aga<strong>in</strong>.<br />
7.3.3 RS232 Templates<br />
Overview<br />
• MP70 onl<strong>in</strong>e conflicts when mouse driver is <strong>in</strong>stalled on same COM port<br />
• Newly <strong>in</strong>stalled MP70 device only visible after PC reboot<br />
7.3.3.1 MP70 onl<strong>in</strong>e conflicts when mouse driveris<strong>in</strong>stalledonsameCOMport<br />
Description<br />
The mouse po<strong>in</strong>ter is behav<strong>in</strong>g strangely and jumps/selects around. When disconnect<strong>in</strong>g the mouse, the<br />
cursor keeps jump<strong>in</strong>g around.<br />
Cause<br />
When boot<strong>in</strong>g the computer with the MP70 switched on, the computer <strong>in</strong>terprets it as a serial mouse. That<br />
means that the computer recognizes 2 mouses what causes the cursor jumps on the display.<br />
Solution<br />
Try one of the follow<strong>in</strong>g solutions:<br />
84 R5976955 <strong>XVS</strong> - 2 14/03/2007
7. Troubleshoot<strong>in</strong>g<br />
1. Disable the serial mouse device <strong>in</strong> device management.<br />
2. Switch off the MP70 and reboot the computer.<br />
3. Install a handshak<strong>in</strong>g cable (normally delivered with the MP70) between the computer and the MP70.<br />
This causes the PC to see the MP70 as a device requir<strong>in</strong>g handshak<strong>in</strong>g.<br />
7.3.3.2 Newly <strong>in</strong>stalled MP70 device only visible after PC reboot<br />
Description<br />
After <strong>in</strong>stallation and configuration of the MP70 service, check the RTD manager for onl<strong>in</strong>e services. The<br />
newly <strong>in</strong>stalled MP70 service is not visible as an onl<strong>in</strong>e service <strong>in</strong> RTD manager.<br />
Cause<br />
Real time data eng<strong>in</strong>e (RDE service) requires a restart after a OM port template is <strong>in</strong>stalled <strong>in</strong> order to<br />
detect the MP70 service.<br />
Solution<br />
Perform one of the follow<strong>in</strong>g solutions:<br />
• Restart the PC. This will restart the RDE automatically.<br />
• Restart the RDE manually:<br />
a) Close <strong>XVS</strong> RTD by right click<strong>in</strong>g the system tray icon and select<strong>in</strong>g Quit.<br />
b) Click Start → All Programs → <strong>Barco</strong> → <strong>XVS</strong> RTD → Shutdown. This should kill the Comport-<br />
TempalteSource.exe <strong>in</strong> the task manager. If it is not killed automatically, kill it manually <strong>in</strong> the Task<br />
manager.<br />
c) Restart the RDE, click Start → All Programs → Startup → RDE.<br />
d) Click on the <strong>XVS</strong> RTD desktop shortcut to restart. MP70 RTD service should be visible now.<br />
7.4 <strong>XVS</strong> Play<br />
Overview<br />
• Large JPEG files do not play correctly<br />
• Director Toolset configuration must be done before sett<strong>in</strong>g <strong>XVS</strong> Play onl<strong>in</strong>e<br />
• Newly imported (large) content file does not play when scheduled immediately<br />
• Playback generates many font errors<br />
• Scroll<strong>in</strong>g text is not smooth<br />
• The procedure entry po<strong>in</strong>t FreeAddrInfoW could not be located <strong>in</strong> the DLL WS2_32.dll<br />
• RS232 comb<strong>in</strong>er<br />
• Both DVI outputs on different resolution<br />
• <strong>XVS</strong> Playback Integrated PC freezes after a few hours<br />
• MP4 content does not play<br />
7.4.1 Large JPEG files do not play correctly<br />
Description<br />
When schedul<strong>in</strong>g a large JPEG file, at playback side, it can happen that the file takes a long time to load<br />
or it fails to play (could show a white background <strong>in</strong>stead)<br />
R5976955 <strong>XVS</strong> - 2 14/03/2007 85
7. Troubleshoot<strong>in</strong>g<br />
Cause<br />
The problem is related to the texture size limitation video hardware. Current hardware is usually<br />
2048x2048 or 4096x4096. Because of that, images need to be scaled down to fit <strong>in</strong> the maximum size.<br />
The ma<strong>in</strong> problem is due to scal<strong>in</strong>g down of a progressive jpeg. A non-progressive jpeg has much better<br />
scal<strong>in</strong>g performances.<br />
Solution<br />
Try one of the follow<strong>in</strong>g solutions:<br />
• Convert the image to a non-progressive jpeg.<br />
• Scale down the image to the maximum supported texture size of the graphics card (4096x4096).<br />
Note<br />
When the player is not configured <strong>in</strong> the segmentation mode, the texture size limitations must be taken<br />
<strong>in</strong> account for all supported graphics formats. When configured <strong>in</strong> segmentation mode, the player will<br />
automatically segment extreme resolutions and fit them automatically with<strong>in</strong> the texture boundaries.<br />
7.4.2 Director Toolset configuration must be done before sett<strong>in</strong>g <strong>XVS</strong> Play onl<strong>in</strong>e<br />
Description<br />
Start Director Toolset while <strong>XVS</strong> Play is runn<strong>in</strong>g. When clos<strong>in</strong>g Director Toolset errors will be generated<br />
<strong>in</strong> the playback (system_0.cfg is unloaded).<br />
Cause<br />
No cause is def<strong>in</strong>ed yet.<br />
Solution<br />
Only start <strong>XVS</strong> Play after configur<strong>in</strong>g the display with Director Toolset and Director Toolset is closed.<br />
7.4.3 Newly imported (large) content file does not play when scheduled<br />
immediately<br />
Description<br />
Import a large video file and schedule this file to play immediately. The file does not play and errors are<br />
seen <strong>in</strong> the playback.<br />
Cause<br />
The file is not yet copied to the playback.<br />
Solution<br />
Follow the recommended operat<strong>in</strong>g procedures. Import<strong>in</strong>g content should be done dur<strong>in</strong>g the event preparation<br />
and not dur<strong>in</strong>g the event itself.<br />
7.4.4 Playback generates many font errors<br />
Description<br />
The error log is unusually large.<br />
Many errors reported about not be<strong>in</strong>g able to display certa<strong>in</strong> characters with the chosen font.<br />
Cause<br />
The font which is used, does not support some or all of the characters which must be displayed.<br />
86 R5976955 <strong>XVS</strong> - 2 14/03/2007
7. Troubleshoot<strong>in</strong>g<br />
Solution<br />
Use only a font that conta<strong>in</strong>s all characters that should be displayed.<br />
For Ch<strong>in</strong>ese texts, use one of the these fonts: SimSun, SimHei and PM<strong>in</strong>gLiu.<br />
7.4.5 Scroll<strong>in</strong>g text is not smooth<br />
Description<br />
Scroll<strong>in</strong>g text is not scroll<strong>in</strong>g smoothly when played on the LED wall.<br />
Cause<br />
There is no dual processor available and hyperthread<strong>in</strong>g is not enabled and the LED wall is not configured<br />
full screen.<br />
Solution<br />
Use hardware with dual processor and enable the hyperthread<strong>in</strong>g. Configure the LED wall full screen.<br />
7.4.6 The procedure entry po<strong>in</strong>t FreeAddrInfoW could not be located <strong>in</strong> the DLL<br />
WS2_32.dll<br />
Solution<br />
Install W<strong>in</strong>dow XP Service Pack 2<br />
7.4.7 RS232 comb<strong>in</strong>er<br />
Description<br />
Standby Playback does not communicate with the D320.<br />
Causes<br />
• RS232 Comb<strong>in</strong>er not properly <strong>in</strong>stalled.<br />
• Driver is configured with wrong Serial flow control.<br />
Solution<br />
• Follow the <strong>in</strong>structions for RS232 Comb<strong>in</strong>er <strong>in</strong>stallation found <strong>in</strong> xxx.<br />
• Edit the Config_0 file. the flowctrl attribute under Communication → Serial should read “DTRDSR”.<br />
7.4.8 Both DVI outputs on different resolution<br />
Description<br />
When hav<strong>in</strong>g both DVI outputs from the graphics card connected to the D320 you may have the error<br />
where one of the outputs plays out <strong>in</strong> a different resolution as the other one.<br />
Solution<br />
Change the graphical card sett<strong>in</strong>gs to clone mode and then put it back <strong>in</strong> extend horizontally mode.<br />
7.4.9 <strong>XVS</strong> Playback Integrated PC freezes after a few hours<br />
Causes<br />
Incorrect Driver<br />
R5976955 <strong>XVS</strong> - 2 14/03/2007 87
7. Troubleshoot<strong>in</strong>g<br />
Solution<br />
Install the driver <strong>in</strong>cluded with the <strong>XVS</strong>-2 DVD<br />
7.4.10 MP4 content does not play<br />
Description<br />
MP4 content does not play on the Playback system but other content does. An error is given <strong>in</strong> addContent.<br />
Causes<br />
• Codecs not <strong>in</strong>stalled properly.<br />
• A different codec has registered a DirectShow codec with the MP4 extension.<br />
Solution<br />
• Verify correct codec <strong>in</strong>stallation follow<strong>in</strong>g the guidel<strong>in</strong>es set forth <strong>in</strong> "Installation of H264 support <strong>in</strong><br />
<strong>XVS</strong>-2", page 56.<br />
• Check to see if another application has registered the MP4 extension.<br />
- This can be done by open<strong>in</strong>g the Registry (Start->Run type <strong>in</strong> Regedit and click OK) and open<strong>in</strong>g<br />
the registry key "HKEY_CLASSES_ROOT\Media Type\Extensions" and look<strong>in</strong>g for the subkey<br />
".mp4".<br />
If this key exists then more than likely this is the cause of the problem. You can sometimes discover<br />
what application has registered this support by exam<strong>in</strong><strong>in</strong>g the values <strong>in</strong> the key and see<strong>in</strong>g if there<br />
is a path to an <strong>in</strong>stalled application. If the application that has registered support can be determ<strong>in</strong>ed<br />
it is recommended to un<strong>in</strong>stall that application as it would normally be an application that would<br />
conflict with <strong>XVS</strong> Playback performance.<br />
• Some CD/DVD burn<strong>in</strong>g software though may conflict and <strong>in</strong> that case you can manually remove<br />
the extension registration.<br />
a) First export the ".mp4" key by right click<strong>in</strong>g and select<strong>in</strong>g export. That will safeguard the key <strong>in</strong><br />
case there is a stability issue.<br />
b) Second you delete the entire ".mp4" key and all of the contents.<br />
c) Restart the Playback software<br />
88 R5976955 <strong>XVS</strong> - 2 14/03/2007
A. ADOBE FLASH® SUPPORT IN <strong>XVS</strong>-2<br />
A. Adobe Flash® support <strong>in</strong> <strong>XVS</strong>-2<br />
A.1 Overview of features and limitations<br />
Introduction<br />
Flash is supported from <strong>XVS</strong>-2 version 2.3.<br />
Support of Adobe Flash® files <strong>in</strong> <strong>XVS</strong>-2 br<strong>in</strong>g a wealth of new possibilities. However, there are a few<br />
limitations and performance guidel<strong>in</strong>es that should be considered when choos<strong>in</strong>g to take advantage of<br />
the new format support.<br />
Feature Support<br />
Here is an overview of Adobe® Flash support <strong>in</strong> <strong>XVS</strong>-2 v2.3<br />
• Vector-Based Scal<strong>in</strong>g – When a content is sent to a channel larger than the actual size of the content,<br />
the content is rendered at its higher resolution.<br />
• Content Transparency – <strong>XVS</strong>-2 is able to render Flash® content that supports transparency, thus<br />
allow<strong>in</strong>g for flash content to overlay other content, or to be mixed <strong>in</strong> with other content <strong>in</strong> a message.<br />
• Support Up to Flash Player 9 – <strong>XVS</strong>-2 is able to support even the latest features <strong>in</strong> Flash® Player<br />
9, <strong>in</strong>clud<strong>in</strong>g new embedded video and ActionScript features.<br />
Feature Limitations<br />
These are the basic limitations of the format support <strong>in</strong> <strong>XVS</strong>-2:<br />
• SWF files only – Only SWF files are supported, and it is recommended that they are created for use<br />
with Flash® version 6, 7, 8 or 9 Players.<br />
• No UI Interactivity – Because of the nature of <strong>XVS</strong>-2 Operate and Playback, the normal user <strong>in</strong>terface<br />
<strong>in</strong>teractivity of Flash® files is not supported, neither <strong>in</strong> <strong>XVS</strong>-2 Playback or anywhere <strong>in</strong> <strong>XVS</strong>-2 Operate.<br />
Keyboard or mouse events are not forwarded to the Flash® content dur<strong>in</strong>g render<strong>in</strong>g. However if<br />
<strong>in</strong>teraction signals are red from an external data source such as XML us<strong>in</strong>g ActionScript features then<br />
that is still a possibility. However, the external data source must be referenced <strong>in</strong> such a way that does<br />
not depend on the location or name of the SWF file. It must be also noted that the default duration of<br />
the imported content might be <strong>in</strong>correct, requir<strong>in</strong>g the content to only work properly as a cont<strong>in</strong>uously<br />
loop<strong>in</strong>g content, or <strong>in</strong> a message or playlist that can alter the duration content.<br />
• Size Limitations – The Flash® content has a known limitation of 2880 pixels wide or 2880 pixels<br />
high, and Adobe does not support resolutions beyond that. Caution needs to be taken when creat<strong>in</strong>g<br />
content for fascia video walls. Flash® is a vector-based format, and thus <strong>XVS</strong>-2 will allow the format<br />
to be stretched to an even larger size. This however can only be reasonably done up to around 4000<br />
pixels without start<strong>in</strong>g to suffer <strong>in</strong> render<strong>in</strong>g quality.<br />
• Scal<strong>in</strong>g<strong>in</strong>aMessage– Currently when a Flash® file is embedded <strong>in</strong> a message format, it will only<br />
scale to the size given it <strong>in</strong> the message. When a message is sent to a channel larger than the size it<br />
was made for it does not improve the resolution of the embedded Flash content.<br />
• Audio Support – The Adobe Flash® Player is used for all render<strong>in</strong>g of Flash® content, so all play<strong>in</strong>g<br />
of audio <strong>in</strong> the file is supported. However, <strong>XVS</strong>-2 is unable to mute audio <strong>in</strong> a Flash® content, nor is it<br />
able to detect if there is audio conta<strong>in</strong>ed <strong>in</strong> the Flash® content, to know when to disable background<br />
audio when it is play<strong>in</strong>g. Because of this, all audio from Flash® content is fully mixed with other audio<br />
streams that are play<strong>in</strong>g, and it will play regardless of the k<strong>in</strong>d of channel it is placed <strong>in</strong>. If it is sent<br />
to a Audio Only channel, it will not show the video portion still, but the audio stream still will not mute<br />
itself when <strong>in</strong>terrupted.<br />
R5976955 <strong>XVS</strong> - 2 14/03/2007 89
A. Adobe Flash® support <strong>in</strong> <strong>XVS</strong>-2<br />
Other Format Guidel<strong>in</strong>es<br />
S<strong>in</strong>ce Flash® has several unique qualities that make it different than any other content formats that <strong>XVS</strong>-2<br />
supports, there are some guidel<strong>in</strong>es that need to be considered. Also there are several known issues with<br />
Flash® support <strong>in</strong> <strong>XVS</strong>-2 that should be avoided.<br />
• Flash® is Meant Primarily for Web Graphics – It states on Adobe’s website that Adobe Flash®<br />
Player is optimized for publish<strong>in</strong>g graphics on the web or similar computer <strong>in</strong>terfaces. Therefore, if use<br />
of the format deviates too far from this paradigm, then you are runn<strong>in</strong>g the risk of <strong>in</strong>stability problems<br />
with the content <strong>in</strong> <strong>XVS</strong>-2. Here are some of the issues you need to watch for:<br />
- Do not play more than one <strong>in</strong>stance of the same SWF file at the same time <strong>in</strong> different channels.<br />
- Do not “stress” the Flash® player by load<strong>in</strong>g too many different files at once, or by runn<strong>in</strong>g playlists<br />
of flash content too rapidly, or shorter than the duration that the file was created for.<br />
- Caution needs to be taken when creat<strong>in</strong>g file sizes too big or stretch<strong>in</strong>g the file too large <strong>in</strong> size.<br />
- High frame-rates should normally be avoided where possible.<br />
• Use ActionScript with Care – The script<strong>in</strong>g eng<strong>in</strong>e <strong>in</strong> Flash® files is extremely powerful. Caution<br />
must be taken when us<strong>in</strong>g some of it’s features. For example:<br />
- It is possible to create a Flash® content that completely ignores commands from the control <strong>in</strong>terface<br />
to Play, Pause, or set the CurrentFrame. This of course translates to loos<strong>in</strong>g playback control<br />
on the content <strong>in</strong> <strong>XVS</strong>-2.<br />
- The Flash® content should never popup or load other programs, or other web pages, as it will<br />
disrupt the stability of <strong>XVS</strong>-2.<br />
• Manage Resources Wisely – Proper memory management <strong>in</strong> ActionScript becomes more important<br />
as <strong>XVS</strong>-2 must handle potentially number of different content format types at the same time, and<br />
resources should not be wasted.<br />
• Be careful when us<strong>in</strong>g RealVNC – RealVNC (http://www.realvnc.com/) is a separate program, used<br />
to remotely control player computers through the network. There are known issues <strong>in</strong> <strong>XVS</strong>-2 where<br />
the Flash® ActiveX control will fail to render properly <strong>in</strong> the player after VNC has connected with the<br />
player mach<strong>in</strong>e. It would be a good practice to reboot the player computer after VNC has connected<br />
with it, or restart the player software just before clos<strong>in</strong>g the VNC client, so that this issue does not<br />
occur.<br />
90 R5976955 <strong>XVS</strong> - 2 14/03/2007
Index<br />
INDEX<br />
D<br />
Director Toolset 21<br />
About the use 21<br />
Configuration 21<br />
F<br />
Flash support 89<br />
Features 89<br />
Limitations 89<br />
H<br />
Hardware 27, 30, 32–37, 39<br />
Components 36–37, 39<br />
Audio card 36<br />
Video card 37, 39<br />
Overview 27<br />
<strong>XVS</strong> dataserver 35<br />
<strong>XVS</strong> lightweight Play 33<br />
<strong>XVS</strong> Operate 30<br />
<strong>XVS</strong> Play 32<br />
<strong>XVS</strong> Playback Integrated 34<br />
I<br />
Installation 41, 46–47, 56<br />
H264 support 56<br />
<strong>XVS</strong> Operate 46–47<br />
Hardware <strong>in</strong>stallation 46<br />
Software <strong>in</strong>stallation 47<br />
<strong>XVS</strong> Play 41<br />
Hardware connections 41<br />
Software <strong>in</strong>stallation 41<br />
L<br />
<strong>Log</strong>g<strong>in</strong>g <strong>in</strong>formation 75<br />
P<br />
Playback redundancy 69–70, 73–74<br />
Configuration 73<br />
Redundancy controller 73<br />
Hardware 70<br />
Redundancy controller 73–74<br />
Configuration 73<br />
States 74<br />
Some def<strong>in</strong>itions 69<br />
S<br />
System overview 5–6, 10–12<br />
<strong>Barco</strong>’s solution 5<br />
Components 6<br />
Workflow 10<br />
Workflow <strong>in</strong>-game 11<br />
Actions 11<br />
Monitor<strong>in</strong>g 11<br />
Scoreboard control 11<br />
Workflow post-game 12<br />
Diagnostics 12<br />
Report<strong>in</strong>g 12<br />
Workflow pre-game 11<br />
Create content 11<br />
Manage content 11<br />
Workflow setup 10<br />
Physical system <strong>in</strong>stallation 10<br />
Software <strong>in</strong>stallation 10<br />
T<br />
Troubleshoot<strong>in</strong>g 75–79, 81–88<br />
Action Manager 82–83<br />
Actions do not execute 82<br />
Null po<strong>in</strong>ter exception 83<br />
Preset action 83<br />
Schedule item asap 82<br />
General 75–76, 78<br />
Cannot connect to database 78<br />
Cyberl<strong>in</strong>k PowerDVD <strong>in</strong>stalled 76<br />
DVI resolution switch 76<br />
<strong>Log</strong>g<strong>in</strong>g <strong>in</strong>formation 75<br />
Upgrade error 76<br />
VOB files with Dolby 5.1 or 7.1 sound 76<br />
Message Editor 81<br />
CPU usage 81<br />
Offset of 10 seconds 81<br />
System Manager 78–79, 81<br />
Display creation fails 79<br />
Item selection layout tree 81<br />
Menu bar at wrong location 78<br />
No events <strong>in</strong> diagnostic panel 79<br />
<strong>XVS</strong> Operate 77<br />
<strong>XVS</strong> Operate general 77<br />
Startup fails 77<br />
Startup takes long time 77<br />
<strong>XVS</strong> Play 85–88<br />
DVI outputs 87<br />
FreeAddrInfoW not located <strong>in</strong> the DLL<br />
WS2_32.dll 87<br />
Large content does not play 86<br />
Large JPEG files 85<br />
Many font errors 86<br />
M<strong>in</strong>i-PC freezes after a few hours 87<br />
MP4 content does not play 88<br />
No configuration 86<br />
RS232 comb<strong>in</strong>er 87<br />
Scroll<strong>in</strong>g text is not smooth 87<br />
<strong>XVS</strong> RTD 83<br />
<strong>XVS</strong> RTD general 83<br />
RTD fails to startup 83<br />
R5976955 <strong>XVS</strong> - 2 14/03/2007 91
Index<br />
<strong>XVS</strong> RTD RS232 templates 84–85<br />
MP70 conflicts 84<br />
MP70 not visible 85<br />
<strong>XVS</strong> RTD RSS feed manager 84<br />
Delet<strong>in</strong>g RSS feed 84<br />
W<br />
WAN support 57–59, 61–67<br />
About <strong>in</strong>ternet providers 58<br />
Configuration 61<br />
FTP configuration 61–62<br />
Play computer 62<br />
FTP <strong>in</strong>stallation 61<br />
Play computer 61<br />
Installation 61<br />
Introduction 57<br />
Possible ISP restrictions 59<br />
Syncback configuration with FTP profile 63<br />
Operate computer 63<br />
Troubleshoot<strong>in</strong>g 63–67<br />
Display creation fails 64<br />
Introduction 63<br />
No diagnostics <strong>in</strong> Operate 67<br />
No feedback <strong>in</strong> AM queue 66<br />
Operate does start up 64<br />
Real time data fails 65<br />
Report<strong>in</strong>g fails 67<br />
Schedul<strong>in</strong>g fails 65<br />
Storage service Play computer 67<br />
Workflow overview 6<br />
X<br />
<strong>XVS</strong> features 23, 25<br />
Fill formats 25<br />
Overview list 23<br />
<strong>XVS</strong> Operate 12, 14<br />
Action Manager 14<br />
Message Editor 14<br />
System manager 12<br />
<strong>XVS</strong> Play 17–19<br />
Creativity 18<br />
Fascia solutions 18<br />
General 17<br />
Mirror<strong>in</strong>g pr<strong>in</strong>ciple 19<br />
Perimeter solutions 18<br />
Segmentation pr<strong>in</strong>ciple 18<br />
Video cube solutions 18<br />
<strong>XVS</strong> RTD 15–17<br />
RS232 service 17<br />
RTD management 15–16<br />
92 R5976955 <strong>XVS</strong> - 2 14/03/2007
Revision Sheet<br />
To:<br />
<strong>Barco</strong> nv Media/Documentation<br />
Noordlaan 5, B-8520 Kuurne<br />
Phone: +32 56.36.89.70, Fax: +32 56.36.83.86<br />
E-mail: service.media_and_enterta<strong>in</strong>ment.emea@barco.com, Web: www.barco.com<br />
From:<br />
Date:<br />
Please correct the follow<strong>in</strong>g po<strong>in</strong>ts <strong>in</strong> this documentation (R5976955/02):<br />
page wrong correct<br />
R5976955 <strong>XVS</strong> - 2 14/03/2007