B - St. Cloud State University
B - St. Cloud State University
B - St. Cloud State University

Create successful ePaper yourself
Turn your PDF publications into a flip-book with our unique Google optimized e-Paper software.
Ryan’s MFP-3D Procedural Operation ‘Manualette’ Version 10 (v080501; Igor 6.04A); 2.2<br />
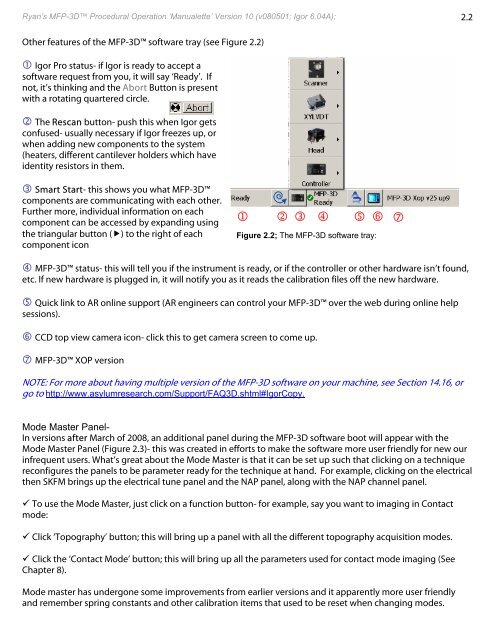
Other features of the MFP-3D software tray (see Figure 2.2)<br />
Igor Pro status- if Igor is ready to accept a<br />
software request from you, it will say ‘Ready’. If<br />
not, it’s thinking and the Abort Button is present<br />
with a rotating quartered circle.<br />
The Rescan button- push this when Igor gets<br />
confused- usually necessary if Igor freezes up, or<br />
when adding new components to the system<br />
(heaters, different cantilever holders which have<br />
identity resistors in them.<br />
Smart <strong>St</strong>art- this shows you what MFP-3D<br />
components are communicating with each other.<br />
Further more, individual information on each<br />
component can be accessed by expanding using<br />
the triangular button () to the right of each<br />
component icon<br />
1 2 3 4 5 6 <br />
Figure 2.2; The MFP-3D software tray:<br />
MFP-3D status- this will tell you if the instrument is ready, or if the controller or other hardware isn’t found,<br />
etc. If new hardware is plugged in, it will notify you as it reads the calibration files off the new hardware.<br />
Quick link to AR online support (AR engineers can control your MFP-3D over the web during online help<br />
sessions).<br />
CCD top view camera icon- click this to get camera screen to come up.<br />
7 MFP-3D XOP version<br />
NOTE: For more about having multiple version of the MFP-3D software on your machine, see Section 14.16, or<br />
go to http://www.asylumresearch.com/Support/FAQ3D.shtml#IgorCopy.<br />
Mode Master Panel-<br />
In versions after March of 2008, an additional panel during the MFP-3D software boot will appear with the<br />
Mode Master Panel (Figure 2.3)- this was created in efforts to make the software more user friendly for new our<br />
infrequent users. What’s great about the Mode Master is that it can be set up such that clicking on a technique<br />
reconfigures the panels to be parameter ready for the technique at hand. For example, clicking on the electrical<br />
then SKFM brings up the electrical tune panel and the NAP panel, along with the NAP channel panel.<br />
To use the Mode Master, just click on a function button- for example, say you want to imaging in Contact<br />
mode:<br />
Click ‘Topography’ button; this will bring up a panel with all the different topography acquisition modes.<br />
Click the ‘Contact Mode’ button; this will bring up all the parameters used for contact mode imaging (See<br />
Chapter 8).<br />
Mode master has undergone some improvements from earlier versions and it apparently more user friendly<br />
and remember spring constants and other calibration items that used to be reset when changing modes.