B - St. Cloud State University
B - St. Cloud State University
B - St. Cloud State University

Create successful ePaper yourself
Turn your PDF publications into a flip-book with our unique Google optimized e-Paper software.
Ryan’s MFP-3D Procedural Operation ‘Manualette’ Version 10 (v080501; Igor 6.03A); ©2008 6.21<br />
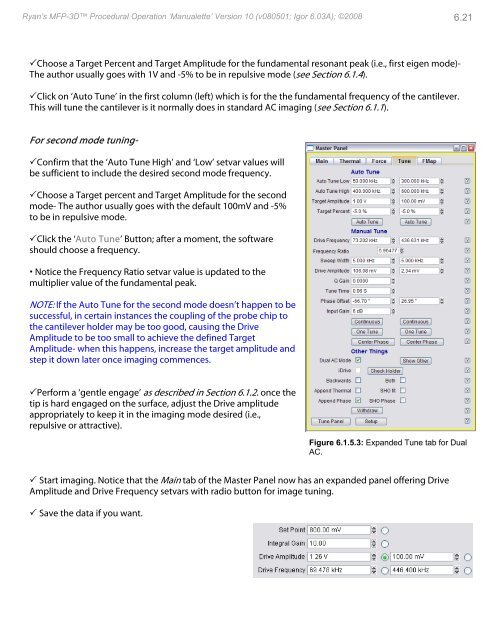
Choose a Target Percent and Target Amplitude for the fundamental resonant peak (i.e., first eigen mode)-<br />
The author usually goes with 1V and -5% to be in repulsive mode (see Section 6.1.4).<br />
Click on ‘Auto Tune’ in the first column (left) which is for the the fundamental frequency of the cantilever.<br />
This will tune the cantilever is it normally does in standard AC imaging (see Section 6.1.1).<br />
For second mode tuning-<br />
Confirm that the ‘Auto Tune High’ and ‘Low’ setvar values will<br />
be sufficient to include the desired second mode frequency.<br />
Choose a Target percent and Target Amplitude for the second<br />
mode- The author usually goes with the default 100mV and -5%<br />
to be in repulsive mode.<br />
Click the ‘Auto Tune’ Button; after a moment, the software<br />
should choose a frequency.<br />
• Notice the Frequency Ratio setvar value is updated to the<br />
multiplier value of the fundamental peak.<br />
NOTE: If the Auto Tune for the second mode doesn’t happen to be<br />
successful, in certain instances the coupling of the probe chip to<br />
the cantilever holder may be too good, causing the Drive<br />
Amplitude to be too small to achieve the defined Target<br />
Amplitude- when this happens, increase the target amplitude and<br />
step it down later once imaging commences.<br />
Perform a ‘gentle engage’ as described in Section 6.1.2. once the<br />
tip is hard engaged on the surface, adjust the Drive amplitude<br />
appropriately to keep it in the imaging mode desired (i.e.,<br />
repulsive or attractive).<br />
Figure 6.1.5.3: Expanded Tune tab for Dual<br />
AC.<br />
<strong>St</strong>art imaging. Notice that the Main tab of the Master Panel now has an expanded panel offering Drive<br />
Amplitude and Drive Frequency setvars with radio button for image tuning.<br />
Save the data if you want.