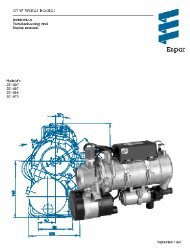
AIRTRONIC D2/D4 Espar
AIRTRONIC D2/D4 Espar
AIRTRONIC D2/D4 Espar

You also want an ePaper? Increase the reach of your titles
YUMPU automatically turns print PDFs into web optimized ePapers that Google loves.
14<br />
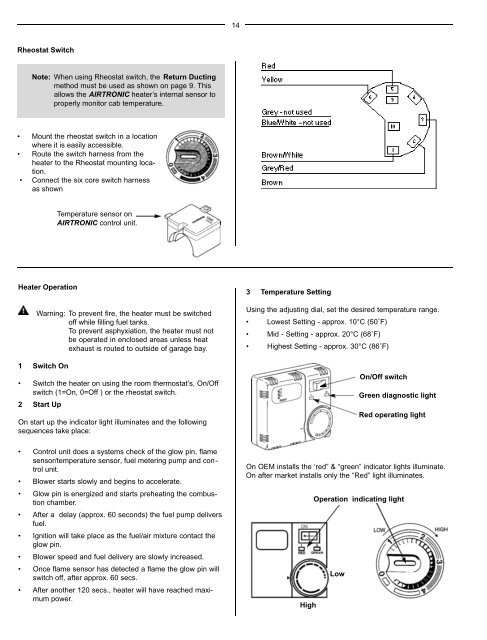
Rheostat Switch<br />
Note: When using Rheostat switch, the Return Ducting<br />
method must be used as shown on page 9. This<br />
allows the <strong>AIRTRONIC</strong> heater’s internal sensor to<br />
properly monitor cab temperature.<br />
• Mount the rheostat switch in a location<br />
where it is easily accessible.<br />
• Route the switch harness from the<br />
heater to the Rheostat mounting location.<br />
• Connect the six core switch harness<br />
as shown<br />
Temperature sensor on<br />
<strong>AIRTRONIC</strong> control unit.<br />
Heater Operation<br />
Warning: To prevent fire, the heater must be switched<br />
off while filling fuel tanks.<br />
To prevent asphyxiation, the heater must not<br />
be operated in enclosed areas unless heat<br />
exhaust is routed to outside of garage bay.<br />
1 Switch On<br />
• Switch the heater on using the room thermostat’s, On/Off<br />
switch (1=On, 0=Off ) or the rheostat switch.<br />
2 Start Up<br />
On start up the indicator light illuminates and the following<br />
sequences take place:<br />
3 Temperature Setting<br />
Using the adjusting dial, set the desired temperature range.<br />
• Lowest Setting - approx. 10°C (50˚F)<br />
• Mid - Setting - approx. 20°C (68˚F)<br />
• Highest Setting - approx. 30°C (86˚F)<br />
On/Off switch<br />
Green diagnostic light<br />
Red operating light<br />
• Control unit does a systems check of the glow pin, flame<br />
sensor/temperature sensor, fuel metering pump and control<br />
unit.<br />
• Blower starts slowly and begins to accelerate.<br />
• Glow pin is energized and starts preheating the combustion<br />
chamber.<br />
• After a delay (approx. 60 seconds) the fuel pump delivers<br />
fuel.<br />
• Ignition will take place as the fuel/air mixture contact the<br />
glow pin.<br />
• Blower speed and fuel delivery are slowly increased.<br />
• Once flame sensor has detected a flame the glow pin will<br />
switch off, after approx. 60 secs.<br />
• After another 120 secs., heater will have reached maximum<br />
power.<br />
On OEM installs the ‘red” & “green” indicator lights illuminate.<br />
On after market installs only the “Red” light illuminates.<br />
High<br />
Operation indicating light<br />
Low