AIRTRONIC D2/D4 Espar
AIRTRONIC D2/D4 Espar
AIRTRONIC D2/D4 Espar

Create successful ePaper yourself
Turn your PDF publications into a flip-book with our unique Google optimized e-Paper software.
8<br />
Installation Procedures<br />
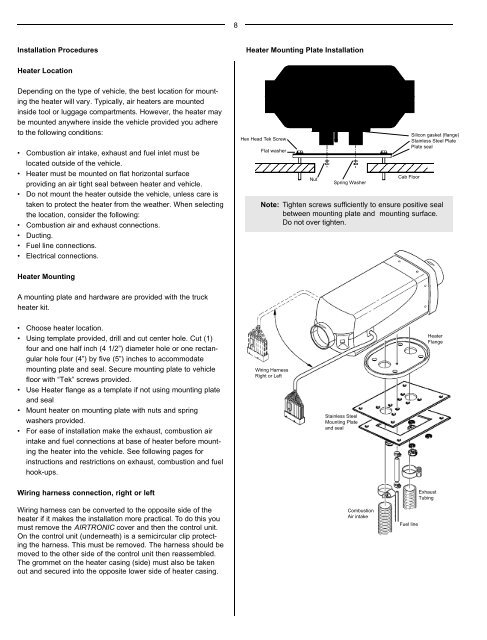
Heater Mounting Plate Installation<br />
Heater Location<br />
Depending on the type of vehicle, the best location for mounting<br />
the heater will vary. Typically, air heaters are mounted<br />
inside tool or luggage compartments. However, the heater may<br />
be mounted anywhere inside the vehicle provided you adhere<br />
to the following conditions:<br />
• Combustion air intake, exhaust and fuel inlet must be<br />
located outside of the vehicle.<br />
• Heater must be mounted on flat horizontal surface<br />
providing an air tight seal between heater and vehicle.<br />
• Do not mount the heater outside the vehicle, unless care is<br />
taken to protect the heater from the weather. When selecting<br />
the location, consider the following:<br />
• Combustion air and exhaust connections.<br />
• Ducting.<br />
• Fuel line connections.<br />
• Electrical connections.<br />
Hex Head Tek Screw<br />
Flat washer<br />
Nut<br />
Spring Washer<br />
Cab Floor<br />
Silicon gasket (flange)<br />
Stainless Steel Plate<br />
Plate seal<br />
Note: Tighten screws sufficiently to ensure positive seal<br />
between mounting plate and mounting surface.<br />
Do not over tighten.<br />
Heater Mounting<br />
A mounting plate and hardware are provided with the truck<br />
heater kit.<br />
• Choose heater location.<br />
• Using template provided, drill and cut center hole. Cut (1)<br />
four and one half inch (4 1/2”) diameter hole or one rectangular<br />
hole four (4”) by five (5”) inches to accommodate<br />
mounting plate and seal. Secure mounting plate to vehicle<br />
floor with “Tek” screws provided.<br />
• Use Heater flange as a template if not using mounting plate<br />
and seal<br />
• Mount heater on mounting plate with nuts and spring<br />
washers provided.<br />
• For ease of installation make the exhaust, combustion air<br />
intake and fuel connections at base of heater before mounting<br />
the heater into the vehicle. See following pages for<br />
instructions and restrictions on exhaust, combustion and fuel<br />
hook-ups.<br />
Wiring Harness<br />
Right or Left<br />
Stainless Steel<br />
Mounting Plate<br />
and seal<br />
Heater<br />
Flange<br />
Wiring harness connection, right or left<br />
Exhaust<br />
Tubing<br />
Wiring harness can be converted to the opposite side of the<br />
heater if it makes the installation more practical. To do this you<br />
must remove the <strong>AIRTRONIC</strong> cover and then the control unit.<br />
On the control unit (underneath) is a semicircular clip protecting<br />
the harness. This must be removed. The harness should be<br />
moved to the other side of the control unit then reassembled.<br />
The grommet on the heater casing (side) must also be taken<br />
out and secured into the opposite lower side of heater casing.<br />
Combustion<br />
Air intake<br />
Fuel line