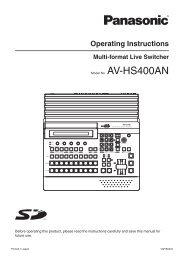
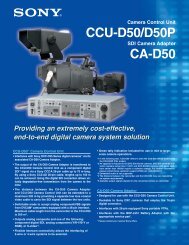
JVC DT-V24L1DU 24 inch Multi-Format LCD Monitor user ... - Talamas
JVC DT-V24L1DU 24 inch Multi-Format LCD Monitor user ... - Talamas
JVC DT-V24L1DU 24 inch Multi-Format LCD Monitor user ... - Talamas

You also want an ePaper? Increase the reach of your titles
YUMPU automatically turns print PDFs into web optimized ePapers that Google loves.
Menu Configuration—SET-UP MENU<br />
For the operation procedure, see page 7.<br />
Operation guide<br />
Shows the buttons for<br />
each operation.<br />
FUNCTION SETTING<br />
Setting for the tally lamp<br />
Item To do Setting value<br />
TALLY SELECT Select the color of the tally lamp on the upper front panel. GREEN, RED<br />
TALLY BLINK Select the blinking time of the tally lamp till it gets lighting. OFF, 5sec., 8sec.<br />
12<br />
NOTE<br />
The tally lamp is controlled using MAKE/TRIG. terminal of REMOTE terminals (☞ “External Control” on page 14).<br />
PICTURE SUB ADJ.<br />
Adjusts the standard level for the picture adjustment and selects the set-up level for the input video signal.<br />
Item To do Setting value<br />
CONTRAST* 1 Adjust the standard level for the contrast adjusted with –20 – 00 – +20<br />
CONTRAST knob on the front panel.<br />
BRIGHT* 1 Adjust the standard level for the brightness adjusted with –20 – 00 – +20<br />
BRIGHT knob on the front panel.<br />
CHROMA* 1 Adjust the standard level for the chroma adjusted with –20 – 00 – +20<br />
CHROMA knob on the front panel.<br />
PHASE* 1 Adjust the standard level for the phase adjusted with –20 – 00 – +20<br />
PHASE knob on the front panel.<br />
NTSC SETUP* 1 Select the set-up level of the input NTSC signal. 00 (compliant with 0% set-up signal), 7.5<br />
(compliant with 7.5% set-up signal)<br />
COMPO. LEVEL Select the level of the analog component signal. SMPTE (compliant with M2VTR signals),<br />
B75 (compliant with BetacamVTR 7.5%<br />
set-up signal), B00 (compliant with<br />
BetacamVTR 0% set-up signal)<br />
sub menu Display the sub menu which enables you to adjust the items in “PICTURE SUB ADJ.” while viewing<br />
the actual picture.<br />
reset<br />
Restore the default settings for all the items in “PICTURE SUB ADJ.”<br />
SIZE/POSI. ADJ.<br />
Adjusts the size and position of the picture.<br />
Item To do Setting value<br />
H SIZE* 2<br />
Adjust the horizontal picture size.<br />
H POSITION* 2 Adjust the horizontal picture position.<br />
Varies depending on the other<br />
V SIZE* 2<br />
Adjust the vertical picture size.<br />
settings.<br />
V POSITION* 2 Adjust the vertical picture position.<br />
sub menu Display the sub menu which enables you to adjust the items of “SIZE/POSI. ADJ.” while viewing<br />
the actual picture.<br />
reset<br />
Restore the default settings for all the items in “SIZE/POSI. ADJ.”<br />
NOTE<br />
• The menu automatically disappears in about 30 seconds after the last menu<br />
operation.<br />
• Some items may not appear on the menu depending on the input or the input<br />
signal. These items are not available.<br />
WHITE BALANCE SET.<br />
Selects the color temperature and adjusts the drive level and cutoff point of each color (R/G/B).<br />
Item To do Setting value<br />
COLOR TEMP. Select the color temperature. HIGH(9300), LOW(6500), OTHER<br />
R DRIVE, G DRIVE, Adjust the drive level of each color (red, green, and blue). MIN – 000 – MAX (in 256 grades)<br />
B DRIVE* 3<br />
R CUT OFF, G CUT Adjust the cutoff point of each color (red, green, and blue). MIN – 000 – MAX (in 256 grades)<br />
OFF, B CUT OFF* 3<br />
sub menu<br />
Display the sub menu which enables you to adjust the items in “WHITE BALANCE SET.” while<br />
viewing the actual picture.<br />
reset<br />
Restore the default settings for the drive levels and cutoff points of the selected color<br />
temperature.<br />
* 1 Memorized for each input.<br />
* 2 Memorized for each signal format.<br />
* 3 Memorized for each color temperature (HIGH, LOW, OTHER).