
Create successful ePaper yourself
Turn your PDF publications into a flip-book with our unique Google optimized e-Paper software.
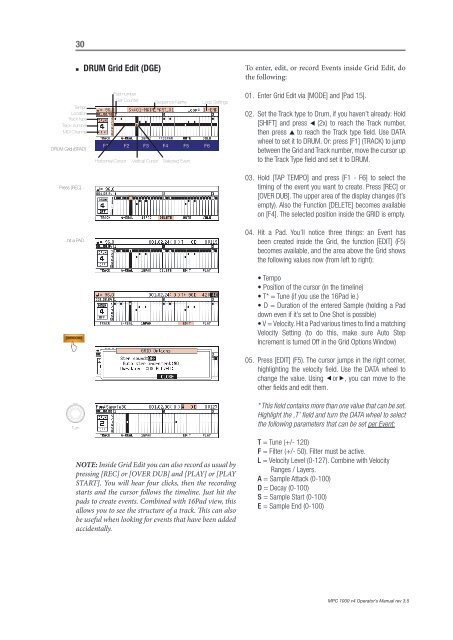
30<br />
• DRUM Grid Edit (DGE)<br />
To enter, edit, or record Events inside Grid Edit, do<br />
the following:<br />
Tempo<br />
Location<br />
Track type<br />
Track number<br />
MIDI Channel<br />
DRUM Grid (6PAD)<br />
Press [REC]...<br />
...hit a PAD.<br />
J<br />
Turn<br />
Pad number<br />
Bar Counter<br />
Sequence Name<br />
F1 F2 F3 F4 F5 F6<br />
Horizontal Cursor Vertical Cursor Selected Event<br />
Loop Settings<br />
01. Enter Grid Edit via [MODE] <strong>and</strong> [Pad 15].<br />
02.<br />
03.<br />
04.<br />
05.<br />
Set the Track type to Drum, if you haven’t already: Hold<br />
[SHIFT] <strong>and</strong> press t (2x) to reach the Track number,<br />
then press p to reach the Track type field. Use DATA<br />
wheel to set it to DRUM. Or: press [F1] (TRACK) to jump<br />
between the Grid <strong>and</strong> Track number, move the cursor up<br />
to the Track Type field <strong>and</strong> set it to DRUM.<br />
Hold [TAP TEMPO] <strong>and</strong> press [F1 - F6] to select the<br />
timing of the event you want to create. Press [REC] or<br />
[OVER DUB]. The upper area of the display changes (it’s<br />
empty). Also the Function [DELETE] becomes available<br />
on [F4]. The selected position inside the GRID is empty.<br />
Hit a Pad. You’ll notice three things: an Event has<br />
been created inside the Grid, the function [EDIT] (F5)<br />
becomes available, <strong>and</strong> the area above the Grid shows<br />
the following values now (from left to right):<br />
• Tempo<br />
• Position of the cursor (in the timeline)<br />
• T* = Tune (if you use the 16Pad ie.)<br />
• D = Duration of the entered Sample (holding a Pad<br />
down even if it’s set to One Shot is possible)<br />
• V = Velocity. Hit a Pad various times to find a matching<br />
Velocity Setting (to do this, make sure Auto Step<br />
Increment is turned Off in the Grid Options Window)<br />
Press [EDIT] (F5). The cursor jumps in the right corner,<br />
highlighting the velocity field. Use the DATA wheel to<br />
change the value. Using or, you can move to the<br />
other fields <strong>and</strong> edit them.<br />
* This field contains more than one value that can be set.<br />
Highlight the ‚T’ field <strong>and</strong> turn the DATA wheel to select<br />
the following parameters that can be set per Event:<br />
NOTE: Inside Grid Edit you can also record as usual by<br />
pressing [REC] or [OVER DUB] <strong>and</strong> [PLAY] or [PLAY<br />
START]. You will hear four clicks, then the recording<br />
starts <strong>and</strong> the cursor follows the timeline. Just hit the<br />
pads to create events. Combined with 16Pad view, this<br />
allows you to see the structure of a track. This can also<br />
be useful when looking for events that have been added<br />
accidentally.<br />
T = Tune (+/- 120)<br />
F = Filter (+/- 50). Filter must be active.<br />
L = Velocity Level (0-127). Combine with Velocity<br />
Ranges / Layers.<br />
A = Sample Attack (0-100)<br />
D = Decay (0-100)<br />
S = Sample Start (0-100)<br />
E = Sample End (0-100)<br />
MPC 1000 v4 Operator’s Manual rev 3.5