06-065 Mini ECO-i II for ARGO - Package
06-065 Mini ECO-i II for ARGO - Package
06-065 Mini ECO-i II for ARGO - Package

You also want an ePaper? Increase the reach of your titles
YUMPU automatically turns print PDFs into web optimized ePapers that Google loves.
<strong>06</strong>-<strong>06</strong>5 <strong>Mini</strong> <strong>ECO</strong>-i <strong>II</strong> <strong>for</strong> <strong>ARGO</strong> 2/8/<strong>06</strong> 4:37 PM Page 59<br />
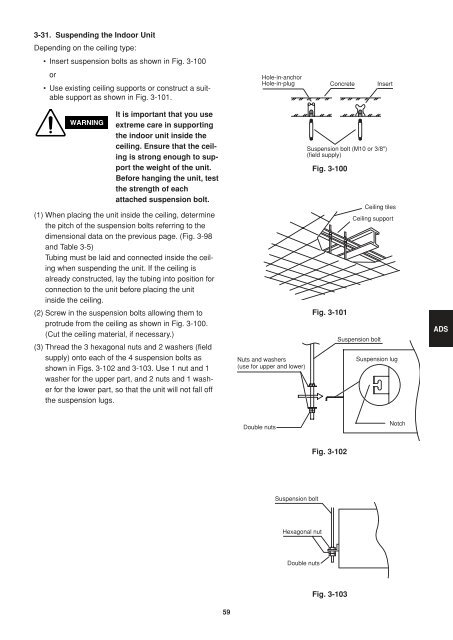
3-31. Suspending the Indoor Unit<br />
Depending on the ceiling type:<br />
• Insert suspension bolts as shown in Fig. 3-100<br />
or<br />
• Use existing ceiling supports or construct a suitable<br />
support as shown in Fig. 3-101.<br />
WARNING<br />
It is important that you use<br />
extreme care in supporting<br />
the indoor unit inside the<br />
ceiling. Ensure that the ceiling<br />
is strong enough to support<br />
the weight of the unit.<br />
Be<strong>for</strong>e hanging the unit, test<br />
the strength of each<br />
attached suspension bolt.<br />
(1) When placing the unit inside the ceiling, determine<br />
the pitch of the suspension bolts referring to the<br />
dimensional data on the previous page. (Fig. 3-98<br />
and Table 3-5)<br />
Tubing must be laid and connected inside the ceiling<br />
when suspending the unit. If the ceiling is<br />
already constructed, lay the tubing into position <strong>for</strong><br />
connection to the unit be<strong>for</strong>e placing the unit<br />
inside the ceiling.<br />
(2) Screw in the suspension bolts allowing them to<br />
protrude from the ceiling as shown in Fig. 3-100.<br />
(Cut the ceiling material, if necessary.)<br />
(3) Thread the 3 hexagonal nuts and 2 washers (field<br />
supply) onto each of the 4 suspension bolts as<br />
shown in Figs. 3-102 and 3-103. Use 1 nut and 1<br />
washer <strong>for</strong> the upper part, and 2 nuts and 1 washer<br />
<strong>for</strong> the lower part, so that the unit will not fall off<br />
the suspension lugs.<br />
Hole-in-anchor<br />
Hole-in-plug Concrete Insert<br />
Nuts and washers<br />
(use <strong>for</strong> upper and lower)<br />
Suspension bolt (M10 or 3/8")<br />
(field supply)<br />
Fig. 3-100<br />
Fig. 3-101<br />
Ceiling tiles<br />
Ceiling support<br />
Suspension bolt<br />
Suspension lug<br />
ADS<br />
Double nuts<br />
Notch<br />
Fig. 3-102<br />
Suspension bolt<br />
Hexagonal nut<br />
Double nuts<br />
Fig. 3-103<br />
59