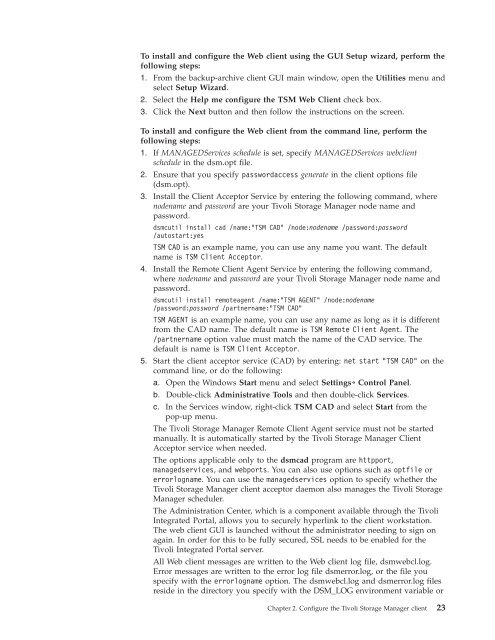
- Page 1: IBM Tivoli Storage Manager for Wind
- Page 4 and 5: Note: Before using this information
- Page 6 and 7: Starting a web client session . . .
- Page 8 and 9: Copy mode attribute . . . . . . . .
- Page 10 and 11: | | | | Vmbackvcbtransport . . . .
- Page 12 and 13: x IBM Tivoli Storage Manager for Wi
- Page 14 and 15: 94. Restore Image command: Related
- Page 16 and 17: You can download PDF versions of pu
- Page 18 and 19: Table 5. IBM Tivoli Storage Manager
- Page 20 and 21: Using IBM Support Assistant IBM Sup
- Page 22 and 23: v v v v Do you have logs, traces, a
- Page 24 and 25: Required choices When two or more i
- Page 26 and 27: | | | | | | | | | | | | | | | | | |
- Page 28 and 29: Considerations for migrating betwee
- Page 30 and 31: to set these options, it is easier
- Page 32 and 33: The following list shows the locati
- Page 34 and 35: | | Table 7. Supported features on
- Page 36 and 37: If the Logical Volume Snapshot Agen
- Page 38 and 39: | | | | | | | | | Silent installati
- Page 40 and 41: Windows 32 bit client features Wind
- Page 42 and 43: | | | | | | | | | | | | | | | | Fol
- Page 44 and 45: 18 IBM Tivoli Storage Manager for W
- Page 46 and 47: 2. From the Utilities menu, select
- Page 50 and 51: in the current working directory. S
- Page 52 and 53: Starting the client scheduler v If
- Page 54 and 55: node. If the server specifies SESSI
- Page 56 and 57: v A certificate that is self-signed
- Page 58 and 59: | | 4. On a 64-bit platform, GSKit
- Page 60 and 61: write to the same journal database
- Page 62 and 63: does not specify a drive letter, (f
- Page 64 and 65: Value type Decimal Hex File Name 1
- Page 66 and 67: ; ; Keep database valid if file sys
- Page 68 and 69: and before duplicate data can be re
- Page 70 and 71: Related tasks “Configuring the cl
- Page 72 and 73: Lan Free Destination...: NO Dedupli
- Page 74 and 75: v v v Tivoli Storage Manager client
- Page 76 and 77: Related concepts “Client configur
- Page 78 and 79: Related reference “Clusternode”
- Page 80 and 81: Configure the scheduler service on
- Page 82 and 83: dialog box: HKEY_LOCAL_MACHINE\SOFT
- Page 84 and 85: See “Install the backup-archive c
- Page 86 and 87: 2. In the New Resource dialog, ente
- Page 88 and 89: 4. Select the Resource Type as Gene
- Page 90 and 91: 1. Carefully read the information i
- Page 92 and 93: 1. Select Utilities → Setup Wizar
- Page 94 and 95: | | | | | | | | | | | | | | | | | |
- Page 96 and 97: You can create an include-exclude l
- Page 98 and 99:
Table 10. Options for excluding fil
- Page 100 and 101:
| | | | | Table 11. Options for con
- Page 102 and 103:
[] To specify files and directories
- Page 104 and 105:
Related concepts “Wildcard charac
- Page 106 and 107:
3. You don't want to back up all of
- Page 108 and 109:
Related concepts “Exclude file sp
- Page 110 and 111:
Table 17. Required user security ri
- Page 112 and 113:
Related tasks “Performing a backu
- Page 114 and 115:
v On Windows Vista or Windows 7, wh
- Page 116 and 117:
When you enter your password, the p
- Page 118 and 119:
Refer to the software requirements
- Page 120 and 121:
Character Description A-Z Any lette
- Page 122 and 123:
Related reference “Loop” on pag
- Page 124 and 125:
Table 19. Planning your backups (co
- Page 126 and 127:
features. For a current list of Dat
- Page 128 and 129:
The following are some items to con
- Page 130 and 131:
Table 20. Command line backup examp
- Page 132 and 133:
v What happens to backup data versi
- Page 134 and 135:
Related concepts “Considerations
- Page 136 and 137:
You can restore an adaptive subfile
- Page 138 and 139:
Restriction: Do not exceed the 64-c
- Page 140 and 141:
Manager client will not reset the l
- Page 142 and 143:
To perform an incremental-by-date b
- Page 144 and 145:
On Windows systems, the snapshot di
- Page 146 and 147:
| | v If a backup set contains syst
- Page 148 and 149:
Associate a local snapshot with a s
- Page 150 and 151:
If you do not want the dllcache dir
- Page 152 and 153:
Note: This example uses x: because
- Page 154 and 155:
| | | | | | | | | | | | | | | | | |
- Page 156 and 157:
v v v v Improves the speed with whi
- Page 158 and 159:
5. Restore your data by performing
- Page 160 and 161:
1. Click on the Backup button in th
- Page 162 and 163:
- Migration - Reclamation - Export
- Page 164 and 165:
Table 23. NAS options and commands
- Page 166 and 167:
data flow through a Tivoli Storage
- Page 168 and 169:
| | | | | | | | | | | | | | | | | |
- Page 170 and 171:
| | | | | | | | | | | | | | | | | |
- Page 172 and 173:
| | | | | | | | | | | | | | | | | |
- Page 174 and 175:
VM backups can only be performed by
- Page 176 and 177:
Table 24. Client command line infor
- Page 178 and 179:
Backup (Windows): Additional consid
- Page 180 and 181:
according to the following policy a
- Page 182 and 183:
A UNC name is a network resource na
- Page 184 and 185:
Dfs link1 \\almaden\snj64test\tools
- Page 186 and 187:
160 IBM Tivoli Storage Manager for
- Page 188 and 189:
A collision can occur even if the f
- Page 190 and 191:
Table 26. Command-line restore exam
- Page 192 and 193:
Standard query restore, no query re
- Page 194 and 195:
state data is SFP files, so a lot o
- Page 196 and 197:
4. Click Restore. Enter values for
- Page 198 and 199:
oscdimg -n -o -bC:\winpe_x86\etfsbo
- Page 200 and 201:
| | | | | | | | | | | | | | | | | |
- Page 202 and 203:
| | | | | | | | | | | | | | | | | |
- Page 204 and 205:
Before you restore an image (offlin
- Page 206 and 207:
inactive files that are restored to
- Page 208 and 209:
| | Table 27. Backup set GUI restor
- Page 210 and 211:
If you are connected to a Tivoli St
- Page 212 and 213:
estore systemobject restore systems
- Page 214 and 215:
| | | | | | | | | | | | | | | | | |
- Page 216 and 217:
| | | | | | | | | | | | | | | | | |
- Page 218 and 219:
v v v v v The Active Directory data
- Page 220 and 221:
v v v v v v Manager, it must be man
- Page 222 and 223:
2. In the Node Access List window,
- Page 224 and 225:
Deleting file spaces You can then r
- Page 226 and 227:
Restore NAS file systems 2. Click t
- Page 228 and 229:
trees using the RESTORE NODE server
- Page 230 and 231:
Note: When you initiate a NAS resto
- Page 232 and 233:
Related tasks “Set the client sch
- Page 234 and 235:
Table 30. Command-line archive exam
- Page 236 and 237:
v Do not use target nodes as tradit
- Page 238 and 239:
Table 31. Command line examples of
- Page 240 and 241:
Event Window start Window end Actua
- Page 242 and 243:
options is honored. If the global o
- Page 244 and 245:
For the scheduler to start unattend
- Page 246 and 247:
Table 32. Sample classic query sche
- Page 248 and 249:
The schedule log continues to grow
- Page 250 and 251:
Event Type: Error Event Source: Ads
- Page 252 and 253:
Commands are scheduled by using the
- Page 254 and 255:
cadschedname:"TSM Client Scheduler1
- Page 256 and 257:
Table 34. Client return codes and t
- Page 258 and 259:
Management classes and copy groups
- Page 260 and 261:
Copy frequency attribute The copy f
- Page 262 and 263:
If you restore or retrieve a file t
- Page 264 and 265:
To assign a management class other
- Page 266 and 267:
has one active backup version (the
- Page 268 and 269:
See the IBM Tivoli Storage Manager
- Page 270 and 271:
v v The backup-archive client is in
- Page 272 and 273:
Use the Dsmcutil command includes t
- Page 274 and 275:
local workstation. Start the servic
- Page 276 and 277:
installed before the Remote Client
- Page 278 and 279:
v v v v v v v /eventlogging /node /
- Page 280 and 281:
The password is validated with the
- Page 282 and 283:
This option can also be used with t
- Page 284 and 285:
258 IBM Tivoli Storage Manager for
- Page 286 and 287:
Q: How do I create a local backup s
- Page 288 and 289:
Related tasks “Creating an Automa
- Page 290 and 291:
12. 2=1,3 13. [DISKS.MBR] 14. 1=1,1
- Page 292 and 293:
location=tape -optfile=tsmasr.opt 3
- Page 294 and 295:
268 IBM Tivoli Storage Manager for
- Page 296 and 297:
Communication options Related conce
- Page 298 and 299:
Table 39. Server and node options (
- Page 300 and 301:
Table 41. Backup and archive proces
- Page 302 and 303:
Table 41. Backup and archive proces
- Page 304 and 305:
| | | | | | | | Table 41. Backup an
- Page 306 and 307:
Table 41. Backup and archive proces
- Page 308 and 309:
| | | | | | Table 41. Backup and ar
- Page 310 and 311:
Table 42. Restore and retrieve proc
- Page 312 and 313:
Table 43. Scheduling options (conti
- Page 314 and 315:
Table 47. Error processing options
- Page 316 and 317:
5. Options received from the server
- Page 318 and 319:
Table 51. Client command options (c
- Page 320 and 321:
Table 51. Client command options (c
- Page 322 and 323:
Table 52. Options that are valid on
- Page 324 and 325:
Client options reference The follow
- Page 326 and 327:
| | | | | | | | | | | | | | | | | |
- Page 328 and 329:
The basic level of the audit loggin
- Page 330 and 331:
Auditlogname The auditlogname optio
- Page 332 and 333:
Autodeploy Use the autodeploy optio
- Page 334 and 335:
Note: When an existing file space i
- Page 336 and 337:
Backupsetname The backupsetname opt
- Page 338 and 339:
Parameters yes no Specifies that th
- Page 340 and 341:
1. In the IBM Tivoli Storage Manage
- Page 342 and 343:
| | | | | | | | | | | | | | | | | |
- Page 344 and 345:
When the clusternode option is set
- Page 346 and 347:
This option is valid only on the in
- Page 348 and 349:
Note: Use this option only when com
- Page 350 and 351:
Supported Clients This option is va
- Page 352 and 353:
| v SFP - The list of files protect
- Page 354 and 355:
that the file server was migrated a
- Page 356 and 357:
v v restore systemstate set event |
- Page 358 and 359:
Examples Options file: dedupcachepa
- Page 360 and 361:
Related reference “Include option
- Page 362 and 363:
Use the detail option with the quer
- Page 364 and 365:
Snapshots can be created with the N
- Page 366 and 367:
Dirsonly The dirsonly option proces
- Page 368 and 369:
Examples Options file: diskbuffsize
- Page 370 and 371:
Supported Clients This option is va
- Page 372 and 373:
Related information Domain.image Th
- Page 374 and 375:
Domain.vmfile The domain.vmfile opt
- Page 376 and 377:
Command line: -domain.vmfile="vm1,v
- Page 378 and 379:
| | | | | | | | | | | | | | | exclu
- Page 380 and 381:
v delete backup v delete group v ex
- Page 382 and 383:
To support LAN-free data movement y
- Page 384 and 385:
_ Underscore - Hyphen & Ampersand N
- Page 386 and 387:
If neither errologmax nor errorlogr
- Page 388 and 389:
| | | | | | | | | | | | | | | | | |
- Page 390 and 391:
Table 56. Options for controlling c
- Page 392 and 393:
Note: Avoid performing a selective
- Page 394 and 395:
v If you set the compression option
- Page 396 and 397:
Examples Command line: -FBBranch=or
- Page 398 and 399:
The fbpolicyname option is the name
- Page 400 and 401:
Parameters repository_location Spec
- Page 402 and 403:
If you specify multiple FastBack cl
- Page 404 and 405:
| | | | | | | | | | | | | | v This
- Page 406 and 407:
HKEY_LOCAL_MACHINE\ SYSTEM\ Control
- Page 408 and 409:
v v restore group retrieve Supporte
- Page 410 and 411:
When you include the timeformat opt
- Page 412 and 413:
| | | | | | | | Host Command line:
- Page 414 and 415:
Examples Options file: Specify an H
- Page 416 and 417:
For example, if you specify a gap s
- Page 418 and 419:
►► INActive ►◄ Parameters T
- Page 420 and 421:
If you do not assign a specific man
- Page 422 and 423:
include.image Includes a file space
- Page 424 and 425:
Related information “Exclude file
- Page 426 and 427:
v v v It does not rebind backup ver
- Page 428 and 429:
Examples Options file: incrthreshol
- Page 430 and 431:
Related information “Lanfreeshmpo
- Page 432 and 433:
Options File Place this option in t
- Page 434 and 435:
Examples Command line: dsmc restore
- Page 436 and 437:
| | schedule Specifies that the cli
- Page 438 and 439:
Supported Clients This option is va
- Page 440 and 441:
Deleted files are not marked inacti
- Page 442 and 443:
Nasnodename Command line: -namedpip
- Page 444 and 445:
Options File Place this option in t
- Page 446 and 447:
Note: The numberformat option does
- Page 448 and 449:
This option is valid only on the in
- Page 450 and 451:
To keep your client node password s
- Page 452 and 453:
Parameters date Specifies the appro
- Page 454 and 455:
postschedulecmd or preschedulecmd.
- Page 456 and 457:
Then configure preschedulecmd to in
- Page 458 and 459:
Options File Place this option in t
- Page 460 and 461:
Restores these directories and file
- Page 462 and 463:
The command string is a valid comma
- Page 464 and 465:
0 B 04/01/2008 12:37:07 STANDARD A
- Page 466 and 467:
Options File Place this option in t
- Page 468 and 469:
Supported Clients This option is va
- Page 470 and 471:
v v v how many tapes on which the r
- Page 472 and 473:
Syntax ►► REVOKEremoteaccess No
- Page 474 and 475:
commands by the server using the ac
- Page 476 and 477:
Note: If you specify a non-zero val
- Page 478 and 479:
| | The schedule log (dsmsched.log)
- Page 480 and 481:
Supported Clients This option is va
- Page 482 and 483:
Options File Place this option in t
- Page 484 and 485:
Manager server. In this case, you c
- Page 486 and 487:
Showmembers Use the showmembers opt
- Page 488 and 489:
Parameters No Yes If you specify No
- Page 490 and 491:
v v v v v have removed the rule tha
- Page 492 and 493:
Table 59. Incremental command: Rela
- Page 494 and 495:
►► SNAPSHOTCACHELocation path
- Page 496 and 497:
If the value you specified with the
- Page 498 and 499:
ms (milliseconds) or s (seconds) qu
- Page 500 and 501:
Supported Clients This option is va
- Page 502 and 503:
include and exclude statements rega
- Page 504 and 505:
Parameters yes no Tivoli Storage Ma
- Page 506 and 507:
operations. If a pre-snapshot or a
- Page 508 and 509:
Syntax ►► STAGINGDIRectory path
- Page 510 and 511:
Examples Options file: subdir no Co
- Page 512 and 513:
This option is valid only on the in
- Page 514 and 515:
Tcpadminport Use the tcpadminport o
- Page 516 and 517:
Examples Options file: tcpcada dsmc
- Page 518 and 519:
v You fully understand the effects
- Page 520 and 521:
Tcpwindowsize Use the tcpwindowsize
- Page 522 and 523:
corresponds to the format you want
- Page 524 and 525:
Use the todate and totime options w
- Page 526 and 527:
►► TXNBytelimit number ►◄ P
- Page 528 and 529:
Examples Options file: usedirectory
- Page 530 and 531:
This option is valid only on the in
- Page 532 and 533:
Syntax ►► VIRTUALNodename noden
- Page 534 and 535:
Command line: dsmc backup vm -vmlis
- Page 536 and 537:
| | | | | | Examples Command line:
- Page 538 and 539:
-VMCH=esx1.storage.usca.example.com
- Page 540 and 541:
| | Examples Options file: VMCUser
- Page 542 and 543:
| | | | | | | | | | | | | | | | | |
- Page 544 and 545:
| | | | | | | | | | | | | | | | | |
- Page 546 and 547:
| Examples Options file: webports 2
- Page 548 and 549:
Table 60. Commands (continued) Comm
- Page 550 and 551:
| | | | | Table 60. Commands (conti
- Page 552 and 553:
Enter client command names, options
- Page 554 and 555:
Wildcard characters v v v objects b
- Page 556 and 557:
Use the snapshotroot option with th
- Page 558 and 559:
Archive FastBack the file system ar
- Page 560 and 561:
Table 63. Archive FastBack command:
- Page 562 and 563:
Backup FastBack “Backup Systemsta
- Page 564 and 565:
The FastBack server name, myFbServe
- Page 566 and 567:
Parameters Table 65. Backup Group c
- Page 568 and 569:
Table 66. Backup Image command: Rel
- Page 570 and 571:
skipped when sending image data to
- Page 572 and 573:
Specifying mode =differential on th
- Page 574 and 575:
System services components can incl
- Page 576 and 577:
| | | | | | | | | | | | | | | | | |
- Page 578 and 579:
| | | Related reference “Query VM
- Page 580 and 581:
Delete Archive delete access See th
- Page 582 and 583:
Delete Backup The delete backup com
- Page 584 and 585:
Table 69. Delete Backup command: Re
- Page 586 and 587:
it resides in because there might b
- Page 588 and 589:
Table 72. Expire command: Related o
- Page 590 and 591:
Command: dsmc help ANS1036 Incremen
- Page 592 and 593:
Table 73. Incremental command: Rela
- Page 594 and 595:
snapshotcachelocation, snapshotcach
- Page 596 and 597:
Related concepts “Restoring NTFS
- Page 598 and 599:
The snapshotroot option does not pr
- Page 600 and 601:
The administrative user can then se
- Page 602 and 603:
INCLuded Display output for include
- Page 604 and 605:
Table 74. Query Adobjects command:
- Page 606 and 607:
Table 75. Query Archive command: Re
- Page 608 and 609:
v File size v Backup date v Whether
- Page 610 and 611:
Table 77. Query Backup command: Rel
- Page 612 and 613:
localfilename Specifies the file na
- Page 614 and 615:
Table 79. Query Backupset command:
- Page 616 and 617:
“Nasnodename” on page 416 “Cl
- Page 618 and 619:
v Image Size - This is the volume s
- Page 620 and 621:
Parameters test pattern Use for tes
- Page 622 and 623:
Syntax ►► Query Node options
- Page 624 and 625:
Query Schedule Start date/time: 10/
- Page 626 and 627:
| v ENV - Environment variables. v
- Page 628 and 629:
Table 87. Query Systemstate command
- Page 630 and 631:
| | | | | | | | | | | | | | | | | |
- Page 632 and 633:
transfer across all command attempt
- Page 634 and 635:
Table 89. Restore command: Related
- Page 636 and 637:
“Restore data from a backup set
- Page 638 and 639:
Restore from file spaces that are n
- Page 640 and 641:
Table 90. Restore Adobjects command
- Page 642 and 643:
► -LOCation= server file tape ►
- Page 644 and 645:
Task Task Task Task Task dsmc resto
- Page 646 and 647:
v v If the backup set is on a SAN-a
- Page 648 and 649:
Task Task Task Task Task Task Resto
- Page 650 and 651:
Table 93. Restore Group command: Re
- Page 652 and 653:
Parameters sourcefilespec Specifies
- Page 654 and 655:
server. You must register the NAS n
- Page 656 and 657:
Supported Clients | This command is
- Page 658 and 659:
Supported Clients This command is v
- Page 660 and 661:
| | | dsmc restore vm myvm -vmname=
- Page 662 and 663:
Supported Clients This command is v
- Page 664 and 665:
Task Task Task Task Task Task Retri
- Page 666 and 667:
Parameters Table 99. Schedule comma
- Page 668 and 669:
Table 100. Selective command: Relat
- Page 670 and 671:
Adaptive subfile backups If you per
- Page 672 and 673:
To allow access to all files in the
- Page 674 and 675:
v Timeformat Examples Task The foll
- Page 676 and 677:
etween Tivoli Storage Manager nodes
- Page 678 and 679:
3. For a FastBack server or a Tivol
- Page 680 and 681:
654 IBM Tivoli Storage Manager for
- Page 682 and 683:
IBM may use or distribute any of th
- Page 684 and 685:
658 IBM Tivoli Storage Manager for
- Page 686 and 687:
planned processing of an administra
- Page 688 and 689:
client A software program or comput
- Page 690 and 691:
media. Other instances of the same
- Page 692 and 693:
external library A type of library
- Page 694 and 695:
inode The internal structure that d
- Page 696 and 697:
storage capacity and communications
- Page 698 and 699:
migrated. When a file is recalled u
- Page 700 and 701:
| | | | | | | receiver A server rep
- Page 702 and 703:
space management The process of kee
- Page 704 and 705:
include substitution for command pa
- Page 706 and 707:
680 IBM Tivoli Storage Manager for
- Page 708 and 709:
ackup 101 automating using Client S
- Page 710 and 711:
copy destination attribute 236 copy
- Page 712 and 713:
image backup (continued) incrementa
- Page 714 and 715:
options (continued) description 334
- Page 716 and 717:
estore (continued) based on date an
- Page 718 and 719:
system recovery (continued) Windows
- Page 720:
694 IBM Tivoli Storage Manager for


