User Manual
User Manual
User Manual

You also want an ePaper? Increase the reach of your titles
YUMPU automatically turns print PDFs into web optimized ePapers that Google loves.
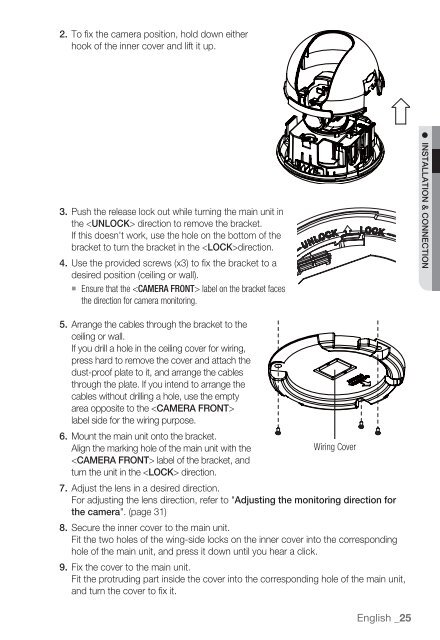
2.<br />
To fix the camera position, hold down either<br />
hook of the inner cover and lift it up.<br />
3.<br />
Push the release lock out while turning the main unit in<br />
the direction to remove the bracket.<br />
If this doesn't work, use the hole on the bottom of the<br />
bracket to turn the bracket in the direction.<br />
4. Use the provided screws (x3) to fix the bracket to a<br />
desired position (ceiling or wall).<br />
Ensure that the label on the bracket faces<br />
the direction for camera monitoring.<br />
INSTALLATION & CONNECTION<br />
5. Arrange the cables through the bracket to the<br />
ceiling or wall.<br />
If you drill a hole in the ceiling cover for wiring,<br />
press hard to remove the cover and attach the<br />
dust-proof plate to it, and arrange the cables<br />
through the plate. If you intend to arrange the<br />
cables without drilling a hole, use the empty<br />
area opposite to the <br />
label side for the wiring purpose.<br />
6. Mount the main unit onto the bracket.<br />
Align the marking hole of the main unit with the<br />
Wiring Cover<br />
label of the bracket, and<br />
turn the unit in the direction.<br />
7. Adjust the lens in a desired direction.<br />
For adjusting the lens direction, refer to "Adjusting the monitoring direction for<br />
the camera". (page 31)<br />
8. Secure the inner cover to the main unit.<br />
Fit the two holes of the wing-side locks on the inner cover into the corresponding<br />
hole of the main unit, and press it down until you hear a click.<br />
9. Fix the cover to the main unit.<br />
Fit the protruding part inside the cover into the corresponding hole of the main unit,<br />
and turn the cover to fix it.<br />
English _25