User Manual
User Manual
User Manual

You also want an ePaper? Increase the reach of your titles
YUMPU automatically turns print PDFs into web optimized ePapers that Google loves.
If the IP router has more than one camera connected<br />
Configure the IP related settings and the Port related settings distinctly with each other.<br />
Category Camera #1 Camera #2<br />
IP related settings<br />
IP Address<br />
Subnet Mask<br />
Gateway<br />
192.168.1.200<br />
255.255.255.0<br />
192.168.1.1<br />
192.168.1.201<br />
255.255.255.0<br />
192.168.1.1<br />
Port related settings<br />
M <br />
HTTP Port<br />
VNP Port<br />
80<br />
4520<br />
10000<br />
4530<br />
If the is set other than 80, you must provide the number in the address<br />
bar of the Internet browser before you can access the camera.<br />
ex) http://IP address : HTTP Port<br />
http://192.168.1.201:10000<br />
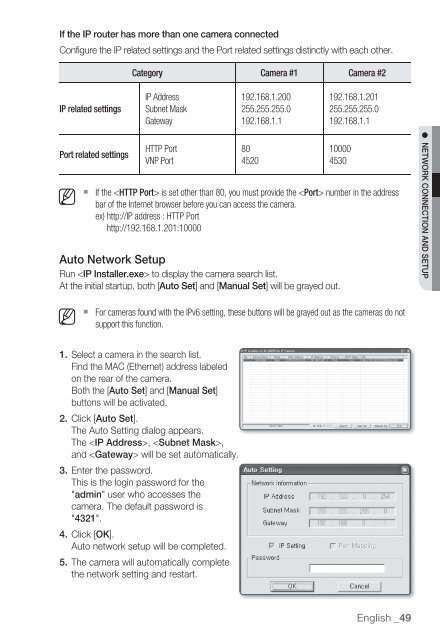
Auto Network Setup<br />
Run to display the camera search list.<br />
At the initial startup, both [Auto Set] and [<strong>Manual</strong> Set] will be grayed out.<br />
NETWORK CONNECTION AND SETUP<br />
M <br />
For cameras found with the IPv6 setting, these buttons will be grayed out as the cameras do not<br />
support this function.<br />
1. Select a camera in the search list.<br />
Find the MAC (Ethernet) address labeled<br />
on the rear of the camera.<br />
Both the [Auto Set] and [<strong>Manual</strong> Set]<br />
buttons will be activated.<br />
2. Click [Auto Set].<br />
The Auto Setting dialog appears.<br />
The , ,<br />
and will be set automatically.<br />
3. Enter the password.<br />
This is the login password for the<br />
"admin" user who accesses the<br />
camera. The default password is<br />
"4321".<br />
4. Click [OK].<br />
Auto network setup will be completed.<br />
5. The camera will automatically complete<br />
the network setting and restart.<br />
English _49