User Manual
User Manual
User Manual

You also want an ePaper? Increase the reach of your titles
YUMPU automatically turns print PDFs into web optimized ePapers that Google loves.
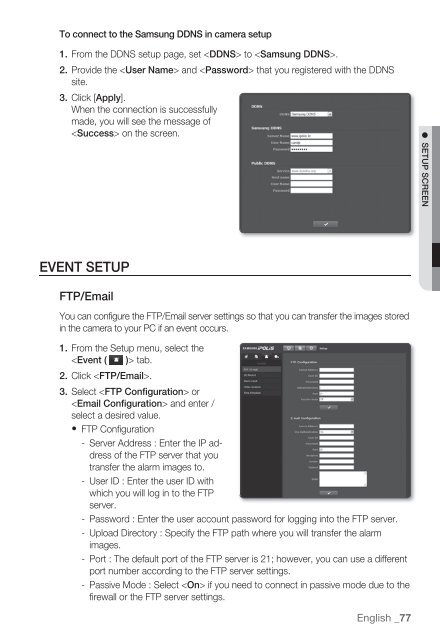
To connect to the Samsung DDNS in camera setup<br />
1. From the DDNS setup page, set to .<br />
2. Provide the and that you registered with the DDNS<br />
site.<br />
3. Click [Apply].<br />
When the connection is successfully<br />
made, you will see the message of<br />
on the screen.<br />
SETUP SCREEN<br />
EVENT SETUP<br />
FTP/Email<br />
You can configure the FTP/Email server settings so that you can transfer the images stored<br />
in the camera to your PC if an event occurs.<br />
1. From the Setup menu, select the<br />
tab.<br />
2. Click .<br />
3. Select or<br />
and enter /<br />
select a desired value.<br />
FTP Configuration<br />
- Server Address : Enter the IP address<br />
of the FTP server that you<br />
transfer the alarm images to.<br />
- <strong>User</strong> ID : Enter the user ID with<br />
which you will log in to the FTP<br />
server.<br />
- Password : Enter the user account password for logging into the FTP server.<br />
- Upload Directory : Specify the FTP path where you will transfer the alarm<br />
images.<br />
- Port : The default port of the FTP server is 21; however, you can use a different<br />
port number according to the FTP server settings.<br />
- Passive Mode : Select if you need to connect in passive mode due to the<br />
firewall or the FTP server settings.<br />
English _77