Marley Sustainable Drainage Rainwater Harvesting Kits ... - BHL.co.uk
Marley Sustainable Drainage Rainwater Harvesting Kits ... - BHL.co.uk
Marley Sustainable Drainage Rainwater Harvesting Kits ... - BHL.co.uk

Create successful ePaper yourself
Turn your PDF publications into a flip-book with our unique Google optimized e-Paper software.
RAINWATER HARVESTING KITS - INSTALLATION MANUAL<br />
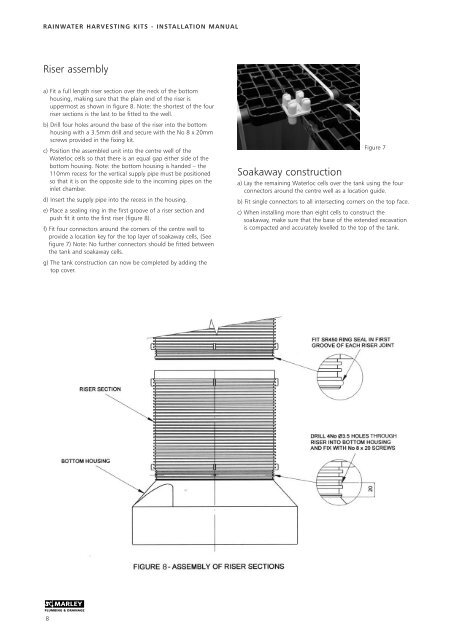
Riser assembly<br />
a) Fit a full length riser section over the neck of the bottom<br />
housing, making sure that the plain end of the riser is<br />
uppermost as shown in figure 8. Note: the shortest of the four<br />
riser sections is the last to be fitted to the well.<br />
b) Drill four holes around the base of the riser into the bottom<br />
housing with a 3.5mm drill and secure with the No 8 x 20mm<br />
screws provided in the fixing kit.<br />
c) Position the assembled unit into the centre well of the<br />
Waterloc cells so that there is an equal gap either side of the<br />
bottom housing. Note: the bottom housing is handed – the<br />
110mm recess for the vertical supply pipe must be positioned<br />
so that it is on the opposite side to the in<strong>co</strong>ming pipes on the<br />
inlet chamber.<br />
d) Insert the supply pipe into the recess in the housing.<br />
e) Place a sealing ring in the first groove of a riser section and<br />
push fit it onto the first riser (figure 8).<br />
f) Fit four <strong>co</strong>nnectors around the <strong>co</strong>rners of the centre well to<br />
provide a location key for the top layer of soakaway cells, (See<br />
figure 7) Note: No further <strong>co</strong>nnectors should be fitted between<br />
the tank and soakaway cells.<br />
g) The tank <strong>co</strong>nstruction can now be <strong>co</strong>mpleted by adding the<br />
top <strong>co</strong>ver.<br />
Figure 7<br />
Soakaway <strong>co</strong>nstruction<br />
a) Lay the remaining Waterloc cells over the tank using the four<br />
<strong>co</strong>nnectors around the centre well as a location guide.<br />
b) Fit single <strong>co</strong>nnectors to all intersecting <strong>co</strong>rners on the top face.<br />
c) When installing more than eight cells to <strong>co</strong>nstruct the<br />
soakaway, make sure that the base of the extended excavation<br />
is <strong>co</strong>mpacted and accurately levelled to the top of the tank.<br />
8