
Create successful ePaper yourself
Turn your PDF publications into a flip-book with our unique Google optimized e-Paper software.
CnM IP Camera <strong>User</strong> <strong>Manual</strong><br />
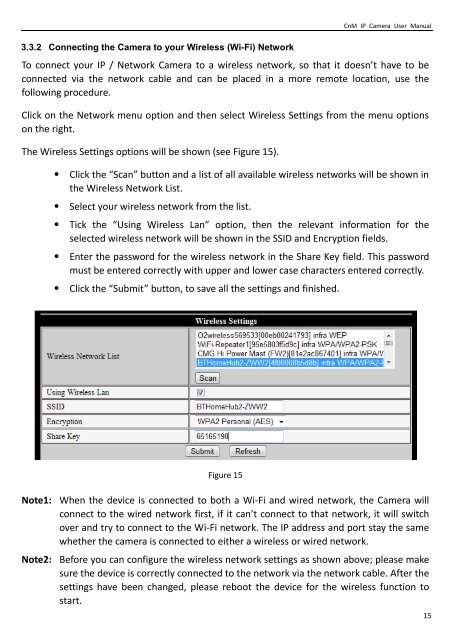
3.3.2 Connecting the Camera to your Wireless (Wi-Fi) Network<br />
To connect your IP / Network Camera to a wireless network, so that it doesn’t have to be<br />
connected via the network cable and can be placed in a more remote location, use the<br />
following procedure.<br />
Click on the Network menu option and then select Wireless Settings from the menu options<br />
on the right.<br />
The Wireless Settings options will be shown (see Figure 15).<br />
• Click the “Scan” button and a list of all available wireless networks will be shown in<br />
the Wireless Network List.<br />
• Select your wireless network from the list.<br />
• Tick the “Using Wireless Lan” option, then the relevant information for the<br />
selected wireless network will be shown in the SSID and Encryption fields.<br />
• Enter the password for the wireless network in the Share Key field. This password<br />
must be entered correctly with upper and lower case characters entered correctly.<br />
• Click the “Submit” button, to save all the settings and finished.<br />
Figure 15<br />
Note1: When the device is connected to both a Wi-Fi and wired network, the Camera will<br />
connect to the wired network first, if it can’t connect to that network, it will switch<br />
over and try to connect to the Wi-Fi network. The IP address and port stay the same<br />
whether the camera is connected to either a wireless or wired network.<br />
Note2: Before you can configure the wireless network settings as shown above; please make<br />
sure the device is correctly connected to the network via the network cable. After the<br />
settings have been changed, please reboot the device for the wireless function to<br />
start.<br />
15