Impala SS and Caprice T56 Six Speed install guide - GRAIL
Impala SS and Caprice T56 Six Speed install guide - GRAIL
Impala SS and Caprice T56 Six Speed install guide - GRAIL

Create successful ePaper yourself
Turn your PDF publications into a flip-book with our unique Google optimized e-Paper software.
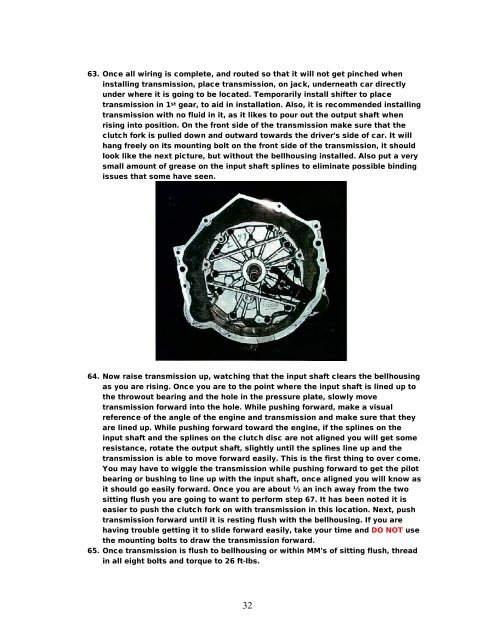
63. Once all wiring is complete, <strong>and</strong> routed so that it will not get pinched when<br />
<strong>install</strong>ing transmission, place transmission, on jack, underneath car directly<br />
under where it is going to be located. Temporarily <strong>install</strong> shifter to place<br />
transmission in 1 st gear, to aid in <strong>install</strong>ation. Also, it is recommended <strong>install</strong>ing<br />
transmission with no fluid in it, as it likes to pour out the output shaft when<br />
rising into position. On the front side of the transmission make sure that the<br />
clutch fork is pulled down <strong>and</strong> outward towards the driver’s side of car. It will<br />
hang freely on its mounting bolt on the front side of the transmission, it should<br />
look like the next picture, but without the bellhousing <strong>install</strong>ed. Also put a very<br />
small amount of grease on the input shaft splines to eliminate possible binding<br />
issues that some have seen.<br />
64. Now raise transmission up, watching that the input shaft clears the bellhousing<br />
as you are rising. Once you are to the point where the input shaft is lined up to<br />
the throwout bearing <strong>and</strong> the hole in the pressure plate, slowly move<br />
transmission forward into the hole. While pushing forward, make a visual<br />
reference of the angle of the engine <strong>and</strong> transmission <strong>and</strong> make sure that they<br />
are lined up. While pushing forward toward the engine, if the splines on the<br />
input shaft <strong>and</strong> the splines on the clutch disc are not aligned you will get some<br />
resistance, rotate the output shaft, slightly until the splines line up <strong>and</strong> the<br />
transmission is able to move forward easily. This is the first thing to over come.<br />
You may have to wiggle the transmission while pushing forward to get the pilot<br />
bearing or bushing to line up with the input shaft, once aligned you will know as<br />
it should go easily forward. Once you are about ½ an inch away from the two<br />
sitting flush you are going to want to perform step 67. It has been noted it is<br />
easier to push the clutch fork on with transmission in this location. Next, push<br />
transmission forward until it is resting flush with the bellhousing. If you are<br />
having trouble getting it to slide forward easily, take your time <strong>and</strong> DO NOT use<br />
the mounting bolts to draw the transmission forward.<br />
65. Once transmission is flush to bellhousing or within MM’s of sitting flush, thread<br />
in all eight bolts <strong>and</strong> torque to 26 ft-lbs.<br />
32