
Create successful ePaper yourself
Turn your PDF publications into a flip-book with our unique Google optimized e-Paper software.
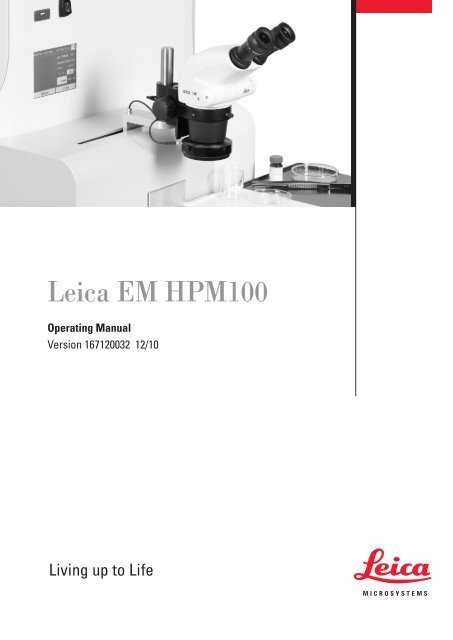
<strong>Leica</strong> <strong>EM</strong> <strong>HPM100</strong><br />
Operating Manual<br />
Version 167120032 12/10
Important Note<br />
<strong>Leica</strong> reserves the right to change technical specifications as well as manufacturing<br />
processes without prior notice. Only in this way is it possible to continuously improve<br />
the technology and manufacturing techniques used to provide our customers with<br />
excellent products.<br />
Any copyrights of this document are retained by <strong>Leica</strong> Mikrosysteme GmbH, Vienna.<br />
Any reproduction of text and illustrations (or any parts thereof) by printing, photocopying,<br />
or other methods (including electronic systems and media) requires express prior<br />
permission in writing.<br />
Issued by:<br />
<strong>Leica</strong> Mikrosysteme GmbH<br />
Hernalser Hauptstrasse 219<br />
A-1170 Vienna
<strong>Leica</strong> <strong>EM</strong> <strong>HPM100</strong><br />
Operating Manual<br />
<strong>Leica</strong> <strong>EM</strong> <strong>HPM100</strong> Serial Number:<br />
Date of purchase:<br />
For the instrument serial number, please refer to the name type label on the<br />
back of the instrument!<br />
Please read this instruction manual carefully<br />
before operating the instrument.
Foreword<br />
This technical documentation is intended to provide essential information about the<br />
proper operation and servicing of the <strong>Leica</strong> <strong>EM</strong> <strong>HPM100</strong>. The system is used for<br />
cryo-immobilization of the ultrastructure of biological material to enable examination<br />
of the specimens under an electron microscope (<strong>EM</strong>) or a light microscope (LM).<br />
This user manual describes commissioning of the <strong>Leica</strong> <strong>EM</strong> <strong>HPM100</strong> High Pressure<br />
Freezer, phased testing and adjustment of all components and movement<br />
sequences, and restoring the basic functionality.<br />
Service and operating staff must familiarize themselves with all components of the<br />
system before commissioning. Particular attention must be paid to the aspect of<br />
safety.<br />
This user manual must be retained for future reference.<br />
Texts, schedules and tables may not be copied or reproduced without our express<br />
consent.<br />
It should be noted that this Technical Documentation does not constitute a part of any<br />
existing, prior agreement or covenant or legal relationship. All obligations arise from<br />
the purchase contract, which also is the sole regulator of the warranty conditions.<br />
Contractual regulations are not affected by this technical documentation.<br />
In addition, all generally applicable legal and otherwise binding regulations for<br />
preventing accidents and protecting the environment must be observed and<br />
communicated.<br />
Page 1 <strong>Leica</strong> <strong>EM</strong> <strong>HPM100</strong> Operating Manual Version 12/10
Tabel of contents<br />
1. Introduction ............................................................................................................................. 4<br />
2. Identification............................................................................................................................ 5<br />
2.1 Product mark and type designation..................................................................................... 5<br />
2.2 Name and address of the manufacturer.............................................................................. 5<br />
3. Product description ................................................................................................................ 6<br />
3.1 Field of application and proper use..................................................................................... 6<br />
3.2 Dimensions and weight (for transport) ................................................................................ 6<br />
3.3 Consumption and emissions............................................................................................... 6<br />
3.4 Environmental conditions for operation and storage........................................................... 7<br />
3.5 Safety information ............................................................................................................... 7<br />
3.5.1 General instructions..................................................................................................... 7<br />
3.5.2 Design safety measures .............................................................................................. 7<br />
3.5.3 Safety measures at the installation site ....................................................................... 7<br />
3.5.4 Safety measures when working with nitrogen ............................................................. 8<br />
3.5.4.1 Physical and chemical properties of nitrogen........................................................ 8<br />
3.5.4.2 Dangers of nitrogen............................................................................................... 8<br />
3.5.4.3 Safety precautions and rules for use..................................................................... 9<br />
3.5.5 Residual hazards ....................................................................................................... 10<br />
3.5.6 Qualification of operating personnel .......................................................................... 10<br />
3.5.7 Emergency procedure ............................................................................................... 11<br />
4. Preparing the system for use............................................................................................... 12<br />
4.1 Transportation and storage conditions.............................................................................. 12<br />
4.2 Installation conditions........................................................................................................ 12<br />
4.2.1 Work area conditions ................................................................................................. 12<br />
4.2.2 Connection conditions ............................................................................................... 12<br />
4.3 Installing, assembling and commissioning........................................................................ 13<br />
4.3.1 Unpacking and assembling the parts......................................................................... 13<br />
4.3.2 Setup ......................................................................................................................... 25<br />
4.3.3 Safe storage of the packing material ......................................................................... 25<br />
4.3.4 Electrical connections ................................................................................................ 25<br />
4.3.5 Commissioning .......................................................................................................... 25<br />
4.3.6 Repacking to prevent damage during transportation................................................. 25<br />
5. Operating instructions.......................................................................................................... 26<br />
5.1 Introduction ....................................................................................................................... 26<br />
5.2 Operating the <strong>Leica</strong> <strong>EM</strong> <strong>HPM100</strong> ..................................................................................... 26<br />
5.2.1 Switching on the system ............................................................................................ 26<br />
5.2.2 Cooling the system .................................................................................................... 33<br />
5.2.3 Inserting the specimen holder in the loading station.................................................. 35<br />
5.2.4 Inserting specimen and carriers into the specimen cartridge .................................... 37<br />
5.2.5 Starting the automatic freezing process .................................................................... 38<br />
Page 2 <strong>Leica</strong> <strong>EM</strong> <strong>HPM100</strong> Operating Manual Version 12/10
5.3 Actions following the freezing process.............................................................................. 40<br />
5.3.1 Checking the processing quality based on process data........................................... 40<br />
5.3.2 Documentation of freezing processes ....................................................................... 41<br />
5.3.3 Separating and sorting specimen carriers ................................................................. 42<br />
5.3.4 Transferring the frozen specimens ............................................................................ 42<br />
5.3.5 Switching off the system ............................................................................................ 44<br />
5.3.5.1 Draining the LN 2 Dewars..................................................................................... 45<br />
5.3.5.2 Bake out of the system........................................................................................ 46<br />
5.4 Changing settings on the main screen.............................................................................. 48<br />
5.4.1 Change directory for saving settings ......................................................................... 48<br />
5.4.2 Reset cycle counter ................................................................................................... 49<br />
5.4.3 Changing the temperature of the process chamber .................................................. 50<br />
5.4.4 Turning off the alcohol ............................................................................................... 51<br />
6. Servicing and cleaning ......................................................................................................... 53<br />
6.1 Draining fluids ................................................................................................................... 53<br />
6.2 Cleaning the <strong>Leica</strong> <strong>EM</strong> <strong>HPM100</strong>....................................................................................... 53<br />
7. Messages during operation.................................................................................................. 54<br />
7.1 Standard messages during operation ............................................................................... 54<br />
7.2 Error messages during operation...................................................................................... 54<br />
8. Appendix I.............................................................................................................................. 55<br />
Page 3 <strong>Leica</strong> <strong>EM</strong> <strong>HPM100</strong> Operating Manual Version 12/10
1. Introduction<br />
In order to ensure the safety of service technicians and operators, and to prevent any<br />
damage to the <strong>Leica</strong> <strong>EM</strong> <strong>HPM100</strong> High Pressure Freezer, it is essential to read this<br />
manual carefully before beginning any work with the system.<br />
This user manual is intended to help the user to understand the system more<br />
completely, to use it within the specified limits of its working capabilities, and to<br />
maintain and service it in accordance with its physical parameters.<br />
This user manual includes important information regarding proper commissioning,<br />
operation, servicing, troubleshooting and repair. Observing these instructions will<br />
help to prevent hazards, reduce repair and downtime costs, and prolong the system's<br />
service life.<br />
Symbols used in this manual:<br />
Paragraphs with this symbol contain instructions regarding possible hazards.<br />
Failure to observe these alerts may result in serious injury! These instructions<br />
must be complied with in all cases.<br />
Paragraphs with this symbol contain important information which may<br />
endanger staff or result in damage to the system if it is ignored.<br />
Paragraphs with this symbol contain further information relating to a previous<br />
explanation, which does not have a safety-critical function. However, it is<br />
important to observe this information to ensure that the system functions<br />
optimally.<br />
Page 4 <strong>Leica</strong> <strong>EM</strong> <strong>HPM100</strong> Operating Manual Version 12/10
2. Identification<br />
2.1 Product mark and type designation<br />
<strong>Leica</strong> <strong>EM</strong> <strong>HPM100</strong> UVN High Pressure Freezer: 100-130V / 50-60Hz<br />
<strong>Leica</strong> <strong>EM</strong> <strong>HPM100</strong> EVN High Pressure Freezer: 200-240V / 50-60Hz<br />
2.2 Name and address of the manufacturer<br />
<strong>Leica</strong> Mikrosysteme GmbH<br />
Hernalser Hauptstrasse 219<br />
A-1170 Wien<br />
Tel.: +43 1 48899-0<br />
Fax: +43 1 48899-350<br />
Web: www.leica-microsystems.com<br />
Page 5 <strong>Leica</strong> <strong>EM</strong> <strong>HPM100</strong> Operating Manual Version 12/10
3. Product description<br />
3.1 Field of application and proper use<br />
The <strong>Leica</strong> <strong>EM</strong> <strong>HPM100</strong> High Pressure Freezer is used for freezing aqueous<br />
specimens for examination of the specimens with an electron microscope, a light<br />
microscope or other surface-analysis methods, such as atomic force microscopy,<br />
secondary ion mass spectrometry or photoelectron spectroscopy. Additional<br />
preparation stages may occur between freezing and examination.<br />
Specimens are frozen with liquid nitrogen at a temperature of –197 °C under a<br />
pressure of 210 kPa. Only liquefied nitrogen can be used as the cryogen.<br />
Various specimens such as tissue, cell cultures, cosmetic products, food,<br />
suspensions etc. can be processed.<br />
The high pressure greatly reduces the volume of gaseous substances in the<br />
specimen, so specimens should not contain any gas bubbles, which could reduce<br />
pressure transmission and reduce the freezing quality.<br />
When hazardous substances (e.g., radioactive, explosive, toxic or human pathogenic<br />
substances) are processed the substance-specific safety precautions must be<br />
implemented.<br />
The <strong>Leica</strong> <strong>EM</strong> <strong>HPM100</strong> must not be used beyond the limits specified in Technical<br />
Data.<br />
3.2 Dimensions and weight (for transport)<br />
Dimensions of the shipping container:<br />
Depth:<br />
149cm<br />
Width:<br />
81cm<br />
Height:<br />
146cm<br />
Weight of transport system: approx. 510kg<br />
For detailed information on the <strong>HPM100</strong> dimensions see Appendix I.<br />
3.3 Consumption and emissions<br />
Voltage:<br />
Current:<br />
Power consumption:<br />
LN 2 consumption during cool down:<br />
LN 2 consumption in operation:<br />
LN 2 consumption per freezing process:<br />
Ethanol consumption per freezing process:<br />
Volumetric capacity of the LN 2 Dewar:<br />
Volumetric capacity of the ethanol tank:<br />
Nitrogen gas emission:<br />
Noise level during pressure build-up:<br />
Maximum noise level during the freezing process:<br />
100-130V / 50-60Hz<br />
200-240V / 50-60Hz<br />
max. 7A for 230V<br />
max. 14A for 115V<br />
max. 1200W<br />
approx. 20 liters<br />
approx. 5 liters per hour<br />
50 ml<br />
2 ml<br />
20 liters<br />
0.5 liters<br />
approx. 50m 3 per day<br />
approx. 60dB(A)<br />
approx. 75dB(A)<br />
Page 6 <strong>Leica</strong> <strong>EM</strong> <strong>HPM100</strong> Operating Manual Version 12/10
3.4 Environmental conditions for operation and storage<br />
Operating temperature:<br />
Storage temperature:<br />
Relative humidity:<br />
+15°C to +35°C<br />
+05°C to +40°C<br />
max. 85% non-condensing for operation and storage<br />
Use and store the instrument in an environment free of dust and other destructive<br />
particles.<br />
3.5 Safety information<br />
3.5.1 General instructions<br />
The <strong>Leica</strong> <strong>EM</strong> <strong>HPM100</strong> High pressure Freezer can be handled safely and easily<br />
provided it is operated in accordance with the instructions in this manual.<br />
Failure to follow these safety instructions may endanger people and the<br />
system.<br />
3.5.2 Design safety measures<br />
All mechanical components are protected by enclosures (doors, panels, etc.). These<br />
enclosures must not be opened except for servicing<br />
The <strong>Leica</strong> <strong>EM</strong> <strong>HPM100</strong> High Pressure Freezer must not be operated unless all<br />
enclosures are properly in place.<br />
3.5.3 Safety measures at the installation site<br />
The following measures must be implemented to prevent incorrect use at the<br />
installation site:<br />
• The media connections for the system must be connected at the installation<br />
location by qualified technicians.<br />
• Media must not be added or topped up except by authorized and trained<br />
personnel.<br />
• The system must not be operated except by trained and authorized technicians.<br />
• Repairs may only be made to the system by staff of the manufacturer's technical<br />
department.<br />
If the <strong>Leica</strong> <strong>EM</strong> <strong>HPM100</strong> High Pressure Freezer is installed incorrectly, the<br />
system may be damaged.<br />
Page 7 <strong>Leica</strong> <strong>EM</strong> <strong>HPM100</strong> Operating Manual Version 12/10
3.5.4 Safety measures when working with nitrogen<br />
3.5.4.1 Physical and chemical properties of nitrogen<br />
Nitrogen gas (N 2 ) is a colorless, odorless and tasteless inert gas and is not<br />
combustible. Nitrogen has no physiological effect, therefore it is not poisonous to<br />
humans and other living things. The nitrogen content of atmospheric air is approx.<br />
78%, along with approx. 21% oxygen (O 2 ). The danger of nitrogen is in the<br />
displacement of atmospheric oxygen as a result of the release of nitrogen. At less<br />
than 17% O 2 depending on the duration of inhalation and the value of the actual<br />
oxygen concentration, symptoms of drowsiness, uneasiness, nausea, high blood<br />
pressure and breathing difficulties culminating in unconsciousness will occur. If an<br />
unconscious person remains in a low-oxygen environment, death will result. In a<br />
virtually pure nitrogen atmosphere unconsciousness is immediate (with no warning<br />
by odor), followed shortly after by death.<br />
Cold liquid nitrogen (LN 2 ) is a very cold liquid (boils at –196°C), it is colorless,<br />
odorless, non-reactive and non-combustible. Escaping cold (~ –190°C) nitrogen gas<br />
(GN 2 ) is initially heavier than air and may accumulate near the floor and in lower<br />
areas. When the gas is released a cold fog is formed by condensation and freezing of<br />
moisture in the air, which can spread out over a wide area. If the gas warms up to<br />
room temperature, it is somewhat lighter than air. If the ventilation is inadequate the<br />
oxygen will be replaced.<br />
Evaporation of one liter of liquid nitrogen generates about 0.75m 3 of nitrogen gas.<br />
3.5.4.2 Dangers of nitrogen<br />
• Cold damage: freezing, frost blisters and serious eye damage on direct contact:<br />
o with liquid nitrogen<br />
o with the escaping cold gas or the resulting fog<br />
o with objects or surfaces that have come into contact with liquid nitrogen or<br />
escaping gas (e.g. pipe joints, tubes, valves, tanks, metallic surfaces etc.).<br />
• Freezing to cold surfaces (e.g. metal) on direct contact.<br />
• Headache, nausea, sleepiness, breathing difficulties<br />
• Unconsciousness with no irritation or warning effect, as a result of oxygen<br />
depletion (i.e., less than 17% O2).<br />
• Ice formation on frozen plugs or other gas-tight Dewar flasks can prevent the<br />
evaporation of nitrogen. If this container is shaken or moved, explosive release of<br />
nitrogen gas (delayed boiling) may rupture the container.<br />
• Uncontrolled boiling and increased vaporization of liquid nitrogen may occur if<br />
damaged or poorly insulated Dewar flasks are used.<br />
• When warm objects are cooled in LN 2 , an insulating gas layer will first form around<br />
the object, and slow the heat transfer (minimal boiling of nitrogen). However, when<br />
the object is cooled beyond a certain point, strong boiling often occurs<br />
unexpectedly and liquid nitrogen may be sprayed out.<br />
Page 8 <strong>Leica</strong> <strong>EM</strong> <strong>HPM100</strong> Operating Manual Version 12/10
• Accidental release of liquid nitrogen resulting from material damage caused by<br />
some steels and organic materials (plastic, rubber etc.) becoming brittle by<br />
exposure to cold<br />
• Glass Dewar flasks are very sensitive to impact and may burst even if lightly<br />
touched by metal instruments. (Temperature tension because of the high<br />
conductivity of metal)<br />
• O 2 enrichment may occur at the exterior walls of non-insulated tanks and<br />
pipes.<br />
o Creates a fire and explosion hazard if a container is open and during use<br />
where organic substances are present. The vaporizing, very fire-promoting<br />
liquid oxygen may cause spontaneous combustion. Oxygen enrichment can<br />
be recognized by a slight bluish coloring of the liquid nitrogen.<br />
3.5.4.3 Safety precautions and rules for use<br />
• Ensure good ventilation at all times.<br />
• Do not actuate isolation valves on Dewar tanks suddenly, check regularly for<br />
leaks.<br />
• Fill liquid nitrogen only into clean, completely dry containers and apparatus.<br />
• Use only intact Dewar flasks: check the insulation of the flasks regularly by the<br />
vaporization rate. Light boiling at the container walls is an indication of poor<br />
insulation.<br />
• Never seal Dewar flasks with gas-tight covers without a safety valve. Use only<br />
easily operated covers designed for Dewar flasks. Never use closures with a<br />
gasket.<br />
• Thaw ice on apparatus and containers with warm air or hot water only, never use a<br />
flame or red-hot objects.<br />
• If possible, do not use glass Dewar flasks, and particularly do not use glass Dewar<br />
flasks with a capacity greater than 2L. Dewar flasks of metal are preferred.<br />
• Use lightly covered Dewar flasks with a sheet metal mantle for small volumes.<br />
• Large storage containers of stainless steel (over 10L capacity) must be fitted with<br />
a tilt mechanism or a lever system.<br />
• Store containers in a cool, well-ventilated place.<br />
• Provide a fresh-air feed in case of possible enrichment of N2 gas. If applicable,<br />
provide an exhaust system.<br />
• Use only freshly prepared colorless liquid nitrogen.<br />
• Do not spill it when filling and transferring.<br />
• Do not fill container past the fill level with liquid nitrogen. Fill Dewar flasks with a<br />
bottleneck only to clearly below the neck (please note that the length of the Dewar<br />
neck may be different from the length of the lagging).<br />
• Allow overfull flasks to empty partially by leaving them open.<br />
• Do not immerse objects at room temperature in liquid nitrogen.<br />
• Cover small barrels and specimen chambers immediately after use with light<br />
covers that are not gas tight to prevent condensation of oxygen (fire hazard). Move<br />
closed unpressurized containers slowly to prevent spray or overflow.<br />
• Transport only in high-quality insulated containers for very cold gases (cryoflasks).<br />
• Secure containers to prevent falling.<br />
• Avoid any damage and unnecessary agitation.<br />
• Only sealed, unpressurized metal Dewar flasks are permitted in elevators.<br />
Page 9 <strong>Leica</strong> <strong>EM</strong> <strong>HPM100</strong> Operating Manual Version 12/10
• Wear a face shield or safety glasses (open above and below, not enclosed<br />
glasses).<br />
• Wear cryo gloves or leather work gloves with a very long sleeve.<br />
• Always wear a floor-length PE apron when pouring from Dewar flasks.<br />
Do not allow liquid nitrogen to penetrate into or under protective clothing.<br />
Penetrating N 2 will vaporize immediately and cause serious freezing injuries<br />
before the protective clothing can be removed. If possible, keep the sleeve over<br />
the top of the safety gloves and do not use protective clothing that could be<br />
penetrated by liquid nitrogen.<br />
3.5.5 Residual hazards<br />
The <strong>Leica</strong> <strong>EM</strong> <strong>HPM100</strong> High Pressure Freezer represents the latest technology and<br />
conforms to recognized safety regulations: even so, hazards still exist.<br />
All modifications and conversions to the system are prohibited!<br />
Objects may fall into the system in spite of all possible precautions. In this<br />
case stop the system and switch off the main switch. If the search for the<br />
object that has fallen in is not successful, inform the service department before<br />
continuing to work with the system. Continuing operation may cause damage<br />
to the system.<br />
Install or update software only with data media supplied by <strong>Leica</strong><br />
Microsystems.<br />
When handling toxic or human pathogenic substances observe the biohazard<br />
regulations.<br />
3.5.6 Qualification of operating personnel<br />
The operating personnel must be familiar with and follow the recognized rules for<br />
safety at work.<br />
The operating personnel tasked with operating and maintaining the <strong>Leica</strong> <strong>EM</strong><br />
<strong>HPM100</strong> High Pressure Freezer must satisfy the specific professional requirements<br />
for their respective duties.<br />
The operating personnel must have received training and must be familiar with the<br />
duties that have been assigned to them and for which they are responsible.<br />
The professional profiles for operating personnel responsible for the system are<br />
outlined in the following.<br />
Operator (user class 2)<br />
Personnel with technical training, able to perform simple tasks, i.e., operate the <strong>Leica</strong><br />
<strong>EM</strong> <strong>HPM100</strong> High Pressure Freezer and load and unload samples.<br />
Administrator (user class 1)<br />
Page 10 <strong>Leica</strong> <strong>EM</strong> <strong>HPM100</strong> Operating Manual Version 12/10
Staff with technical training, able to perform the tasks of qualification 2, and also<br />
typical simple maintenance, adjustment and startup activities with protective devices<br />
switched off as well as restarting the system.<br />
Manufacturer's technician (<strong>Leica</strong> Microsystems – user class 0)<br />
Trained technician provided by the manufacturer, who is able to carry out more<br />
complex work in exceptional situations or in cases where such has been agreed with<br />
the user.<br />
3.5.7 Emergency procedure<br />
In case of faults, the display shows an error message that describes the<br />
recommended procedure for correcting the fault.<br />
If unusual operating conditions or unaccustomed noises occur, the system may be<br />
switched off using the main system switch.<br />
If firefighting measures are called for, a CO 2 fire extinguisher must be used.<br />
The Technical Service must be consulted before resuming work with the system.<br />
Page 11 <strong>Leica</strong> <strong>EM</strong> <strong>HPM100</strong> Operating Manual Version 12/10
4. Preparing the system for use<br />
4.1 Transportation and storage conditions<br />
The <strong>Leica</strong> <strong>EM</strong> <strong>HPM100</strong> High Pressure Freezer is delivered properly packed and in<br />
the semi-assembled state. The customer must check the condition of the system<br />
upon delivery and file a damage report with the shipping company if the equipment is<br />
damaged. The customer must immediately inform the manufacturer of any possible<br />
damage in transit.<br />
The system must be positioned upright for transporting.<br />
The overall weight including packaging is approx. 510 kg.<br />
The packed equipment must be stored in clean, dry areas at temperatures between<br />
5° and 40°C and must not be exposed to aggressive substance that could cause<br />
corrosion.<br />
4.2 Installation conditions<br />
4.2.1 Work area conditions<br />
The system must be installed on a level horizontal base. There must be a specific<br />
clearance around it.<br />
The minimum working distances are 20 cm at the back and to the right and 60<br />
cm at the front and left.<br />
4.2.2 Connection conditions<br />
The following connections must be assured:<br />
• power supply 100-130V / 50-60Hz for <strong>Leica</strong> <strong>EM</strong> <strong>HPM100</strong> UVN<br />
• power supply 200-240V / 50-60Hz for <strong>Leica</strong> <strong>EM</strong> <strong>HPM100</strong> EVN<br />
Page 12 <strong>Leica</strong> <strong>EM</strong> <strong>HPM100</strong> Operating Manual Version 12/10
4.3 Installing, assembling and commissioning<br />
The packaged <strong>Leica</strong> <strong>EM</strong> <strong>HPM100</strong> High Pressure Freezer must be transported with a<br />
forklift truck or a pallet hoist.<br />
4.3.1 Unpacking and assembling the parts<br />
After selecting the installation location, remove the top cover and all side panels of<br />
the wooden crate.<br />
Remove the packaging material in the crate. Do not remove plastic packaging from<br />
around the machine. Place all included boxes in a secure place to the side.<br />
Page 13 <strong>Leica</strong> <strong>EM</strong> <strong>HPM100</strong> Operating Manual Version 12/10
Remove the screws and remove the wooden brace at the front of the machine.<br />
Remove the screws from the sides of the top wood wedges and remove the wedges<br />
from under the system.<br />
Page 14 <strong>Leica</strong> <strong>EM</strong> <strong>HPM100</strong> Operating Manual Version 12/10
Use the two wedges as a ramp to roll the <strong>Leica</strong> <strong>EM</strong> <strong>HPM100</strong> to the floor from the<br />
pallet.<br />
Release the roller brakes and carefully move the system down the ramps to the floor.<br />
Never do this alone. The heavy weight of the <strong>Leica</strong> <strong>EM</strong> HPM 100 High Pressure<br />
Freezer may be hazardous to persons if it tilts or when moving it on slopes.<br />
Carefully unpack the boxes with the disassembled parts of the system. Check with<br />
the packing slip that all parts are included and check for damage.<br />
Page 15 <strong>Leica</strong> <strong>EM</strong> <strong>HPM100</strong> Operating Manual Version 12/10
Remove the plastic packaging from the <strong>Leica</strong> <strong>EM</strong> <strong>HPM100</strong>.<br />
Loosely fasten the metal support to the loading station with 2 bolts and washers<br />
(6mm hex).<br />
Page 16 <strong>Leica</strong> <strong>EM</strong> <strong>HPM100</strong> Operating Manual Version 12/10
Fasten the worktop to the loading station of the <strong>Leica</strong> <strong>EM</strong> <strong>HPM100</strong> with the supplied<br />
bolts.<br />
The long bolt attaches through the metal support. Tighten all 7 bolts.<br />
Page 17 <strong>Leica</strong> <strong>EM</strong> <strong>HPM100</strong> Operating Manual Version 12/10
Undo the loading mechanism from the lever axis by removing the two (2mm hex)<br />
bolts.<br />
Loading<br />
mechanism<br />
Lever axis<br />
Place the loading mechanism into the loading station.<br />
Page 18 <strong>Leica</strong> <strong>EM</strong> <strong>HPM100</strong> Operating Manual Version 12/10
Insert the lever axis through the worktop and the loading mechanism.<br />
Fix the lever axis to the loading mechanism of the loading station with the two hex<br />
bolts.<br />
Page 19 <strong>Leica</strong> <strong>EM</strong> <strong>HPM100</strong> Operating Manual Version 12/10
Unpack the box containing the stereomicroscope, two eye pieces, support ring and<br />
ring-light.<br />
Place the stereomicroscope support ring onto the microscope column.<br />
Page 20 <strong>Leica</strong> <strong>EM</strong> <strong>HPM100</strong> Operating Manual Version 12/10
Place the stereomicroscope into the support ring.<br />
Fasten the stereomicroscope to the support ring.<br />
Page 21 <strong>Leica</strong> <strong>EM</strong> <strong>HPM100</strong> Operating Manual Version 12/10
Remove the eye piece caps.<br />
Attach the eye piece to the stereomicroscope.<br />
Page 22 <strong>Leica</strong> <strong>EM</strong> <strong>HPM100</strong> Operating Manual Version 12/10
Attach the ring-light to the outside of the objective lens.<br />
Connect the cable from the microscope column to the ring-light.<br />
Page 23 <strong>Leica</strong> <strong>EM</strong> <strong>HPM100</strong> Operating Manual Version 12/10
Unscrew the back panel of the <strong>Leica</strong> <strong>EM</strong> <strong>HPM100</strong> leaving the bottom screws in<br />
place.<br />
Leave the bottom<br />
screws in place<br />
Fasten the handle to the back panel from the inside of the <strong>Leica</strong> <strong>EM</strong> <strong>HPM100</strong> with<br />
the supplied bolts.<br />
Page 24 <strong>Leica</strong> <strong>EM</strong> <strong>HPM100</strong> Operating Manual Version 12/10
4.3.2 Setup<br />
The <strong>Leica</strong> <strong>EM</strong> <strong>HPM100</strong> is moved to the installation location on the integrated rollers.<br />
Release the roller brakes and set them again once the final position has been<br />
reached.<br />
The back rollers have a fixed direction. The front rollers can swivel for steering<br />
the <strong>Leica</strong> <strong>EM</strong> <strong>HPM100</strong> when it is being moved.<br />
Avoid moving the <strong>Leica</strong> <strong>EM</strong> <strong>HPM100</strong> over slopes and uneven ground. The<br />
system must never be tilted more than 3°.<br />
The system must be installed on a hard floor or on a floor plate that is at least 100 cm<br />
deep and 70 cm wide.<br />
Sufficient space is required to allow comfortable operation of the <strong>Leica</strong> <strong>EM</strong> <strong>HPM100</strong><br />
and also for maintenance and service. Reserve a minimum working distance of 20<br />
cm at the back and right and 60 cm at the front and left.<br />
4.3.3 Safe storage of the packing material<br />
The packing material for the <strong>Leica</strong> <strong>EM</strong> <strong>HPM100</strong> must be kept safely for use if the<br />
system is shipped again, since the system may be damaged if it is not transported in<br />
the original packing. Store the packaging for the parts and the floor of the crate with<br />
the side panels of the lagging.<br />
4.3.4 Electrical connections<br />
The electrical terminal is on the back of the <strong>Leica</strong> <strong>EM</strong> <strong>HPM100</strong>. Power is supplied via<br />
a connector for non-heating appliances. Install a country-specific electrical plug to<br />
connect the power supply at the installation location.<br />
4.3.5 Commissioning<br />
The <strong>Leica</strong> <strong>EM</strong> <strong>HPM100</strong> is commissioned by employees of <strong>Leica</strong> Microsystems<br />
and specially trained and authorized technicians.<br />
Before commissioning the system, carry out the following steps:<br />
• unpack the <strong>Leica</strong> <strong>EM</strong> <strong>HPM100</strong><br />
• install the high pressure freezer<br />
• connect the power<br />
Once the above steps have been completed, commissioning involves following the<br />
operator actions to ensure the machine is functioning properly.<br />
4.3.6 Repacking to prevent damage during transportation<br />
To disassemble and pack the system, carry out the steps for assembly and<br />
unpacking in reverse order.<br />
Page 25 <strong>Leica</strong> <strong>EM</strong> <strong>HPM100</strong> Operating Manual Version 12/10
5. Operating instructions<br />
5.1 Introduction<br />
The formation of ice crystals can be greatly reduced if the specimen is subjected to a<br />
pressure of 2100 bar before the freezing process has started. Aqueous specimens<br />
can be frozen without ice crystals up to a thickness of 200 µm. Pressure may cause<br />
changes in the physical and chemical equilibrium, such as dissociation or the<br />
reactivity of enzymes. This must be prevented to immobilize the specimen in as close<br />
to a natural state as possible. The pressure should be applied as quickly as possible<br />
and once the specimen is under 2100 bar it should be cooled to at least –140 °C as<br />
quickly as possible. Below this temperature amorphous (vitrified) ice remains stable.<br />
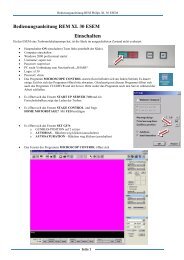
The diagram (Kanno et al. 1975) shows the stable states of water depending on<br />
pressure and temperature. The melting temperature and the temperature for<br />
homogenous nucleation reach a minimum at 2100 bar. At this pressure water can be<br />
supercooled to -90 °C and changes to a very viscous liquid. I, II and III show ranges<br />
in which H 2 O is present as hexagonally oriented ice.<br />
5.2 Operating the <strong>Leica</strong> <strong>EM</strong> <strong>HPM100</strong><br />
The next section explains the complete freezing process in detail.<br />
5.2.1 Switching on the system<br />
Close all valves at the back of the machine. Switch on the system at the main switch<br />
on the front panel. The compressor starts to build up the operating pressure. This can<br />
take up to 15 minutes if there is no residual air pressure in the machine.<br />
Page 26 <strong>Leica</strong> <strong>EM</strong> <strong>HPM100</strong> Operating Manual Version 12/10
Close valves at the back of the machine.<br />
Position of main switch<br />
Main switch<br />
Page 27 <strong>Leica</strong> <strong>EM</strong> <strong>HPM100</strong> Operating Manual Version 12/10
If a USB stick is connected to the port on the front panel, the process parameters for<br />
every freezing cycle will be saved in the selected directory.<br />
If the USB stick is not connected the process parameters will be displayed following<br />
each freezing cycle, but will not be saved.<br />
Connection for<br />
the USB stick<br />
If you use a directory name that has already been used with the USB stick the<br />
older process parameter will be overwritten!<br />
Create a directory name using the touch screen. Press Enter to confirm the name. Up<br />
to 8 characters can be used.<br />
Page 28 <strong>Leica</strong> <strong>EM</strong> <strong>HPM100</strong> Operating Manual Version 12/10
After pressing “ENTER” on the “directory screen” the following display will appear.<br />
Add isopropanol or absolute ethanol to the <strong>Leica</strong> <strong>EM</strong> <strong>HPM100</strong>.<br />
The tank must be filled with 100% isopropanol or absolute ethanol only!<br />
To add isopropanol or absolute ethanol slide the microscope to the right until it<br />
comes to a stop.<br />
Page 29 <strong>Leica</strong> <strong>EM</strong> <strong>HPM100</strong> Operating Manual Version 12/10
Open the front safety cover and prop it using the cover support lock.<br />
Cover support lock<br />
Alcohol tank<br />
Unscrew the alcohol tank cap and fill the tank with 40ml isopropanol or absolute<br />
ethanol.<br />
After filling, screw the tank lid closed (hand tight only). Close the safety cover by<br />
pushing the cover support back to release the lock.<br />
Page 30 <strong>Leica</strong> <strong>EM</strong> <strong>HPM100</strong> Operating Manual Version 12/10
The touch screen shows a “wait for air pressure” message until the compressor has<br />
built up the operating pressure.<br />
Page 31 <strong>Leica</strong> <strong>EM</strong> <strong>HPM100</strong> Operating Manual Version 12/10
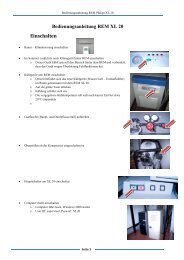
Once the operating pressure has been reached the main touch screen will appear.<br />
Settings can be made with the main touch screen. See Section 5.4.7.<br />
Buttons always have a light background and open a new window when pressed.<br />
2<br />
3<br />
1<br />
4<br />
5<br />
6<br />
7<br />
8<br />
9<br />
10<br />
1 status display(During the cooling process the main screen shows "wait for cool<br />
down“)<br />
2 alcohol On/Off display<br />
3 cycle counter<br />
4 storage Dewar fill level display<br />
5 actual temperature in process chamber<br />
6 button for setpoint temperature in process chamber<br />
7 directory selection button<br />
8 file name display for saving the process data<br />
9 service button (access for service technicians only)<br />
10 system button (includes draining and bake-out)<br />
Page 32 <strong>Leica</strong> <strong>EM</strong> <strong>HPM100</strong> Operating Manual Version 12/10
5.2.2 Cooling the system<br />
The <strong>Leica</strong> <strong>EM</strong> <strong>HPM100</strong> is cooled with LN 2 while the system is reaching operating<br />
pressure.<br />
Add liquid nitrogen to the storage Dewar. Use caution as rapid LN 2 evaporation<br />
during the first cooling stages can cause splashing of the LN 2 .<br />
A small pop-up rod in the top cover rises when the Dewar is completely full of LN 2 .<br />
Page 33 <strong>Leica</strong> <strong>EM</strong> <strong>HPM100</strong> Operating Manual Version 12/10
The display on the main screen shows the “LN 2 Storage” level as a percentage.<br />
The internal LN 2 pump will start when the storage Dewar registers at least 30% full.<br />
The current status is displayed in the top left corner of the main screen.<br />
Fill the specimen Dewar with liquid nitrogen before freezing.<br />
After cryofixation, the frozen sample is automatically released into the specimen<br />
Dewar.<br />
Drawer for removable<br />
specimen Dewar<br />
Note: Freezing can not take place if the specimen Dewar is not filled with LN 2 .<br />
Page 34 <strong>Leica</strong> <strong>EM</strong> <strong>HPM100</strong> Operating Manual Version 12/10
Fill the specimen Dewar with liquid nitrogen before freezing.<br />
Open the specimen Dewar drawer by pulling the drawer away from the machine.<br />
Position the LN 2 filled specimen Dewar firmly against the metal holder and then close<br />
the drawer.<br />
Specimen LN Dewar<br />
Metal holder<br />
When the system is fully cooled (approximately 30 minutes after the internal LN 2<br />
pump starts) and the small LN 2 Dewar is filled, the main screen shows “ready for<br />
freezing” in the top left corner. The freezing process can begin.<br />
5.2.3 Inserting the specimen holder in the loading station<br />
The loading mechanism must be open to insert the three-piece cartridge consisting of<br />
an upper cylinder, carrier plate and lower cylinder.<br />
Open the loading mechanism by rotating it towards you into the front locking position<br />
with the loading lever.<br />
Hold the bottom half of the closure with the right forefinger and turn the top half to a<br />
vertical position with the loading lever.<br />
Front locking<br />
position of the<br />
loading<br />
mechanism<br />
Loading lever<br />
Page 35 <strong>Leica</strong> <strong>EM</strong> <strong>HPM100</strong> Operating Manual Version 12/10
Insert the upper and lower cylinder into the loading mechanism. The upper cylinder is<br />
placed in the top closure and the lower cylinder is placed in the bottom closure. A pin<br />
in the bottom closure ensures it is placed correctly.<br />
Place the carrier plate onto the lower cylinder. Note that the side openings of the<br />
carrier plate match with the side openings of the lower cylinder.<br />
Upper<br />
cylinder<br />
Side openings<br />
Lower cylinder<br />
Carrier plate<br />
If the carrier plate is incorrectly oriented it will be damaged when the specimen<br />
is ejected.<br />
Page 36 <strong>Leica</strong> <strong>EM</strong> <strong>HPM100</strong> Operating Manual Version 12/10
5.2.4 Inserting specimen and carriers into the specimen cartridge<br />
The <strong>Leica</strong> <strong>EM</strong> <strong>HPM100</strong> requires two specimen carriers for standard freezing. The<br />
following section explains the insertion of the standard 3 mm specimen carriers (Type<br />
A and B). For more detail and insertion of different specimen carriers, e.g. Type C or<br />
others please see the relevant data sheet.<br />
Specimen<br />
carrier and<br />
specimen<br />
Place a type A specimen carrier into the round hole of the carrier plate with the<br />
hollow section of the specimen carrier facing upwards.<br />
Place the specimen into the Type A specimen carrier. Make sure that the specimen<br />
does not extend above the well in the carrier and that the space inside the carrier is<br />
completely filled and there are no air bubbles.<br />
Place a type B specimen carrier with the smooth side down onto the Type A carrier<br />
containing the specimen. Make sure that the carriers are even with the plane of the<br />
carrier plate.<br />
The carrier must be completely filled with liquid (eg Hexadecen, culture media,<br />
cryoprotectant, etc) before freezing<br />
When the carriers are in place, rotate the loading lever so that the top closure locks<br />
(clicks) into the bottom.<br />
Page 37 <strong>Leica</strong> <strong>EM</strong> <strong>HPM100</strong> Operating Manual Version 12/10
The loading mechanism is now closed and the sample is ready for freezing.<br />
5.2.5 Starting the automatic freezing process<br />
Rotate the loading lever 180°C until the process button is in position.<br />
Process<br />
button<br />
Page 38 <strong>Leica</strong> <strong>EM</strong> <strong>HPM100</strong> Operating Manual Version 12/10
Push the process button to start the freezing process.<br />
The microscope must not be used during the freezing process. The motion of<br />
the device may cause injury to the eyes.<br />
After cryo-fixation the three-piece cartridge and specimen carriers are automatically<br />
ejected into the specimen Dewar and are ready for transfer (see Section 5.3.4). The<br />
freezing process is now complete.<br />
Page 39 <strong>Leica</strong> <strong>EM</strong> <strong>HPM100</strong> Operating Manual Version 12/10
5.3 Actions following the freezing process<br />
5.3.1 Checking the processing quality based on process data<br />
After the freezing process has finished, the following measurement parameters can<br />
be read on the main screen:<br />
Rise Time - The time [ms] it took for the pressure to rise to 2100 bar<br />
Shift p/T - The time [ms] between when pressure rose above 2100 bar and when<br />
the temperature dropped below -100 °C<br />
HP Dwell - The time [ms] from when the pressure rose past 2100 bar until it<br />
dropped back down below 2100 bar<br />
Cooling - The cooling speed [°C/s]<br />
Display of measurement parameters:<br />
The measurement values for temperature and pressure can also be viewed as a<br />
graph. To display the graph press the GRAPH button at the bottom left.<br />
Display of measurement as curves:<br />
Page 40 <strong>Leica</strong> <strong>EM</strong> <strong>HPM100</strong> Operating Manual Version 12/10
The first 500 ms are shown. At the left is the axis for the temperature and on the right<br />
the axis for the pressure. The top curve shows the pressure trend, the bottom the<br />
temperature trend. To display the first 20 ms press the DETAILS button.<br />
Display of measurement curves in detail:<br />
Press VALUES button to return to the main screen.<br />
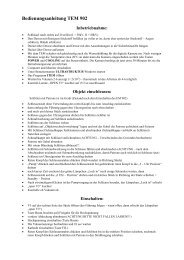
5.3.2 Documentation of freezing processes<br />
If a USB stick was connected before starting the freezing process, all processing data<br />
are saved to the selected directory under the displayed name (e.g. 002.xls). These<br />
files can be opened with Microsoft Excel and other programs. The following picture<br />
shows an extract from such a file. The header contains general information such as<br />
date and time. Pressure and temperature data are shown below. A value is saved<br />
every 50 µs for the first 50 ms, then every 2.5 ms.<br />
Overview of saved data:<br />
<strong>Leica</strong><br />
Microsystems 17/10/2010 08:21<br />
<strong>HPM100</strong> Version V4.06<br />
Directory name hpm100<br />
Filename<br />
001.xls<br />
Rise time 4.0 ms<br />
Shift p/T 1.1 ms<br />
hp Dwell 310.4 ms<br />
Cooling rate 13986 °C/s<br />
============ ============ ============<br />
time [µs] pressure [bar] temperature[°C]<br />
0 60 18<br />
50 65 18<br />
100 72 20<br />
150 77 20<br />
Page 41 <strong>Leica</strong> <strong>EM</strong> <strong>HPM100</strong> Operating Manual Version 12/10
5.3.3 Separating and sorting specimen carriers<br />
At the end of the freezing process the upper and lower cylinder can be removed from<br />
the specimen Dewar and heated. Clean the cylinders with a lint-free paper towel.<br />
Handling the carrier plate with the frozen sample in it is explained in the following<br />
section.<br />
5.3.4 Transferring the frozen specimens<br />
Place the inset for sample carrier release (3 mm, 4.5 mm or 6 mm respectively) and<br />
the specimen container in the metal bath. Connect the lever by screwing it to the<br />
punching device.<br />
Fill the bath with LN 2 and allow all parts to cool before transferring the specimens.<br />
The container has six numbered storage positions.<br />
Page 42 <strong>Leica</strong> <strong>EM</strong> <strong>HPM100</strong> Operating Manual Version 12/10
Position the carrier plate (arresting the frozen specimen) in the slot of the inset using<br />
cold forceps. Push the carrier plate into the guide until it stops.<br />
Punching<br />
tool<br />
Carrier plate slot<br />
Page 43 <strong>Leica</strong> <strong>EM</strong> <strong>HPM100</strong> Operating Manual Version 12/10
Push the lever forward.<br />
The specimen carrier is ejected from the carrier plate into a small specimen container<br />
within the insert where they can be retrieved from.<br />
Transfer the released specimen in specimen container under the desired<br />
number.<br />
5.3.5 Switching off the system<br />
Once all freezing is complete, the <strong>Leica</strong> <strong>EM</strong> <strong>HPM100</strong> can be shut down. If the<br />
machine will not be used for several days it is safe to simply turn off the power and let<br />
the LN 2 evaporate and the machine gradually warm to room temperature. If the <strong>Leica</strong><br />
<strong>EM</strong> <strong>HPM100</strong> is to be used within the next 24 hours, the following drain and bake-out<br />
protocol should be followed.<br />
Page 44 <strong>Leica</strong> <strong>EM</strong> <strong>HPM100</strong> Operating Manual Version 12/10
5.3.5.1 Draining the LN 2 Dewars<br />
The <strong>Leica</strong> <strong>EM</strong> <strong>HPM100</strong> operates with two LN 2 Dewars, one storage Dewar (20 ltr)<br />
and a process Dewar (10 ltr).<br />
Two valves at the back panel of the instrument allow draining of both Dewars.<br />
Storage Dewar<br />
drain valve<br />
Process Dewar<br />
drain valve<br />
Place a small Dewar or LN 2 bucket under the hose and open the storage and/or<br />
process Dewar valves to drain the LN 2 . The LN 2 can be used for other purposes or<br />
disposed of.<br />
Before commissioning the instrument again, close both the storage and process<br />
Dewar valves.<br />
Page 45 <strong>Leica</strong> <strong>EM</strong> <strong>HPM100</strong> Operating Manual Version 12/10
5.3.5.2 Bake out of the system<br />
Once the storage Dewar has reached a level of below 20%, select SYST<strong>EM</strong> from the<br />
main screen.<br />
Select AIR HEATER ON display button to activate the heating cycle.<br />
The 80°C heating cycle will only start when the chamber temperature warms to 10°C.<br />
Page 46 <strong>Leica</strong> <strong>EM</strong> <strong>HPM100</strong> Operating Manual Version 12/10
When the heating cycle is activated the status display reads “air heater working”.<br />
The screen displays the cycle time left (starting at 8000 seconds), and the<br />
temperatures of the air inlet, draw tube, storage Dewar and the connecting pipe<br />
(in °C).<br />
The bake-out will automatically terminate after reaching the end of the cycle leaving<br />
the instrument ready for the next use. Once the cycle is complete, the machine<br />
switches back to the standard screen.<br />
Note: Leave the main power on for the heating cycle to run.<br />
The heating cycle can be terminated at any time by pressing “Air Heater Off”.<br />
During the bake-out cycle DO NOT turn the system and main power off for this<br />
will terminate the bake-out and the bake-out cycle.<br />
Page 47 <strong>Leica</strong> <strong>EM</strong> <strong>HPM100</strong> Operating Manual Version 12/10
5.4 Changing settings on the main screen<br />
Certain parameters and settings can be changed on the main screen and are<br />
explained below.<br />
5.4.1 Change directory for saving settings<br />
To change the current directory press the current directory name on the main screen.<br />
The new directory is ready for input.<br />
Confirm your input by pressing Enter.<br />
Page 48 <strong>Leica</strong> <strong>EM</strong> <strong>HPM100</strong> Operating Manual Version 12/10
5.4.2 Reset cycle counter<br />
The cycle counter starts from zero when the system is switched on. The counter can<br />
also be reset manually during operation.<br />
To reset the cycle counter press the “cycle no.” counter button in the top right corner.<br />
Confirm the reset by pressing YES.<br />
Resetting the cycle number does not influence the file name in which the process<br />
data are saved when a USB stick is connected.<br />
Page 49 <strong>Leica</strong> <strong>EM</strong> <strong>HPM100</strong> Operating Manual Version 12/10
5.4.3 Changing the temperature of the process chamber<br />
The temperature of the process chamber can be controlled. The current nominal and<br />
actual values of the cryo chamber can be read on the main screen.<br />
To change the temperature of the process chamber press the nominal temperature<br />
button.<br />
Increase or decrease the temperature using the two arrow buttons.<br />
Confirm the temperature by pressing the nominal temperature and the main screen<br />
will appear.<br />
Page 50 <strong>Leica</strong> <strong>EM</strong> <strong>HPM100</strong> Operating Manual Version 12/10
5.4.4 Turning off the alcohol<br />
A freezing process can be carried out without alcohol if needed.<br />
To turn off the alcohol select SYST<strong>EM</strong> from the main screen (see 5.3.5.2) and press<br />
ALCOHOL ON.<br />
The display button changes to ALCOHOL OFF.<br />
Page 51 <strong>Leica</strong> <strong>EM</strong> <strong>HPM100</strong> Operating Manual Version 12/10
The machine is ready to freeze without alcohol, which is indicated on the main<br />
screen.<br />
Page 52 <strong>Leica</strong> <strong>EM</strong> <strong>HPM100</strong> Operating Manual Version 12/10
6. Servicing and cleaning<br />
Servicing and cleaning<br />
• preserves the perfect condition and operating readiness of the system,<br />
• increases the system's rate of use by avoiding downtime;<br />
• enables efficient planning of maintenance work and materials.<br />
6.1 Draining fluids<br />
There are three valves on the back lower panel of the <strong>Leica</strong> <strong>EM</strong> <strong>HPM100</strong><br />
The FRESH ALCOHOL OUT valve drains the pure (clean) alcohol from the alcohol<br />
tank.<br />
The WASTE ALCOHOL OUT valve drains the collected waste (used) alcohol and<br />
should be drained into a beaker and disposed of in accordance with local chemical<br />
disposal guidelines. The valve should be opened slowly and carefully.<br />
The AIR PRESSURE OUT valve releases the air pressure from the reserve tank. The<br />
power should be turned off before opening this valve. It is only necessary to release<br />
the air pressure if the instrument is going to be shipped<br />
6.2 Cleaning the <strong>Leica</strong> <strong>EM</strong> <strong>HPM100</strong><br />
It is recommended to periodically wipe the machine with a mild cleaning solution and<br />
a soft cloth. Use of solvents will damage the finish.<br />
Page 53 <strong>Leica</strong> <strong>EM</strong> <strong>HPM100</strong> Operating Manual Version 12/10
7. Messages during operation<br />
7.1 Standard messages during operation<br />
Message Explanation Solution<br />
Close safety cover Safety cover is open Close safety cover<br />
Wait for air pressure<br />
Wait for storage<br />
pressure<br />
The machine has not<br />
reached operating<br />
pressure<br />
The machine has not<br />
reached storage pressure<br />
Wait for the machine<br />
to reach operating<br />
pressure<br />
Wait for the machine<br />
to reach storage<br />
pressure<br />
7.2 Error messages during operation<br />
Message Explanation Solution<br />
INIT Rotor The rotor is out of position Press the Init button<br />
Check specimen holder<br />
INIT HP Cylinder<br />
Refill Alcohol<br />
Close LN 2 storage<br />
Dewar<br />
Refill LN 2 storage Dewar<br />
Check Drawer LN 2<br />
Dewar<br />
Check Process<br />
Chamber<br />
Cartridge is not loaded or<br />
the specimen was lost<br />
before the freezing<br />
process<br />
The cylinder is out of<br />
position<br />
The alcohol level is low<br />
The LN 2 specimen Dewar<br />
drawer is open<br />
The specimen Dewar is<br />
empty or the level of LN 2<br />
is low<br />
The specimen Dewar is<br />
missing<br />
The cartridge is lost after<br />
the freezing process<br />
Open the safety cover.<br />
Remove the lost<br />
cartridge pieces from<br />
the rotor. Press exit.<br />
Press INIT<br />
Open safety cover and<br />
refill the alcohol tank<br />
Close the LN 2<br />
specimen Dewar<br />
drawer<br />
Fill the specimen<br />
Dewar with LN 2 or<br />
position the specimen<br />
Dewar firmly against<br />
the metal holder<br />
Place the specimen<br />
Dewar in the drawer<br />
and fill with LN 2<br />
Open the safety cover.<br />
Remove the lost<br />
cartridge pieces from<br />
the process chamber<br />
or the rotor.<br />
In the event other error messages appear on your <strong>Leica</strong> <strong>EM</strong> <strong>HPM100</strong> touch screen,<br />
please contact your local service representative.<br />
Page 54 <strong>Leica</strong> <strong>EM</strong> <strong>HPM100</strong> Operating Manual Version 12/10
8. Appendix I<br />
Numbers show dimensions in millimeters.<br />
Page 55 <strong>Leica</strong> <strong>EM</strong> <strong>HPM100</strong> Operating Manual Version 12/10
Numbers show dimensions in millimeters.<br />
Page 56 <strong>Leica</strong> <strong>EM</strong> <strong>HPM100</strong> Operating Manual Version 12/10
EC Declaration<br />
EC Declaration of Conformity<br />
EG Konformitäts-Erklärung<br />
Déclaration CE de Conformité<br />
We/Wir/Nous<br />
<strong>Leica</strong> Mikrosysteme GmbH<br />
Hernalser Hauptstrasse 219<br />
A-1170 Wien, Austria<br />
declare in exclusive responsibility that the product<br />
erklären in alleiniger Verantwortung, dass das Produkt<br />
déclarons sous notre seule responsabilité que le produit<br />
Model<br />
Modell<br />
modèle<br />
<strong>EM</strong> <strong>HPM100</strong><br />
<strong>EM</strong> <strong>HPM100</strong><br />
<strong>EM</strong> <strong>HPM100</strong><br />
Type/Typenbezeichnung/type<br />
<strong>HPM100</strong><br />
to which this declaration relates is in conformity with the following standards:<br />
auf das sich diese Erklärung bezieht, mit den folgenden Normen übereinstimmt:<br />
auquel se réfère cette déclaration est conforme aux normes :<br />
EN 61010-1<br />
EN 61326-1<br />
following the provisions of directive<br />
gemäss den Bestimmungen der Richtlinie<br />
conformément aux dispositions de directive<br />
2004/108/EC<br />
2006/95/EC<br />
2006/42/EC<br />
87/404/EWG<br />
(Electromagnetic compatibility)<br />
(Elektromagnetische Verträglichkeit)<br />
(Low Voltage Equipment)<br />
(Niederspannungsrichtlinie)<br />
(Machinery)<br />
(Maschinen)<br />
(Pressure Vessel)<br />
(Druckbehälter)<br />
Wien, 15. Februar 2008<br />
Dr. Reinhard Lihl<br />
Entwicklungsleiter<br />
R & D Manager<br />
Chef du service développement<br />
<strong>Leica</strong> Microsysteme GmbH Tel. +43 1 48899<br />
Hernalser Hauptstrasse 219 Fax +43 1 48899-350<br />
A-1170 Wien www.leica-microsystems.com
Minutes<br />
LMS Holdings GmbH Tel. +49(0)6441/29-2327<br />
Ernst-Leitz-Strasse 17-37 Fax +49(0)6441/29-2211<br />
D-35578 Wetzlar www.leica-microsystems.com
www.leica-microsystems.com<br />
Copyright © <strong>Leica</strong> Mikrosysteme GmbH, Hernalser Hauptstrasse 219, 1170 Vienna, Austria · Tel. +43 1 48899, Fax +43 1 48899350 LEICA and the <strong>Leica</strong> logos are registered trademarks of Leic IR GmbH.<br />
Order nos. of the editions in: Operating Manual <strong>Leica</strong> <strong>EM</strong> <strong>HPM100</strong>, Version 167120032 12/10 Printed on chlorine-free bleached paper.