

PT-19 ARF Assembly Manual - E-flite
PT-19 ARF Assembly Manual - E-flite
PT-19 ARF Assembly Manual - E-flite

Create successful ePaper yourself
Turn your PDF publications into a flip-book with our unique Google optimized e-Paper software.
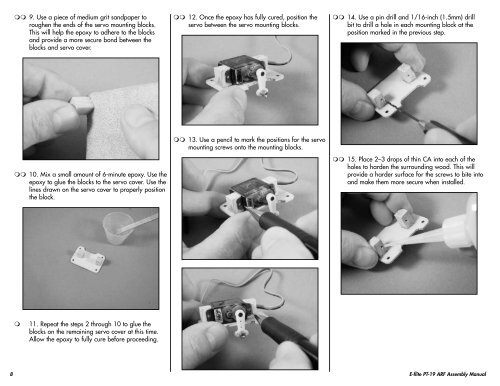
9. Use a piece of medium grit sandpaper to<br />
roughen the ends of the servo mounting blocks.<br />
This will help the epoxy to adhere to the blocks<br />
and provide a more secure bond between the<br />
blocks and servo cover.<br />
12. Once the epoxy has fully cured, position the<br />
servo between the servo mounting blocks.<br />
14. Use a pin drill and 1/16-inch (1.5mm) drill<br />
bit to drill a hole in each mounting block at the<br />
position marked in the previous step.<br />
10. Mix a small amount of 6-minute epoxy. Use the<br />
epoxy to glue the blocks to the servo cover. Use the<br />
lines drawn on the servo cover to properly position<br />
the block.<br />
13. Use a pencil to mark the positions for the servo<br />
mounting screws onto the mounting blocks.<br />
15. Place 2–3 drops of thin CA into each of the<br />
holes to harden the surrounding wood. This will<br />
provide a harder surface for the screws to bite into<br />
and make them more secure when installed.<br />
<br />
11. Repeat the steps 2 through 10 to glue the<br />
blocks on the remaining servo cover at this time.<br />
Allow the epoxy to fully cure before proceeding.<br />
8 E-<strong>flite</strong> <strong>PT</strong>-<strong>19</strong> <strong>ARF</strong> <strong>Assembly</strong> <strong>Manual</strong>


