Chapter 1 Routine maintenance and servicing
Chapter 1 Routine maintenance and servicing
Chapter 1 Routine maintenance and servicing

Create successful ePaper yourself
Turn your PDF publications into a flip-book with our unique Google optimized e-Paper software.
1•10 6000 Mile / 6 Month Service<br />
checked using the special electronic tool at<br />
the earliest opportunity.<br />
1 Except for XU9J4 16-valve engines, all<br />
models are fitted with one auxiliary drivebelt<br />
driven from the crankshaft pulley on the righth<strong>and</strong><br />
side of the engine. On non-air<br />
conditioning models the belt drives the<br />
alternator <strong>and</strong> power steering pump <strong>and</strong> its<br />
tension is adjusted manually. On models fitted<br />
with air conditioning it drives the alternator,<br />
power steering pump <strong>and</strong> the air conditioning<br />
compressor. On XU9J4 models a separate<br />
drivebelt drives the power steering pump from<br />
a pulley on the end of the camshaft.<br />
Checking the<br />
auxiliary drivebelt condition<br />
Except XU9J4 16-valve<br />
power steering drivebelt<br />
2 Apply the h<strong>and</strong>brake, then jack up the front<br />
of the car <strong>and</strong> support it on axle st<strong>and</strong>s (see<br />
“Jacking <strong>and</strong> Vehicle Support”). Remove the<br />
right-h<strong>and</strong> front roadwheel.<br />
3 Remove the engine undercover <strong>and</strong><br />
wheelarch cover as applicable.<br />
4 Using a suitable socket <strong>and</strong> extension bar<br />
fitted to the crankshaft sprocket/pulley bolt,<br />
rotate the crankshaft so that the entire length<br />
of the drivebelt can be examined. Examine the<br />
drivebelt for cracks, splitting, fraying or<br />
damage. Check also for signs of glazing (shiny<br />
patches) <strong>and</strong> for separation of the belt plies.<br />
Renew the belt if worn or damaged.<br />
5 If the condition of the belt is satisfactory, on<br />
models where the belt is adjusted manually,<br />
check the drivebelt tension as described<br />
below. On models with an automatic springloaded<br />
tensioner, there is no need to check<br />
the drivebelt tension.<br />
XU9J4 16-valve<br />
power steering drivebelt<br />
6 The power steering drivebelt is positioned<br />
on the left-h<strong>and</strong> end of the cylinder head.<br />
Examine the full length of the drivebelt for<br />
cracks, splitting, fraying or damage. If<br />
necessary turn the engine with a spanner on<br />
the crankshaft pulley or by engaging 4th gear<br />
<strong>and</strong> pushing the car (for safety, the car must<br />
be on level ground). Check also for signs of<br />
glazing (shiny patches) <strong>and</strong> for separation of<br />
the belt plies.<br />
7 If the condition of the belt is satisfactory,<br />
check the drivebelt tension as described later<br />
in this Section.<br />
Auxiliary drivebelt<br />
(early models) - removal,<br />
refitting <strong>and</strong> tensioning<br />
Removal<br />
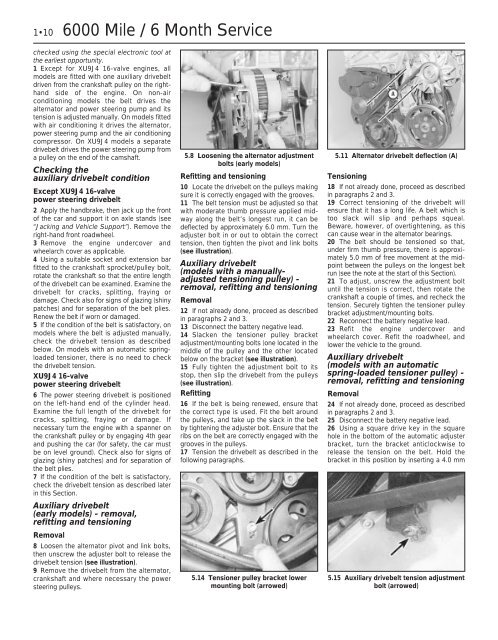
8 Loosen the alternator pivot <strong>and</strong> link bolts,<br />
then unscrew the adjuster bolt to release the<br />
drivebelt tension (see illustration).<br />
9 Remove the drivebelt from the alternator,<br />
crankshaft <strong>and</strong> where necessary the power<br />
steering pulleys.<br />
5.8 Loosening the alternator adjustment<br />
bolts (early models)<br />
Refitting <strong>and</strong> tensioning<br />
10 Locate the drivebelt on the pulleys making<br />
sure it is correctly engaged with the grooves.<br />
11 The belt tension must be adjusted so that<br />
with moderate thumb pressure applied midway<br />
along the belt’s longest run, it can be<br />
deflected by approximately 6.0 mm. Turn the<br />
adjuster bolt in or out to obtain the correct<br />
tension, then tighten the pivot <strong>and</strong> link bolts<br />
(see illustration).<br />
Auxiliary drivebelt<br />
(models with a manuallyadjusted<br />
tensioning pulley) -<br />
removal, refitting <strong>and</strong> tensioning<br />
Removal<br />
12 If not already done, proceed as described<br />
in paragraphs 2 <strong>and</strong> 3.<br />
13 Disconnect the battery negative lead.<br />
14 Slacken the tensioner pulley bracket<br />
adjustment/mounting bolts (one located in the<br />
middle of the pulley <strong>and</strong> the other located<br />
below on the bracket (see illustration).<br />
15 Fully tighten the adjustment bolt to its<br />
stop, then slip the drivebelt from the pulleys<br />
(see illustration).<br />
Refitting<br />
16 If the belt is being renewed, ensure that<br />
the correct type is used. Fit the belt around<br />
the pulleys, <strong>and</strong> take up the slack in the belt<br />
by tightening the adjuster bolt. Ensure that the<br />
ribs on the belt are correctly engaged with the<br />
grooves in the pulleys.<br />
17 Tension the drivebelt as described in the<br />
following paragraphs.<br />
5.14 Tensioner pulley bracket lower<br />
mounting bolt (arrowed)<br />
5.11 Alternator drivebelt deflection (A)<br />
Tensioning<br />
18 If not already done, proceed as described<br />
in paragraphs 2 <strong>and</strong> 3.<br />
19 Correct tensioning of the drivebelt will<br />
ensure that it has a long life. A belt which is<br />
too slack will slip <strong>and</strong> perhaps squeal.<br />
Beware, however, of overtightening, as this<br />
can cause wear in the alternator bearings.<br />
20 The belt should be tensioned so that,<br />
under firm thumb pressure, there is approximately<br />
5.0 mm of free movement at the midpoint<br />
between the pulleys on the longest belt<br />
run (see the note at the start of this Section).<br />
21 To adjust, unscrew the adjustment bolt<br />
until the tension is correct, then rotate the<br />
crankshaft a couple of times, <strong>and</strong> recheck the<br />
tension. Securely tighten the tensioner pulley<br />
bracket adjustment/mounting bolts.<br />
22 Reconnect the battery negative lead.<br />
23 Refit the engine undercover <strong>and</strong><br />
wheelarch cover. Refit the roadwheel, <strong>and</strong><br />
lower the vehicle to the ground.<br />
Auxiliary drivebelt<br />
(models with an automatic<br />
spring-loaded tensioner pulley) -<br />
removal, refitting <strong>and</strong> tensioning<br />
Removal<br />
24 If not already done, proceed as described<br />
in paragraphs 2 <strong>and</strong> 3.<br />
25 Disconnect the battery negative lead.<br />
26 Using a square drive key in the square<br />
hole in the bottom of the automatic adjuster<br />
bracket, turn the bracket anticlockwise to<br />
release the tension on the belt. Hold the<br />
bracket in this position by inserting a 4.0 mm<br />
5.15 Auxiliary drivebelt tension adjustment<br />
bolt (arrowed)