Chapter 1 Routine maintenance and servicing
Chapter 1 Routine maintenance and servicing
Chapter 1 Routine maintenance and servicing

You also want an ePaper? Increase the reach of your titles
YUMPU automatically turns print PDFs into web optimized ePapers that Google loves.
1•20 24 000 Mile / 2 Year Service<br />
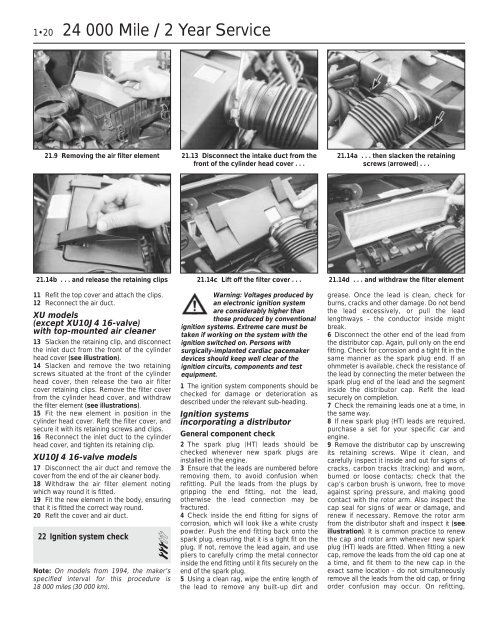
21.9 Removing the air filter element 21.13 Disconnect the intake duct from the 21.14a . . . then slacken the retaining<br />
front of the cylinder head cover . . .<br />
screws (arrowed) . . .<br />
21.14b . . . <strong>and</strong> release the retaining clips<br />
11 Refit the top cover <strong>and</strong> attach the clips.<br />
12 Reconnect the air duct.<br />
XU models<br />
(except XU10J4 16-valve)<br />
with top-mounted air cleaner<br />
13 Slacken the retaining clip, <strong>and</strong> disconnect<br />
the inlet duct from the front of the cylinder<br />
head cover (see illustration).<br />
14 Slacken <strong>and</strong> remove the two retaining<br />
screws situated at the front of the cylinder<br />
head cover, then release the two air filter<br />
cover retaining clips. Remove the filter cover<br />
from the cylinder head cover, <strong>and</strong> withdraw<br />
the filter element (see illustrations).<br />
15 Fit the new element in position in the<br />
cylinder head cover. Refit the filter cover, <strong>and</strong><br />
secure it with its retaining screws <strong>and</strong> clips.<br />
16 Reconnect the inlet duct to the cylinder<br />
head cover, <strong>and</strong> tighten its retaining clip.<br />
XU10J4 16-valve models<br />
17 Disconnect the air duct <strong>and</strong> remove the<br />
cover from the end of the air cleaner body.<br />
18 Withdraw the air filter element noting<br />
which way round it is fitted.<br />
19 Fit the new element in the body, ensuring<br />
that it is fitted the correct way round.<br />
20 Refit the cover <strong>and</strong> air duct.<br />
22 Ignition system check<br />
3<br />
Note: On models from 1994, the maker’s<br />
specified interval for this procedure is<br />
18 000 miles (30 000 km).<br />
21.14c Lift off the filter cover . . .<br />
Warning: Voltages produced by<br />
an electronic ignition system<br />
are considerably higher than<br />
those produced by conventional<br />
ignition systems. Extreme care must be<br />
taken if working on the system with the<br />
ignition switched on. Persons with<br />
surgically-implanted cardiac pacemaker<br />
devices should keep well clear of the<br />
ignition circuits, components <strong>and</strong> test<br />
equipment.<br />
1 The ignition system components should be<br />
checked for damage or deterioration as<br />
described under the relevant sub-heading.<br />
Ignition systems<br />
incorporating a distributor<br />
General component check<br />
2 The spark plug (HT) leads should be<br />
checked whenever new spark plugs are<br />
installed in the engine.<br />
3 Ensure that the leads are numbered before<br />
removing them, to avoid confusion when<br />
refitting. Pull the leads from the plugs by<br />
gripping the end fitting, not the lead,<br />
otherwise the lead connection may be<br />
fractured.<br />
4 Check inside the end fitting for signs of<br />
corrosion, which will look like a white crusty<br />
powder. Push the end fitting back onto the<br />
spark plug, ensuring that it is a tight fit on the<br />
plug. If not, remove the lead again, <strong>and</strong> use<br />
pliers to carefully crimp the metal connector<br />
inside the end fitting until it fits securely on the<br />
end of the spark plug.<br />
5 Using a clean rag, wipe the entire length of<br />
the lead to remove any built-up dirt <strong>and</strong><br />
21.14d . . . <strong>and</strong> withdraw the filter element<br />
grease. Once the lead is clean, check for<br />
burns, cracks <strong>and</strong> other damage. Do not bend<br />
the lead excessively, or pull the lead<br />
lengthways - the conductor inside might<br />
break.<br />
6 Disconnect the other end of the lead from<br />
the distributor cap. Again, pull only on the end<br />
fitting. Check for corrosion <strong>and</strong> a tight fit in the<br />
same manner as the spark plug end. If an<br />
ohmmeter is available, check the resistance of<br />
the lead by connecting the meter between the<br />
spark plug end of the lead <strong>and</strong> the segment<br />
inside the distributor cap. Refit the lead<br />
securely on completion.<br />
7 Check the remaining leads one at a time, in<br />
the same way.<br />
8 If new spark plug (HT) leads are required,<br />
purchase a set for your specific car <strong>and</strong><br />
engine.<br />
9 Remove the distributor cap by unscrewing<br />
its retaining screws. Wipe it clean, <strong>and</strong><br />
carefully inspect it inside <strong>and</strong> out for signs of<br />
cracks, carbon tracks (tracking) <strong>and</strong> worn,<br />
burned or loose contacts; check that the<br />
cap’s carbon brush is unworn, free to move<br />
against spring pressure, <strong>and</strong> making good<br />
contact with the rotor arm. Also inspect the<br />
cap seal for signs of wear or damage, <strong>and</strong><br />
renew if necessary. Remove the rotor arm<br />
from the distributor shaft <strong>and</strong> inspect it (see<br />
illustration). It is common practice to renew<br />
the cap <strong>and</strong> rotor arm whenever new spark<br />
plug (HT) leads are fitted. When fitting a new<br />
cap, remove the leads from the old cap one at<br />
a time, <strong>and</strong> fit them to the new cap in the<br />
exact same location - do not simultaneously<br />
remove all the leads from the old cap, or firing<br />
order confusion may occur. On refitting,