Chapter 1 Routine maintenance and servicing
Chapter 1 Routine maintenance and servicing
Chapter 1 Routine maintenance and servicing

You also want an ePaper? Increase the reach of your titles
YUMPU automatically turns print PDFs into web optimized ePapers that Google loves.
1•16 12 000 Mile / 12 Month Service<br />
the wheel. Repeat this check by holding the<br />
inner joint <strong>and</strong> attempting to rotate the<br />
driveshaft. Any obvious movement indicates<br />
wear in the joints, wear in the driveshaft splines,<br />
or a loose driveshaft retaining nut.<br />
14 Front <strong>and</strong> rear<br />
disc pad check 1<br />
Note: On models from 1994, the maker’s<br />
specified interval for this procedure is<br />
18 000 miles (30 000 km) for the front brake<br />
pads, <strong>and</strong> 36 000 miles (60 000 km) for the<br />
rear brake pads or shoes.<br />
1 Firmly apply the h<strong>and</strong>brake, then jack up<br />
the front or rear of the car (as applicable) <strong>and</strong><br />
support it securely on axle st<strong>and</strong>s (see<br />
“Jacking <strong>and</strong> Vehicle Support”). Remove the<br />
front or rear roadwheels.<br />
For a quick check, the<br />
thickness of friction material<br />
remaining on each brake pad<br />
can be measured through<br />
the aperture in the caliper body.<br />
2 If any pad’s friction material is worn to the<br />
specified thickness or less, all four pads must<br />
be renewed as a set.<br />
3 For a comprehensive check, the brake pads<br />
should be removed <strong>and</strong> cleaned. The<br />
operation of the caliper can then also be<br />
checked, <strong>and</strong> the condition of the brake disc<br />
itself can be fully examined on both sides.<br />
Refer to <strong>Chapter</strong> 9 for further information.<br />
15 H<strong>and</strong>brake check <strong>and</strong><br />
adjustment 3<br />
Note: On models from 1994, the maker’s<br />
specified interval for this procedure is<br />
9000 miles (15 000 km) or 12 months.<br />
Refer to <strong>Chapter</strong> 9.<br />
16 Steering<br />
<strong>and</strong> suspension check 2<br />
Note: On models from 1994, the maker’s<br />
specified interval for this procedure is<br />
9000 miles (15 000 km) or 12 months.<br />
Front suspension<br />
<strong>and</strong> steering check<br />
1 Raise the front of the car, <strong>and</strong> support on axle<br />
st<strong>and</strong>s (see “Jacking <strong>and</strong> Vehicle Support”).<br />
2 Inspect the balljoint dust covers <strong>and</strong> the<br />
steering rack-<strong>and</strong>-pinion gaiters for splits,<br />
chafing or deterioration. Any wear of these<br />
components will cause loss of lubricant, with<br />
dirt <strong>and</strong> water entry, resulting in rapid<br />
deterioration of the balljoints or steering gear.<br />
3 On vehicles with power steering, check the<br />
fluid hoses for chafing or deterioration, <strong>and</strong><br />
the pipe <strong>and</strong> hose unions for fluid leaks. Also<br />
check for signs of fluid leakage under<br />
pressure from the steering gear rubber<br />
gaiters, which would indicate failed fluid seals<br />
within the steering gear.<br />
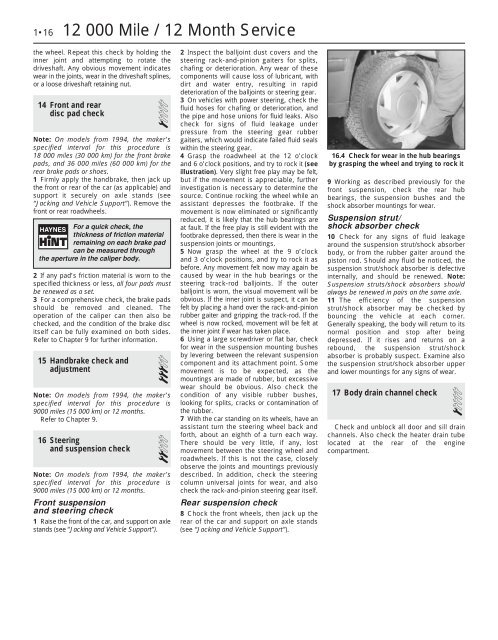
4 Grasp the roadwheel at the 12 o’clock<br />
<strong>and</strong> 6 o’clock positions, <strong>and</strong> try to rock it (see<br />
illustration). Very slight free play may be felt,<br />
but if the movement is appreciable, further<br />
investigation is necessary to determine the<br />
source. Continue rocking the wheel while an<br />
assistant depresses the footbrake. If the<br />
movement is now eliminated or significantly<br />
reduced, it is likely that the hub bearings are<br />
at fault. If the free play is still evident with the<br />
footbrake depressed, then there is wear in the<br />
suspension joints or mountings.<br />
5 Now grasp the wheel at the 9 o’clock<br />
<strong>and</strong> 3 o’clock positions, <strong>and</strong> try to rock it as<br />
before. Any movement felt now may again be<br />
caused by wear in the hub bearings or the<br />
steering track-rod balljoints. If the outer<br />
balljoint is worn, the visual movement will be<br />
obvious. If the inner joint is suspect, it can be<br />
felt by placing a h<strong>and</strong> over the rack-<strong>and</strong>-pinion<br />
rubber gaiter <strong>and</strong> gripping the track-rod. If the<br />
wheel is now rocked, movement will be felt at<br />
the inner joint if wear has taken place.<br />
6 Using a large screwdriver or flat bar, check<br />
for wear in the suspension mounting bushes<br />
by levering between the relevant suspension<br />
component <strong>and</strong> its attachment point. Some<br />
movement is to be expected, as the<br />
mountings are made of rubber, but excessive<br />
wear should be obvious. Also check the<br />
condition of any visible rubber bushes,<br />
looking for splits, cracks or contamination of<br />
the rubber.<br />
7 With the car st<strong>and</strong>ing on its wheels, have an<br />
assistant turn the steering wheel back <strong>and</strong><br />
forth, about an eighth of a turn each way.<br />
There should be very little, if any, lost<br />
movement between the steering wheel <strong>and</strong><br />
roadwheels. If this is not the case, closely<br />
observe the joints <strong>and</strong> mountings previously<br />
described. In addition, check the steering<br />
column universal joints for wear, <strong>and</strong> also<br />
check the rack-<strong>and</strong>-pinion steering gear itself.<br />
Rear suspension check<br />
8 Chock the front wheels, then jack up the<br />
rear of the car <strong>and</strong> support on axle st<strong>and</strong>s<br />
(see “Jacking <strong>and</strong> Vehicle Support”).<br />
16.4 Check for wear in the hub bearings<br />
by grasping the wheel <strong>and</strong> trying to rock it<br />
9 Working as described previously for the<br />
front suspension, check the rear hub<br />
bearings, the suspension bushes <strong>and</strong> the<br />
shock absorber mountings for wear.<br />
Suspension strut/<br />
shock absorber check<br />
10 Check for any signs of fluid leakage<br />
around the suspension strut/shock absorber<br />
body, or from the rubber gaiter around the<br />
piston rod. Should any fluid be noticed, the<br />
suspension strut/shock absorber is defective<br />
internally, <strong>and</strong> should be renewed. Note:<br />
Suspension struts/shock absorbers should<br />
always be renewed in pairs on the same axle.<br />
11 The efficiency of the suspension<br />
strut/shock absorber may be checked by<br />
bouncing the vehicle at each corner.<br />
Generally speaking, the body will return to its<br />
normal position <strong>and</strong> stop after being<br />
depressed. If it rises <strong>and</strong> returns on a<br />
rebound, the suspension strut/shock<br />
absorber is probably suspect. Examine also<br />
the suspension strut/shock absorber upper<br />
<strong>and</strong> lower mountings for any signs of wear.<br />
17 Body drain channel check<br />
1<br />
Check <strong>and</strong> unblock all door <strong>and</strong> sill drain<br />
channels. Also check the heater drain tube<br />
located at the rear of the engine<br />
compartment.