Chapter 1 Routine maintenance and servicing
Chapter 1 Routine maintenance and servicing
Chapter 1 Routine maintenance and servicing

You also want an ePaper? Increase the reach of your titles
YUMPU automatically turns print PDFs into web optimized ePapers that Google loves.
1•14 12 000 Mile / 12 Month Service<br />
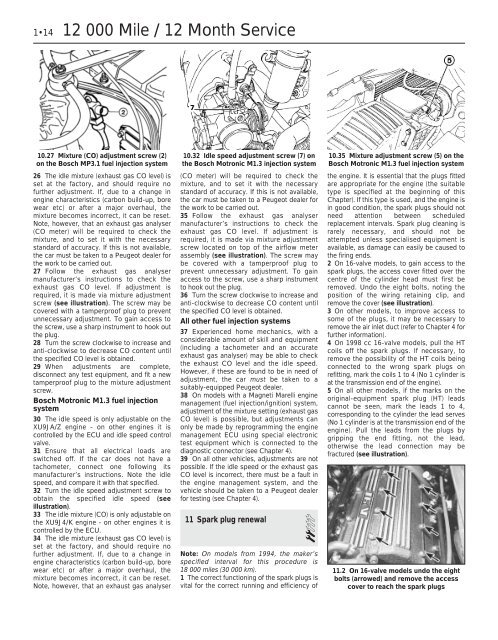
10.27 Mixture (CO) adjustment screw (2)<br />
on the Bosch MP3.1 fuel injection system<br />
26 The idle mixture (exhaust gas CO level) is<br />
set at the factory, <strong>and</strong> should require no<br />
further adjustment. If, due to a change in<br />
engine characteristics (carbon build-up, bore<br />
wear etc) or after a major overhaul, the<br />
mixture becomes incorrect, it can be reset.<br />
Note, however, that an exhaust gas analyser<br />
(CO meter) will be required to check the<br />
mixture, <strong>and</strong> to set it with the necessary<br />
st<strong>and</strong>ard of accuracy. If this is not available,<br />
the car must be taken to a Peugeot dealer for<br />
the work to be carried out.<br />
27 Follow the exhaust gas analyser<br />
manufacturer’s instructions to check the<br />
exhaust gas CO level. If adjustment is<br />
required, it is made via mixture adjustment<br />
screw (see illustration). The screw may be<br />
covered with a tamperproof plug to prevent<br />
unnecessary adjustment. To gain access to<br />
the screw, use a sharp instrument to hook out<br />
the plug.<br />
28 Turn the screw clockwise to increase <strong>and</strong><br />
anti-clockwise to decrease CO content until<br />
the specified CO level is obtained.<br />
29 When adjustments are complete,<br />
disconnect any test equipment, <strong>and</strong> fit a new<br />
tamperproof plug to the mixture adjustment<br />
screw.<br />
Bosch Motronic M1.3 fuel injection<br />
system<br />
30 The idle speed is only adjustable on the<br />
XU9JA/Z engine - on other engines it is<br />
controlled by the ECU <strong>and</strong> idle speed control<br />
valve.<br />
31 Ensure that all electrical loads are<br />
switched off. If the car does not have a<br />
tachometer, connect one following its<br />
manufacturer’s instructions. Note the idle<br />
speed, <strong>and</strong> compare it with that specified.<br />
32 Turn the idle speed adjustment screw to<br />
obtain the specified idle speed (see<br />
illustration).<br />
33 The idle mixture (CO) is only adjustable on<br />
the XU9J4/K engine - on other engines it is<br />
controlled by the ECU.<br />
34 The idle mixture (exhaust gas CO level) is<br />
set at the factory, <strong>and</strong> should require no<br />
further adjustment. If, due to a change in<br />
engine characteristics (carbon build-up, bore<br />
wear etc) or after a major overhaul, the<br />
mixture becomes incorrect, it can be reset.<br />
Note, however, that an exhaust gas analyser<br />
10.32 Idle speed adjustment screw (7) on<br />
the Bosch Motronic M1.3 injection system<br />
(CO meter) will be required to check the<br />
mixture, <strong>and</strong> to set it with the necessary<br />
st<strong>and</strong>ard of accuracy. If this is not available,<br />
the car must be taken to a Peugeot dealer for<br />
the work to be carried out.<br />
35 Follow the exhaust gas analyser<br />
manufacturer’s instructions to check the<br />
exhaust gas CO level. If adjustment is<br />
required, it is made via mixture adjustment<br />
screw located on top of the airflow meter<br />
assembly (see illustration). The screw may<br />
be covered with a tamperproof plug to<br />
prevent unnecessary adjustment. To gain<br />
access to the screw, use a sharp instrument<br />
to hook out the plug.<br />
36 Turn the screw clockwise to increase <strong>and</strong><br />
anti-clockwise to decrease CO content until<br />
the specified CO level is obtained.<br />
All other fuel injection systems<br />
37 Experienced home mechanics, with a<br />
considerable amount of skill <strong>and</strong> equipment<br />
(including a tachometer <strong>and</strong> an accurate<br />
exhaust gas analyser) may be able to check<br />
the exhaust CO level <strong>and</strong> the idle speed.<br />
However, if these are found to be in need of<br />
adjustment, the car must be taken to a<br />
suitably-equipped Peugeot dealer.<br />
38 On models with a Magneti Marelli engine<br />
management (fuel injection/ignition) system,<br />
adjustment of the mixture setting (exhaust gas<br />
CO level) is possible, but adjustments can<br />
only be made by reprogramming the engine<br />
management ECU using special electronic<br />
test equipment which is connected to the<br />
diagnostic connector (see <strong>Chapter</strong> 4).<br />
39 On all other vehicles, adjustments are not<br />
possible. If the idle speed or the exhaust gas<br />
CO level is incorrect, there must be a fault in<br />
the engine management system, <strong>and</strong> the<br />
vehicle should be taken to a Peugeot dealer<br />
for testing (see <strong>Chapter</strong> 4).<br />
11 Spark plug renewal<br />
2<br />
Note: On models from 1994, the maker’s<br />
specified interval for this procedure is<br />
18 000 miles (30 000 km).<br />
1 The correct functioning of the spark plugs is<br />
vital for the correct running <strong>and</strong> efficiency of<br />
10.35 Mixture adjustment screw (5) on the<br />
Bosch Motronic M1.3 fuel injection system<br />
the engine. It is essential that the plugs fitted<br />
are appropriate for the engine (the suitable<br />
type is specified at the beginning of this<br />
<strong>Chapter</strong>). If this type is used, <strong>and</strong> the engine is<br />
in good condition, the spark plugs should not<br />
need attention between scheduled<br />
replacement intervals. Spark plug cleaning is<br />
rarely necessary, <strong>and</strong> should not be<br />
attempted unless specialised equipment is<br />
available, as damage can easily be caused to<br />
the firing ends.<br />
2 On 16-valve models, to gain access to the<br />
spark plugs, the access cover fitted over the<br />
centre of the cylinder head must first be<br />
removed. Undo the eight bolts, noting the<br />
position of the wiring retaining clip, <strong>and</strong><br />
remove the cover (see illustration).<br />
3 On other models, to improve access to<br />
some of the plugs, it may be necessary to<br />
remove the air inlet duct (refer to <strong>Chapter</strong> 4 for<br />
further information).<br />
4 On 1998 cc 16-valve models, pull the HT<br />
coils off the spark plugs. If necessary, to<br />
remove the possibility of the HT coils being<br />
connected to the wrong spark plugs on<br />
refitting, mark the coils 1 to 4 (No 1 cylinder is<br />
at the transmission end of the engine).<br />
5 On all other models, if the marks on the<br />
original-equipment spark plug (HT) leads<br />
cannot be seen, mark the leads 1 to 4,<br />
corresponding to the cylinder the lead serves<br />
(No 1 cylinder is at the transmission end of the<br />
engine). Pull the leads from the plugs by<br />
gripping the end fitting, not the lead,<br />
otherwise the lead connection may be<br />
fractured (see illustration).<br />
11.2 On 16-valve models undo the eight<br />
bolts (arrowed) <strong>and</strong> remove the access<br />
cover to reach the spark plugs