download benjamin latham instruction manual
download benjamin latham instruction manual
download benjamin latham instruction manual

You also want an ePaper? Increase the reach of your titles
YUMPU automatically turns print PDFs into web optimized ePapers that Google loves.
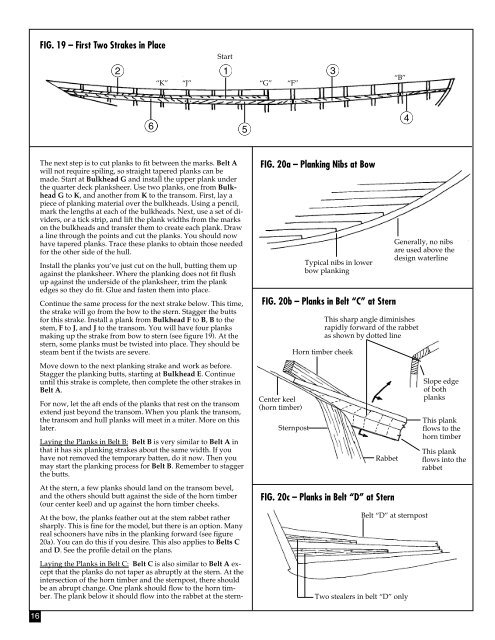
FIG. 19 – First Two Strakes in Place<br />
Start<br />
2<br />
“K”<br />
1<br />
“J” “G” “F”<br />
3<br />
“B”<br />
6 5<br />
4<br />
The next step is to cut planks to fit between the marks. Belt A<br />
will not require spiling, so straight tapered planks can be<br />
made. Start at Bulkhead G and install the upper plank under<br />
the quarter deck planksheer. Use two planks, one from Bulkhead<br />
G to K, and another from K to the transom. First, lay a<br />
piece of planking material over the bulkheads. Using a pencil,<br />
mark the lengths at each of the bulkheads. Next, use a set of dividers,<br />
or a tick strip, and lift the plank widths from the marks<br />
on the bulkheads and transfer them to create each plank. Draw<br />
a line through the points and cut the planks. You should now<br />
have tapered planks. Trace these planks to obtain those needed<br />
for the other side of the hull.<br />
Install the planks you’ve just cut on the hull, butting them up<br />
against the planksheer. Where the planking does not fit flush<br />
up against the underside of the planksheer, trim the plank<br />
edges so they do fit. Glue and fasten them into place.<br />
Continue the same process for the next strake below. This time,<br />
the strake will go from the bow to the stern. Stagger the butts<br />
for this strake. Install a plank from Bulkhead F to B, B to the<br />
stem, F to J, and J to the transom. You will have four planks<br />
making up the strake from bow to stern (see figure 19). At the<br />
stern, some planks must be twisted into place. They should be<br />
steam bent if the twists are severe.<br />
FIG. 20a – Planking Nibs at Bow<br />
Typical nibs in lower<br />
bow planking<br />
FIG. 20b – Planks in Belt “C” at Stern<br />
Horn timber cheek<br />
This sharp angle diminishes<br />
rapidly forward of the rabbet<br />
as shown by dotted line<br />
Generally, no nibs<br />
are used above the<br />
design waterline<br />
Move down to the next planking strake and work as before.<br />
Stagger the planking butts, starting at Bulkhead E. Continue<br />
until this strake is complete, then complete the other strakes in<br />
Belt A.<br />
For now, let the aft ends of the planks that rest on the transom<br />
extend just beyond the transom. When you plank the transom,<br />
the transom and hull planks will meet in a miter. More on this<br />
later.<br />
Laying the Planks in Belt B: Belt B is very similar to Belt A in<br />
that it has six planking strakes about the same width. If you<br />
have not removed the temporary batten, do it now. Then you<br />
may start the planking process for Belt B. Remember to stagger<br />
the butts.<br />
Center keel<br />
(horn timber)<br />
Sternpost<br />
Rabbet<br />
Slope edge<br />
of both<br />
planks<br />
This plank<br />
flows to the<br />
horn timber<br />
This plank<br />
flows into the<br />
rabbet<br />
At the stern, a few planks should land on the transom bevel,<br />
and the others should butt against the side of the horn timber<br />
(our center keel) and up against the horn timber cheeks.<br />
At the bow, the planks feather out at the stem rabbet rather<br />
sharply. This is fine for the model, but there is an option. Many<br />
real schooners have nibs in the planking forward (see figure<br />
20a). You can do this if you desire. This also applies to Belts C<br />
and D. See the profile detail on the plans.<br />
Laying the Planks in Belt C: Belt C is also similar to Belt A except<br />
that the planks do not taper as abruptly at the stern. At the<br />
intersection of the horn timber and the sternpost, there should<br />
be an abrupt change. One plank should flow to the horn timber.<br />
The plank below it should flow into the rabbet at the stern-<br />
FIG. 20c – Planks in Belt “D” at Stern<br />
Belt “D” at sternpost<br />
Two stealers in belt “D” only<br />
16