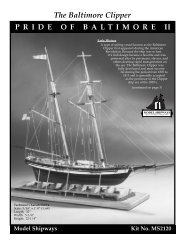
download benjamin latham instruction manual
download benjamin latham instruction manual
download benjamin latham instruction manual

You also want an ePaper? Increase the reach of your titles
YUMPU automatically turns print PDFs into web optimized ePapers that Google loves.
STAGE G<br />
GENERAL RIGGING & SAILMAKING INFORMATION<br />
Rigging plans are often confusing because of the numerous<br />
lines involved, and the fact that overlapping and concealing of<br />
some of the detail occurs. Every effort, however, has been made<br />
to make the Benjamin W. Latham rigging procedure as clear as<br />
possible. Modelers should have little trouble, if the plans are reviewed<br />
thoroughly and the <strong>instruction</strong>s are followed.<br />
1. Cordage<br />
Standing rigging is black and running rigging is white. The<br />
nylon rigging line supplied in this kit will be adequate for most<br />
modelers. To rig as accurately as possible, however, search out<br />
and buy different line sizes to match the scale of the plans.<br />
Seasoned veterans will probably want to make substitutions,<br />
using linen, which comes in a wider variety of sizes and will<br />
last longer. Rigging diameters, block lengths and a conversion<br />
table are given on page 34.<br />
Generally speaking, when selecting the size of thread for a<br />
given line, it is better to err on the small side. Many beautifully<br />
crafted hulls have lost their look of realism because of a heavy,<br />
clumsy-looking rigging job. Look at photographs of these fishermen<br />
and note how delicate the rigging appears, then strive to<br />
attain the same visual effect.<br />
The use of wire for standing rigging: By Benjamin W. Latham’s<br />
time, using wire for the standing rigging on fishermen was an<br />
accepted practice. From the visual standpoint, the diameters of<br />
shrouds, stays, etc. were considerably reduced, and not much<br />
larger, if ever, than the heaviest running rigging. Some of these<br />
lines, such as the stays, stood bare to the elements. But, a lot of<br />
them were completely covered with serving (see next paragraph)<br />
and well tarred, thus prolonging their life considerably.<br />
In addition, the eyes, ends and splices in all pieces of wire rigging<br />
were served. Shrouds, bobstays, bowsprit guys and<br />
footropes were served over their entire lengths. The main<br />
boom topping lift was served wherever chafe gear is shown in<br />
the rigging plan, then covered with baggy-wrinkle (scruffylooking<br />
padding used on shrouds to prevent chafing).<br />
Using real wire for standing rigging can be a tricky business.<br />
However, there is no doubt that it looks better. The results can<br />
be heartbreaking if the wrong techniques are applied to the<br />
wrong materials. First of all, avoid the tinned copper wires.<br />
These stretch, kink and never set up as tightly as you would<br />
have them do. Such wire is always subject to minute temperature<br />
changes, and what looks taut at 65° will look terrible at 70°.<br />
There is a very fine stranded steel cable on the market advertised<br />
as control lines for model airplanes. It can be had in several<br />
sizes at hobby shops. It is suggested that any standing rigging<br />
which is all-served should be made up of linen thread,<br />
using the wire only for stays, etc. which have some of the wire<br />
exposed.<br />
Steel wire is tough stuff to work into loops, eyes, etc., so it is<br />
best worked prior to being fitted to the model. Don’t let the<br />
wire be too shiny, but work a little black or dark umber into<br />
the lay to simulate tar.<br />
2. Treating the Lines<br />
Worming, Parcelling & Serving: Lines on ships were wormed,<br />
parcelled and served (a method of protecting parts of a rope)<br />
where they are likely to be chafed, such as the shrouds, especially<br />
at the mast heads and ends of lines fitted with thimbles.<br />
For models, worming (laying thin pieces of line (the worms)<br />
between the strands), and parcelling (winding strips of canvas<br />
saturated with tar over the part wormed) is unnecessary. Only<br />
serving (tightly binding the wormed and parcelled area in the<br />
other direction with spun yarn) of the lines is required on the<br />
model.<br />
Serving the lines is best left to the experienced modelmaker.<br />
Beginners should not attempt it unless they are exceptionally<br />
good at detail and are able to scale down accurately.<br />
Cordage for serving should be as fine as can be obtained. Silk,<br />
nylon, polyester and dacron are all good for the job. Avoid<br />
using cotton or linen for this work because they are too coarse<br />
and lumpy.<br />
How to serve: Stretch the line between two points and use a<br />
miniature serving mallet the same way the early riggers would<br />
have done it (see figure 59). You also could secure a line between<br />
two fishing line swivels (see figure 60). Rotate the line<br />
with one hand while feeding the serving line with the other<br />
hand. Just make sure you do not stop without grabbing hold of<br />
the serving end. Otherwise, the entire thing could unravel.<br />
3. Differentiating Between the Lines<br />
Standing rigging: Stockholm tar was the usual preservative<br />
for standing rigging on the lifesize fishermen. It was dark<br />
brown and almost black in color. If you mix burnt umber and<br />
black in equal parts, you will have about the right shade for<br />
the model.<br />
In tinting standing rigging, it is suggested that you try thin<br />
down Model Shipways paints. Avoid a “jet black” color; even<br />
blackened tar had a slight brownish tinge to it. A little glow<br />
will not hurt either, for it accentuates the lay of the rope, or<br />
FIG. 59 – Serving<br />
Exploded View<br />
Vise<br />
Serving Mallet<br />
Thread<br />
Tension pulley<br />
Serving<br />
mallet<br />
Turn of serving<br />
Table<br />
BENCH LAYOUT<br />
Weight<br />
END VIEW<br />
Lay of rope (or thread)<br />
31