download benjamin latham instruction manual
download benjamin latham instruction manual
download benjamin latham instruction manual

You also want an ePaper? Increase the reach of your titles
YUMPU automatically turns print PDFs into web optimized ePapers that Google loves.
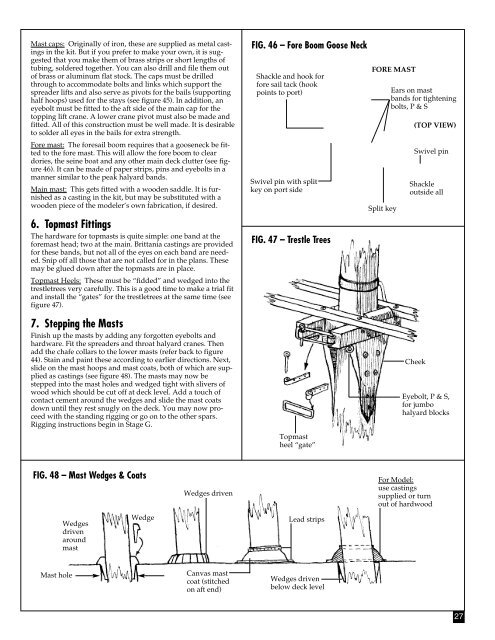
Mast caps: Originally of iron, these are supplied as metal castings<br />
in the kit. But if you prefer to make your own, it is suggested<br />
that you make them of brass strips or short lengths of<br />
tubing, soldered together. You can also drill and file them out<br />
of brass or aluminum flat stock. The caps must be drilled<br />
through to accommodate bolts and links which support the<br />
spreader lifts and also serve as pivots for the bails (supporting<br />
half hoops) used for the stays (see figure 45). In addition, an<br />
eyebolt must be fitted to the aft side of the main cap for the<br />
topping lift crane. A lower crane pivot must also be made and<br />
fitted. All of this construction must be well made. It is desirable<br />
to solder all eyes in the bails for extra strength.<br />
Fore mast: The foresail boom requires that a gooseneck be fitted<br />
to the fore mast. This will allow the fore boom to clear<br />
dories, the seine boat and any other main deck clutter (see figure<br />
46). It can be made of paper strips, pins and eyebolts in a<br />
manner similar to the peak halyard bands.<br />
Main mast: This gets fitted with a wooden saddle. It is furnished<br />
as a casting in the kit, but may be substituted with a<br />
wooden piece of the modeler’s own fabrication, if desired.<br />
6. Topmast Fittings<br />
The hardware for topmasts is quite simple: one band at the<br />
foremast head; two at the main. Brittania castings are provided<br />
for these bands, but not all of the eyes on each band are needed.<br />
Snip off all those that are not called for in the plans. These<br />
may be glued down after the topmasts are in place.<br />
Topmast Heels: These must be “fidded” and wedged into the<br />
trestletrees very carefully. This is a good time to make a trial fit<br />
and install the “gates” for the trestletrees at the same time (see<br />
figure 47).<br />
FIG. 46 – Fore Boom Goose Neck<br />
Shackle and hook for<br />
fore sail tack (hook<br />
points to port)<br />
Swivel pin with split<br />
key on port side<br />
FIG. 47 – Trestle Trees<br />
FORE MAST<br />
Split key<br />
Ears on mast<br />
bands for tightening<br />
bolts, P &S<br />
(TOP VIEW)<br />
Swivel pin<br />
Shackle<br />
outside all<br />
7. Stepping the Masts<br />
Finish up the masts by adding any forgotten eyebolts and<br />
hardware. Fit the spreaders and throat halyard cranes. Then<br />
add the chafe collars to the lower masts (refer back to figure<br />
44). Stain and paint these according to earlier directions. Next,<br />
slide on the mast hoops and mast coats, both of which are supplied<br />
as castings (see figure 48). The masts may now be<br />
stepped into the mast holes and wedged tight with slivers of<br />
wood which should be cut off at deck level. Add a touch of<br />
contact cement around the wedges and slide the mast coats<br />
down until they rest snugly on the deck. You may now proceed<br />
with the standing rigging or go on to the other spars.<br />
Rigging <strong>instruction</strong>s begin in Stage G.<br />
Topmast<br />
heel “gate”<br />
Cheek<br />
Eyebolt, P & S,<br />
for jumbo<br />
halyard blocks<br />
FIG. 48 – Mast Wedges & Coats<br />
Wedges<br />
driven<br />
around<br />
mast<br />
Wedge<br />
Wedges driven<br />
Lead strips<br />
For Model:<br />
use castings<br />
supplied or turn<br />
out of hardwood<br />
Mast hole<br />
Canvas mast<br />
coat (stitched<br />
on aft end)<br />
Wedges driven<br />
below deck level<br />
27