
Create successful ePaper yourself
Turn your PDF publications into a flip-book with our unique Google optimized e-Paper software.
<strong>MIRAGE</strong> Service Manual <strong>Carefree</strong> <strong>of</strong> <strong>Colorado</strong><br />
STANDARD SERVICE PROCEDURES<br />
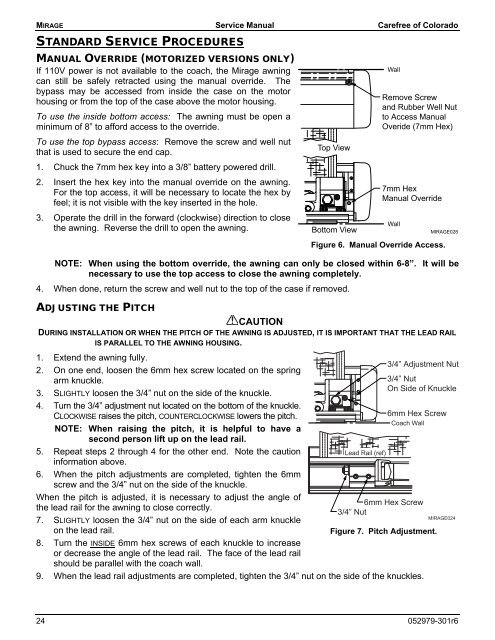
MANUAL OVERRIDE (MOTORIZED VERSIONS ONLY)<br />
If 110V power is not available to the coach, the Mirage awning<br />
can still be safely retracted using the manual override. The<br />
bypass may be accessed from inside the case on the motor<br />
housing or from the top <strong>of</strong> the case above the motor housing.<br />
To use the inside bottom access: The awning must be open a<br />
minimum <strong>of</strong> 8” to afford access to the override.<br />
To use the top bypass access: Remove the screw and well nut<br />
that is used to secure the end cap.<br />
1. Chuck the 7mm hex key into a 3/8” battery powered drill.<br />
2. Insert the hex key into the manual override on the awning.<br />
For the top access, it will be necessary to locate the hex by<br />
feel; it is not visible with the key inserted in the hole.<br />
3. Operate the drill in the forward (clockwise) direction to close<br />
the awning. Reverse the drill to open the awning.<br />
NOTE: When using the bottom override, the awning can only be closed within 6-8”. It will be<br />
necessary to use the top access to close the awning completely.<br />
4. When done, return the screw and well nut to the top <strong>of</strong> the case if removed.<br />
ADJUSTING THE PITCH<br />
CAUTION<br />
DURING INSTALLATION OR WHEN THE PITCH OF THE AWNING IS ADJUSTED, IT IS IMPORTANT THAT THE LEAD RAIL<br />
IS PARALLEL TO THE AWNING HOUSING.<br />
1. Extend the awning fully.<br />
2. On one end, loosen the 6mm hex screw located on the spring<br />
arm knuckle.<br />
3. SLIGHTLY loosen the 3/4” nut on the side <strong>of</strong> the knuckle.<br />
4. Turn the 3/4” adjustment nut located on the bottom <strong>of</strong> the knuckle.<br />
CLOCKWISE raises the pitch, COUNTERCLOCKWISE lowers the pitch.<br />
NOTE: When raising the pitch, it is helpful to have a<br />
second person lift up on the lead rail.<br />
5. Repeat steps 2 through 4 for the other end. Note the caution<br />
information above.<br />
6. When the pitch adjustments are completed, tighten the 6mm<br />
screw and the 3/4” nut on the side <strong>of</strong> the knuckle.<br />
When the pitch is adjusted, it is necessary to adjust the angle <strong>of</strong><br />
the lead rail for the awning to close correctly.<br />
7. SLIGHTLY loosen the 3/4” nut on the side <strong>of</strong> each arm knuckle<br />
on the lead rail.<br />
8. Turn the INSIDE 6mm hex screws <strong>of</strong> each knuckle to increase<br />
or decrease the angle <strong>of</strong> the lead rail. The face <strong>of</strong> the lead rail<br />
should be parallel with the coach wall.<br />
Top View<br />
Bottom View<br />
9. When the lead rail adjustments are completed, tighten the 3/4” nut on the side <strong>of</strong> the knuckles.<br />
Wall<br />
Remove Screw<br />
and Rubber Well Nut<br />
to Access Manual<br />
Overide (7mm Hex)<br />
7mm Hex<br />
Manual Override<br />
Wall<br />
<strong>MIRAGE</strong>028<br />
Figure 6. Manual Override Access.<br />
Lead Rail (ref)<br />
3/4” Adjustment Nut<br />
3/4” Nut<br />
On Side <strong>of</strong> Knuckle<br />
6mm Hex Screw<br />
Coach Wall<br />
6mm Hex Screw<br />
3/4” Nut<br />
Figure 7. Pitch Adjustment.<br />
<strong>MIRAGE</strong>024<br />
24 052979-301r6