LTO half-height SAS Tape Drives User Guide - Tandberg Data
LTO half-height SAS Tape Drives User Guide - Tandberg Data
LTO half-height SAS Tape Drives User Guide - Tandberg Data

Create successful ePaper yourself
Turn your PDF publications into a flip-book with our unique Google optimized e-Paper software.
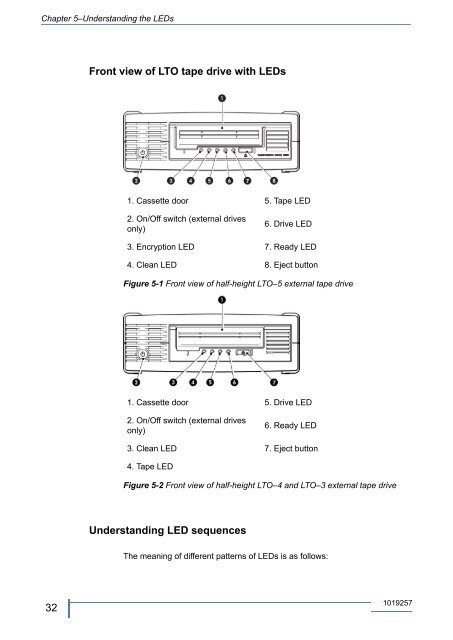
Chapter 5–Understanding the LEDs<br />
Front view of <strong>LTO</strong> tape drive with LEDs<br />
1. Cassette door<br />
2. On/Off switch (external drives<br />
only)<br />
3. Encryption LED<br />
4. Clean LED<br />
5. <strong>Tape</strong> LED<br />
6. Drive LED<br />
7. Ready LED<br />
8. Eject button<br />
Figure 5-1 Front view of <strong>half</strong>-<strong>height</strong> <strong>LTO</strong>–5 external tape drive<br />
1. Cassette door<br />
2. On/Off switch (external drives<br />
only)<br />
3. Clean LED<br />
5. Drive LED<br />
6. Ready LED<br />
7. Eject button<br />
4. <strong>Tape</strong> LED<br />
Figure 5-2 Front view of <strong>half</strong>-<strong>height</strong> <strong>LTO</strong>–4 and <strong>LTO</strong>–3 external tape drive<br />
Understanding LED sequences<br />
The meaning of different patterns of LEDs is as follows:<br />
32<br />
1019257