The Temple Between.pdf
The Temple Between.pdf
The Temple Between.pdf
Create successful ePaper yourself
Turn your PDF publications into a flip-book with our unique Google optimized e-Paper software.
<strong>The</strong> <strong>Temple</strong> <strong>Between</strong><br />
C9A: Rescuing Durkik<br />
When the PCs descend the ladder beneath the<br />
trapdoor in the warehouse, read:<br />
You are within a narrow, stone-walled hallway. Mildew<br />
darkens the mortar between the bricks and fills the air<br />
with the damp scent of rot. A steel door, speckled with rust,<br />
stands at the far end of the hall. It boasts a small barred<br />
window, but from here you cannot see what might lie<br />
beyond.<br />
Once the PCs near the door and can see through<br />
the bars, continue:<br />
A dwarf, his flesh bruised and beaten, his hair and beard<br />
matted with blood, stands chained to the far wall of a<br />
stench-ridden, claustrophobic cell. It takes you a moment<br />
to recognize him as none other than High Priest Durkik<br />
Forgeheart!<br />
Slowly, as though even so minor a move pains him,<br />
he looks up to meet your gaze through the bars, his eyes<br />
widening slightly as he recognizes you. “Be careful,” he<br />
rasps in a hoarse voice. “<strong>The</strong> door’s trapped.”<br />
He gestures with a finger, the chain clinking, to indicate<br />
a series of tubes that protrude from the walls of the cell,<br />
pointing in his direction. “And not to kill you, either,” he<br />
adds impassively. “<strong>The</strong>y don’t want me escaping.”<br />
<strong>The</strong> door can be picked with a DC 21 Thievery check<br />
(as can the chains on his wrists, once the PCs move<br />
inside), but if the door is opened without the safeguards<br />
being disabled, one or more of the tubes fires a<br />
sharpened spike into Durkik’s chest, killing him. <strong>The</strong><br />
“trap” is three traps, each of which must be disabled.<br />
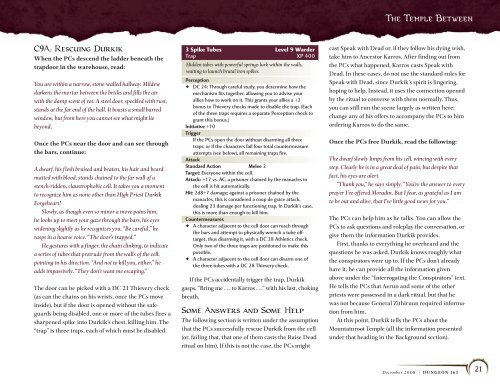
3 Spike Tubes Level 9 Warder<br />
Trap XP 400<br />
Hidden tubes with powerful springs lurk within the walls,<br />
waiting to launch brutal iron spikes.<br />
Perception<br />
✦ DC 24: Through careful study, you determine how the<br />
mechanism fits together, allowing you to advise your<br />
allies how to work on it. This grants your allies a +2<br />
bonus to Thievery checks made to disable the trap. (Each<br />
of the three traps requires a separate Perception check to<br />
grant this bonus.)<br />
Initiative +10<br />
Trigger<br />
If the PCs open the door without disarming all three<br />
traps, or if the characters fail four total countermeasure<br />
attempts (see below), all remaining traps fire.<br />
Attack<br />
Standard Action Melee 2<br />
Target: Everyone within the cell.<br />
Attack: +17 vs. AC; a prisoner chained by the manacles in<br />
the cell is hit automatically.<br />
Hit: 2d8+7 damage; against a prisoner chained by the<br />
manacles, this is considered a coup de grace attack,<br />
dealing 23 damage per functioning trap. In Durkik’s case,<br />
this is more than enough to kill him.<br />
Countermeasures<br />
✦ A character adjacent to the cell door can reach through<br />
the bars and attempt to physically wrench a tube offtarget,<br />
thus disarming it, with a DC 28 Athletics check.<br />
Only two of the three traps are positioned to make this<br />
possible.<br />
✦ A character adjacent to the cell door can disarm one of<br />
the three tubes with a DC 28 Thievery check.<br />
If the PCs accidentally trigger the trap, Durkik<br />
gasps, “Bring me . . . to Karros . . .” with his last, choking<br />
breath.<br />
Some Answers and Some Help<br />
<strong>The</strong> following section is written under the assumption<br />
that the PCs successfully rescue Durkik from the cell<br />
(or, failing that, that one of them casts the Raise Dead<br />
ritual on him). If this is not the case, the PCs might<br />
cast Speak with Dead or, if they follow his dying wish,<br />
take him to Ancestor Karros. After finding out from<br />
the PCs what happened, Karros casts Speak with<br />
Dead. In these cases, do not use the standard rules for<br />
Speak with Dead, since Durkik’s spirit is lingering,<br />
hoping to help. Instead, it uses the connection opened<br />
by the ritual to converse with them normally. Thus,<br />
you can still run the scene largely as written here;<br />
change any of his offers to accompany the PCs to him<br />
ordering Karros to do the same.<br />
Once the PCs free Durkik, read the following:<br />
<strong>The</strong> dwarf slowly limps from his cell, wincing with every<br />
step. Clearly he is in a great deal of pain, but despite that<br />
fact, his eyes are alert.<br />
“Thank you,” he says simply. “You’re the answer to every<br />
prayer I’ve offered Moradin. But I fear, as grateful as I am<br />
to be out and alive, that I’ve little good news for you.”<br />
<strong>The</strong> PCs can help him as he talks. You can allow the<br />
PCs to ask questions and roleplay the conversation, or<br />
give them the information Durkik provides.<br />
First, thanks to everything he overheard and the<br />
questions he was asked, Durkik knows roughly what<br />
the conspirators were up to. If the PCs don’t already<br />
have it, he can provide all the information given<br />
above under the “Interrogating the Conspirators” text.<br />
He tells the PCs that Aerun and some of the other<br />
priests were possessed in a dark ritual, but that he<br />
was not because General Zithiruun required information<br />
from him.<br />
At this point, Durkik tells the PCs about the<br />
Mountainroot <strong>Temple</strong> (all the information presented<br />
under that heading in the Background section).<br />
December 2008 |<br />
21<br />
DUNGEON 161


![Scales of War - [Lvl 17] - Garaitha's Anvil.pdf](https://img.yumpu.com/49980560/1/190x146/scales-of-war-lvl-17-garaithas-anvilpdf.jpg?quality=85)
![[Lvl 27] - Test of Fire.pdf](https://img.yumpu.com/49457165/1/190x146/lvl-27-test-of-firepdf.jpg?quality=85)
![[Lvl 3] - Siege of Bordrin's Watch.pdf](https://img.yumpu.com/46813203/1/190x146/lvl-3-siege-of-bordrins-watchpdf.jpg?quality=85)
![[Lvl 1] - Rescue at Rivenroar with Printable Battle Mats.pdf](https://img.yumpu.com/45544975/1/190x147/lvl-1-rescue-at-rivenroar-with-printable-battle-matspdf.jpg?quality=85)
![Menace of the Icy Spire [Forgotten Realms].pdf - Property Is Theft!](https://img.yumpu.com/44650754/1/190x146/menace-of-the-icy-spire-forgotten-realmspdf-property-is-theft.jpg?quality=85)
![[Lvl 4] - The Shadow Rift of Umbraforge.pdf](https://img.yumpu.com/43339296/1/190x146/lvl-4-the-shadow-rift-of-umbraforgepdf.jpg?quality=85)
![Scales of War - [Lvl 10] - Fist of Mourning.pdf](https://img.yumpu.com/42937391/1/190x146/scales-of-war-lvl-10-fist-of-mourningpdf.jpg?quality=85)
![[Lvl 19] - A Tyranny of Souls.pdf](https://img.yumpu.com/41897394/1/190x146/lvl-19-a-tyranny-of-soulspdf.jpg?quality=85)
![Scales of War - [Lvl 11] - Beyond the Mottled Tower.pdf](https://img.yumpu.com/41072792/1/190x146/scales-of-war-lvl-11-beyond-the-mottled-towerpdf.jpg?quality=85)