GNAV Pro Quick Reference Guide - NEC Corporation of America
GNAV Pro Quick Reference Guide - NEC Corporation of America
GNAV Pro Quick Reference Guide - NEC Corporation of America

Create successful ePaper yourself
Turn your PDF publications into a flip-book with our unique Google optimized e-Paper software.
2-4 Requirements and Installation<br />
Uninstalling <strong>GNAV</strong> <strong>Pro</strong><br />
You can remove the <strong>GNAV</strong> <strong>Pro</strong> from your computer using the Add/<br />
Remove <strong>Pro</strong>grams control panel. You can also uninstall the <strong>GNAV</strong> <strong>Pro</strong><br />
from the CD file “gnavsetup.exe”. The setup file automatically detects<br />
the current installation and leads you to the uninstall process. Due to<br />
differences in the control panel’s location between Micros<strong>of</strong>t Windows<br />
versions, consult your computer’s online help for specific instructions.<br />
To remove the <strong>GNAV</strong> <strong>Pro</strong> application, do the following:<br />
Step 1<br />
Step 2<br />
Step 3<br />
Step 4<br />
Locate the Add/Remove <strong>Pro</strong>grams control panel.<br />
Double-click the Add / Remove <strong>Pro</strong>grams icon. The Add / Remove<br />
<strong>Pro</strong>grams <strong>Pro</strong>perties window displays.<br />
Select <strong>GNAV</strong> <strong>Pro</strong> from the list <strong>of</strong> programs and click the Add / Remove<br />
button.<br />
When asked to verify that you want to uninstall <strong>GNAV</strong> <strong>Pro</strong>, click Yes to<br />
begin the uninstall.<br />
NOTE<br />
After the uninstall is complete, a dialog displays. If there are elements that could not<br />
be removed, then a Details button displays. The <strong>GNAV</strong> <strong>Pro</strong> folder will not be<br />
removed automatically but this can be performed manually. In default installations,<br />
this will be under the <strong>Pro</strong>gram Files / <strong>NEC</strong> folder. If you are reinstalling another<br />
version <strong>of</strong> <strong>GNAV</strong> <strong>Pro</strong>, then removing the directory is not necessary.<br />
Step 5<br />
Click OK to complete the uninstall procedure.<br />
Auto Update—<strong>GNAV</strong><strong>Pro</strong> Client 6.1.0 to 6.1.10<br />
<strong>GNAV</strong> <strong>Pro</strong> Client has an automatic (auto) update feature to check for<br />
updates. When prompted, you can choose to update your version <strong>of</strong><br />
<strong>GNAV</strong> <strong>Pro</strong> Client. This upgrade process is for <strong>GNAV</strong>Client 6.1.0 to 6.1.11.<br />
Follow the steps below to update <strong>GNAV</strong> <strong>Pro</strong>.<br />
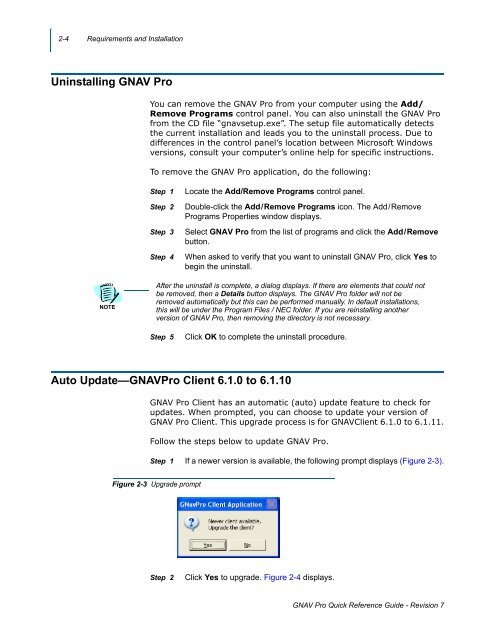
Step 1 If a newer version is available, the following prompt displays (Figure 2-3).<br />
Figure 2-3 Upgrade prompt<br />
Step 2<br />
Click Yes to upgrade. Figure 2-4 displays.<br />
<strong>GNAV</strong> <strong>Pro</strong> <strong>Quick</strong> <strong>Reference</strong> <strong>Guide</strong> - Revision 7