Raychem Heatshrink Products - RB Racing
Raychem Heatshrink Products - RB Racing
Raychem Heatshrink Products - RB Racing

You also want an ePaper? Increase the reach of your titles
YUMPU automatically turns print PDFs into web optimized ePapers that Google loves.
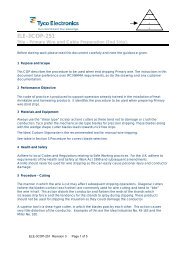
Adhesives<br />
Installation Guide (Continued)<br />
Molded Parts Pre-coated<br />
with Thermoplastic<br />
Adhesive<br />
Connector Boot<br />
1. Degrease the area of<br />
the adapter to which<br />
the boot will be bonded,<br />
using appropriate solvent<br />
on a paper tissue<br />
or clean cloth. Do not<br />
abrade the adapter or<br />
inside surface of the<br />
boot.<br />
2. Lightly abrade the bonding<br />
area of the cable<br />
jacket with #320 emery<br />
cloth, then wipe off loose<br />
particles with a tissue or<br />
clean cloth dampened<br />
with solvent.<br />
3. Position the boot on the<br />
adapter and cable.<br />
Apply heat starting at<br />
the connector end.<br />
4. Recover the connector<br />
end of the boot onto the<br />
adapter and continue<br />
heating until the area is<br />
fully recovered and the<br />
adhesive is properly<br />
melted.<br />
5. Complete the recovery<br />
of the boot, continuing<br />
toward the cable end of<br />
the boot until the part is<br />
fully recovered and the<br />
adhesive is properly<br />
melted. The adhesive<br />
should form a bead or<br />
fillet between the cable<br />
and boot when fully<br />
melted.<br />
6. With a clean cloth,<br />
remove excess<br />
adhesive from all<br />
areas immediately.<br />
7. Follow the curing<br />
conditions outlined in<br />
this guide.<br />
Transition<br />
1. Lightly abrade the bonding<br />
area of the cable<br />
jacket with #320 emery<br />
cloth, then wipe off loose<br />
particles with a tissue or<br />
clean cloth dampened<br />
with solvent.<br />
2. Center the molded part<br />
over the transition area.<br />
3. Apply heat to the center<br />
of the transition. Recover<br />
one leg of the transition,<br />
moving heat from the<br />
center of the transition<br />
to the adhesive opening<br />
of the leg. Repeat the<br />
procedure on each leg<br />
of the transition.<br />
4. Continue heating each<br />
end until the part is<br />
fully recovered and the<br />
adhesive has properly<br />
melted. The adhesive<br />
should form a bead or<br />
fillet between the cable<br />
and transition when<br />
fully melted.<br />
5. Follow the curing<br />
conditions specified<br />
for “thermosets” in the<br />
“Adhesive/Sealant<br />
Product Characteristics<br />
Table” on pages 10184<br />
and 10185.<br />
10188<br />
Catalog 1308940 Dimensions are in millimeters Dimensions are shown for USA: 1-800-522-6752 South America: 55-11-3611-1514<br />
Revised 5-03 and inches unless otherwise reference purposes only. Canada: 1-905-470-4425 Japan: 81-44-900-5102<br />
specified. Values in brackets Specifications subject Mexico: 01-800-733-8926 Singapore: 65-4866-151<br />
www.tycoelectronics.com are U.S. equivalents. to change. C. America: 52-55-5-729-0425 UK: 44-1793-528171