Raychem Heatshrink Products - RB Racing
Raychem Heatshrink Products - RB Racing
Raychem Heatshrink Products - RB Racing
You also want an ePaper? Increase the reach of your titles
YUMPU automatically turns print PDFs into web optimized ePapers that Google loves.
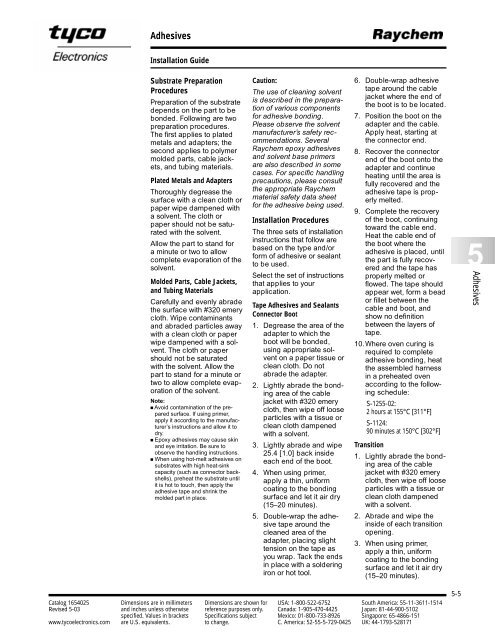
Adhesives<br />
Installation Guide<br />
Substrate Preparation<br />
Procedures<br />
Preparation of the substrate<br />
depends on the part to be<br />
bonded. Following are two<br />
preparation procedures.<br />
The first applies to plated<br />
metals and adapters; the<br />
second applies to polymer<br />
molded parts, cable jackets,<br />
and tubing materials.<br />
Plated Metals and Adapters<br />
Thoroughly degrease the<br />
surface with a clean cloth or<br />
paper wipe dampened with<br />
a solvent. The cloth or<br />
paper should not be saturated<br />
with the solvent.<br />
Allow the part to stand for<br />
a minute or two to allow<br />
complete evaporation of the<br />
solvent.<br />
Molded Parts, Cable Jackets,<br />
and Tubing Materials<br />
Carefully and evenly abrade<br />
the surface with #320 emery<br />
cloth. Wipe contaminants<br />
and abraded particles away<br />
with a clean cloth or paper<br />
wipe dampened with a solvent.<br />
The cloth or paper<br />
should not be saturated<br />
with the solvent. Allow the<br />
part to stand for a minute or<br />
two to allow complete evaporation<br />
of the solvent.<br />
Note:<br />
■ Avoid contamination of the prepared<br />
surface. If using primer,<br />
apply it according to the manufacturer’s<br />
instructions and allow it to<br />
dry.<br />
■ Epoxy adhesives may cause skin<br />
and eye irritation. Be sure to<br />
observe the handling instructions.<br />
■ When using hot-melt adhesives on<br />
substrates with high heat-sink<br />
capacity (such as connector backshells),<br />
preheat the substrate until<br />
it is hot to touch, then apply the<br />
adhesive tape and shrink the<br />
molded part in place.<br />
Caution:<br />
The use of cleaning solvent<br />
is described in the preparation<br />
of various components<br />
for adhesive bonding.<br />
Please observe the solvent<br />
manufacturer’s safety recommendations.<br />
Several<br />
<strong>Raychem</strong> epoxy adhesives<br />
and solvent base primers<br />
are also described in some<br />
cases. For specific handling<br />
precautions, please consult<br />
the appropriate <strong>Raychem</strong><br />
material safety data sheet<br />
for the adhesive being used.<br />
Installation Procedures<br />
The three sets of installation<br />
instructions that follow are<br />
based on the type and/or<br />
form of adhesive or sealant<br />
to be used.<br />
Select the set of instructions<br />
that applies to your<br />
application.<br />
Tape Adhesives and Sealants<br />
Connector Boot<br />
1. Degrease the area of the<br />
adapter to which the<br />
boot will be bonded,<br />
using appropriate solvent<br />
on a paper tissue or<br />
clean cloth. Do not<br />
abrade the adapter.<br />
2. Lightly abrade the bonding<br />
area of the cable<br />
jacket with #320 emery<br />
cloth, then wipe off loose<br />
particles with a tissue or<br />
clean cloth dampened<br />
with a solvent.<br />
3. Lightly abrade and wipe<br />
25.4 [1.0] back inside<br />
each end of the boot.<br />
4. When using primer,<br />
apply a thin, uniform<br />
coating to the bonding<br />
surface and let it air dry<br />
(15–20 minutes).<br />
5. Double-wrap the adhesive<br />
tape around the<br />
cleaned area of the<br />
adapter, placing slight<br />
tension on the tape as<br />
you wrap. Tack the ends<br />
in place with a soldering<br />
iron or hot tool.<br />
6. Double-wrap adhesive<br />
tape around the cable<br />
jacket where the end of<br />
the boot is to be located.<br />
7. Position the boot on the<br />
adapter and the cable.<br />
Apply heat, starting at<br />
the connector end.<br />
8. Recover the connector<br />
end of the boot onto the<br />
adapter and continue<br />
heating until the area is<br />
fully recovered and the<br />
adhesive tape is properly<br />
melted.<br />
9. Complete the recovery<br />
of the boot, continuing<br />
toward the cable end.<br />
Heat the cable end of<br />
the boot where the<br />
adhesive is placed, until<br />
the part is fully recovered<br />
and the tape has<br />
properly melted or<br />
flowed. The tape should<br />
appear wet, form a bead<br />
or fillet between the<br />
cable and boot, and<br />
show no definition<br />
between the layers of<br />
tape.<br />
10.Where oven curing is<br />
required to complete<br />
adhesive bonding, heat<br />
the assembled harness<br />
in a preheated oven<br />
according to the following<br />
schedule:<br />
S-1255-02:<br />
2 hours at 155°C [311°F]<br />
S-1124:<br />
90 minutes at 150°C [302°F]<br />
Transition<br />
1. Lightly abrade the bonding<br />
area of the cable<br />
jacket with #320 emery<br />
cloth, then wipe off loose<br />
particles with a tissue or<br />
clean cloth dampened<br />
with a solvent.<br />
2. Abrade and wipe the<br />
inside of each transition<br />
opening.<br />
3. When using primer,<br />
apply a thin, uniform<br />
coating to the bonding<br />
surface and let it air dry<br />
(15–20 minutes).<br />
5Adhesives<br />
Catalog 1654025 Dimensions are in millimeters Dimensions are shown for USA: 1-800-522-6752 South America: 55-11-3611-1514<br />
Revised 5-03 and inches unless otherwise reference purposes only. Canada: 1-905-470-4425 Japan: 81-44-900-5102<br />
specified. Values in brackets Specifications subject Mexico: 01-800-733-8926 Singapore: 65-4866-151<br />
www.tycoelectronics.com are U.S. equivalents. to change. C. America: 52-55-5-729-0425 UK: 44-1793-528171<br />
5-5


