- Page 1:
ChemOffice.Com ® ChemOffice ® Che
- Page 4 and 5:
License Information ChemOffice, Che
- Page 6 and 7:
· Licensed users of ChemOffice Ent
- Page 8 and 9:
computer, except as provided below.
- Page 10 and 11:
Q: IS IT OK TO COPY MY COLLEAGUE’
- Page 12 and 13:
A Guide to CambridgeSoft Manuals An
- Page 14 and 15:
Administrator Setting Molecular Sur
- Page 16 and 17:
Administrator Methods Available in
- Page 18 and 19:
Administrator Defining Atom Types.
- Page 20 and 21:
Administrator • CambridgeSoft
- Page 22 and 23:
Administrator provides a balance be
- Page 24 and 25:
Administrator the activation each t
- Page 26 and 27:
Administrator The following table d
- Page 28 and 29:
Administrator • Stereo Pairs—A
- Page 30 and 31:
Administrator • Bond Angles—Dis
- Page 32 and 33:
Administrator The Building Toolbar
- Page 34 and 35:
Administrator The Calculation Toolb
- Page 36 and 37:
Administrator 1. Right-click in the
- Page 38 and 39:
Administrator • In the Model Sett
- Page 40 and 41:
Administrator modes and color setti
- Page 42 and 43:
Administrator 30 •Chem3D Basics C
- Page 44 and 45:
Administrator 2. Click the ChemDraw
- Page 46 and 47:
3. Move the pointer over the C-C bo
- Page 48 and 49:
Administrator Add serial numbers an
- Page 50 and 51:
Administrator 5. Press the Enter ke
- Page 52 and 53:
. Administrator b. From the Structu
- Page 54 and 55:
Administrator In the Measurements t
- Page 56 and 57:
A molecule of Epinephrine appears.
- Page 58 and 59:
Administrator Tutorial 7: Docking M
- Page 60 and 61:
Administrator To save the iteration
- Page 62 and 63:
The allyl radical, CH 2 =CHCH 2·,
- Page 64 and 65:
Administrator Determine the raw spi
- Page 66 and 67:
Administrator atoms are relatively
- Page 68 and 69:
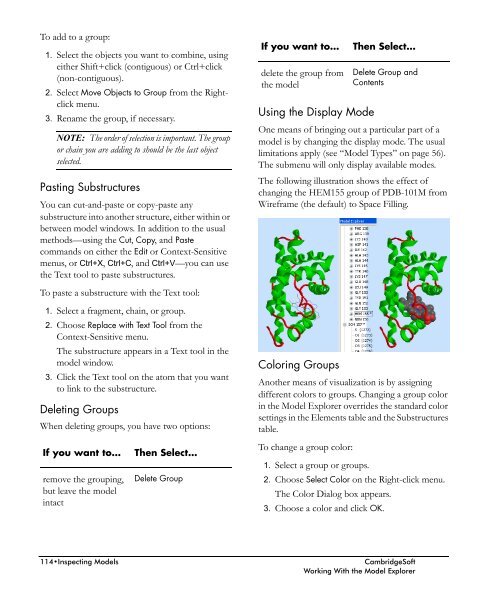
To change the structural display ty
- Page 70 and 71:
Administrator When sizing by partia
- Page 72 and 73:
Administrator Depth Fading3D enhanc
- Page 74 and 75:
• Select Parallel to rotate the r
- Page 76 and 77: Administrator • From the Computat
- Page 78 and 79: Administrator Surface Type Solid De
- Page 80 and 81: Administrator 2. Adjust the slider
- Page 82 and 83: Administrator Density surface is ca
- Page 84 and 85: Administrator 72 •Displaying Mode
- Page 86 and 87: Administrator The following table d
- Page 88 and 89: Administrator When Correct Atom Typ
- Page 90 and 91: Administrator To use the same text
- Page 92 and 93: Administrator Example 2. Building a
- Page 94 and 95: Administrator copied into blank tab
- Page 96 and 97: Administrator 3. Type the atom type
- Page 98 and 99: Administrator Clean Up Structure or
- Page 100 and 101: Setting Serial Numbers this step, y
- Page 102 and 103: Administrator Refining a Model Afte
- Page 104 and 105: Administrator Selecting Multiple At
- Page 106 and 107: Administrator New in Chem3D version
- Page 108 and 109: Administrator Dragging moves atoms
- Page 110 and 111: Administrator 3. Hold down the Shif
- Page 112 and 113: To position a plane in your model p
- Page 114 and 115: Administrator • Second Positioned
- Page 116 and 117: Administrator For example, consider
- Page 118 and 119: Administrator If you want to displa
- Page 120 and 121: Administrator Example: To examine t
- Page 122 and 123: Administrator Chem3D provides two o
- Page 124 and 125: Administrator change a property. By
- Page 128 and 129: To stop spinning: • On the Movie
- Page 130 and 131: Administrator If you want to … Th
- Page 132 and 133: Administrator EPS The PostScript fi
- Page 134 and 135: If you want the file to … Then cl
- Page 136 and 137: Molecular Design Limited MolFile (.
- Page 138 and 139: Administrator 7. Leave the last lin
- Page 140 and 141: Administrator 128•Printing and Ex
- Page 142 and 143: Administrator • Semiempirical Ext
- Page 144 and 145: Method Type Advantages Disadvantage
- Page 146 and 147: Administrator • A single point ca
- Page 148 and 149: Administrator • Molecular mechani
- Page 150 and 151: Administrator constant), while θ 0
- Page 152 and 153: Administrator The van der Waals int
- Page 154 and 155: Administrator 6. The modified value
- Page 156 and 157: the same wave function and a consta
- Page 158 and 159: Administrator A variety of other ba
- Page 160 and 161: Administrator Molecular wave functi
- Page 162 and 163: Administrator activation barriers.
- Page 164 and 165: 3. From the Calculations menu, poin
- Page 166 and 167: minimizing a second model, the mini
- Page 168 and 169: Administrator move to lower the ene
- Page 170 and 171: . Administrator Molecular Dynamics
- Page 172 and 173: Administrator If you want to … Th
- Page 174 and 175: Administrator The Compute Propertie
- Page 176 and 177:
Administrator To run a previously c
- Page 178 and 179:
Administrator The procedures assume
- Page 180 and 181:
Administrator improvements in each
- Page 182 and 183:
Administrator • Overall errors in
- Page 184 and 185:
Administrator The following table c
- Page 186 and 187:
Administrator TRIPLET QUARTET QUINT
- Page 188 and 189:
Administrator Chemical symbol ++ ba
- Page 190 and 191:
Administrator 4. Click Run. A new m
- Page 192 and 193:
Administrator Minimizing Energy Min
- Page 194 and 195:
Administrator criteria, to optimize
- Page 196 and 197:
Administrator 6. Hold down the S ke
- Page 198 and 199:
Administrator Dipole Moment The dip
- Page 200 and 201:
Administrator Molecular Surfaces Mo
- Page 202 and 203:
The following table contains the ke
- Page 204 and 205:
Administrator 3. Click in the model
- Page 206 and 207:
Keyword Description 7. On the Prope
- Page 208 and 209:
Administrator Hyperfine Coupling Co
- Page 210 and 211:
Administrator 198•MOPAC Computati
- Page 212 and 213:
Administrator If you want to … re
- Page 214 and 215:
Administrator In the Results In tex
- Page 216 and 217:
Administrator Repeating a Gaussian
- Page 218 and 219:
Property Description Property Descr
- Page 220 and 221:
Property Description Error Message
- Page 222 and 223:
Administrator Property Electronic E
- Page 224 and 225:
Administrator To specify the calcul
- Page 226 and 227:
Administrator 3. Click Open. The ap
- Page 228 and 229:
Administrator • Server—limits t
- Page 230 and 231:
Administrator To perform property c
- Page 232 and 233:
The Step 4 of 4 dialog box appears.
- Page 234 and 235:
Administrator • From the ChemOffi
- Page 236 and 237:
Administrator Accessing the Online
- Page 238 and 239:
Administrator To find a structure t
- Page 240 and 241:
Administrator 228• Accessing the
- Page 242 and 243:
Administrator Performance Below are
- Page 244 and 245:
Administrator Defining Substructure
- Page 246 and 247:
Administrator If an atom can be ass
- Page 248 and 249:
Key Drag Shift+Drag Administrator Q
- Page 250 and 251:
Administrator 238• Keyboard Modif
- Page 252 and 253:
Administrator Example 3 In Example
- Page 254 and 255:
Administrator 14 13 H 2.197 -0.8229
- Page 256 and 257:
Administrator Connection tables by
- Page 258 and 259:
Administrator FORTRAN Formats The F
- Page 260 and 261:
5 6 1.11606 3 109.41 5 109.41 -1 21
- Page 262 and 263:
Administrator 41 4 1 0 0 0 0 0 0 0
- Page 264 and 265:
Administrator 32 3 12 1 0 0 0 33 3
- Page 266 and 267:
Administrator 13 * 3D displacement
- Page 268 and 269:
Administrator The field value for C
- Page 270 and 271:
Administrator Line 4e: C 1.53597 1
- Page 272 and 273:
Administrator CONECT 4 2 9 10 11 CO
- Page 274 and 275:
Administrator COMPND ATOM HETATM CO
- Page 276 and 277:
Administrator Line 56 -2794 21139 6
- Page 278 and 279:
Administrator 7 2 10 1 8 3 6 1 9 3
- Page 280 and 281:
Administrator Line 16 6 C -0.559 1.
- Page 282 and 283:
Administrator 12. Line 30, “@BOND
- Page 284 and 285:
Parameter Table Use Parameter Table
- Page 286 and 287:
Administrator 3. Type the informati
- Page 288 and 289:
Administrator Geometry The geometry
- Page 290 and 291:
Administrator KS The KS, or bond st
- Page 292 and 293:
Administrator one attached hydrogen
- Page 294 and 295:
Administrator bond length between t
- Page 296 and 297:
Administrator R* The R* field is th
- Page 298 and 299:
Administrator The V1 torsional cons
- Page 300 and 301:
Administrator VDW Interactions The
- Page 302 and 303:
Administrator Editing Parameters Yo
- Page 304 and 305:
Administrator 6. The pi molecular o
- Page 306 and 307:
Administrator Adding Parameters to
- Page 308 and 309:
Administrator fragments 84 paramete
- Page 310 and 311:
Administrator CC1 see Cartesian coo
- Page 312 and 313:
Administrator Copy As Bitmap comman
- Page 314 and 315:
Administrator Examining angles, tut
- Page 316 and 317:
Administrator density 67 editing 67
- Page 318 and 319:
Administrator editing 107 non-bonde
- Page 320 and 321:
Administrator repeating jobs 178 RH
- Page 322 and 323:
Administrator Rectification, when d
- Page 324 and 325:
Administrator all atoms 95 atoms or
- Page 326 and 327:
Administrator Translucent surface t
- Page 328 and 329:
Desktop Software Enterprise Solutio
- Page 330 and 331:
SOLUTIONS Enterprise Solutions APPL
- Page 332 and 333:
Desktop to Enterprise Solutions Che
- Page 334 and 335:
SOFTWARE E-Notebook Ultra Ultimate
- Page 336 and 337:
SOFTWARE ChemDraw Ultra Ultimate Dr
- Page 338 and 339:
SOFTWARE Chem3D Ultra Ultimate Mode
- Page 340 and 341:
SOFTWARE ChemFinder/Word • Search
- Page 342 and 343:
SOFTWARE The Merck Index • Encycl
- Page 344 and 345:
SOLUTIONS •Development and deploy
- Page 346 and 347:
SOLUTIONS •Adds chemical data typ
- Page 348 and 349:
MANAGEMENT •Custom organization o
- Page 350 and 351:
MANAGEMENT • Indexes chemical str
- Page 352 and 353:
MANAGEMENT • E-Notebook Enterpris
- Page 354 and 355:
DISCOVERY • Accessed through your
- Page 356 and 357:
DISCOVERY • Integrated with Regis
- Page 358 and 359:
DISCOVERY • Reagent lists can be
- Page 360 and 361:
DISCOVERY •Effectively manages da
- Page 362 and 363:
DISCOVERY • Catalog driven data m
- Page 364 and 365:
DATABASES • Fully structure-searc
- Page 366 and 367:
DATABASES • Encyclopedic referenc
- Page 368 and 369:
DATABASES • Extensive collection
- Page 370:
SERVICES · Business Case Developme
- Page 375:
CS ChemOffice ® Desktop to Enterpr