KM-2030 Instruction Handbook - KYOCERA Document Solutions
KM-2030 Instruction Handbook - KYOCERA Document Solutions
KM-2030 Instruction Handbook - KYOCERA Document Solutions

Create successful ePaper yourself
Turn your PDF publications into a flip-book with our unique Google optimized e-Paper software.
INSTRUCTION HANDBOOK<br />
* The above illustration includes the optional original cover.<br />
Please read the instruction handbook before using the copier.<br />
Keep it close to the copier for easy reference.
As an ENERGY STAR Partner, <strong>KYOCERA</strong> MITA CORPORATION has determined<br />
that this product meets the ENERGY STAR guidelines for energy efficiency.<br />
The ENERGY STAR program is an energy reduction plan introduced by the United<br />
States Environmental Protection Agency in response to environmental issues and for<br />
the purpose of advancing the development and utilization of more energy efficient<br />
office equipment.<br />
* ENERGY STAR is a U.S. registered mark.<br />
The Auto-Shut-off time setting becomes 15 to 120 minutes in the areas<br />
corresponding to the Swiss Energy 2000 program.<br />
All rights reserved. No part of this material may be reproduced or transmitted in any<br />
form or by any means, electronic or mechanical, including photocopying, recording<br />
or by any information storage and retrieval system, without permission in writing from<br />
the Publisher.<br />
Legal Restriction On Copying<br />
• It may be prohibited to copy copyrighted material without permission of the copyright<br />
owner.<br />
• It is prohibited under any circumstances to copy domestic or foreign currencies.<br />
• Copying other items may be prohibited.
Please read the instruction handbook before using the copier. Keep it close to the copier for easy<br />
reference.<br />
The sections of this handbook and parts of the copier marked with symbols are safety warnings meant to<br />
protect the user, other individuals and surrounding objects, and ensure correct and safe usage of the copier.<br />
The symbols and their meanings are indicated below.<br />
DANGER: Indicates that serious injury or even death will very possibly result from insufficient attention to<br />
or incorrect compliance with the related points.<br />
WARNING: Indicates that serious injury or even death may result from insufficient attention to or incorrect<br />
compliance with the related points.<br />
CAUTION: Indicates that personal injury or mechanical damage may result from insufficient attention to<br />
or incorrect compliance with the related points.<br />
Symbols<br />
The m symbol indicates that the related section includes safety warnings. Specific points of attention are<br />
indicated inside the symbol.<br />
.................... [General warning]<br />
.................... [Warning of danger of electrical shock]<br />
.................... [Warning of high temperature]<br />
The symbol indicates that the related section includes information on prohibited actions. Specifics of the<br />
prohibited action are indicated inside the symbol.<br />
.................... [Warning of prohibited action]<br />
.................... [Disassembly prohibited]<br />
The ● symbol indicates that the related section includes information on actions which must be performed.<br />
Specifics of the required action are indicated inside the symbol.<br />
.................... [Alert of required action]<br />
.................... [Remove the power plug from the outlet]<br />
.................... [Always connect the copier to an outlet with a ground connection]<br />
Please contact your service representative to order a replacement if the safety warnings in the handbook are<br />
illegible or if the handbook itself is missing. (fee required)
CONTENTS<br />
CHAPTER 1<br />
IMPORTANT! PLEASE READ FIRST ..... 1-1<br />
CAUTION LABELS ............................................... 1-1<br />
INSTALLATION PRECAUTIONS .......................... 1-2<br />
PRECAUTIONS FOR USE ................................... 1-3<br />
CHAPTER 2 NAMES OF PARTS ........... 2-1<br />
1. Main body ................................................................. 2-1<br />
2. Operation panel ........................................................ 2-3<br />
CHAPTER 3 HOW TO LOAD PAPER .... 3-1<br />
1. How to load paper .................................................... 3-1<br />
(1) Precautions for loading paper .............................. 3-1<br />
(2) Loading paper into the drawer ............................. 3-1<br />
(3) Loading paper into the multi-bypass .................... 3-2<br />
● Setting the paper size for the multi-bypass ...... 3-3<br />
● Setting envelopes ............................................. 3-4<br />
2. Replacing the toner cartridge<br />
and waste toner tank ................................................ 3-5<br />
CHAPTER 4 BASIC OPERATION ........ 4-1<br />
1. Basic copying procedure .......................................... 4-1<br />
2. Enlargement/reduction ............................................. 4-4<br />
(1) Auto magnification selection mode ...................... 4-4<br />
(2) Zoom copy mode ................................................. 4-4<br />
(3) Standard zoom mode .......................................... 4-5<br />
(4) Size zoom mode .................................................. 4-5<br />
3. Interrupt copying ....................................................... 4-6<br />
4. Energy saver (preheat) function ............................... 4-7<br />
5. Auto shut-off function ................................................ 4-7<br />
CHAPTER 5 FUNCTIONS ................... 5-1<br />
1. Duplex copying from various originals<br />
[Duplex copy] ............................................................ 5-1<br />
(1) Duplex copying from two-sided originals ............. 5-1<br />
(2) Duplex copying from a book original .................... 5-1<br />
(3) Duplex copying from one-sided originals ............. 5-2<br />
2. Copying two-page originals as separate pages<br />
[Page separation copy mode] ................................. 5-4<br />
(1) Page separation copies from book originals ........ 5-4<br />
(2) Page separation copies from two-sided originals 5-4<br />
3. Making a margin space for binding [Margin mode] ... 5-5<br />
4. Making copies with clean edges<br />
[Border erase mode] ................................................. 5-6<br />
(1) Erasing blemishes from edges of copies<br />
(Sheet Erase) ....................................................... 5-6<br />
(2) Erasing blemishes from the edges and middle of<br />
copies made from books (Book Erase) ................ 5-6<br />
5. One copy from two or four originals [Layout copy] ... 5-7<br />
(1) 2-UP ..................................................................... 5-7<br />
(2) 4-UP ..................................................................... 5-7<br />
6. Sorting automatically [Sort copy] .............................. 5-9<br />
7. Rotate copy ............................................................ 5-10<br />
8. Auto selection mode ............................................... 5-10<br />
CHAPTER 6<br />
COPIER MANAGEMENT ........................ 6-1<br />
1. Copy management ................................................... 6-1<br />
(1) Copy management mode .................................... 6-1<br />
(2) How to display the selection screen of the<br />
copy management mode ...................................... 6-3<br />
(3) How to make various settings .............................. 6-3<br />
(4) Making copies when the copier is in the<br />
copy management mode ...................................... 6-8<br />
2. Default settings ......................................................... 6-9<br />
(1) Copy default settings ........................................... 6-9<br />
(2) How to set the copy default setting mode ...........6-11<br />
(3) Machine default settings .................................... 6-14<br />
(4) How to set the machine default setting mode .... 6-16<br />
3. Selection of language ............................................. 6-19<br />
CHAPTER 7 OPTIONAL EQUIPMENT .. 7-1<br />
(1) ADF (Automatic document feeder) ...................... 7-1<br />
1 Originals that can be used with the DF ........... 7-1<br />
2 Precautions for the use of DF ......................... 7-1<br />
3 DF part names ................................................ 7-1<br />
4 How to set originals in the DF ......................... 7-1<br />
5 How to set originals on the platen ................... 7-2<br />
(2) RADF (Reversing Auto <strong>Document</strong> Feeder) ......... 7-3<br />
(3) Drawer ................................................................. 7-3<br />
(4) Finisher ................................................................ 7-3<br />
(5) Duplex unit ........................................................... 7-3<br />
(6) Job separator ....................................................... 7-3<br />
(7) Key counter .......................................................... 7-3<br />
(8) Printer board ........................................................ 7-4<br />
(9) Printer network board .......................................... 7-4<br />
(10) Network scanner ................................................ 7-4<br />
CHAPTER 8<br />
WHEN A PROBLEM OCCURS ............... 8-1<br />
1. Error messages ........................................................ 8-1<br />
2. When paper misfeeds ............................................... 8-3<br />
(1) Misfeed location indicators .................................. 8-3<br />
(2) Cautions ............................................................... 8-3<br />
(3) Removal procedures ............................................ 8-3<br />
3. Troubleshooting ....................................................... 8-7<br />
CHAPTER 9<br />
CLEANING AND SPECIFICATIONS ....... 9-1<br />
1. Cleaning the copier ................................................... 9-1<br />
2. Specifications ........................................................... 9-2<br />
i
● MAKING FULL USE OF THE MACHINE’S ADVANCED FUNCTIONS<br />
1 Having the machine automatically select 2<br />
paper of the same size as the original<br />
<br />
(page 4-1)<br />
Various functions for making enlarged<br />
and reduced copies<br />
■ Enlarging/reducing copies to fit the<br />
size of paper in a specified drawer<br />
<br />
(page 4-4)<br />
■ Enlarging/reducing copies to any<br />
desired size in the 50 - 200% range.<br />
(page 4-4)<br />
■ Specifying the magnification by selecting<br />
the paper size<br />
(page 4-5)<br />
■ Selecting the zoom ratio with one<br />
touch<br />
(page 4-5)<br />
3<br />
Making clear reproductions of photographs<br />
(page 4-2)<br />
4<br />
Making a margin on copies<br />
5<br />
Making copies with clean edges<br />
6<br />
(page 5-5)<br />
(page 5-6)<br />
Making one copy from two or four<br />
originals<br />
(page 5-7)<br />
7<br />
Copying two-page originals as separate Duplex copying from various originals<br />
8 9<br />
pages<br />
<br />
(page 5-4)<br />
(page 5-1)<br />
* When optional duplex unit is installed.<br />
Sorting automatically<br />
(page 5-9)<br />
10<br />
Changing copy orientation for easy<br />
Making copies from originals of different<br />
11 12<br />
sorting<br />
(page 5-9)<br />
sizes at a time<br />
(page 5-10)<br />
* When optional ADF or RADF is<br />
installed.<br />
Managing the number of copies by IDcode<br />
(page 6-1)<br />
ii
13<br />
A full range of optional equipment is<br />
available<br />
■ ADF (automatic document feeder)<br />
(page 7-1)<br />
● MAKING FULL USE OF THE MACHINE’S ADVANCED FUNCTIONS<br />
■ RADF (Reversing Auto <strong>Document</strong><br />
Feeder) (page 7-3)<br />
■ Drawer (page 7-3)<br />
■ Finisher (page 7-3) ■ Duplex unit (page 7-3) ■ Job separator (page 7-3)<br />
■ Key counter (page 7-3) ■ Printer board (page 7-4)<br />
■ Printer network board (page 7-4)<br />
■ Network scanner (page 7-4)<br />
iii
CHAPTER 1 IMPORTANT! PLEASE READ FIRST.<br />
CAUTION LABELS<br />
Caution labels have been attached to the copier at the following locations for safety purposes.<br />
BE SUFFICIENTLY CAREFUL to avoid fire or electric shock when removing a paper jam or when replacing toner.<br />
Label 2<br />
High temperature inside. Do not touch<br />
parts in this area, because there is a<br />
danger of getting burned. ......................<br />
Label 1<br />
High voltage inside. NEVER touch parts<br />
in this area, because there is a danger of<br />
electric shock. ...........................................<br />
Label 3<br />
Do not incinerate toner and toner<br />
containers. Dangerous sparks may cause<br />
burn. ......................................................<br />
NOTE: DO NOT remove these labels.<br />
1-1
INSTALLATION PRECAUTIONS<br />
■ Environment<br />
CAUTION<br />
• Avoid placing the copier on or in locations which are<br />
unstable or not level. Such locations may cause the<br />
copier to fall down or fall over. This type of situation<br />
presents a danger of personal injury or damage to the<br />
copier. .........................................................................<br />
• Avoid locations with humidity or dust and dirt. If dust or<br />
dirt become attached to the power plug, clean the plug<br />
to avoid the danger of fire or electrical shock. ............<br />
• Avoid locations near radiators, heaters, or other heat<br />
sources, or locations near flammable items, to avoid<br />
the danger of fire. ........................................................<br />
■ Power supply/Grounding the copier<br />
WARNING<br />
• DO NOT use a power supply with a voltage other than<br />
that specified. Avoid multiple connections in the same<br />
outlet. These types of situations present a danger of<br />
fire or electrical shock. ...............................................<br />
• Plug the power cord securely into the outlet. If metallic<br />
objects come in contact with the prongs on the plug, it<br />
may cause a fire or electric shock. .............................<br />
• Always connect the copier to an outlet with a ground<br />
connection to avoid the danger of fire or electrical shock<br />
in case of an electric short. If an earth connection is<br />
not possible, contact your service representative. .....<br />
• To keep the copier cool and facilitate changing of<br />
parts and maintenance, allow access space as shown<br />
below.<br />
Leave adequate space, especially around the left<br />
cover, to allow air to be properly ventilated out of<br />
the copier. .................................................................<br />
Other precautions<br />
• Connect the power plug to the closest outlet possible to<br />
the copier.<br />
■ Handling of plastic bags<br />
WARNING<br />
• Keep the plastic bags that are used with the copier away<br />
from children. The plastic may cling to their nose and<br />
mouth causing suffocation..........................................<br />
• Always use the caster stoppers to stabilize the copier<br />
once it is in place to keep it from moving and/or falling<br />
over and causing injury...............................................<br />
Other precautions<br />
• Adverse environmental conditions may affect the safe<br />
operation and performance of the copier. Install in an<br />
air-conditioned room (recommended room temperature:<br />
around 20°C, humidity: around 65%RH) and avoid the<br />
following locations when selecting a site for the copier.<br />
. Avoid locations near a window or with exposure to<br />
direct sunlight.<br />
. Avoid locations with vibrations.<br />
. Avoid locations with drastic temperature fluctuations.<br />
. Avoid locations with direct exposure to hot or cold air.<br />
. Avoid poorly ventilated locations.<br />
1-2
PRECAUTIONS FOR USE<br />
■ Cautions when using the copier<br />
WARNING<br />
• DO NOT place metallic objects or containers with water<br />
(flower vases, flower pots, cups, etc.) on or near the<br />
copier. This type of situation presents a danger of fire<br />
or electrical shock should they fall inside. ...................<br />
• DO NOT remove any of the covers from the copier as<br />
there is a danger of electrical shock from high voltage<br />
parts inside the copier. ................................................<br />
• DO NOT damage, break or attempt to repair the power<br />
cord. DO NOT place heavy objects on the cord, pull it,<br />
bend it unnecessarily or cause any other type of damage.<br />
These types of situations present a danger of fire or<br />
electrical shock. ..........................................................<br />
• NEVER attempt to repair or disassemble the copier or<br />
its parts as there is a danger of fire, electrical shock or<br />
damage to the laser. If the laser beam escapes, there<br />
is a danger of it causing blindness. .............................<br />
• If the copier becomes excessively hot, smoke appears<br />
from the copier, there is an odd smell, or any other<br />
abnormal situation occurs, there is a danger of fire or<br />
electrical shock. Turn the main switch OFF (O)<br />
immediately, remove the power plug from the outlet and<br />
contact your service representative. ...........................<br />
• If anything harmful (paper clips, water, other fluids, etc.)<br />
falls into the copier, turn the main switch OFF (O)<br />
immediately. Next, remove the power plug from the<br />
outlet to avoid the danger of fire or electrical shock. Then<br />
contact your service representative. ...........................<br />
• DO NOT remove or connect the power plug with wet<br />
hands, as there is a danger of electrical shock. ..........<br />
• ALWAYS contact your service representative for<br />
maintenance or repair of internal parts. ......................<br />
CAUTION<br />
• DO NOT pull the power cord when removing it from the<br />
outlet. If the power cord is pulled, the wires may become<br />
broken and there is a danger of fire or electrical shock.<br />
(ALWAYS grasp the power plug when removing the<br />
power cord from the outlet.) ........................................<br />
• ALWAYS remove the power plug from the outlet when<br />
moving the copier. If the power cord is damaged, there<br />
is a danger of fire or electrical shock. .........................<br />
• If the copier will not be used for a short period of time<br />
(overnight, etc.), turn the main switch OFF (O).<br />
If it will not be used for an extended period of time<br />
(vacations, etc.), remove the power plug from the outlet<br />
for safety purposes during the time the copier is not in<br />
use. .............................................................................<br />
• ALWAYS hold the designated parts only when lifting or<br />
moving the copier. .......................................................<br />
• For safety purposes, ALWAYS remove the power plug<br />
from the outlet when performing cleaning operations. ..<br />
Other precautions<br />
• DO NOT place heavy objects on the copier or cause<br />
other damage to the copier.<br />
• DO NOT open the front cover, turn off the main switch,<br />
or pull out the power plug during copying.<br />
• During copying, some ozone is released, but the amount<br />
does not cause any ill effect to one's health. If, however,<br />
the copier is used over a long period of time in a poorly<br />
ventilated room or when making an extremely large<br />
number of copies, the smell may become unpleasant.<br />
To maintain the appropriate environment for copy work,<br />
it is suggested that the room be properly ventilated.<br />
• When lifting or moving the copier, contact your service<br />
representative.<br />
• Do not touch electrical parts, such as connectors or<br />
printed circuit boards. They could be damaged by static<br />
electricity.<br />
• DO NOT attempt to perform any operations not<br />
explained in this handbook.<br />
• CAUTION : Use of controls or adjustments or<br />
performance of procedures other than those specified<br />
herein may result in hazardous radiation exposure.<br />
■ Cautions when handling<br />
consumables<br />
CAUTION<br />
• Avoid inhalation, ingestion, skin or eye contact. If<br />
ingestion occurs, dilute stomach contents thoroughly<br />
with water and seek medical treatment. If skin contact<br />
occurs, wash with soap and water. If contact with eyes<br />
occurs, flush thoroughly with water and seek medical<br />
treatment. ....................................................................<br />
• Prolonged inhalation of excessive dusts may cause lung<br />
damage. Use of this product, as intended, does not result<br />
in inhalation of excessive dusts. .................................<br />
• Keep away from children. ...........................................<br />
• Do not incinerate toner and toner containers. Dangerous<br />
sparks may cause burn. ..............................................<br />
Other precautions<br />
• Always read the safety instructions which are included<br />
in the box or printed on the container when handling<br />
consumables.<br />
• Dispose of the toner or toner containers in accordance<br />
with Federal, State and Local rules and regulations.<br />
• Store consumables in a cool, dark location.<br />
• If the copier will not be used for an extended period of<br />
time, remove the paper from the cassette, return it to its<br />
original package and reseal it.<br />
• If dust accumulates within the copier, there is a danger<br />
of fire or other trouble. It is therefore recommended that<br />
you consult with your service representative in regard<br />
to cleaning of internal parts. This is particularly effective<br />
if accomplished prior to seasons of high humidity.<br />
Consult with your service representative in regard to<br />
the cost of cleaning the internal parts of the copier. ...<br />
1-3
CHAPTER 2 NAMES OF PARTS<br />
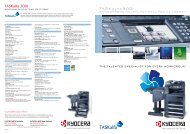
1. Main body<br />
2-1
CHAPTER 2 NAMES OF PARTS<br />
1 Original cover <br />
(Open/close to set the original on the platen.)<br />
2 Operation panel<br />
(Contains the keys and indicators for operating the copier.)<br />
3 Left cover handle<br />
(Hold to open the left cover.)<br />
4 Left cover<br />
(Open when a paper misfeed occurs.)<br />
5 Multi-Bypass<br />
(Load paper here when copying onto small-size or special<br />
paper.)<br />
6 Insert guides<br />
(Be sure to set the paper width when loading paper on the<br />
multi-bypass.)<br />
7 Support tray<br />
(Operate to use large-size paper.)<br />
8 Toner cartridge<br />
9 Toner cartridge release lever<br />
(Operate to replace the toner cartridge.)<br />
0 Waste toner tank<br />
! Waste toner tank release lever<br />
(Operate to replace the waste toner tank.)<br />
@ Cleaning shaft<br />
(Pull and push back in after toner cartridge replacement or<br />
when copy images become soiled with toner.)<br />
# Front cover<br />
(Open to replace the toner cartridge or waste toner tank.)<br />
$ Main switch<br />
(Turn ON (|) before starting to make copies.)<br />
% Copy store section<br />
(Copied paper is stored here.)<br />
^ Ejection section<br />
& Platen<br />
(Set originals here for copying. Place originals face-down<br />
with the edges aligned with the size scales on the left and<br />
rear sides of the platen.)<br />
* Original size scales<br />
(Be sure to align the original with these when setting the<br />
original on the platen.)<br />
( Drawer 1<br />
(Holds up to 250 sheets of standard paper [standard paper<br />
specified by our company].)<br />
) Drawer 2<br />
(Holds up to 250 sheets of standard paper [standard paper<br />
specified by our company].)<br />
⁄ Drawer left cover<br />
(Open when a paper misfeed occurs inside the drawer left<br />
cover.)<br />
¤ Length adjustment plate<br />
(Adjust to the length of the paper to be set in the drawer.)<br />
‹ Width adjustment lever<br />
(Hold the lever and adjust the width guide to the width of<br />
the paper to be set in the drawer.)<br />
› Drawer bottom plate<br />
(Push down when loading paper.)<br />
fi Handles for transport<br />
(The right two handles are indented handles. The left two<br />
become handles when pulled out.)<br />
2-2
CHAPTER 2<br />
NAMES OF PARTS<br />
2. Operation panel<br />
1 Start key (Indicator)<br />
(When the indicator is lit green, press to start copying.)<br />
2 Clear All key (See the “● Initial mode” on page 2-4.)<br />
3 Interrupt key (Indicator)<br />
(Press to interrupt copying. The Indicator will light when the<br />
key is pressed. See page 4-6.)<br />
4 Energy Saver (preheat) key (Indicator)<br />
(Press to select the energy saver mode. The indicator is lit<br />
while the energy saver mode is ON. See page 4-7.)<br />
5 Stop/Clear key<br />
(Press to stop copying or to change the number of copies<br />
to be made. Press to return to the previous setting screen,<br />
such as the copy function setting, too.)<br />
6 Numeric keys<br />
(Press to set the number of copies and enter other values.)<br />
7 Message display<br />
(Displays messages on how to operate the copier as well<br />
as trouble. Display contrast can be adjusted.<br />
See “! DISPLAY CONTRAST ADJUST.” on page 6-18.)<br />
8 Enter key<br />
(Press to confirm selected functions and selected items on<br />
the message display.)<br />
9 Paper Select/Cursor up key<br />
(Paper size can be selected by simply changing the paper<br />
feed drawer. The paper size selected at present is indicated<br />
on the message display. Also used to move the<br />
cursor in the message display upward.)<br />
0 Original/Cursor down key<br />
(Press to select the original size. Also used to move the<br />
cursor in the message display downward.)<br />
! Manual/Cursor right key<br />
(Press to make copies at the same ratio, regardless of the<br />
original size. Also used to move the cursor in the message<br />
display to the right.)<br />
2-3<br />
@ Cursor left key<br />
(Press to move the cursor in the message display to the<br />
left.)<br />
# Machine Error indicator<br />
(Lights when a machine problem occurs, such as a paper<br />
misfeed.)<br />
$ Data indicator<br />
(Lights/blinks when using the optional printer function.)<br />
% Zoom (+) key<br />
(Press to increase magnification ratio in zoom copying.)<br />
^ Zoom (–) key<br />
(Press to decrease magnification ratio in zoom copying.)<br />
& Preset R/E key<br />
(Press to change the magnification ratio.)<br />
* On-line/Printer key (Indicator)<br />
(Press to switch to the printer mode when the optional<br />
printer board has been installed. The On-line/Printer<br />
indicator will light while the copier is in the online mode.)<br />
( Layout key (Indicator)<br />
(Press to copy multiple images onto the same face of the<br />
copy. The indicator is lit in the layout copy mode.<br />
See page 5-7.)<br />
) Copy exposure adjustment keys/Copy exposure indicators<br />
(Press to adjust copy exposure. The indicator will show the<br />
present copy exposure.)<br />
⁄ Scanner key (Indicator)<br />
(Press to switch to the scanner mode when the optional<br />
network scanner has been installed. The indicator will light<br />
while the copier is in the scanner mode.)<br />
¤ Duplex/Split Page key (Indicator)<br />
(Press to perform duplex or page separation copying. The<br />
indicator will light. The optional duplex unit must be<br />
installed to use these functions. See pages 5-1 and 4.)<br />
‹ * /Language key<br />
(Press to set copy management, default settings and<br />
language selection.)
CHAPTER 2<br />
NAMES OF PARTS<br />
● Initial mode (at the end of warm-up or when the Clear All<br />
key is pressed)<br />
In the initial mode, paper of the same size as the original is<br />
selected automatically (“auto paper selection mode”), the<br />
number of copies is set to “1” and copy quality is set to “Text &<br />
Photo”.<br />
NOTE<br />
• It is also possible to change the default setting for copy exposure<br />
adjustment to “auto exposure mode” in the initial mode. (See<br />
“1 EXPOSURE MODE” on page 6-11.)<br />
● Auto clear function<br />
About 90 seconds after copying stops, the copier will automatically<br />
return to the same settings as those after warm up.<br />
(However, the exposure mode will not change.) Copying can<br />
be performed at the same settings (copy mode, number of<br />
copies and exposure mode) if copying is started before the<br />
auto clear function operates.<br />
› Margin/Border Erase/Book Erase key (Indicator)<br />
(Press to create margins or erase borders in copies. The<br />
indicator will light. See pages 5-5 and 6.)<br />
fi Copy quality selection key/Auto Exposure/Text & Photo/<br />
Photo/Text indicators<br />
(Press to select copy quality. See page 4-2.)<br />
fl Sort mode key/Staple Sort/Sort/Group indicators<br />
(Press to sort copies into separate sets, or for stapling,<br />
sorting or grouping copies with the optional finisher. The<br />
indicators will light in the respective modes.)<br />
‡ Auto Selection key (Indicator)<br />
(Press to perform auto selection copying. The indicator will<br />
light. The optional DF must be installed to use this function.<br />
See page 5-10.)<br />
● Automatic drawer switching function<br />
If two drawers contain the same size of paper and the paper<br />
in one drawer runs out during copying, this function switches<br />
paper feed from the empty drawer to the full drawer.<br />
NOTE<br />
• The automatic drawer switching function can be disabled. (See<br />
“$ AUTO DRAWER SWITCH” on page 6-19.)<br />
Message display<br />
1 Displays messages regarding the machine status and<br />
required operations.<br />
2 Displays copy modes.<br />
APS (auto paper selection mode)<br />
AMS (auto magnification selection mode)<br />
1:1 (manual copy mode)<br />
3 Displays magnification ratio.<br />
4 Displays the original size, paper size and preset magnification<br />
ratios.<br />
5 Displays the number of copies to be made.<br />
2-4
CHAPTER 3 HOW TO LOAD PAPER<br />
1. How to load paper<br />
Paper can be loaded into the two drawers and the multi-bypass.<br />
(1) Precautions for loading paper<br />
After unpacking the paper, fan it several times and then load into the<br />
tray.<br />
2<br />
Press the drawer bottom plate down and fix it there.<br />
3<br />
Hold the width adjustment lever and move it to align the<br />
width guide with the required paper width.<br />
Paper sizes are marked inside the drawer.<br />
(2) Loading paper into the drawer<br />
Up to 250 sheets of standard paper (75 or 80 g/m 2 /standard paper as<br />
specified by our company) or colored paper can be loaded into the<br />
each drawer.<br />
(Inch specifications)<br />
* The each drawer can be set to hold paper of any desired size from<br />
11" x 17" to 5 1/2" x 8 1/2".<br />
(Metric specifications)<br />
* The each drawer can be set to hold paper of any desired size from<br />
A3 to A5R.<br />
IMPORTANT<br />
• Set the type of paper (standard paper, recycled paper, letterheads or<br />
colored paper) to be loaded in the drawer in "5 PAPER TYPE (1ST<br />
to 4TH)" on page 6-14.<br />
4<br />
Hold both sides of the length adjustment plate and move it to<br />
align with the required paper length.<br />
1<br />
Pull the drawer out toward you as far as it will go.<br />
* Do not pull more than one drawer out at a time.<br />
3-1
CHAPTER 3 HOW TO LOAD PAPER<br />
5<br />
Set the paper flush against the left-hand wall of the drawer.<br />
7<br />
Gently push the drawer back in.<br />
* Check that the paper is kept under the claws of the drawer.<br />
If not, reload the paper.<br />
NOTE<br />
• Before leaving the copier in disuse for a prolonged period of time,<br />
remove the paper from the drawer(s) and seal it in its original<br />
packaging to protect from moisture.<br />
IMPORTANT<br />
• There is a sticker (1 in the illustration) indicating paper capacity<br />
attached to the inside of the drawer. Do not load paper above this<br />
limit.<br />
• When loading paper into the drawer, make sure that the copy side is<br />
facing upward. (The copy side is the side facing upward when the<br />
package is opened.)<br />
• Check that the length adjustment plate makes secure contact with<br />
the paper. If there is a gap, adjust the position of the length adjustment<br />
plate.<br />
(3) Loading paper into the multi-bypass<br />
Special paper as well as standard paper can be loaded into the multibypass.<br />
When copying onto transparencies or thick paper, be sure to<br />
use the multi-bypass.<br />
NOTE<br />
• Number of sheets of standard paper, colored paper and letterheads<br />
that can be loaded into the multi-bypass differ depending on the<br />
paper size.<br />
11" x 17" and 8 1/2" x 14" (A3, B4 and Folio): 25 sheet<br />
11" x 8 1/2" and 5 1/2" x 8 1/2" (A4 to A6R): 50 sheets<br />
• The types of special paper and the number of sheets that can be<br />
loaded in the multi-bypass are:<br />
· Transparencies: 1 sheet<br />
· Standard paper (120g/m 2 , 160g/m 2 ): 1 sheet<br />
IMPORTANT<br />
• When loading special paper such as transparencies and thick paper<br />
in the multi-bypass, select the type of paper in "6 PAPER TYPE<br />
(BYPASS)" on page 6-14.<br />
1<br />
Open the multi-bypass.<br />
6<br />
Set the supplied paper size sheet so that the size of the<br />
paper loaded can be checked by looking at the front of the<br />
drawer.<br />
3-2
CHAPTER 3 HOW TO LOAD PAPER<br />
2<br />
Adjust the insert guides to the size of the paper to be loaded.<br />
● Setting the paper size for the multi-bypass<br />
By setting either the transparency mode or thick paper mode and the<br />
paper size for the multi-bypass, the multi-bypass can be automatically<br />
selected according to the original size such as when the auto paper<br />
selection mode is selected.<br />
1<br />
Press and hold the Paper Select key for 3 seconds. The<br />
screen to set the paper size and select either the transparency<br />
or thick paper mode appears.<br />
NOTE<br />
• When loading B4 or larger paper, pull out the support guide.<br />
3<br />
Insert the paper along the guides as far as it will go.<br />
2<br />
When using transparencies or thick paper, first select the<br />
mode by pressing the cursor up or down key and then select<br />
the paper size.<br />
The setting of transparencies or thick paper will be reset<br />
when the Clear All key is pressed or by the auto clear<br />
function.<br />
When using standard paper or other types of paper, select<br />
the size from those given below. If "No size designation" is<br />
selected, the width will be determined by the position of the<br />
insert guides of the multi-bypass. This size setting will not be<br />
reset by the auto clear function. It will be stored for the next<br />
use.<br />
BYPASS PAPER<br />
SIZE SELECTION<br />
OHP FILM<br />
THICK PAPER<br />
NO SIZE DESIGNATION<br />
CUSTOM SIZES<br />
A3<br />
A4<br />
A4R<br />
A5R<br />
B4<br />
B5<br />
B5R<br />
B6<br />
Folio<br />
LENGTH<br />
WIDTH<br />
IMPORTANT<br />
• When loading paper into the multi-bypass, make sure that the copy<br />
side is facing downward. (The copy side is the side facing upward<br />
when the package is opened.) If the leading edge of the paper is<br />
curled, straighten it out before loading the paper in the multi-bypass.<br />
3<br />
Press the cursor right or cursor left key and select the paper<br />
length, which is shown highlighted. The paper length can be<br />
set to any value from 100 to 297 mm in 1 mm increments.<br />
3-3
CHAPTER 3 HOW TO LOAD PAPER<br />
4<br />
5<br />
Press the cursor down key.<br />
Press the cursor right or cursor left key and select the paper<br />
width, which is shown highlighted. The paper width can be<br />
set to any value from 148 to 420 mm in 1 mm increments.<br />
3<br />
Open the envelope and set it with the print side face-down<br />
and its flap opposite to the insertion slot and then insert it<br />
along the insert guide as far as it will go.<br />
6<br />
Press the enter key.<br />
NOTE<br />
• Incorrectly loading envelopes can result in printing in the wrong<br />
orientation or on the wrong side.<br />
● Setting envelopes<br />
When using the optional printer function, envelopes can be set in the<br />
multi-bypass.<br />
NOTE<br />
• The types of envelopes that can be used are COM-10, Monarch, DL<br />
and C5. Up to 6 envelopes can be loaded in the multi-bypass at a<br />
time.<br />
1<br />
Open the multi-bypass.<br />
2<br />
Align the insert guides with the envelope size.<br />
3-4
CHAPTER 3 HOW TO LOAD PAPER<br />
2. Replacing the toner cartridge and waste toner tank<br />
If "ADD TONER TO RESUME COPYING" appears on the message<br />
display, replenish the toner. Although several copies can be made<br />
after the message appears, it is recommended to replace the toner<br />
cartridge immediately. After replacing the toner cartridge, be sure to<br />
also replace the waste toner tank.<br />
* Replenish toner only when the message is displayed.<br />
3<br />
Pull the old toner cartridge out toward you.<br />
CAUTION<br />
Do not incinerate toner and toner containers. Dangerous<br />
sparks may cause burns.<br />
WARNING<br />
High voltage is present in the charger section. Take<br />
sufficient care when working in this area, as there is a<br />
danger of electrical shock.<br />
1<br />
Open the front cover.<br />
4<br />
Tap the new toner cartridge on the top 5 or 6 times and<br />
shake it from side to side 8 to 10 times.<br />
2<br />
Turn the toner cartridge release lever to the right as far as it<br />
will go. The old cartridge will be unlocked.<br />
5<br />
Fit the new toner cartridge into the copier.<br />
* Align the arrow on the top of the toner cartridge with the<br />
cutout in the copier and then insert the cartridge into the<br />
copier.<br />
3-5
CHAPTER 3 HOW TO LOAD PAPER<br />
6<br />
Turn the toner cartridge release lever to the left as far as it<br />
will go.<br />
The new toner cartridge is now be locked.<br />
9<br />
While holding the waste toner tank release lever up, fit the<br />
new waste toner tank into the copier.<br />
7<br />
While holding the waste toner tank release lever 1 up,<br />
remove the waste toner tank.<br />
10<br />
Gently pull the cleaning shaft as far as it will go and then<br />
push it back in.<br />
8<br />
Close the opening of the waste toner tank with its seal.<br />
IMPORTANT<br />
• Do not pull the cleaning shaft with force or pull it out completely.<br />
CAUTION<br />
Do not incinerate toner and toner containers. Dangerous<br />
sparks may cause burn.<br />
11<br />
Close the front cover.<br />
3-6
CHAPTER 4<br />
BASIC OPERATION<br />
1. Basic copying procedure<br />
1<br />
3<br />
1. Warm-up<br />
Turn the main switch ON ( l ). At the end of warm-up, “READY TO<br />
COPY.” will appear on the message display.<br />
3. Function selection<br />
Select from the copier’s various functions.<br />
NOTE<br />
• If originals are set and the Start key is pressed while the copier is<br />
still warming up, copying will begin as soon as warm-up ends.<br />
2<br />
• Enlargement/reduction (see page 4-4)<br />
• Interrupt copying (see page 4-6)<br />
• Duplex copying from various originals (see page 5-1)<br />
• Copying two-page originals as separate pages (see page 5-4)<br />
• Making a margin space for binding (see page 5-5)<br />
• Making copies with clean edges (see page 5-6)<br />
• One copy from two or four originals (see page 5-7)<br />
• Sorting automatically (see page 5-9)<br />
• Rotate copy (see page 5-10)<br />
• Auto selection mode (see page 5-10)<br />
2. Setting originals<br />
Set originals on the platen or in the DF (document feeder).<br />
When setting the original on the platen, adjust it with the original size<br />
scales based on the left rear position.<br />
NOTE<br />
• See the references given below for how to set originals in the DF.<br />
If the ADF (automatic document feeder) is installed, see page 7-1.<br />
If the RADF (reversing automatic document feeder) is installed, see<br />
the instruction handbook provided with the RADF.<br />
4-1
4<br />
5-2<br />
CHAPTER 4<br />
BASIC OPERATION<br />
4. Paper size selection<br />
When “APS” appears on the message display, paper of the same size<br />
as the original is automatically selected. To copy the original’s image<br />
onto a different size paper without changing the size of the image,<br />
press the Paper Select key for the desired size of paper, and press<br />
the Manual key. To make copies of the same size as the originals with<br />
images of the same size, no special settings are required.<br />
NOTE<br />
• Automatic paper selection can also be turned off. (See “7 PAPER<br />
SELECTION” on page 6-12.)<br />
• A drawer (paper feed drawer) to be selected automatically can be<br />
specified without setting any originals. (See “@ DEFAULT<br />
DRAWER” on page 6-13.)<br />
5-1<br />
To have the copy exposure adjusted automatically, press the copy<br />
quality selection key and set the auto exposure mode. The Auto Exp.<br />
indicator will light. In the auto exposure mode, the brightness of the<br />
original is detected and the most suitable exposure selected. It is also<br />
possible to make clean copies without the original background or<br />
color.<br />
NOTE<br />
• When the copies are too dark/light overall, exposure will be<br />
adjusted. (See “3 A.E.” on page 6-12.)<br />
• The default setting of the copy exposure adjustment can be set to<br />
auto exposure. (See “1 EXPOSURE MODE” on page 6-11.)<br />
6<br />
5. Copy exposure adjustment<br />
In the initial mode, one of the Copy exposure indicators is lit and the<br />
copy exposure can be adjusted manually. By moving the cursor on<br />
the exposure scale to the right, copies become darker. By moving it to<br />
the left, copies become lighter.<br />
NOTE<br />
• Exposure adjustment is selected from 5 or 9 levels.<br />
(See “2 EXPOSURE STEPS” on page 6-11.)<br />
6. Copy quality selection<br />
Copy quality is selected according to the original. Press the copy<br />
quality selection key to light the following indicators.<br />
Text mode: Text indicator<br />
Photo mode: Photo indicator<br />
Text & Photo mode: Text & Photo indicator<br />
Ecoprint mode: Turn all the copy quality indicators off by pressing the<br />
copy quality selection key. The density of copied images will be<br />
slightly lighter in ecoprint mode to reduce toner consumption.<br />
NOTE<br />
• The default copy quality mode used in the initial mode can be<br />
selected. (See “1 EXPOSURE MODE” on page 6-11.)<br />
• The copy exposure can be adjusted in all copy quality modes.<br />
(See “4 MIX ORI.DENSITY”, “5 PHO ORI.DENSITY” and<br />
“6 TXT ORI.DENSITY” on page 6-12.)<br />
4-2
CHAPTER 4<br />
7<br />
BASIC OPERATION<br />
7. Setting the number of copies<br />
Use the numeric keys to enter the desired number of copies on the<br />
message display. Up to 250 copies can be set.<br />
NOTE<br />
• It is possible to lower the limit on the number of copies that can be<br />
set at a time. (See “9 COPY LIMIT” on page 6-13.)<br />
CAUTION<br />
If the copier will not be used for a short period of time<br />
(overnight, etc.), turn the main switch OFF (O). If it will not<br />
be used for an extended period of time (vacations, etc.),<br />
remove the power plug from the outlet for safety purposes<br />
during the time the copier is not in use.<br />
8<br />
8. Starting copying<br />
Press the Start key. If the Start indicator is lit green and “READY TO<br />
COPY.” is displayed on the message display, copying is possible.<br />
9<br />
9. At the end of copying<br />
Finished copies are ejected onto the copy store section.<br />
IMPORTANT<br />
• Up to 250 sheets can be stored. Note that the number of sheets that<br />
can be stored varies depending on the condition of the paper used.<br />
4-3
CHAPTER 4<br />
BASIC OPERATION<br />
2. Enlargement/reduction<br />
(1) Auto magnification selection mode<br />
The original image is enlarged/reduced automatically according to the<br />
selected paper size.<br />
2<br />
Press the Paper Select key to specify the paper size.<br />
The magnification ratio will be displayed.<br />
3<br />
Copying will start when the Start key is pressed.<br />
IMPORTANT<br />
• When using this mode regularly, make sure that “AMS” has been<br />
selected in “8 AMS MODE” on page 6-12.<br />
(2) Zoom copy mode<br />
The zoom ratio can be set to any value from 50 to 200% in 1%<br />
increments.<br />
1<br />
Set the original(s).<br />
The size of the original will be automatically detected and the<br />
same size paper as the original will be selected.<br />
NOTE<br />
• If “100%” has been selected in “8 AMS MODE” on page 6-12,<br />
press the Manual key to display “AMS”.<br />
1<br />
2<br />
Set the original(s).<br />
Press the Zoom (+) or Zoom (–) key to change the displayed<br />
zoom ratio.<br />
Press the Paper Select key to change the paper size.<br />
3<br />
Copying will start when the Start key is pressed.<br />
4-4
CHAPTER 4<br />
BASIC OPERATION<br />
(3) Standard zoom mode<br />
Enlargement/reduction copying is possible using the ratios preset in<br />
the copier.<br />
Available ratios<br />
Reduction<br />
Enlargement<br />
50% : A3 → A5<br />
70% : A3 → A4, A4 → A5<br />
75% : 11" × 15" → A4<br />
90% : Folio → A4<br />
106% : 11" × 15" → A3<br />
127% : Folio → A3<br />
141% : A4 → A3, A5 → A4<br />
200% : A5 → A3<br />
(4) Size zoom mode<br />
When the sizes of the original and copy paper are selected, the zoom<br />
ratio is automatically set.<br />
1<br />
Set the original(s).<br />
2<br />
Press the Preset R/E key.<br />
The zoom mode setting screen will appear in the message<br />
display.<br />
1<br />
Set the original(s).<br />
2<br />
Press the Original key to select the original size.<br />
3<br />
Press the cursor up or down key to select the desired<br />
magnification ratio and then press the enter key.<br />
The message display will return to the “READY TO COPY.”<br />
screen, with the selected ratio displayed.<br />
3<br />
Press the Paper Select key to select the paper size.<br />
When the paper size is selected, the zoom ratio will be<br />
displayed.<br />
NOTE<br />
• The zoom ratio can be changed in increments of 1% from the<br />
selected ratio by pressing the numeric keys or the Zoom (+) and<br />
Zoom (–) keys.<br />
4<br />
Copying will start when the Start key is pressed.<br />
4<br />
Copying will start when the Start key is pressed.<br />
4-5
CHAPTER 4<br />
BASIC OPERATION<br />
3. Interrupt copying<br />
Interrupt copying is useful if, during one copy job, other originals need<br />
to be copied at different settings. The interrupted copy job can be<br />
resumed at the same settings as before after the rush job is finished.<br />
4<br />
When copying ends, press the Interrupt key again, and<br />
replace the newly copied original(s) with the one(s) removed<br />
before. Then, press the Start key.<br />
The interrupted copy job will be resumed.<br />
1<br />
Press the Interrupt key to light the indicator.<br />
The “INTERRUPT MODE.” screen will appear.<br />
2<br />
Remove the present original(s) and put it (them) aside.<br />
3<br />
Set the new original(s) and execute copying.<br />
4-6
CHAPTER 4<br />
BASIC OPERATION<br />
4. Energy saver (preheat) function<br />
This function turns the machine off to save energy by pressing the<br />
Energy Saver (preheat) key, while leaving the main switch turned ON.<br />
When this function is activated, the Energy Saver (preheat) indicator<br />
is the only indicator lit on the operation panel.<br />
5. Auto shut-off function<br />
This function automatically turns the main switch OFF (O) if no copying<br />
operation is performed for a certain period (15 to 240 minutes). To<br />
make copies again, set the main switch to the ON ( l ) position.<br />
To resume copying after the energy saver (preheat) function has been<br />
activated, press the Energy Saver key again. It takes about 30 seconds<br />
for the copier to recover from the energy saver (preheat) function.<br />
NOTE<br />
• The auto energy saver function can be set to trigger after no copying<br />
has been done for a certain period of time. (See “9 PREHEAT<br />
TIME” on page 6-18.)<br />
● Auto shut-off function<br />
The auto shut-off function is a power saving feature which automatically<br />
turns the main switch OFF (O) when a certain time elapses<br />
without copying being performed.<br />
Copiers are generally in the standby mode more than operation<br />
mode, and power consumption in the standby mode accounts for a<br />
large part of overall consumption. Having the copier turn OFF (O)<br />
automatically reduces unnecessary power consumption in the<br />
standby mode or at night if the copier is left on. The result is a lower<br />
electricity bill.<br />
NOTE<br />
• To change the time remaining until the auto shut off function<br />
operates, see “0 SHUT-OFF TIME” on page 6-18. To cancel the<br />
auto shut-off function, see “2 AUTO SHUT-OFF” on page 6-16.<br />
4-7
CHAPTER 5<br />
FUNCTIONS<br />
1. Duplex copying from various originals [Duplex copy]<br />
Duplex copies can be made from two-page originals or one-sided<br />
originals with the optional duplex unit.<br />
(2) Duplex copying from a book original<br />
Facing pages of a magazine or book are copied on both sides of the<br />
paper by a single press of the Start key.<br />
IMPORTANT<br />
• Duplex copies cannot be made with the multi-bypass.<br />
(1) Duplex copying from two-sided originals<br />
A two-sided original is copied onto both the front and back side of the<br />
paper.<br />
The copy looks just like the original.<br />
IMPORTANT<br />
• The paper size used in this mode is limited to A4.<br />
IMPORTANT<br />
• The paper sizes that can be used are A3 to A5R.<br />
5-1
(3) Duplex copying from one-sided originals<br />
The one-sided original is copied on both sides (back and front) of the<br />
paper.<br />
When an odd number of originals are copied, the back side of the last<br />
page is blank.<br />
1<br />
2<br />
Set the original(s).<br />
CHAPTER 5<br />
FUNCTIONS<br />
Press the Duplex/Split Page key to light the indicator.<br />
The function selection screen will appear.<br />
NOTE<br />
• The back side copy can also be rotated 180 degrees.<br />
1 Normal: The back side comes out in the same direction as the<br />
original.<br />
2 Rotate: The back side is rotated 180 degree with respect to the<br />
original.<br />
When bound at the top, the copies are oriented in the same<br />
direction.<br />
3<br />
Make sure that “2-SIDED COPY” is selected and press the<br />
enter key.<br />
The duplex copy setting screen will appear.<br />
4<br />
Press the cursor down key to select the duplex copy mode.<br />
5<br />
Press the enter key.<br />
If “1-SIDED ORIG.> DUPLEX” was selected, go to the next<br />
step.<br />
If “DUPLEX ORIG.> DUPLEX” or “BOOK ORIGINAL” was<br />
selected, the message display will be changed to the<br />
“DUPLEX MODE.” screen.<br />
5-2
CHAPTER 5<br />
6<br />
FUNCTIONS<br />
Select whether to rotate the back side of the copy 180 degree<br />
or not.<br />
7<br />
8<br />
Press the enter key.<br />
The message display will be changed to the “DUPLEX<br />
MODE.” screen.<br />
Press the Start key. Scanning of the originals will start. When<br />
setting the original in the DF, copying will be performed.<br />
When setting the original on the platen, go to the next step.<br />
9<br />
Replace the original and press the Start key. Scanning of the<br />
originals will start. Carry out the same procedures to the<br />
originals of which copying will be performed, and finally,<br />
press the enter key. Copying will start.<br />
5-3
CHAPTER 5<br />
FUNCTIONS<br />
2. Copying two-page originals as separate pages<br />
[Page separation copy mode]<br />
(1) Page separation copies from book originals<br />
Facing two-page of a magazine, book or the like is divided down the<br />
middle and copied onto two separate sheets of paper.<br />
1<br />
Set the original(s).<br />
NOTE<br />
• When copying from a book, set the book as illustrated.<br />
IMPORTANT<br />
• The available size of originals is limited to A3, A4R, and A5R, and<br />
paper size is limited to A4.<br />
2<br />
Press the Duplex/Split Page key to light the indicator.<br />
The function selection screen will appear.<br />
(2) Page separation copies from two-sided originals<br />
Each face of a two-sided originals is copied onto a separate sheet of<br />
paper.<br />
3<br />
4<br />
Press the cursor down key to select “PAGE SEPARATION”.<br />
Press the enter key.<br />
The page separation copy mode setting screen will appear.<br />
5<br />
Press the cursor down key to select the page separation<br />
mode.<br />
6<br />
Press the enter key.<br />
The message display will return to the “READY TO COPY.”<br />
screen.<br />
5-4
CHAPTER 5<br />
FUNCTIONS<br />
3. Making a margin space for binding [Margin mode]<br />
The image of the original is shifted rightward to make a margin for<br />
binding on the left side of the paper between 6 mm and 18 mm in<br />
1 mm increments.<br />
3<br />
Make sure that “MARGIN” has been selected, and press the<br />
enter key.<br />
The margin copy setting screen will appear.<br />
NOTE<br />
• The initial value of margin width can be set. (See “0 MARGIN<br />
WIDTH” on page 6-13.)<br />
• If the left margin is specified while duplex copy setting has been set,<br />
the same right margin width as the front side is automatically set to<br />
the back side.<br />
4<br />
Press the cursor right or left key to select the margin width if<br />
the margin width setting is changed from the default value.<br />
The margin width can be set between 6 mm and 18 mm in<br />
1 mm increments.<br />
When not changing margin width, go to the next step.<br />
1<br />
Set the original(s).<br />
IMPORTANT<br />
• Set the originals so that the top (left) side of the original is at the rear<br />
side. Setting them in the wrong direction may cause the failure of<br />
making margin in the correct position.<br />
5<br />
Press the enter key. The “READY TO COPY.” screen will<br />
appear.<br />
2<br />
Press the Margin/Border Erase/Book Erase key to light the<br />
indicator.<br />
The function selection screen will appear.<br />
5-5
CHAPTER 5<br />
FUNCTIONS<br />
4. Making copies with clean edges [Border erase mode]<br />
(1) Erasing blemishes from edges of copies (Sheet<br />
Erase)<br />
Use for erasing shadows, lines, etc., that occur around the edges of<br />
copies made from sheet originals. The border width can be selected<br />
from 6, 12 and 18 mm. (a is the width of erasing border.)<br />
1<br />
Set the original(s).<br />
NOTE<br />
• See step 1 on page 5-4 to set the book original.<br />
2<br />
Press the Margin/Border Erase/Book Erase key to light the<br />
indicator.<br />
The function selection screen will appear.<br />
NOTE<br />
• The initial value of the erasing border width can be set. (See<br />
“! BORDER WIDTH” on page 6-13.)<br />
(2) Erasing blemishes from the edges and middle of<br />
copies made from books (Book Erase)<br />
Use for making neat copies from thick books. The border width can be<br />
selected from 6, 12 and 18 mm. (a is the width of erasing border.)<br />
3<br />
Press the cursor down key to select the border erase mode.<br />
4<br />
5<br />
Press the enter key.<br />
Press the cursor down or up key to select the erasing border<br />
width. The width can be selected from 6, 12 and 18 mm.<br />
NOTE<br />
• The initial value of the erasing border width can be set. (See<br />
“! BORDER WIDTH” on page 6-13.)<br />
6<br />
Press the enter key. The message display will return to the<br />
“READY TO COPY.” screen.<br />
5-6
CHAPTER 5<br />
FUNCTIONS<br />
5. One copy from two or four originals [Layout copy]<br />
2 or 4 originals can be combined into a single copy.<br />
The borderline of each original can also be marked with a solid line or<br />
dotted line.<br />
(2) 4-UP<br />
Use this mode to copy four originals onto one sheet. It can be used in<br />
conjunction with the duplex copy mode to copy eight originals onto<br />
one sheet, though this will require the optional duplex unit.<br />
(When setting originals on the platen, originals are arranged in the<br />
order from 1, 2, 3 and 4.)<br />
NOTE<br />
• The original and copy paper must be the standard size.<br />
(1) 2-UP<br />
Use this mode to copy two originals onto one sheet. It can be used in<br />
conjunction with the duplex copy mode to copy four originals onto one<br />
sheet, though this will require the optional duplex unit.<br />
(When setting the originals on the platen, originals are arranged in the<br />
order from 1 to 2.)<br />
NOTE<br />
• In the “4-UP” mode, the available modes differ depending on the<br />
orientation of the originals.<br />
• When performing duplex copy, the images on the back side can be<br />
rotated.<br />
NOTE<br />
• When performing duplex copy, the images on the back side can be<br />
rotated.<br />
5-7
CHAPTER 5<br />
FUNCTIONS<br />
1<br />
Press the Layout key to light the indicator.<br />
The layout copy setting screen will appear.<br />
7<br />
Press the Start key.<br />
If originals are set in the DF, all originals are scanned one by<br />
one and copying performed accordingly.<br />
If setting originals on the platen, go to the next step.<br />
2<br />
Press the cursor down or up key to select the layout copy<br />
mode.<br />
In the “4-UP” mode, when setting originals horizontally, select<br />
“4-UP (Z)”; when setting originals vertically, select “4-UP (N)”.<br />
8<br />
Replace the original and press the Start key. Scanning of the<br />
originals will start. Carry out the same procedures to the<br />
originals of which copying will be performed, and finally,<br />
press the enter key. Copying will start.<br />
3<br />
Press the enter key.<br />
4<br />
Press the cursor down or up key to select the type of the<br />
borderline.<br />
Select from “DOTTED” or “SOLID”.<br />
5<br />
Press the enter key.<br />
The message display will return to the “READY TO COPY.”<br />
screen.<br />
6<br />
Set the original(s).<br />
IMPORTANT<br />
• Before setting original on the platen, make sure they are in a<br />
sequence that produces images in the numbered positions.<br />
• Select the paper according to the situation.<br />
5-8
CHAPTER 5<br />
FUNCTIONS<br />
6. Sorting automatically [Sort copy]<br />
Since copying is performed after memorizing multiple originals, copies<br />
can be sorted into the required number of sets even without an<br />
optional finisher.<br />
3<br />
Enter the number of copies and press the Start key.<br />
When using the DF, scans and copies originals one at a time.<br />
When setting the originals on the platen, go to the next step.<br />
NOTE<br />
• If “ON” is set in “$ ROTATE SORT” on page 6-13, and the paper<br />
size is A4, the orientation of each set of copies is changed, thus<br />
making copies easy to handle. To use this setting, A4 paper must be<br />
set lengthwise in one drawer and widthwise in the other.<br />
4<br />
Set the next original and press the Start key.<br />
NOTE<br />
• Repeat this operation for all originals.<br />
5<br />
After all the originals have been scanned, press the enter<br />
key.<br />
Copying will start.<br />
1<br />
2<br />
Set the original(s).<br />
Press the sort mode key to light the indicator.<br />
5-9
CHAPTER 5<br />
FUNCTIONS<br />
7. Rotate copy 8. Auto selection mode<br />
Even when the orientation of original is different from that of paper in<br />
the drawer, the image will be turned 90 degrees counter-clockwise for<br />
copying. For this function, no setting is required.<br />
When the optional DF is used, if the paper size is not selected with<br />
the Paper Select key the DF automatically detects the size of every<br />
original. Copies are then made onto paper of the same size as the<br />
originals.<br />
IMPORTANT<br />
• The paper size available for rotate copy is limited to A4.<br />
IMPORTANT<br />
• Up to 50 sheets of paper can be set in the DF in this mode.<br />
• Originals used in this mode are limited to A3 and A4 (horizontal) or<br />
A4 (vertical) and Folio, and the width of all original must be the<br />
same.<br />
NOTE<br />
• If the automatic drawer switching function is “ON”, copying will be<br />
continued with the same size of paper as the original in a different<br />
orientation if the paper of the same orientation runs out. (See<br />
“$ AUTO DRAWER SWITCH” on page 6-19.)<br />
1<br />
2<br />
Set originals in the DF.<br />
Press the Auto Selection key to light the indicator.<br />
3<br />
Press the Start key.<br />
Copying will start.<br />
5-10
CHAPTER 6<br />
COPIER MANAGEMENT<br />
1. Copy management<br />
The total number of copies made by each department can be<br />
managed using 4-digit codes for up to 100 departments.<br />
Limits for the number of copies can be set on a department-bydepartment<br />
basis.<br />
(1) Copy management mode<br />
Copy management mode<br />
Copy management mode content<br />
Page<br />
● Registering new<br />
ID-codes<br />
Assigns a 4-digit ID-code and a maximum number of copies to the departments in your<br />
organization. Up to 100 departments can be assigned. Limits are set in units of 1,000 sheets,<br />
up to a maximum of 999,000.<br />
Entering “0” enables unlimited copying.<br />
When a department reaches its limit, the copier will not make any more copies.<br />
6-3<br />
● Deleting ID-codes<br />
Deletes registered ID-codes.<br />
6-4<br />
● Altering limits<br />
Alters limits for the copies of respective departments without deleting or re-registering the<br />
ID-codes.<br />
6-5<br />
● Clearing copy counts<br />
Clears all the copy counts for the various departments after a suitable period of time. Copy<br />
counts cannot be cleared individually, however.<br />
6-6<br />
● Viewing copy counts<br />
Displays the number of copies. The total number of copies can be displayed, as well as by<br />
paper size and ID-code.<br />
6-6<br />
● Printing a copy<br />
management list<br />
Prints out the number of copies made by ID-code.<br />
6-7<br />
6-1
CHAPTER 6<br />
COPIER MANAGEMENT<br />
Copy management mode<br />
Copy management mode content<br />
Page<br />
● Turning copy<br />
management ON/OFF<br />
Turn copy management ON when required (to apply the settings made).<br />
Turn it OFF when not required.<br />
6-8<br />
● Turning printer management<br />
ON/OFF<br />
Turn ON to use the printer management for printing when using the printer function of this<br />
copier. Turn OFF when not using printer management.<br />
• This mode is not displayed when the copier is not equipped with the optional printer board.<br />
————<br />
● Turning print error<br />
report function ON/OFF<br />
The print error report function prints the details of the error if an ID-code mismatch error<br />
occurs when the printer management is ON. Turn it ON to print the print error report; turn it<br />
OFF to not print the report.<br />
• This mode is not displayed when the copier is not equipped with the optional printer board.<br />
————<br />
6-2
CHAPTER 6<br />
COPIER MANAGEMENT<br />
(2) How to display the selection screen of the copy<br />
management mode<br />
Press the * /Language key to light the indicator.<br />
The management mode selection screen will appear.<br />
1 1<br />
(3) How to make various settings<br />
● Registering new ID-codes<br />
Display the copy management selection screen. (See (2) How<br />
to display the selection screen of the copy management<br />
mode.)<br />
2<br />
Press the cursor down key to select “COPY MGMT SET-<br />
TING”.<br />
2<br />
Press the cursor down key to select “MANAGEMENT”.<br />
3<br />
4<br />
Press the enter key.<br />
Press the cursor down key to select “REGISTER”.<br />
3<br />
4<br />
Press the enter key.<br />
Enter the 4-digit management code “2000” with the numeric<br />
keys.<br />
5<br />
6<br />
Press the enter key.<br />
Enter the ID-code (4-digit) with the numeric keys.<br />
NOTE<br />
• The 4-digit management code can be changed. (See “@ MANAGE-<br />
MENT CODE CHANGE” on page 6-18.)<br />
• See the following “(3) How to make various settings” and make<br />
settings.<br />
• (>) displayed in each setting screen indicates the present setting<br />
value.<br />
7<br />
Press the cursor down key to highlight the maximum number<br />
of copies.<br />
6-3
8<br />
Enter the maximum number of copies with the numeric keys.<br />
Limits are set in units of 1000’s, up to a maximum of<br />
999,000.<br />
CHAPTER 6<br />
COPIER MANAGEMENT<br />
● Deleting ID-codes<br />
Display the copy management selection screen. (See page<br />
1 6-3.)<br />
2<br />
Press the cursor down key to select “COPY MGMT SET-<br />
TING”.<br />
NOTE<br />
• Entering “0” enables unlimited copying.<br />
• If the Stop/Clear key is pressed, the registered ID-code is cleared<br />
and a new ID-code can be entered.<br />
9<br />
Press the enter key. The display will return to the screen in<br />
step 4.<br />
3<br />
4<br />
Press the enter key.<br />
Press the cursor down key to select “CODE DELETE”.<br />
NOTE<br />
• To register another ID-code, repeat steps 5 to 9.<br />
10<br />
Press the cursor up key to select “END”, and press the enter<br />
key.<br />
The message display will return to the screen in step 2.<br />
5<br />
6<br />
Press the enter key.<br />
Press the cursor down or up key to select the ID-code to be<br />
deleted.<br />
11<br />
Press the cursor up key to select “END”, and press the enter<br />
key.<br />
The message display will return to the “READY TO COPY.”<br />
screen.<br />
NOTE<br />
• When no ID-code is registered, “– – – –” will appear and the cursor<br />
will not move.<br />
7<br />
Press the enter key.<br />
6-4
CHAPTER 6<br />
8<br />
COPIER MANAGEMENT<br />
A message asking you to confirm the deletion will appear. To<br />
delete the code, press the cursor up key to select “YES” and<br />
press the enter key. To cancel the command, make sure that<br />
“NO” has been selected and press the enter key. The<br />
message display will return to the screen in step 6.<br />
4<br />
Press the cursor down key to select “COPY LIMIT CORREC-<br />
TION”.<br />
NOTE<br />
• To delete another Dept. code, repeat steps 6 to 8.<br />
5<br />
6<br />
Press the enter key.<br />
Press the cursor down or up key to select the ID-code whose<br />
limit is to be altered.<br />
9<br />
10<br />
Make sure that “END” has been selected and press the enter<br />
key.<br />
The message display will return to the screen in step 4.<br />
Press the cursor up key to select “END”, and press the enter<br />
key.<br />
The message display will return to the screen in step 2.<br />
7<br />
8<br />
Press the enter key.<br />
Enter the new limit with the numeric keys.<br />
Limits are set in units of 1,000’s, up to a maximum of<br />
999,000.<br />
11<br />
Press the cursor up key to select “END”, and press the enter<br />
key.<br />
The message display will return to the “READY TO COPY.”<br />
screen.<br />
● Altering limits<br />
Display the copy management selection screen. (See page<br />
1 6-3.)<br />
2<br />
Press the cursor down key to select “COPY MGMT SET-<br />
TING”.<br />
NOTE<br />
• Entering “0” enables unlimited copying.<br />
9<br />
Press the enter key.<br />
The display will return to the screen in step 6.<br />
3<br />
Press the enter key.<br />
NOTE<br />
• To alter the copy limit of an other departments, repeat steps 6 to 9.<br />
6-5
CHAPTER 6<br />
COPIER MANAGEMENT<br />
10<br />
Make sure that “END” has been selected and press the enter<br />
key.<br />
The message display will return to the screen in step 4.<br />
6<br />
A message will appear asking you to confirm whether to<br />
clear all copy counts or not. To clear the copy counts, press<br />
the cursor up key to select “YES” and press the enter key. To<br />
cancel the command, make sure that “NO” has been<br />
selected and press the enter key. The message display will<br />
return to the screen in step 4.<br />
11<br />
Press the cursor up key to select “END”, and press the enter<br />
key.<br />
The message display will return to the screen in step 2.<br />
7<br />
Press the cursor up key to select “END”, and press the enter<br />
key.<br />
The message display will return to the screen in step 2.<br />
12<br />
Press the cursor up key to select “END”, and press the enter<br />
key.<br />
The message display will return to the “READY TO COPY.”<br />
screen.<br />
● Clearing copy counts<br />
Display the copy management selection screen. (See page<br />
1 6-3.)<br />
2<br />
Press the cursor down key to select “COPY MGMT SET-<br />
TING”.<br />
8<br />
Press the cursor up key to select “END”, and press the enter<br />
key.<br />
The message display will return to the “READY TO COPY.”<br />
screen.<br />
● Viewing copy counts<br />
Display the copy management selection screen. (See page<br />
1 6-3.)<br />
2<br />
Press the cursor down key to select “REFERENCE”.<br />
3<br />
4<br />
Press the enter key.<br />
Press the cursor down key to select “COUNTS CLEAR”.<br />
3<br />
4<br />
Press the enter key.<br />
Press the cursor down key to view the number of copies in<br />
all the departments and select “TOTAL: ALL ID-CODES”. To<br />
view the number of copies by one department each, select<br />
“ID-CODE LIST”.<br />
5<br />
Press the enter key.<br />
6-6
CHAPTER 6<br />
5<br />
6<br />
7<br />
COPIER MANAGEMENT<br />
Press the enter key.<br />
If having selected “TOTAL: ALL ID-CODES”, go to the next<br />
step. If having selected “ID-CODE LIST”, go to step 9.<br />
The total number of copies will appear on the message<br />
display. The number of copies by size will appear at the<br />
bottom. Press the cursor down key to view the number of<br />
copies of the size other than those appearing on the<br />
message display.<br />
When finished viewing, press the cursor up key to select<br />
“END”.<br />
13<br />
Press the cursor up key to select “END”, and press the enter<br />
key.<br />
The message display will return to the “READY TO COPY.”<br />
screen.<br />
● Printing copy management list<br />
Display the copy management selection screen. (See page<br />
1 6-3.)<br />
IMPORTANT<br />
• Make sure that A4 size paper is set in the drawer.<br />
8<br />
Press the enter key. The message display will return to the<br />
screen in step 4.<br />
Go to step 12.<br />
2<br />
Press the cursor down key to select “PRINT MANAGEMENT<br />
LIST”.<br />
9<br />
Press the cursor down or up key to select the ID-code to be<br />
displayed.<br />
3<br />
Press the enter key. Printing will start. After the list has been<br />
printed, the display will return to the screen in step 2.<br />
NOTE<br />
• When no ID-code is registered, “– – – –” will appear and the cursor<br />
will not move.<br />
10<br />
11<br />
12<br />
After finished viewing, press the cursor up to select “END”.<br />
Press the enter key. The message display will return to the<br />
screen in step 4.<br />
Press the cursor up key to select “END”, and press the enter<br />
key.<br />
The message display will return to the screen in step 2.<br />
NOTE<br />
• Select the paper to be used and press the Start key if A4 size paper<br />
is not loaded.<br />
4<br />
Press the cursor up key to select “END”, and press the enter<br />
key.<br />
The message display will return to the “READY TO COPY.”<br />
screen.<br />
6-7
CHAPTER 6<br />
COPIER MANAGEMENT<br />
● Turning copy management ON/OFF<br />
Display the copy management selection screen. (See page<br />
1 6-3.)<br />
(4) Making copies when the copier is in the copy<br />
management mode<br />
When the copier is in the copy management mode, “ENTER 4-DIGIT<br />
CODE WITH #-KEYS” will appear on the message display.<br />
NOTE<br />
• Copy management ON or OFF appears in the upper right-hand of<br />
the screen.<br />
See the following procedures to turn copy management ON/OFF.<br />
1<br />
Enter the ID-code for your department with the numeric keys.<br />
2<br />
Press the cursor down key to select “COPY MANAGEMENT<br />
ON/OFF”.<br />
3<br />
4<br />
Press the enter key.<br />
Press the cursor down or up key to select “ON” or “OFF”.<br />
2<br />
If “READY TO COPY.” appears, carry out copying in the<br />
usual manner.<br />
5<br />
6<br />
Press the enter key.<br />
The display will return to the screen in step 2.<br />
Make sure that “END” has been selected and press the enter<br />
key. When “OFF” is selected, the message display will return<br />
to the “READY TO COPY.” screen.<br />
NOTE<br />
• When copying is finished, press the Energy Saver (preheat) key. If<br />
the auto clear function works, the copier will return to the previous<br />
state.<br />
6-8
CHAPTER 6<br />
COPIER MANAGEMENT<br />
2. Default settings<br />
The state the copier is in at the end of warm-up or after the Clear All key has been pressed<br />
is called “initial mode”. The functions and values that are automatically preset for the initial<br />
mode are called “default settings”. “COPY DEFAULT” and “MACHINE DEFAULT” are set in<br />
the default settings. They can be changed as desired to suit the copying needs.<br />
(1) Copy default settings<br />
The following 14 types of settings can be changed in the copy default<br />
setting mode.<br />
Set them as desired, in order to gain full use of your copier.<br />
Copy default setting<br />
Content of copy default setting<br />
Setting range<br />
Default setting<br />
Page<br />
1 EXPOSURE MODE<br />
Selects the copy exposure mode at power-on from auto exposure<br />
mode (page 4-2), mixed (text and photo) mode (page 4-2), photo mode<br />
(page 4-2) and text mode (page 4-2).<br />
AUTO/MIXED/<br />
PHOTO/TEXT<br />
MIXED<br />
6-11<br />
2 EXPOSURE STEPS<br />
Changes the number of exposure steps in the manual exposure mode.<br />
5 STEPS/9 STEPS<br />
5 STEPS<br />
6-11<br />
3 A.E.<br />
Changes the overall exposure when using the auto exposure mode.<br />
1 to 5<br />
3 (center)<br />
6-12<br />
4 MIX ORI.DENSITY<br />
Adjusts the exposure of the original when selecting photo & text mode<br />
in the copy quality selection (page 4-2).<br />
1 to 5<br />
3 (center)<br />
6-12<br />
5 PHO ORI.DENSITY<br />
Adjusts the exposure of the original when photo mode is selected in<br />
the copy quality selection (page 4-2).<br />
1 to 5<br />
3 (center)<br />
6-12<br />
6 TXT ORI.DENSITY<br />
Adjusts the exposure of the original when text mode is selected in the<br />
copy quality selection (page 4-2).<br />
1 to 5<br />
3 (center)<br />
6-12<br />
7 PAPER SELEC-<br />
TION<br />
Specifies whether the drawer with paper of the same size as the<br />
original is automatically selected or whether paper size is selected<br />
manually.<br />
AUTO/MANUAL<br />
AUTO<br />
6-12<br />
8 AMS MODE<br />
Sets whether to enlarge/reduce the image of the original (see “(1) Auto<br />
magnification selection mode” on page 4-4.) or copy it at the same size<br />
when an original has been set and the Paper Select key is pressed.<br />
AMS/100%<br />
AMS<br />
6-12<br />
9 COPY LIMIT<br />
Limits the number of copies that can be made at a time.<br />
1 to 250 SETS<br />
250 SETS<br />
6-13<br />
0 MARGIN WIDTH<br />
Sets the initial value of the margin width for the left margin in the<br />
margin copy mode (page 5-5).<br />
1 to 18 mm<br />
(1-mm increments)<br />
6 mm<br />
6-13<br />
6-9
CHAPTER 6<br />
COPIER MANAGEMENT<br />
Copy default setting<br />
Content of copy default setting<br />
Setting range<br />
Default setting<br />
Page<br />
! BORDER WIDTH<br />
Sets the initial value of the border erase width for the sheet erase or<br />
book erase in the border erase mode (page 5-6).<br />
6, 12, 18 mm<br />
6 mm<br />
6-13<br />
@ DEFAULT<br />
DRAWER<br />
Specifies the paper feed drawer to be selected automatically when<br />
warm-up ends or when the Clear All key is pressed. Paper feed drawer<br />
3 and 4 can be selected only when the optional drawer is installed.<br />
SOURCE 1 to<br />
SOURCE 4<br />
SOURCE 1<br />
6-13<br />
# OUTPUT FORM<br />
Sets whether or not to perform sort copying (page 5-9).<br />
SORT: ON/<br />
SORT: OFF<br />
SORT: OFF<br />
6-13<br />
$ ROTATE SORT<br />
Sets whether the normal sort copy (page 5-9) or rotate sort copy (page<br />
5-9) is used when the sort mode is selected.<br />
• This setting is not displayed when the copier is equipped with the<br />
optional finisher.<br />
ON/OFF<br />
OFF<br />
6-13<br />
6-10
CHAPTER 6<br />
COPIER MANAGEMENT<br />
(2) How to set the copy default setting mode<br />
1<br />
Press the */Language key to light the indicator.<br />
The management mode selection screen will appear.<br />
6<br />
7<br />
NOTE<br />
Press the enter key.<br />
Make settings as explained below.<br />
• (>) displayed in each setting screen indicates the present setting<br />
value.<br />
• After finishing each setting, the display will return to the screen in<br />
step 5. If changing other settings, repeat step 5 to 7.<br />
8<br />
Press the cursor up key to select “END” and press the enter<br />
key to finish settings. The message display will return to the<br />
“READY TO COPY.” screen.<br />
2<br />
Press the cursor down key to select “COPY DEFAULT”.<br />
1 EXPOSURE MODE<br />
Press the cursor down or up key to select “AUTO”, “MIXED”,<br />
1 “PHOTO” or “TEXT”.<br />
3<br />
4<br />
Press the enter key.<br />
Enter the management code “2000” with the numeric keys.<br />
2<br />
Press the enter key.<br />
2 EXPOSURE STEPS<br />
Press the cursor down or up key to select “5 STEPS” or<br />
1 “9 STEPS”.<br />
NOTE<br />
• The 4-digit management code can be changed. (See “@ MANAGE-<br />
MENT CODE CHANGE” on page 6-18.)<br />
5<br />
Press the cursor down or up key to select the copy default<br />
setting to be changed. See “(1) Copy default settings” on<br />
page 6-9 for settings that can be changed.<br />
2<br />
Press the enter key.<br />
6-11
CHAPTER 6<br />
COPIER MANAGEMENT<br />
3 A.E.<br />
1<br />
Press the cursor right or left key to move the cursor on the<br />
exposure scale.<br />
Move the cursor to the right to make copies darker, and to<br />
the left to make copies lighter.<br />
6 TXT ORI.DENSITY<br />
Press the cursor right or left key to move the cursor on the<br />
1 exposure scale.<br />
Move the cursor to the right to make copies darker, and to<br />
the left to make copies lighter.<br />
2<br />
Press the enter key.<br />
2<br />
Press the enter key.<br />
4 MIX ORI.DENSITY<br />
Press the cursor right or left key to move the cursor on the<br />
1 exposure scale.<br />
Move the cursor to the right to make copies darker, and to<br />
the left to make copies lighter.<br />
7 PAPER SELECTION<br />
Press the cursor down or up key to select “AUTO” or<br />
1 “MANUAL”.<br />
2<br />
Press the enter key.<br />
2<br />
Press the enter key.<br />
5 PHO ORI.DENSITY<br />
Press the cursor right or left key to move the cursor on the<br />
1 exposure scale.<br />
Move the cursor to the right to make copies darker, and to<br />
the left to make copies lighter.<br />
8 AMS MODE<br />
Press the cursor down or up key to select “AMS” or “100%”.<br />
1<br />
2<br />
Press the enter key.<br />
2<br />
Press the enter key.<br />
6-12
CHAPTER 6<br />
COPIER MANAGEMENT<br />
9 COPY LIMIT<br />
Enter the maximum number of copies that can be made with<br />
1 the numeric keys.<br />
@ DEFAULT DRAWER<br />
Press the cursor down or up key to select the drawer (paper<br />
1 feed drawer) to be automatically selected.<br />
2<br />
Press the enter key.<br />
2<br />
Press the enter key.<br />
0 MARGIN WIDTH<br />
Press the cursor right or left key to select the margin width.<br />
1<br />
The width can be set between 6 mm and 18 mm in 1 mm<br />
increments.<br />
# OUTPUT FORM<br />
Press the cursor down or up key to select “SORT: ON” or<br />
1 “SORT: OFF”.<br />
2<br />
Press the enter key.<br />
2<br />
Press the enter key.<br />
! BORDER WIDTH<br />
Press the cursor down or up key to select the border erase<br />
1 width.<br />
The width can be selected from 6, 12 and 18 mm.<br />
$ ROTATE SORT<br />
Press the cursor down or up key to select “ON” or “OFF”.<br />
1<br />
2<br />
Press the enter key.<br />
2<br />
Press the enter key.<br />
6-13
CHAPTER 6<br />
COPIER MANAGEMENT<br />
(3) Machine default settings<br />
The following 15 types of settings can be changed in the machine<br />
default setting mode.<br />
Set them as desired, in order to gain full use of your copier.<br />
Machine default setting<br />
Content of machine default setting<br />
Setting range<br />
Default setting<br />
Page<br />
1 STATUS REPORT<br />
Prints contents of machine default settings as a status report.<br />
———————<br />
—————<br />
6-16<br />
2 AUTO SHUT-OFF<br />
Turns the auto shut-off function (page 4-7) On or Off. The auto shut-off<br />
function automatically turns off the main switch if copying is not<br />
performed for a certain period of time.<br />
• If auto shut-off interferes with your copying operations, turn this<br />
function off. It is recommended to prolong the time interval that<br />
triggers auto shut-off before actually turning it off.<br />
ON/OFF<br />
ON<br />
6-16<br />
3 SPECIAL PAPER<br />
In case of selecting the paper size on the message display, displays ( * )<br />
next to the paper size of the drawer if it contains special paper such as<br />
colored paper or recycled paper. Drawer 3 or 4 can be selected only<br />
when the optional drawer has been installed.<br />
• If special paper is loaded in the drawer, select the paper type in<br />
“5 PAPER TYPE (1ST to 4TH)”.<br />
SOURCE 1 to<br />
SOURCE 4<br />
Not set<br />
6-17<br />
4 APS<br />
Selects whether paper in the drawer set in “3 SPECIAL PAPER” is<br />
used or not in the auto paper selection mode or automatic drawer<br />
switching (page 2-4).<br />
ON/OFF<br />
OFF<br />
6-17<br />
5 PAPER TYPE<br />
(1ST to 4TH)<br />
Selects the type (standard or special) of paper to be loaded in the<br />
drawer.<br />
• The settings for Drawers 3 and 4 are not displayed when the copier is<br />
not equipped with the optional drawers for Drawers 3 and 4.<br />
PLAIN,<br />
RECYCLED,<br />
LETTERHEAD,<br />
COLOR<br />
PLAIN<br />
6-17<br />
6 PAPER TYPE<br />
(BYPASS)<br />
Selects the type (standard or special) of paper to be loaded in the<br />
multi-bypass.<br />
PLAIN,<br />
TRANSPARENCY,<br />
LABELS,<br />
RECYCLED,<br />
ROUGH,<br />
LETTERHEAD,<br />
COLOR,<br />
ENVELOPE,<br />
CARDSTOCK<br />
PLAIN<br />
6-17<br />
7 SELECT EJECTOR<br />
OF FAX<br />
Selects whether to eject fax outputs to the copier or either the finisher<br />
or job separator.<br />
• This setting is not displayed when the copier is not equipped with the<br />
optional fax board and finisher or job separator.<br />
INNER TRAY,<br />
FINISHER,<br />
JOB SEPARATOR<br />
INNER TRAY<br />
—<br />
8 SELECT EJECTOR<br />
OF COPY<br />
Selects whether to eject copied paper to the copier or either the<br />
finisher or job separator.<br />
• This setting is not displayed when the copier is not equipped with the<br />
optional finisher or job separator.<br />
INNER TRAY,<br />
FINISHER,<br />
JOB SEPARATOR<br />
INNER TRAY<br />
6-18<br />
9 PREHEAT TIME<br />
Selects a certain length of time from when copying ends to when the<br />
energy saver function (page 4-7) is actuated.<br />
5 to 45 MIN.<br />
(5-minute increments)<br />
15 MIN.<br />
6-18<br />
6-14
CHAPTER 6<br />
COPIER MANAGEMENT<br />
Machine default setting<br />
Content of machine default setting<br />
Setting range<br />
Default setting<br />
Page<br />
0 SHUT-OFF TIME<br />
Selects a certain length of time from when the copier is not used to<br />
when the auto shut-off function (page 4-7) switches off the power<br />
automatically. The auto shut off function can be turned off as well. This<br />
setting cannot be used in that case (“2 AUTO SHUT-OFF”).<br />
The initial setting is 30 minutes.<br />
• It is recommended to prolong time interval that triggers the auto shutoff<br />
if the copier is used frequently, whereas shorten it if it is not used<br />
frequently.<br />
• See “2 AUTO SHUT-OFF” to release the auto shut-off function.<br />
15 to 240 MIN.<br />
(5-minute increments)<br />
30 MIN.<br />
6-18<br />
! DISPLAY CON-<br />
TRAST ADJUST.<br />
Changes the display contrast when the message display is not seen<br />
clearly.<br />
1 to 7<br />
4 (center)<br />
6-18<br />
@ MANAGEMENT<br />
CODE CHANGE<br />
Changes the management code that accesses the management mode<br />
(page 6-1) and management mode in this default setting (page 6-9).<br />
• If management code is changed, keep a note of the new one.<br />
––––<br />
2000<br />
6-18<br />
# SILENT MODE<br />
The copier can be switched to the silent mode, which stops the motor<br />
inside the copy machine immediately after copying has been finished.<br />
When “ON” is selected, the motor stops immediately after copying has<br />
been finished.<br />
ON/OFF<br />
OFF<br />
6-18<br />
$ AUTO DRAWER<br />
SWITCH<br />
Selects whether the automatic drawer switching function (page 2-4) is<br />
used or not.<br />
ON/OFF<br />
ON<br />
6-19<br />
% COUNTER<br />
REPORT<br />
Prints the toner counter report.<br />
———————<br />
—————<br />
6-19<br />
6-15
(4) How to set the machine default setting mode<br />
1<br />
Press the */Language key to light the indicator.<br />
The management mode selection screen will appear.<br />
6<br />
7<br />
NOTE<br />
CHAPTER 6 COPIER MANAGEMENT<br />
Press the enter key.<br />
Make settings as explained below.<br />
• (>) displayed in each setting screen indicates the present setting<br />
value.<br />
• After finishing each setting, the display will return to the screen in<br />
step 5. If changing other settings, repeat step 5 to 7.<br />
8<br />
Press the cursor up key to select “END” and press the enter<br />
key to finish settings.<br />
The message display will return to the “READY TO COPY.”<br />
screen.<br />
2<br />
Press the cursor down key to select “MACHINE DEFAULT”.<br />
1 STATUS REPORT<br />
Press the cursor down key to select “STATUS REPORT”.<br />
1<br />
3<br />
4<br />
Press the enter key.<br />
Enter the management code “2000” with the numeric keys.<br />
2<br />
Press the enter key. The status report is printed. After<br />
finishing printing, the display will return to the screen in<br />
step 1.<br />
NOTE<br />
• If no A4 paper is set, a confirmation display will appear. Select the<br />
paper size to be used and press the Start key.<br />
NOTE<br />
• The 4-digit management code can be changed. (See “@ MANAGE-<br />
MENT CODE CHANGE” on page 6-18.)<br />
2 AUTO SHUT-OFF<br />
Press the cursor down or up key to select “ON” or “OFF”.<br />
1<br />
5<br />
Press the cursor down or up key to select the machine<br />
default setting to be changed. See “(3) Machine default<br />
settings” on page 6-14 for the settings that can be changed.<br />
2<br />
Press the enter key.<br />
6-16
CHAPTER 6<br />
COPIER MANAGEMENT<br />
3 SPECIAL PAPER<br />
Press the cursor down or up key to select the paper feed<br />
1 drawer to be marked with ( * ).<br />
5 PAPER TYPE (1ST to 4TH)<br />
Press the cursor down or up key to select the paper type.<br />
1<br />
2<br />
Press the cursor right or left key. The mark ( *) will appear<br />
aside the paper feed drawer. Press the cursor right or left key<br />
again to cancel it.<br />
2<br />
Press the enter key.<br />
NOTE<br />
• The setting procedure for the paper type is the same for Drawers 1,<br />
2, 3 and 4.<br />
NOTE<br />
• More than two marks can be put.<br />
6 PAPER TYPE (BYPASS)<br />
Press the cursor down or up key to select the paper type.<br />
1<br />
3<br />
Press the cursor up key to select “END” and press the enter<br />
key.<br />
4 APS<br />
1<br />
Press the cursor down or up key to select “ON” or “OFF”.<br />
2<br />
Press the enter key.<br />
7 SELECT EJECTOR OF FAX<br />
The optional fax board and job separator must be installed to perform<br />
this setting. If not, this setting will not be displayed.<br />
2<br />
Press the enter key.<br />
6-17
CHAPTER 6<br />
COPIER MANAGEMENT<br />
8 SELECT EJECTOR OF COPY<br />
Press the cursor down or up key to select the eject point.<br />
1<br />
! DISPLAY CONTRAST ADJUST.<br />
Press the cursor right or left key to move the cursor on the<br />
1 exposure scale.<br />
Move the cursor to the right to make display darker, and to<br />
the left to make display lighter.<br />
2<br />
Press the enter key.<br />
NOTE<br />
• The display shown in step 1 appears when the finisher is installed. If<br />
the job separator is installed, “2 JOB SEPARATOR” appears instead<br />
of “2 FINISHER”.<br />
2<br />
Press the enter key.<br />
@ MANAGEMENT CODE CHANGE<br />
Enter a new 4-digit management code with the numeric keys.<br />
1<br />
9 PREHEAT TIME<br />
Press the cursor down or up key to select the time interval<br />
1 from when copying ends to when the energy saver function<br />
is actuated.<br />
Time can be set from 5 to 45 minutes in increments of<br />
5 minutes.<br />
NOTE<br />
• If you enter a wrong number, press the Stop/Clear key. The<br />
management code before change will appear.<br />
2<br />
Press the enter key.<br />
2<br />
Press the enter key.<br />
0 SHUT-OFF TIME<br />
Press the cursor down or up key to select the time interval<br />
1 from when copying ends to when the auto shut-off function is<br />
actuated. Time can be set from 15 to 240 minutes in<br />
increments of 15 minutes.<br />
# SILENT MODE<br />
Press the cursor down or up key to select “ON” or “OFF”.<br />
1<br />
2<br />
Press the enter key.<br />
2<br />
Press the enter key.<br />
6-18
CHAPTER 6<br />
COPIER MANAGEMENT<br />
$ AUTO DRAWER SWITCH<br />
Press the cursor down or up key to select “ON” or “OFF”.<br />
1<br />
3. Selection of language<br />
Selects the language to be used in the message display, from<br />
English, German, French, Italian and Spanish.<br />
1<br />
Press the */Language key to light the indicator.<br />
The management mode selection screen will appear.<br />
2<br />
Press the enter key.<br />
% COUNTER REPORT<br />
Press the cursor down key to select “COUNTER REPORT”.<br />
1<br />
2<br />
Press the cursor down key to select “LANGUAGE”.<br />
2<br />
Press the enter key. The toner counter report is printed. After<br />
finishing printing, the display will return to the screen in<br />
step 1.<br />
NOTE<br />
• If no A4 paper is set, a confirmation message will appear. Select the<br />
paper size to be used and press the Start key.<br />
3<br />
4<br />
Press the enter key.<br />
Selectable languages will be displayed.<br />
Press the cursor down or up key to select the language.<br />
5<br />
Press the enter key. The language will be changed, and the<br />
message display will return to the “READY TO COPY.”<br />
screen.<br />
6-19
CHAPTER 7 OPTIONAL EQUIPMENT<br />
(1) ADF (Automatic document feeder)<br />
3 DF part names<br />
Automatically feeds multiple sheet originals one by one for scanning.<br />
1 Originals that can be used with the DF<br />
• Sheet originals only<br />
• Original weights: Single-sided original of 35 g/m 2 to 160 g/m 2<br />
• Original sizes: 11" x 17"/A3 (maximum) to 5 1/2" x 8 1/2" (vertical)/<br />
A5R (minimum)<br />
• Capacity: 70 sheets (11" x 8 1/2"/A4 and smaller, 75 g/m 2 or<br />
80 g/m 2 )<br />
50 sheets (8 1/2" x 14"/B4 and larger, 75 g/m 2 or 80 g/m 2 )<br />
50 sheets in auto selection mode<br />
1 Original table<br />
(Place the originals here.)<br />
2 Original insertion guides<br />
(Adjust the guides to the width of the originals.)<br />
3 DF open/close handle<br />
(Hold this handle when opening and closing the DF.)<br />
4 Original eject cover<br />
(Copied originals are stored here.)<br />
5 DF original cover<br />
(Open this cover to remove an original misfed in the DF.)<br />
2 Precautions for the use of DF<br />
Do not use any of the originals given below with the DF. Also do not<br />
set originals with punch holes or tear-off strips positioned at the<br />
leading edge.<br />
• Transparency films<br />
• Carbon paper and extremely creased or folded originals, originals<br />
of soft material such as vinyl<br />
• Non-square originals, wet originals, originals with adhesive tape or<br />
glue<br />
• Originals bundled with a paper clip or staple (if inevitable, remove<br />
the paper clip or staple and straighten out the creases and folds<br />
before setting the originals)<br />
• Clipped out originals, originals with slippery surface<br />
• Originals with still-wet whiteout<br />
• Originals with creases (if inevitable, straighten out the creases<br />
before setting the originals)<br />
4 How to set originals in the DF<br />
1<br />
Adjust the original insertion guides to the original size.<br />
NOTE<br />
• Before setting the originals in the DF, check that no original from the<br />
previous operation is remaining on the original eject cover. Originals<br />
remaining on the original eject cover may cause original misfeed.<br />
7-1
CHAPTER 7 OPTIONAL EQUIPMENT<br />
2<br />
Set the originals on the original table in correct sequence<br />
with the side to be copied facing upward. Securely insert the<br />
leading edge of the originals into the DF as far as they will<br />
go.<br />
2<br />
Set the original with the side to be copied facing downward.<br />
Be sure to align the original with the original size scales.<br />
IMPORTANT<br />
• Do not set originals exceeding the limit indicated on the sticker<br />
attached on the rear original insertion guide. Setting more originals<br />
than specified may cause original misfeed.<br />
3<br />
Hold the DF open/close handle and close the DF.<br />
5 How to set originals on the platen<br />
When using an original that cannot be set in the DF, such as a book<br />
or magazine, open the DF and place it on the platen.<br />
1<br />
Hold the DF open/close handle and open the DF.<br />
* Before opening the DF, check that no original is present on<br />
the original table or original eject cover. If present, the<br />
original may fall off when the DF is opened.<br />
IMPORTANT<br />
• Do not press the DF against the platen with force. Doing so may<br />
cause damage to the glass material.<br />
CAUTION<br />
DO NOT leave the document feeder open as there is a<br />
danger of personal injury.<br />
7-2
CHAPTER 7 OPTIONAL EQUIPMENT<br />
(2) RADF (Reversing Auto <strong>Document</strong> Feeder)<br />
The RADF automatically feeds one-sided originals one by one for<br />
scanning. It also reverses two-sided originals automatically for duplex<br />
copying and page separation copying. For details, see the RADF's<br />
instruction handbook.<br />
(5) Duplex unit<br />
If the Duplex unit is installed, duplex copies can be made. Duplex<br />
copies can be made with A3 to A5 (vertical) [17" x 11" to 5 1/2" x 8 1/<br />
2"] (75 to 80 g/m 2 ) paper.<br />
(3) Drawer<br />
Up to two drawers of the same type as that in the main body can be<br />
added.<br />
Capacity and the paper loading method is the same as those for the<br />
standard drawer in the main unit.<br />
* Paper misfed in the optional cassette can be removed by opening its<br />
left cover.<br />
(6) Job separator<br />
When using the optional printer function, the paper eject point can be<br />
changed according to the used function, making it easier to sort<br />
paper.<br />
Copies are ejected onto the lower section (copy store section), and<br />
printouts are ejected onto the upper section. These ejection points<br />
can also be specified.<br />
(4) Finisher<br />
The finisher stores a large quantity of copies. It can also sorts multiple<br />
copies into sets by shifting the eject position. Paginated copies can be<br />
stapled, too.<br />
(7) Key counter<br />
The key counter determines the number of copies that have been<br />
made. It is useful for copier centralized management on a department<br />
or even company level.<br />
7-3
CHAPTER 7 OPTIONAL EQUIPMENT<br />
● Setting the key counter<br />
Insert the key counter securely into the key counter opening.<br />
(10) Network scanner<br />
This copier can be used as a network scanner that allows access<br />
from multiple computers.<br />
NOTE<br />
• When the key counter function is used, copies cannot be made<br />
unless the key counter is inserted into the copier. If the key counter<br />
is not inserted securely, "INSERT KEY COUNTER." appears on the<br />
message display.<br />
(8) Printer board<br />
If the printer board is installed, this copier can be used as a printer.<br />
For details, see the printer's instruction handbook.<br />
(9) Printer network board<br />
If the network board is installed along with the optional printer board,<br />
this copier can be used as a network printer, allowing access from<br />
multiple computers.<br />
For details, see the network's instruction handbook.<br />
7-4
CHAPTER 8 WHEN A PROBLEM OCCURS<br />
1. Error messages<br />
When any of the messages listed in the table below appear on the message display, take the corrective action as instructed.<br />
Message Action Page<br />
"CLOSE xxx COVER."<br />
The cover indicated is open. Close the cover securely.<br />
"ADD PAPER IN DRAWER."<br />
There is no paper in the drawer indicated. Load paper.<br />
3-1<br />
"CLOSE PAPER DRAWER."<br />
One of the drawers is not closed properly. Pull it out and push it back in all the<br />
way.<br />
"PAPER DRAWER IS OUT OF ORDER.<br />
SELECT OTHER PAPER DRAWER."<br />
The drawer currently in use is out of order and cannot be used. Contact your<br />
service representative immediately. Continue copying using another drawer.<br />
"CHECK PAPER SIZE."<br />
No paper that can be used in the selected mode is loaded. Check the paper.<br />
"REPOSITION ORIGINAL OR SELECT<br />
OTHER PAPER DRAWER."<br />
The orientation of the original and the selected paper are different. Change the<br />
orientation of the original. If the Start key is pressed, same-size copying will be<br />
performed.<br />
"COPY LIMIT REACHED. NO COPYING"<br />
The number of copies reached the limit set in the copy management mode and<br />
no more copies can be made. Clear the copy count from the management<br />
mode.<br />
6-1<br />
"READY TO COPY.<br />
ADD TONER TO RESUME COPYING."<br />
There is not enough toner in the copier. Replace the toner cartridge immediately<br />
as only one copy can be made at a time.<br />
3-5<br />
"ADD TONER TO RESUME COPYING."<br />
There is not enough toner in the copier to make copies. Replace the toner<br />
cartridge immediately.<br />
3-5<br />
"CALL FOR SERVICE."<br />
Open and close the front cover. If the same message appears again, make a<br />
note of the "C" and the number appearing with it, turn the main switch OFF (O),<br />
and contact your service representative.<br />
8-1
CHAPTER 8 WHEN A PROBLEM OCCURS<br />
Message Action Page<br />
"TIME FOR MAINTENANCE"<br />
Periodic maintenance is necessary to keep your copier in good condition.<br />
Contact your service representative as soon as possible.<br />
"MEMORY IS FULL."<br />
The copier memory if full. Either print out or clear all scanned data. It is not<br />
possible to copy or scan another original until one of these two operations is<br />
performed.<br />
"PAPER MISFEED."<br />
If paper is misfed, the copier will stop and the location of the misfeed will<br />
appear on the message display. Remove the misfed paper with the main switch<br />
turned ON (|) by following the appropriate procedure.<br />
8-3<br />
"REMOVE ORIGINAL FROM FEEDER."<br />
"MISFEED IN FEEDER. REMOVE<br />
ORIGINAL(S)."<br />
Originals have not been fed correctly from the DF (optional). Remove the<br />
originals with the main switch turned ON (|) by following the appropriate<br />
procedure.<br />
8-6<br />
"DUPLEX UNIT IS OUT OF ORDER. 1-SIDED<br />
COPYING IS POSSIBLE."<br />
The duplex unit (optional) is out of order and duplex copying is not possible.<br />
Contact your service representative immediately.<br />
"INSTALL FINISHER."<br />
The finisher (optional) is not installed correctly. Install it securely.<br />
"CHECK PAPER IN FINISHER. INCOM-<br />
PLETE COPIES INSIDE."<br />
Unfinished copies were ejected onto the finisher (optional) due to a problem<br />
occurred during copying. Check and remove those copies.<br />
"FINISHER IS OUT OF ORDER. DETACH<br />
FINISHER."<br />
The copier is inoperable due to a problem in the finisher (optional). Contact<br />
your service representative immediately.<br />
"PAPER CAPACITY EXCEEDED. REMOVE<br />
PAPER FROM FINISHER."<br />
The number of sheets in the finisher (optional) exceeded the capacity. Remove<br />
the excess sheets.<br />
"REMOVE PAPER FROM INNER TRAY OF<br />
FINISHER."<br />
Paper has been misfed inside the finisher (optional). See the finisher's<br />
instruction handbook and remove the paper.<br />
"REMOVE PAPER FROM SUB TRAY OF<br />
FINISHER."<br />
Paper has been misfed at the sub-tray of the finisher (optional). See the<br />
finisher's instruction handbook and remove the paper.<br />
"STAPLER EMPTY. ADD STAPLES."<br />
There are no staples in the finisher (optional). See the finisher's instruction<br />
handbook and replace the staple cartridge.<br />
"CANNOT STAPLE THIS PAPER SIZE."<br />
Stapling is not possible with small size paper. For details, see the finisher's<br />
instruction handbook.<br />
8-2
CHAPTER 8 WHEN A PROBLEM OCCURS<br />
2. When paper misfeeds<br />
If a paper misfeed occurs, copying will stop. A misfeed message will appear and the misfeed location will be indicated on the message display.<br />
Remove the misfed paper by referring to "(3) Removal procedures" with the main switch turned ON (|).<br />
(1) Misfeed location indicators<br />
1 Misfeed in paper feed section<br />
2 Misfeed in left cover (page 8-5)<br />
3 Misfeed in DF (page 8-6)<br />
4 Misfeed in duplex unit (page 8-6)<br />
5 Misfeed in finisher (page 8-6)<br />
(3) Removal procedures<br />
1 Misfeed in paper feed section<br />
● Misfeed in drawer<br />
If the message "MISFEED IN PAPER DRAWER. REMOVE PAPER."<br />
appears with the misfeed location indicator shown in the illustration, a<br />
misfeed has occurred in the drawer (or optional drawer). Remove the<br />
misfed paper using the procedure given below.<br />
1<br />
Open the drawer.<br />
(2) Cautions<br />
WARNING<br />
High voltage is present in the charger section. Take<br />
sufficient care when working in this area, as there is a<br />
danger of electrical shock.<br />
CAUTION<br />
The copier's fixing unit is extremely hot. Take sufficient<br />
care when working in this area, as there is a danger of<br />
getting burned.<br />
* Do not reuse misfed paper.<br />
* If paper is torn during removal, be sure to remove all loose scraps<br />
from inside the copier, or they could cause misfeed later.<br />
* After misfed paper has been removed, warm-up will begin. The<br />
Misfeed indicator will turn off and the copier will return to the same<br />
settings prior to the misfeed.<br />
8-3
CHAPTER 8 WHEN A PROBLEM OCCURS<br />
2<br />
Remove the misfed paper while taking care not to tear it.<br />
* If the paper should be torn, remove all the scraps from the<br />
inside the copier.<br />
2<br />
Remove the misfed paper while taking care not to tear it.<br />
* If the paper should be torn, remove all the scraps from the<br />
inside the copier.<br />
3<br />
Close the drawer slowly.<br />
* Check that the paper is kept under the claws of the drawer.<br />
If not, reload the paper.<br />
3<br />
Close the drawer left cover.<br />
● Misfeed in drawer left cover<br />
If the message "PAPER MISFEED. OPEN LEFT 2 (3) COVER."<br />
appears with the misfeed location indicator shown in the illustration, a<br />
misfeed has occurred in the drawer left cover. Remove the misfed<br />
paper using the procedure given below.<br />
● Misfeed in multi-bypass<br />
If the message "PAPER MISFEED IN STACK BYPASS. REMOVE<br />
PAPER." appears with the misfeed location indicator shown in the<br />
illustration, a misfeed has occurred in the multi-bypass. Remove the<br />
misfed paper using the procedure given below.<br />
1<br />
Open the drawer left cover.<br />
1<br />
Remove all the paper remaining in the multi-bypass.<br />
2<br />
Check that the misfeed location indicator disappears and reload<br />
paper into the multi-bypass.<br />
8-4
CHAPTER 8 WHEN A PROBLEM OCCURS<br />
2 Misfeed in the left cover<br />
If the message "PAPER MISFEED. OPEN LEFT 1 COVER." appears<br />
with the misfeed location indicator shown in the illustration, a misfeed<br />
has occurred in the left cover. Remove the misfed paper using<br />
procedure given below.<br />
3<br />
Remove the misfed paper while taking care not to tear it.<br />
If the paper is not easy to remove, proceed to the next step.<br />
If the paper is removed successfully, proceed to step 5.<br />
* If the paper should be torn, remove all the scraps from the<br />
inside the copier.<br />
* When the optional duplex unit is installed, "PAPER MISFEED."<br />
appears. Open the duplex unit and then follow the procedure given<br />
below.<br />
1<br />
Open the multi-bypass.<br />
IMPORTANT<br />
The drum 1 is highly sensitive to light and dirt. Be careful not to<br />
expose it to strong light such as room lighting or to touch the drum<br />
with the hands.<br />
2<br />
Open the left cover.<br />
4<br />
Hold the green handle 2 and open the ejection guide, and<br />
then remove the misfed paper.<br />
CAUTION<br />
The copier's fixing unit is extremely hot. Take sufficient<br />
care when working in this area, as there is a danger of<br />
getting burned.<br />
WARNING<br />
High voltage is present in the charger section. Take<br />
sufficient care when working in this area, as there is a<br />
danger of electrical shock.<br />
CAUTION<br />
The copier's fixing unit is extremely hot. Take sufficient<br />
care when working in this area, as there is a danger of<br />
getting burned.<br />
8-5
5<br />
IMPORTANT<br />
Close the left cover and multi-bypass.<br />
• If the optional duplex unit is installed, be sure to close the multibypass<br />
closing the duplex unit.<br />
CHAPTER 8 WHEN A PROBLEM OCCURS<br />
4 Misfeed in duplex unit <br />
If the message "PAPER MISFEED. OPEN DRAWER OF DUPLEX<br />
UNIT." appears with the misfeed location indicator shown in the<br />
illustration, a misfeed has occurred in the duplex unit. Remove the<br />
misfed paper using the procedure given below.<br />
3 Misfeed in DF <br />
If the message "MISFEED IN FEEDER. REMOVE ORIGINAL(S)."<br />
appears with the misfeed location indicator shown in the illustration, a<br />
misfeed has occurred in the DF. Remove the misfed original using the<br />
procedure given below.<br />
1<br />
Hold the duplex unit open/close lever 1 and open the<br />
duplex unit.<br />
1<br />
Remove all the originals from the original table.<br />
2<br />
Hold the switchback guide handle 2 and open the<br />
switchback guide, and then remove the misfed paper.<br />
2<br />
Open the DF original cover.<br />
3<br />
Remove the misfed original.<br />
3<br />
Close the switchback guide first and then close the duplex<br />
unit.<br />
5 Misfeed in finisher <br />
If the message "REMOVE PAPER. FINISHER" appears with the<br />
misfeed location indicator shown in the illustration, a misfeed has<br />
occurred in the finisher.<br />
4<br />
Close the DF original cover.<br />
Set the misfed original together with those removed back<br />
onto the original table and resume the copying operation.<br />
8-6
CHAPTER 8 WHEN A PROBLEM OCCURS<br />
3. Troubleshooting<br />
If trouble occurs, carry out the applicable checks and actions given below. If the trouble persists, contact your service representative.<br />
Trouble Checks Action Page<br />
Nothing lights on the<br />
operation panel when the<br />
main switch is turned ON.<br />
Is the power plug connected to an AC<br />
outlet<br />
Connect the plug to an AC outlet.<br />
No copies come out when<br />
the Start key is pressed.<br />
Is there any message appearing on the<br />
messsage display<br />
Perform the corrective action corresponding<br />
to the messsage.<br />
8-1<br />
Copies come out blank. Are the originals set correctly When setting originals on the platen, place<br />
them face-down.<br />
4-1<br />
When setting originals in the optional DF,<br />
place them face-up.<br />
7-1<br />
Copies come out too light. Is the copier in the auto exposure mode To change the overall exposure, perform the<br />
auto exposure adjustment.<br />
6-9<br />
Is the copier in the manual exposure mode<br />
Adjust the exposure to the correct degree<br />
using the copy exposure adjustment keys.<br />
4-2<br />
To change the overall exposure, perform the<br />
exposure adjustment for the each copy<br />
quality mode.<br />
6-9<br />
Is the add toner message displayed<br />
Replace the toner cartridge.<br />
3-5<br />
Is paper wet<br />
Replace the paper with new paper.<br />
3-1<br />
8-7
CHAPTER 8 WHEN A PROBLEM OCCURS<br />
Trouble Checks Action Page<br />
Copies come out too dark. Is the copier in the auto exposure mode To change the overall exposure, perform the<br />
auto exposure adjustment.<br />
6-9<br />
Is the copier in the manual exposure mode<br />
Adjust the exposure to the correct degree<br />
using the copy exposure adjustment keys.<br />
4-2<br />
To change the overall exposure, perform the<br />
exposure adjustment for the each copy<br />
quality mode.<br />
6-9<br />
Copies are dirty. Is the platen or the original cover dirty Clean the platen and/or the original cover.<br />
9-1<br />
Open the front cover and pull and push back<br />
in the cleaning shaft.<br />
3-6<br />
Copy image is askew. Are the originals set correctly When setting originals on the platen, align<br />
their edges with the correct original size<br />
scale for their size.<br />
4-1<br />
When setting originals in the optional DF,<br />
adjust the original insertion guides to the<br />
size of the originals correctly.<br />
7-1<br />
Misfeed occurs frequently. Is the paper set correctly in the drawer Set paper properly.<br />
3-1<br />
Is paper curled, folded or wrinkled<br />
Replace the paper with new paper.<br />
3-1<br />
Is there any misfed paper or loose scraps of<br />
paper remaining inside the copier<br />
Carry out the appropriate procedure to<br />
remove the paper.<br />
8-3<br />
8-8
CHAPTER 9 CLEANING AND SPECIFICATIONS<br />
1. Cleaning the copier<br />
CAUTION<br />
For safety purposes, ALWAYS remove the power plug<br />
from the outlet when performing cleaning operations.<br />
* If soiling, such as black lines appear on the copy while using the<br />
optional DF, the slit glass a is soiled.<br />
Wipe the slit glass with a soft cloth dampened with alcohol or a mild<br />
detergent.<br />
● Cleaning the original cover<br />
Lift open the original cover. Wipe the back side of the original cover<br />
with a soft cloth dampened with alcohol or a mild detergent.<br />
* Never use thinner or other organic solvents for this purpose.<br />
● Cleaning the platen<br />
Lift open the original cover. Wipe the platen with a soft cloth dampened<br />
with alcohol or a mild detergent.<br />
* Never use the thinner or other organic solvents for this purpose.<br />
9-1
CHAPTER 9 CLEANING AND SPECIFICATIONS<br />
2. Specifications<br />
Type ............................................................................... Desk-top<br />
Original table .................................................................. Fixed type<br />
Copying system ............................................................. Indirect electrostatic<br />
Originals ......................................................................... Sheets, books and 3-dimensional objects (Maximum original size: A3)<br />
Copy sizes ..................................................................... A3, B4 (257 x 364 mm), Folio, A4, B5, A5 (vertical), B6 (vertical), A6 (vertical), envelopes<br />
(when used as printer)<br />
Duplex copying: A3 to A5 (vertical)<br />
Copying speed ............................................................... Same-size copying/memory copying; A3: 10 copies/min., B4: 11 copies/min.,<br />
A4 (horizontal): 20 copies/min., A4 (vertical): 13 copies/min.<br />
Warm-up time ................................................................. Within 30 seconds(at room temperature of 20˚C, humidity 65%RH)<br />
From energy saver mode: Within 30 seconds [priority to power save], within 10 seconds<br />
[priority to recovery] (at room temperature of 20˚C, humidity 65%RH)<br />
First copy time ................................................................ From 5.50 to 5.60 seconds (A4(horizontal))<br />
Zoom ratio ...................................................................... Any ratio between 50 to 200% (in increments of 1%). Alternatively, standard ratios.<br />
Image storage memory .................................................. 47 MB<br />
Resolution ...................................................................... Reading: 600 x 600 dpi<br />
Writing: 600 x 600 dpi<br />
Paper feed system ......................................................... Automatic feeding from drawers (2 drawers, capacity 250 sheets each [80 g/m 2 /standard<br />
paper specified by our company]), automatic feeding from multi-bypass (capacity 25 sheets<br />
of A4, B4, Folio paper, or 50 sheets of A4 or smaller paper [80 g/m 2 ])<br />
Copy paper .................................................................... Drawer and duplex unit: Standard paper (64 - 80 g/m 2 )<br />
Multi-bypass: Standard paper (60 - 160 g/m 2 ), special paper (letterheads, colored paper and<br />
transparencies), envelopes (DL, C5, COM-#10, Monarch) [when using the printer function<br />
only]<br />
Continuous copying ....................................................... 1 - 250 sheets<br />
Light source ................................................................... Rare gas lamp<br />
Developing system ......................................................... Dry process<br />
Fixing system ................................................................. Heat roller<br />
Cleaning system ............................................................ Blade<br />
Photoconductor .............................................................. OPC<br />
Functions and modes ..................................................... Self-diagnosis function, energy save mode, auto exposure adjustment function, original size<br />
detection function, auto paper size selection function, auto magnification selection mode,<br />
zoom copy mode, standard zoom mode, size zoom mode, photo mode, margin mode,<br />
border erase mode, layout copy, sort mode, copy management function, language selection<br />
function<br />
Power source ................................................................. 220 - 240 V AC, 50 or 60 Hz, 2.8 A (Average)<br />
Power consumption ....................................................... Rated power consumption 1080 W Max.<br />
Dimensions .................................................................... 550 mm (W) x 603 mm (D) x 554 mm (H)<br />
Weight ............................................................................ Approx. 46.4 kg<br />
Noise emission ............................................................... < 70 dB (A)<br />
Required space .............................................................. 891 mm (W) x 603 mm (D)<br />
Optional equipment ........................................................ ADF (automatic document feeder), RADF (reversing auto document feeder), drawer,<br />
finisher, duplex unit, job separator, key counter, printer board, network board, network<br />
scanner, original holder<br />
(Specifications are subject to change without notice.)<br />
9-2
Laser Safety<br />
Laser radiation could be hazardous to the human body. For this reason, laser radiation emitted inside this<br />
machine is hermetically sealed within the protective housing and external cover. In the normal operation of<br />
the product by user, no radiation can leak from the machine.<br />
This machine is classified as Class 1 laser product under IEC 825.<br />
CAUTION<br />
Performance of procedures other than those specified in this manual may result in hazardous radiation<br />
exposure.<br />
This label is attached to the laser scanner unit inside the machine and is not in a user access area.<br />
The labels shown below are attached on the rear side of the machine.<br />
CLASS 1 LASER PRODUCT<br />
KLASSE 1 LASER PRODUKT
CAUTION!<br />
The power plug is the main isolation device! Other switches on the equipment are only<br />
functional switches and are not suitable for isolating the equipment from the power source.<br />
VORSICHT!<br />
Der Netzstecker ist die Hauptisoliervorrichtung! Die anderen Schalter auf dem Gerät sind<br />
nur Funktionsschalter und können nicht verwendet werden, um den Stromfluß im Gerät<br />
zu unterbrechen.<br />
DECLARATION OF CONFORMITY<br />
TO<br />
89/336/EEC, 73/23/EEC, 93/68/EEC and 1999/5/EC<br />
We declare under our sole responsibility that the product to which<br />
this declaration relates is in conformity with the following specifications.<br />
Limits and methods of measurement for immunity<br />
characteristics of information technology equipment<br />
Limits and methods of measurement for radio interference<br />
characteristics of information technology equipment<br />
Limits for harmonic currents emissions<br />
for equipment input current ≤ 16A per phase<br />
Limitation of voltage fluctuations and flicker in low-voltage<br />
supply systems for equipment with rated current ≤ 16A<br />
Safety of information technology equipment,<br />
including electrical equipment<br />
Radiation Safety of laser products, equipment classification,<br />
Çíequirements and user’s guide<br />
EN55024<br />
EN55022 Class B<br />
EN61000-3-2<br />
EN61000-3-3<br />
EN60950<br />
EN60825-1<br />
The common technical regulation for the attachment requirements<br />
for connection to the analogue public switched telephone networks<br />
(PSTNs) of terminal equipment (excluding terminal equipment<br />
supporting the voice telephony justified case service) in which<br />
network addressing, if provided, is by means of dual tone<br />
mulch-frequency (DTMF) signaling CTR 21<br />
E
* For best copy results and machine performance, we recommend that you use only <strong>KYOCERA</strong><br />
MITA original supplies for your <strong>KYOCERA</strong> MITA copier.
<strong>KYOCERA</strong> MITA EUROPE B.V.<br />
Hoeksteen 40, 2132 MS Hoofddorp,<br />
The Netherlands<br />
Phone: (020) 6540000<br />
Home page: http://www.mita.nl, Email: info@mita.nl<br />
<strong>KYOCERA</strong> MITA NEDERLAND B.V.<br />
Gyroscoopweg 122, 1042 AZ Amsterdam,<br />
The Netherlands<br />
Phone: (020) 5877200<br />
<strong>KYOCERA</strong> MITA (U.K.) LTD.<br />
Mita House, Hamm Moor Lane,<br />
Addlestone, Weybridge,<br />
Surrey KT15 2SB, U.K.<br />
Phone: (01932) 858266<br />
<strong>KYOCERA</strong> MITA ITALIA S.P.A.<br />
Via Marconi 8, 20041 Agrate Brianza,<br />
Milano, Italy<br />
Phone: (039) 65641<br />
S.A. <strong>KYOCERA</strong> MITA BELGIUM N.V.<br />
Hermesstraat 8A 1930 Zaventem, Belgium<br />
Phone: (02) 7209270<br />
<strong>KYOCERA</strong> MITA FRANCE S.A.R.L.<br />
1 Rue Pelloutier,<br />
77183 Croissy Beaubourg, France<br />
Phone: (1) 60175152<br />
<strong>KYOCERA</strong> MITA ESPAÑA S.A.<br />
Edificio Mita, Avda. De Manacor Nº 2,<br />
Urb. Parque Rozas, Apartado De Correos 76,<br />
28230 Las Rozas, Madrid, Spain<br />
Phone: 34-91-631-8392<br />
<strong>KYOCERA</strong> MITA FINLAND OY<br />
Kirvesmiehenkatu 4, 00810 Helsinki,<br />
Finland<br />
Phone: (09) 478 05200<br />
<strong>KYOCERA</strong> MITA (SCHWEIZ) AG<br />
Hölzliwisen Industriestrasse 28,<br />
8604 Volketswil, Switzerland<br />
Phone: (01) 9084949<br />
<strong>KYOCERA</strong> MITA DEUTSCHLAND GMBH<br />
Industriestrasse 17, D-61449 Steinbach/TS,<br />
Germany<br />
Phone: (06171) 7005-0<br />
<strong>KYOCERA</strong> MITA GMBH AUSTRIA<br />
Eduard Kittenberger Gasse 95<br />
A-1230 Wien, Austria<br />
Phone: (01) 86338 210<br />
<strong>KYOCERA</strong> MITA SVENSKA AB<br />
Siktgatan 2<br />
162 26 Vällingby, Sweden<br />
Phone: (08) 4719999<br />
<strong>KYOCERA</strong> MITA DANMARK A/S<br />
Industrivej 11, DK-4632 Bjæverskov,<br />
Denmark<br />
Phone: 56871100<br />
<strong>KYOCERA</strong> MITA PORTUGAL LDA.<br />
CASCAISTOCK-Armazem nº8,<br />
Rua das Fisgas, Alcoitão,<br />
2765 Estoril, Portugal<br />
Phone: 1-4602221<br />
<strong>KYOCERA</strong> MITA SOUTH AFRICA<br />
(PTY) LTD.<br />
Unit 3, "KYALAMI CRESCENT",<br />
KYALAMI BUSINESS PARK,<br />
1685 Midrand, South Africa<br />
Phone: (011) 4663290<br />
<strong>KYOCERA</strong> MITA<br />
AMERICA, INC.<br />
Headquarters:<br />
225 Sand Road, P.O. Box 40008<br />
Fairfield, New Jersey 07004-0008<br />
U.S.A.<br />
Phone: (973) 808-8444<br />
<strong>KYOCERA</strong> MITA ASIA<br />
OCEANIA SALES DIVISION<br />
2-28, 1-chome, Tamatsukuri, Chuo-ku,<br />
Osaka 540-8585, Japan<br />
Phone: (06) 6764-3668<br />
<strong>KYOCERA</strong> MITA AUSTRALIA PTY.<br />
LTD.<br />
P.O. Box 211,<br />
Regents Park Estate Unit 2,<br />
Block V 391 Park Road,<br />
Regents Park N.S.W. 2143, Australia<br />
Phone: 61-2-9645-5100<br />
<strong>KYOCERA</strong> MITA NEW ZEALAND LTD.<br />
5 Howe Street, Newton, Auckland 1,<br />
P.O. Box 68343,<br />
Auckland, New Zealand<br />
Phone: (09) 377-2088<br />
<strong>KYOCERA</strong> MITA (THAILAND) CORP.,<br />
LTD.<br />
9/209 Ratchada-Prachacheun Road,<br />
Bang Sue, Bangkok 10800, Thailand<br />
Phone: (02) 586-0333<br />
<strong>KYOCERA</strong> MITA SINGAPORE<br />
PTE LTD.<br />
121 Genting Lane, 3rd. Level,<br />
Singapore 349572<br />
Phone: 65-7418733<br />
<strong>KYOCERA</strong> MITA HONG KONG<br />
LIMITED.<br />
11/F., Mita Centre,<br />
552-566 Castle Peak Road,<br />
Tsuen Wan, New Territories,<br />
Hong Kong<br />
Phone: 852-2423-2163<br />
<strong>KYOCERA</strong> MITA<br />
CORPORATION<br />
2-28, 1-chome, Tamatsukuri, Chuo-ku,<br />
Osaka 540-8585, Japan<br />
Phone: (06) 6764-3555<br />
Fax: (06) 6764-3981<br />
©2000 <strong>KYOCERA</strong> MITA CORPORATION<br />
is a trademark of Kyocera Corporation<br />
is a registered trademark of <strong>KYOCERA</strong> MITA CORPORATION<br />
2000. 7<br />
2AX80020A