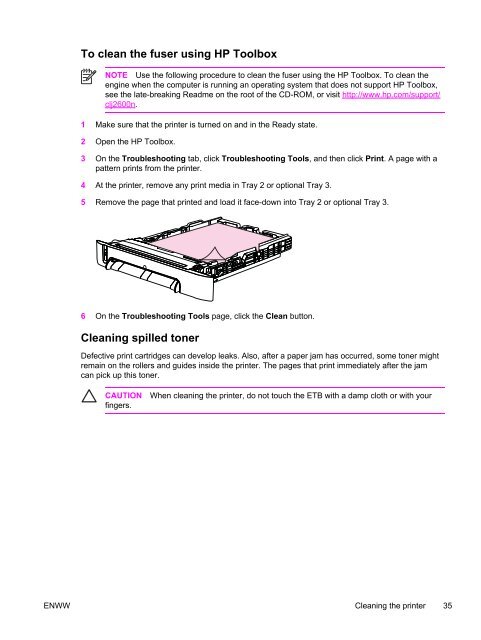
- Page 3 and 4: HP Color LaserJet 2600n Service Man
- Page 5 and 6: Table of contents 1 Product informa
- Page 7 and 8: General timing chart ..............
- Page 9 and 10: Diagnostic resources...............
- Page 11 and 12: List of tables Table 1-1 Printer fe
- Page 13 and 14: List of figures Figure 1-1 HP Color
- Page 15 and 16: 1 Product information This section
- Page 17 and 18: Printer configuration HP Color Lase
- Page 19 and 20: Table 1-1 Printer features (continu
- Page 21 and 22: Back and side view Figure 1-3 Back
- Page 23 and 24: CAUTION You might not receive any i
- Page 25 and 26: Software This section contains info
- Page 27 and 28: Starting the Uninstaller 1 Click St
- Page 29 and 30: Care should be taken not to purchas
- Page 31 and 32: Labels Select the type of label tha
- Page 33 and 34: ■ Labels that are not specificall
- Page 35 and 36: 2 Installation This chapter contain
- Page 37 and 38: ■ Walls or other objects. There m
- Page 39 and 40: Install input devices Installing op
- Page 41 and 42: Installing supplies Print cartridge
- Page 43 and 44: 7 Align the print cartridge with th
- Page 45 and 46: 3 Managing and maintenance This cha
- Page 47: Storing supplies Follow these guide
- Page 51 and 52: 4 Operational theory This chapter c
- Page 53 and 54: Figure 4-1 Engine control system Po
- Page 55 and 56: Image formation system The image fo
- Page 57 and 58: Image formation process Figure 4-3
- Page 59 and 60: Figure 4-4 Latent image formation L
- Page 61 and 62: Figure 4-7 Print cartridge structur
- Page 63 and 64: The toner on the photosensitive dru
- Page 65 and 66: Pickup and feed system The pickup/f
- Page 67 and 68: SR4 Fuser delivery paper sensor SR5
- Page 69 and 70: Solenoid, motor, and fan locations
- Page 71 and 72: Figure 4-16 Location of 250-sheet t
- Page 73 and 74: Printer calibration Calibration set
- Page 75 and 76: 5 Removal and replacement This chap
- Page 77 and 78: Service approach Field Service on t
- Page 79 and 80: 4 Grasp both sides of the print car
- Page 81 and 82: 2 Remove three (3) screws, two (2)
- Page 83 and 84: 5 Remove the left cover. 6 Squeeze
- Page 85 and 86: 9 Remove the small black cable cove
- Page 87 and 88: 15 Remove the ETB. Use the followin
- Page 89 and 90: 3 Remove two (2) screws from the ri
- Page 91 and 92: 9 Lift up and remove the face-down
- Page 93 and 94: 13 Unplug two (2) 3-pin optical enc
- Page 95 and 96: Use the following procedure to repl
- Page 97 and 98: 3 Remove the rear plate. ENWW Remov
- Page 99 and 100:
5 Remove four (4) screws from the f
- Page 101 and 102:
4 Gently unplug 16 connectors. 5 Re
- Page 103 and 104:
Paper pickup roller removal and rep
- Page 105 and 106:
6 Rotating it towards the back, rem
- Page 107 and 108:
5 Lift up and remove the upper face
- Page 109 and 110:
9 Remove the control panel assembly
- Page 111 and 112:
6 Troubleshooting This troubleshoot
- Page 113 and 114:
Clearing jams This section contains
- Page 115 and 116:
Where to look for jams Jams can occ
- Page 117 and 118:
2 Carefully grasp the jammed paper
- Page 119 and 120:
2 Open and close the front door. Pi
- Page 121 and 122:
Print problems Getting information
- Page 123 and 124:
Control panel message Description R
- Page 125 and 126:
Control panel message Description R
- Page 127 and 128:
Reports menu The following reports
- Page 129 and 130:
5 DC controller version. This secti
- Page 131 and 132:
Table 6-5 Status log messages Error
- Page 133 and 134:
The following secondary service men
- Page 135 and 136:
Table 6-7 Extended print modes (con
- Page 137 and 138:
6 Restart the computer and the devi
- Page 139 and 140:
Functional tests (SERVICE ONLY) Eng
- Page 141 and 142:
3 Turn on the printer. 4 When you s
- Page 143 and 144:
Configuration page The Configuratio
- Page 145 and 146:
Event log NOTE The color bars on th
- Page 147 and 148:
Control panel message Description R
- Page 149 and 150:
Control panel message Description R
- Page 151 and 152:
Control panel message Description R
- Page 153 and 154:
Table 6-13 General print quality is
- Page 155 and 156:
Table 6-13 General print quality is
- Page 157 and 158:
Table 6-14 Color document issues (c
- Page 159 and 160:
NOTE If you have access to HP Toolb
- Page 161 and 162:
Repetitive image defect ruler Use a
- Page 163 and 164:
7 Parts and diagrams NOTE In this c
- Page 165 and 166:
Table 7-1 Available replaceable par
- Page 167 and 168:
ENWW Overview 153
- Page 169 and 170:
Table 7-4 Assembly locations Ref De
- Page 171 and 172:
Table 7-5 External panels and cover
- Page 173 and 174:
Table 7-6 External panels and cover
- Page 175 and 176:
Table 7-7 Upper assembly cover Ref
- Page 177 and 178:
Table 7-8 Internal components (1 of
- Page 179 and 180:
ENWW Internal assemblies 165
- Page 181 and 182:
Table 7-9 Internal components (2 of
- Page 183 and 184:
ENWW Internal assemblies 169
- Page 185 and 186:
Table 7-10 Internal components (3 o
- Page 187 and 188:
ENWW Internal assemblies 173
- Page 189 and 190:
Table 7-11 Control panel assembly R
- Page 191 and 192:
Table 7-12 Main drive assembly Ref
- Page 193 and 194:
ENWW Internal assemblies 179
- Page 195 and 196:
Table 7-13 Fuser assembly Ref Descr
- Page 197 and 198:
ENWW Internal assemblies 183
- Page 199 and 200:
Table 7-14 PCB assembly location Tr
- Page 201 and 202:
Table 7-15 Tray 2 input tray (casse
- Page 203 and 204:
ENWW Input devices 189
- Page 205 and 206:
Table 7-16 250-sheet input tray (ca
- Page 207 and 208:
Table 7-17 Tray 2 sheet input tray
- Page 209 and 210:
ENWW Input devices 195
- Page 211 and 212:
Table 7-18 Paper pick-up feeder ass
- Page 213 and 214:
ENWW Input devices 199
- Page 215 and 216:
Table 7-19 Tray 3 input tray (casse
- Page 217 and 218:
ENWW Input devices 203
- Page 219 and 220:
Table 7-20 Paper pickup feeder asse
- Page 221 and 222:
Table 7-21 Paper pickup feeder asse
- Page 223 and 224:
Alphabetical parts list Table 7-22
- Page 225 and 226:
Table 7-22 Alphabetical parts list
- Page 227 and 228:
Table 7-22 Alphabetical parts list
- Page 229 and 230:
Table 7-22 Alphabetical parts list
- Page 231 and 232:
Table 7-22 Alphabetical parts list
- Page 233 and 234:
Table 7-22 Alphabetical parts list
- Page 235 and 236:
Table 7-22 Alphabetical parts list
- Page 237 and 238:
Table 7-22 Alphabetical parts list
- Page 239 and 240:
Table 7-22 Alphabetical parts list
- Page 241 and 242:
Table 7-22 Alphabetical parts list
- Page 243 and 244:
Table 7-22 Alphabetical parts list
- Page 245 and 246:
Table 7-23 Numerical parts list (co
- Page 247 and 248:
Table 7-23 Numerical parts list (co
- Page 249 and 250:
Table 7-23 Numerical parts list (co
- Page 251 and 252:
Table 7-23 Numerical parts list (co
- Page 253 and 254:
Table 7-23 Numerical parts list (co
- Page 255 and 256:
Table 7-23 Numerical parts list (co
- Page 257 and 258:
Table 7-23 Numerical parts list (co
- Page 259 and 260:
Table 7-23 Numerical parts list (co
- Page 261 and 262:
Table 7-23 Numerical parts list (co
- Page 263 and 264:
Table 7-23 Numerical parts list (co
- Page 265 and 266:
A Product specifications This chapt
- Page 267 and 268:
Supplies specifications Table A-2 S
- Page 269 and 270:
Environmental specifications Table
- Page 271 and 272:
B Product warranty statements ENWW
- Page 273 and 274:
Print Cartridge Limited Warranty St
- Page 275 and 276:
C Regulatory statements This chapte
- Page 277 and 278:
Laser safety statement The Center f
- Page 279 and 280:
VCCI statement (Japan) Figure C-1 V
- Page 281 and 282:
Finnish laser statement LASERTURVAL
- Page 283 and 284:
Index Symbols/Numerics 600 dpi prin
- Page 285 and 286:
transparencies 17 tray 1, types sup
- Page 287 and 288:
engine control 38 image formation 4